oneConcept 10029282 User manual

Espressomaschine
10029282

2
Sehr geehrter Kunde,
wir gratulieren Ihnen zum Erwerb Ihres Gerätes. Lesen Sie die folgenden Hinweise sorgfäl-
tig durch und befolgen Sie diese, um möglichen Schäden vorzubeugen. Für Schäden, die
durch Missachtung der Hinweise und unsachgemäßen Gebrauch entstehen, übernehmen
wir keine Haftung.
Inhaltsverzeichnis
Technische Daten 2
Sicherheitshinweise 2
Geräteübersicht 3
Inbetriebnahme und Bedienung 4
Reinigung und Pege 6
Fehlersuche und Fehlerbehebung 7
Hinweise zur Entsorgung 7
Konformitätserklärung 7
Technische Daten
Artikelnummer 10029282
Stromversorgung 230 V ~ 50 Hz
Leistung 850 W
Sicherheitshinweise
• Lesen Sie sich alle Hinweise sorgfältig durch und bewahren Sie die Anleitung zum Nach-
schlagen gut auf.
• Schließen Sie das Gerät nur an Steckdosen an, die der angegeben Spannung des Geräts
entsprechen.
• Um die Gefahr eines Stromschlags bei einer Störung oder Fehlfunktion zu verringern,
muss das Gerät an eine geerdete Steckdose angeschlossen werden.
• Benutzen Sie das Gerät in Anwesenheit von Kindern nur unter Aufsicht.
• Stellen Sie das Gerät nicht auf oder neben eine Wärmequelle.
• Ziehen Sie den Stecker aus der Steckdose, bevor Sie das Gerät reinigen oder wenn es
länger nicht in Gebrauch ist. Lassen Sie das Gerät komplett abkühlen, bevor Sie Teile
entfernen oder anbringen.
• Reparaturen dürfen nur von Fachpersonal ausgeführt werden und sind erforderlich, wenn
das Gerät beschädigt wurde, Netzkabel oder Stecker beschädigt sind, Flüssigkeiten dar-
auf ausgelaufen oder Objekte darauf gefallen sind, wenn das Gerät Nässe oder Feuchtig-
keit ausgesetzt oder fallen gelassen wurde oder nicht ordnungsgemäß funktioniert.
• Benutzen Sie nur Zubehör, das vom Hersteller ausdrücklich empfohlen wird.
• Stellen Sie das Gerät auf eine ebene Arbeitsäche und lassen Sie das Netzkabel nicht von
der Arbeitsäche hängen.

3
• Achten Sie darauf, dass das Netzkabel keine heißen Geräteoberächen berührt.
• Manche Teile des Geräts werden im Betrieb sehr heiß, fassen Sie sie nicht mit bloßen
Händen an.
• Tauchen Sie das Gerät nicht in Wasser oder andere Flüssigkeiten.
• Benutzen Sie das Gerät nicht im Freien.
• Benutzen Sie das Gerät nur im Haushalt.
Geräteübersicht
1 Eine Tasse
Kaee/Wasser
2 Zwei Tassen
Kaee/Wasser
3 Ein/Aus
4 Wasserdampf
5 Tropfschale
6 Tassenablage
7 Wassertankabedeckung
8 Wassertank
9 Dampfregler
10 Dampfrohr
11 Dampfdüse
12 Edelstahlsieb
13 Metalltrichter
14 Gri
15 Pulverpresse

4
Inbetriebnahme und Bedienung
Vor dem ersten Gebrauch
Geben Sie Wasser in den Wassertank und achten Sie darauf, dass die MAX-Markierung im
Tank nicht überschritten wird. Das Gerät ist mit einem abnehmbaren Tank ausgestattet,
damit Sie ihn leichter reinigen können. Sie können daher den Tank befüllen, bevor Sie ihn
ins Gerät stecken. Setzen Sie dann die Abedeckung wieder auf.
Stecken Sie den Stecker in die Steckdose und drücken
Sie den Ein/Aus-Schalter. Drehen Sie den Dampfregler
auf. Die Pumpe beginnt zu arbeiten und Wasser kommt
heraus. Schließen Sie den Dampfregler wieder.
Hinweis: Es kann sein, dass die Wasserpumpe etwas
rauscht. Das ist normal und kein Fehler.
Die Kontrollleuchte beginnt zu leuchten, solange das Gerät vorheizt. Nach etwa 2 Minuten
ist das Gerät aufgeheizt, die Leuchte beginnt zu blinken und leuchtet dann durchgehend.
Drücken Sie auf den Ein-Tassen-Schalter, um heißes Wasser zur Reini-
gung durchlaufen zu lassen. Sie können nun mit der Kaeezubereitung
beginnen.
Hinweis: Das Gerät wird nicht mit Espressotassen oder Kaeebechern
geliefert. Zur Zubereitung benötigen Sie einen Becher oder eine Tasse.
Während das Gerät vorheizt, befüllen Sie das Sieb mit Espressopulver und
drücken Sie das Pulver im Sieb mit der Pulverpresse fest. Achten Sie darauf
eine Espressosorte zu wählen, die weder zu dick, noch zu dünn ist.
Wischen Sie überschüssiges Espressopulver mit einer Bürste vom Rand
weg. Achten Sie auf die Markierung im Sieb und befüllen Sie das Sieb ent-
sprechend mit Pulver für eine oder zwei Tassen.
Setzen Sie das Sieb in den Trichter
und den Trichter an der Markierung
an und befestigen Sie ihn am Gerät.
Wählen Sie die Taste für 1 oder 2
Tassen, je nachdem wie viele Tassen
Sie möchten. Achten Sie darauf, dass
die Tassen richtig unter dem Trichter
stehen. Sobald kein Espresso mehr
nachießt, können sie die Tassen ent-
nehmen und das Gerät ausschalten.

5
Milch für Cappuccino aufschäumen
1. Bereiten Sie zunächst einen großen Espresso in einem ausreichend großen Becher zu.
Versichern Sie sich, dass der Dampfregler auf OFF oder „0“ steht.
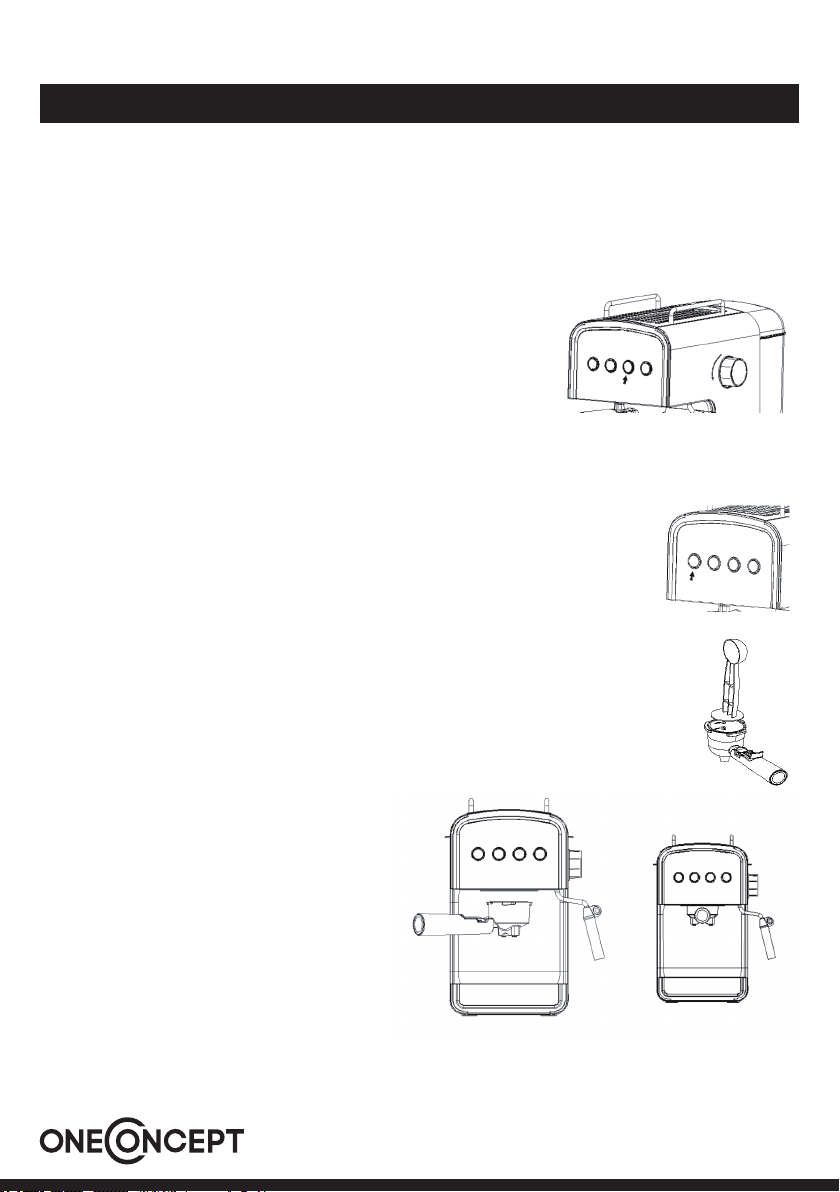
2. Drehen Sie den Dampfregler auf Position „1“ und warten Sie bis die Kontrollleuchte
aueuchtet. Wenn die grüne Leuchte während des Betriebs erlischt, drehen Sie den
Dampfregler wieder auf OFF oder „0“. Wenn Sie mehr heißes Wasser oder Dampf möch-
ten warten Sie 30 Sekunden bis die grüne Kontrollleuchte wieder angeht. Drehen Sie
den Dampfregler wieder auf und fahren Sie fort.
3. Geben Sie 100 ml Milch in einen Becher. Verwenden Sie Vollmilch aus dem Kühlschrank.
Die Milch sollte nicht warm oder heiß sein. Wählen Sie einen Becher, der groß genug ist,
da sich die Milch beim Aufschäumen um mehr als das Doppelt ausdehnt.
4. Stecken Sie die Düse 2 cm tief in die Milch und bewegen Sie das Gefäß hoch und runter.
Sobald die Milch aufgeschäumt ist, drehen Sie den Druckregler auf OFF oder „0“. Reini-
gen Sie die Düse umgehend nach dem Aufschäumen, damit sie nicht verklebt.
5. Geben Sie den Milchschaum auf den Espresso und bestäuben Sie den Schaum mit etwas
Kakao.
6. Drücken Sie auf die Ein/Aus-Taste und ziehen Sie den Stecker aus der Steckdose. Las-
sen Sie das Gerät 5 Minuten lang abkühlen, bevor Sie erneut Espresso kochen, andern-
falls könnte der Espresso etwas verbrannt schmecken.
So koche sie heißes Wasser
1. Drücken Sie auf den Ein/Aus-Schalter. Drehen Sie den Dampfregler auf „0“. Die rote
Kontrollleuchte geht an. Warten Sie einen Moment, bis die grüne Kontrollleuchte angeht.
2. Drehen Sie den Dampfregler von OFF auf „0“ in dem Sie ihn mindestens um 135 gegen
den Uhrzeigersinn drehen. Drücken Sie auf die Kaee/Wasser-Taste und heißes Wasser
ießt aus der Düse.
Getränke mit Wasserdampf erhitzen
1. Önen Sie die Tankabdeckung, entnehmen Sie den Tank und befüllen Sie ihn mit Was-
ser. Achten Sie darauf, dass die MAX-Markierung nicht überschritten wird. Setzen Sie
den Tank wieder ein.
2. Setzen Sie die Abdeckung wieder auf und schließen Sie das Gerät an. Schalten Sie das
Gerät ein, die rote Kontrollleuchte geht an.
3. Drehen Sie den Dampfregler auf OFF oder „0“. Stellen Sie die Kaee/Wasser-Taste auf
„1“, die Pumpe beginnt zu arbeiten, sobald Wasser herausießt stellen Sie den die Aus-
wahl wieder auf „0“. Drehen Sie den Dampfregler auf „1“ und warten Sie einen Moment.
Das Gerät beginnt vorzuheizen. Sobald die grüne Leuchte aueuchtet ist das Gerät
bereit.
4. Tauchen Sie die Düse in das zu erhitzende Getränk und drehen Sie den Dampfregler
langsam auf.
5. Sobald das Getränk die gewünschte Temperatur erreicht hat drehen Sie den Dampfreg-
ler auf „0“. Drücken Sie auf die AN/AUS-Taste, um das Gerät auszuschalten.

6
Reinigung und Pege
• Ziehen Sie den Stecker und lassen Sie das Gerät vollständig abkühlen, bevor Sie es reinigen.
• Reinigen Sie das Gehäuse mit einem feuchten Lappen. Reinigen Sie ebenfalls den Was-
sertank, die Tropfschale und die Ablage und trocknen Sie alle Teile danach sorgfältig ab.
Benutzen Sie zur Reinigung keine alkoholischen Reiniger und tauchen Sie das Gerät nicht
in Wasser oder andere Flüssigkeiten.
• Entfernen Sie den Trichter, indem Sie ihn gegen den Uhrzeigersinn abdrehen. Spülen Sie
die Rückstände ab und reinigen Sie ihn unter ießendem Wasser.
Maschine entkalken
1. Entkalken Sie das Gerät alle 2-3 Monate.
2. Befüllen Sie dazu den Wassertank mit einer 4:1 Mischung aus Wasser und Entkalker.
Halten Sie sich an die Angaben auf der Enkalker-Verpackung. Benutzen Sie nur Entkal-
ker der für Espressomaschinen geeignet ist. Alternativ können sie eine stark verdünnte
Mischung aus Wasser und Essigessenz benutzen.
3. Setzen Sie den Trichter (ohne Kaeepulver) ins Gerät ein und stellen Sie einen Becher
darunter.
4. Drücken Sie den Ein/Aus-Schalter, die rote Leuchte geht an. Stellen Sie den Dampfregler
auf „0“ und die Kaee/Wasser-Taste auf „1“. Sobald Wasser herausießt stellen Sie den
Auwahl-Taste wieder auf „0“ und warten Sie einen Moment bis sich das Gerät aufheizt.
5. Sobald die grüne Lampe angeht ist das Gerät aufgeheizt. Drücken Sie auf die Kaee/
Wasser-Taste und bereiten 2 Tassen zu. Schalten Sie die Auswahl-Taste wieder auf „0“
und warten Sie 5 Sekunden lang.
6. Drehen Sie den Dampfregler auf „1“ und warten Sie bis die grüne Leuchte angeht.
Lassen Sie 2 Minuten lang Dampf ab und schließen Sie den Dampfregler danach wie-
der. Schalten Sie das Gerät aus und lassen Sie die Entkalker-Mischung mindestens 15
Minuten lang einwirken.
7. Schalten Sie das Gerät wieder ein und wiederholen Sie die Schritte 4-6 weitere 3 Mal.
8. Schalten Sie das Gerät dann abermals ein. Sobald das Gerät aufgeheizt ist, drücken Sie
auf die Kaee/Wasser-Taste und brühen Sie Wasser auf, bis kein Entkalker mehr in der
Maschine sind.
9. Brühen Sie dann Kaee mit frischem Leitungswasser auf (ohne Kaee im Sieb) und wie-
derholen Sie die Schritte 4-6 weitere 3 Mal (sie können nun nach Schritt 6 direkt wieder
zu Schritt 4 springen ohne 15 Minuten zu warten), bis kein Wasser mehr im Tank ist.
10. Wiederholen Sie Schritt 9 weitere 3 Mal, um sicherzugehen, dass sich keine Rückstände
mehr im Gerät benden.

7
Fehlersuche und Fehlerbehebung
Fehler Mögliche Ursache Lösung
Kein Wasser oder Dampf. Kein Wasser im Tank. Füllen Sie Wasser in den Tank,
schalten Sie das Gerät ein und
drücken Sie die Ka e/Wasser-
Auswahltaste.
Der Tank sitzt nicht richtig.
Das Gerät ist nicht fertig auf-
geheizt.
Kein Durch uss. Das Ka eepulver ist zu dick. Verwenden Sie anderes Pulver.
Kein Dampf. Die Düse ist blockiert. Verwenden Sie eine kleinen
Draht, um die Damp öcher
freizustechen.
Das Gerät läuft nicht, obwohl
die Heißwasser und Dampf-
Leuchten an sind, die zwei
anderen Lampen sind nicht an.
Der Dampfregler ist nicht ge-
schlossen.
Schließen Sie den Dampfregler.
Zu starker oder zu schwacher
Espresso.
Zu wenig oder zu viel Pulver
im Sieb.
Benutzen Sie einen Lö el pro
Tasse und drücken Sie ihn mit
der Pulverpresse ins Sieb.
Die Milch schäumt nicht auf. Keine Vollmilch. Verwenden Sie kalte Vollmilch.
Die Vorheiz-Anzeige ist noch
nicht erloschen.
Warten Sie bis sich das Gerät
aufgeheizt hat, bereiten Sie erst
dann Milchschaum zu.
Hinweise zur Entsorgung
Be ndet sich die linke Abbildung (durchgestrichene Mülltonne auf Rädern) auf dem
Produkt, gilt die Europäische Richtlinie 2002/96/EG. Diese Produkte dürfen nicht mit
dem normalen Hausmüll entsorgt werden. Informieren Sie sich über die örtlichen Re-
gelungen zur getrennten Sammlung elektrischer und elektronischer Gerätschaften.
Richten Sie sich nach den örtlichen Regelungen und entsorgen Sie Altgeräte nicht
über den Hausmüll. Durch die regelkonforme Entsorgung der Altgeräte werden Um-
welt und die Gesundheit ihrer Mitmenschen vor möglichen negativen Konsequenzen
geschützt. Materialrecycling hilft, den Verbrauch von Rohsto en zu verringern.
Konformitätserklärung
Hersteller: Chal-Tec GmbH, Wallstraße 16, 10179 Berlin, Deutschland.
Dieses Produkt entspricht den folgenden Europäischen Richtlinien:
2014/30/EU (EMV)
2014/35/EU (LVD)
2011/65/EU (RoHS)

8
Dear Customer,
Congratulations on purchasing this equipment. Please read this manual carefully and take
care of the following hints to avoid damages. Any failure caused by ignoring the mentioned
items and cautions mentioned in the instruction manual are not covered by our warranty
and any liability.
Contents
Technical Data 8
Safety Instructions 8
Product Description 9
Use and Operation 19
Cleaning and Care 12
Troubleshooting 13
Hints on Disposal 13
Declaration of Conformity 13
Technical Data
Item number 10029282
Power supply 230 V ~ 50 Hz
Power consumtion 850 W
Safety Instructions
• Read all the safety and operating instructions carefully and retain them for future reference.
• Before using checks that the voltage of wall outlet corresponds to coee maker rating
plate.
• The appliance must be earthed.
• Close supervision is necessary when your appliance is being used near children.
• Do not place the coee maker on hot surface or beside re, avoid to be damaged.
• Remove plug from wall outlet before cleaning and when not in use.
• Allow appliance to cool down completely before taking o, attaching components or be-
fore cleaning.
• Do not operate any appliance with a damaged cord or plug or after the appliance mal-
functions, or is dropped or damaged in any manner. Return appliance to the nearest
authorized service facility for examination, repair or electrical or mechanical adjustment.
• The use of accessory which is not recommended by manufacturer may cause injury to
persons or damage to appliance.
• Place appliance on at surface or table, do not hang its power cord over the edge of table
or counter.

9
• Ensure that the power cord does not touch hot surface of appliance.
• Some parts of appliance are hot when operated, so do not touch with hand directly.
• Do not immerse appliance or power cord into water or any other liquids.
• Do not use outdoors.
• Household use only.
Product Description
1 One cup
Coee/Water
2 Two cup
Coee/Water
3 ON/OFF
4 Steam switch
5 Drip tray
6 Cup cushion
7 Water tank cover
8 Water tank
9 Steam control knob
10 Steam tube assembly
11 Steam jacket
12 Stainless steel strainer
13 Metal funnel
14 Funnel handle
15 Press bar

10
Use and Operation
Before rst Use
Pour water into water tank, the water level should not exceed the “MAX” mark in the tank.
Then replace the water tank cover. Note: The appliance is supplied with a detachable tank
for easy cleaning, you can ll the tank with water rstly, and then put the tank into the
appliance.
Connect to power source, turn the ON/OFF switch(you
should buck-up the left knob if the indicator lamp is not illu-
minated), open the steam knob, the pump begins to work
and th water will come out, then buck-up the steam knob.
Note:
There may be noise when pump the water it is normal
The switch indicator lamp begins to twinkle when the coee maker is preheating, the pre-
heating nished time is about two minutes and the indicator lamps twinkle will be stopped
and lighted status.
Press one cup switch to let the hot water clean coee rosebox or coee
cup. Began to boil the coee/engine condition.
Note: The appliance is not equipped with jug, please use yourself jug
or coee cup.
Machine is at the same time in the preheating, grinding well a good coee
powder(coee powder need 1 which can‘t be too thick nor too thin) packed into
the metal strainer mesh and then use pressure pressed powder compaction.
At the same time will be on the edge of the funnel coee powder with a
brush or hand wipe clean (if need to make 1 cup, with a cup of the nets, if
need to make 2 cups with 2 cups).
Select 1 cup, coee begins to ow 1
cup of coee. (or select 2 cups, then
it is out 2 cups of coee).
At the same time, adjust the position
of the coee cup make coee liquid
along the glass into the cup 10.Wait
a moment let coee drip o, coee
nished!

11
Frothing Milf for Cappuccino
1. Prepare espresso rst with container big enough according to the part “MAKE ESPRESSO
COFFEE”, make sure that the steam control knob is at the “OFF” or “0” position.
2. Press the steam switch to the “1” position, waiting for until the indicator is illuminated.
During operation, if the green indicator is extinguished, you should turn the steam
control knob to “OFF”or “0” position. Press coee/hot water selector to the “1” position
and pump water, after about 30s, close the pump coee/hot water selector to the “0”
position, then wait for until the green indicator is illuminated and turn the steam control
knob in anti-clockwise, the steam will come out again.
3. Fill a jug with about 100 grams of milk for each cappuccino to be prepared, you are
recommended to use whole milk at refrigerator temperature (not hot!). In choosing the
size of jug, bear in mind that the milk increases in volume by 2 times, make sure the
height of jug is enough. Turn the steam control knob slowly in anti-clockwise, steam will
come out from the frothing device. Insert the frothing device into the milk about two
centimetre, froth milk in the way moving vessel round from up to down. When the re-
quired purpose is reached, you can turn the steam control knob to “OFF” or “0” position.
Clean steam outlet with wet sponge immediately after steam stops generating.
4. Pour the frothed milk into the espresso prepared; now the cappuccino is ready. Sweeten
to taste and if desired, sprinkle the froth with a little cocoa powder.
5. Press the ON/OFF switch to the “0” position to cut the power source o. We recommend
you allow the maker to cool down at least for 5 min before making coee again. Other-
wise burnt odor may occur in your Espresso coee.
Making Hot Water
1. Press the On/O switch to the “1” position; the Steam switch to “0” position, Coee/hot
water selector to “0” position. The red lamp will be illuminated; waiting for a moment,
the green lamp will be illuminated.
2. First, turn the steam control knob from “OFF” to “0” position in anti-clockwise. (Turn the
knob with at least 135 degree.) Then press coee/hot water selector to “1” position, and
hot water will ow out from the steam wand.
Producing Steam to heat Liquids
1. Open the tank cover, remove the detachable tank and ll it with desired water, the water
level should not exceed the “MAX” mark in the tank. Then place the tank into the appli-
ance properly. Replace the tank, then connecting the appliance to power supply source.
2. Press the ON/OFF switch to the “1” position, the red lamp is illuminated.
3. Turn the steam control knob to “OFF” or “0” position make the coee/hot water selector
on the “1” position, the pump will pump water, when there is water owing out, close the
4. pump(coee/hot water selector to the “0” position) immediately, pressing the steam
selector to the “1” position and waiting for a moment, the appliance begins to be heated
until the green lamp is illuminated, it shows the heating is nish.
5. Dip the steam wand into the liquid to be heated. Turn the steam control knob in anti-
clockwise slowly to start making steam. When the required temperature is reached, you
can turn the steam control knob to “OFF” or “0” position. Press the ON/OFF switch to the
“0” position to cut the power source o.

12
Cleaning and Care
• Cut o power source and let the coee maker cool down completely before cleaning.
• Clean housing of coee maker with moisture-proof sponge often and clean water tank, drip
tray and removable shelf regularly then dry them.
• Do not clean with alcohol or solvent cleanser. Never immerse the housing in water for cleaning.
• Detach the metal funnel through turn it anticlockwise, get rid of coee residue inside, then
you can clean it with cleanser, but at last you must rinse with clear water.
Cleaning Mineral Deposits
1. To make sure your coee maker operating eciently, internal piping is cleanly and the
peak avor of coee, you should clean away the mineral deposits left every 2-3 months.
2. Fill the tank with water and descaler to the MAX level (the scale of water and descaler is
4:1; the detail refers to the instruction of descaler. Please use “household descaler”, you
can use the citric acid (obtainable from chemist’s or drug stores) instead of the descaler
(the one hundred parts of water and three parts of citric acid).
3. According to the program of pre-heating, put the metal funnel (no coee powder in it)
and carafe (jug) in place. Brewing water per “PRE-HEATING”.
4. Press the ON/OFF switch to “1” position, the red lamp will be illuminated, press the
steam switch to the “0” position and the coee/hot water selector to the “1” position,
when there is water owing out and close the pump the coee/hot water selector to the
“0” position, and waiting for a moment, the coee maker begins to be heated.
5. When the green lamp is illuminated, it shows the heating is nish. Pressing the coee/
hot water selector to the “1” position and make make two cups coee (about 2Oz). Then
close the pump the coee/hot water selector to the “0” position and wait for 5s.
6. Press the steam switch to the “1” position, waiting for until the green indicator is illumi-
nated. Make steam for 2min, then turn the steam control knob to “OFF” or “0” position
to stop making steam. Press the steam switch to the “0” position to stop the unit imme-
diately; make the descalers deposit in the unit at least 15 minutes.
7. Restart the unit and repeat the steps of 4‐6 at least 3 times.
8. Then Press the ON/OFF switch to “1” position, when the green lamp is illuminated, press
the coee/hot water selector to the “1” position to brew until no descaler is left.
9. Then brewing coee (no coee powder) with tap water in the MAX level, repeat the
steps of 4‐6 for 3 times (it is not necessary to wait for 15 minutes in step of 6), then
brewing until no water is left in the tank.
10. Repeat the step of 9 at least 3 times to make sure the piping is cleanly.

13
Troubleshooting
Problem Possible Cause Solution
No water/no steam. No water inside the tank. Will be adding water into the
water tank, Switch on the
power switch and co ee switch.
Tank is not located well.
Preheating is un nished
No lipa. Co ee powder is too thick. Change the co ee powder.
No steam. The steam hole was blocked. Use a small wire to poke the
steam holes.
Co ee maker can‘t work any
more, hot water & steam lamp
are on, another two lamps not.
Not closed steam knob. Closed steam knob
Co ee more or less. Co ee powder loading is too
much or less.
1 cup 1 spoon with atten
according to the standard
amount of lling. Too thick
co ee powder can not be
complete extraction, too ne
a ect the quantity of co ee
The steam cannot froth. Is it whole milk? Use cold whole milk.
The steam ready indicator is
not illuminated, then begins to
frothing milk.
Only after the steam ready
indicator is illuminated, the
steam can be used to froth.
Hints on Disposal
According to the European waste regulation 2002/96/EC this symbol on the product
or on its packaging indicates that this product may not be treated as household
waste. Instead it should be taken to the appropriate collection point for the recycling
of electrical and electronic equipment. By ensuring this product is disposed of cor-
rectly, you will help prevent potential negative consequences for the environment
and human health, which could otherwise be caused by inappropriate waste hand-
ling of this product. For more detailed information about recycling of this product,
please contact your local council or your household waste disposal service.
Declaration of Conformity
Producer: Chal-Tec GmbH, Wallstraße 16, 10179 Berlin, Germany.
This product is conform to the following European Directives:
2014/30/EU (EMC)
2014/35/EU (LVD)
2011/65/EU (RoHS)

14
Estimado cliente:
Le felicitamos por la adquisición de este producto. Lea atentamente el siguiente manual y
siga cuidadosamente las instrucciones de uso con el n de evitar posibles daños. La empre-
sa no se responsabiliza de los daños ocasionados por un uso indebido del producto o por
haber desatendido las indicaciones de seguridad.
Índice
Datos técnicos 14
Indicaciones de seguridad 14
Descripción del aparato 15
Puesta en marcha y uso 16
Limpieza y cuidado 18
Detección y resolución de problemas 19
Indicaciones para la retirada del aparato 19
Declaración de conformidad 19
Datos técnicos
Número de artículo 10029282
Suministro eléctrico 230 V ~ 50 Hz
Potencia 850 W
Indicaciones de seguridad
• Lea atentamente todas las indicaciones y conserve este manual para futuras consultas.
• Conecte el aparato solamente a tomas de corriente que se adecuen a la tensión del mismo.
• Para reducir el riesgo de una descarga eléctrica provocada por un fallo en el funcionamiento
del aparato, este deberá estar conectado a una toma de corriente con toma de tierra.
• En presencia de niños, utilice el aparato solamente si estos se encuentran bajo supervisión.
• No coloque el aparato encima o cerca de fuentes de calor.
• Desconecte el enchufe de la toma de corriente antes de limpiar el aparato o cuando no lo
utilice durante un periodo prolongado de tiempo. Deje que se enfríe completamente antes
de desmontar o montar alguna de sus piezas.
• Las reparaciones deberán ser realizadas por personal técnico cualicado y serán necesari-
as cuando el aparato, el cable de alimentación o el enchufe hayan sufrido daños, si se han
vertido líquidos o han caído objetos sobre el aparato, si el aparato se ha visto expuesto a
la humedad o al agua, si se ha dejado caer o si no funciona correctamente.
• Utilice exclusivamente los accesorios recomendados por el fabricante.
• Coloque el aparato en una supercie plana y no deje que el cable de alimentación quede
colgando.

15
• Asegúrese de que el cable de alimentación no entra en contacto con supercies calientes.
• Algunas piezas del aparato alcanzan temperaturas muy elevadas durante el funciona-
miento, no las toque con ambas manos.
• Nunca sumerja el aparato en agua ni en ningún otro líquido.
• No utilice el aparato al aire libre.
• Utilice este aparato en entornos domésticos.
Descripción del aparato
1 Una taza de café/agua
2 Dos tazas de café/agua
3 On/O
4 Vapor de agua
5 Bandeja anti goteo
6 Soporte para la taza
7 Tapa del depósito de agua
8 Depósito de agua
9 Regulador de vapor
10 Conducto de vapor
11 Boquilla para el vapor
12 Filtro de acero inoxidable
13 Embudo metálico
14 Mango del embudo
15 Prensa para el café molido

16
Puesta en marcha y uso
Antes del primer uso
Introduzca agua dentro del depósito y asegúrese de no superar la marca MAX del mismo. El
aparato está diseñado con un depósito extraíble para facilitar su limpieza. Rellene el depó-
sito antes de enchufar el aparato. A continuación, coloque la tapa.
Conecte el enchufe a la toma de corriente y pulse el
botón On/O. Gire el regulador de vapor. La bomba co-
menzará a trabajar y el agua saldrá. Vuelva a cerrar el
regulador de vapor.
Advertencia: es posible que la bomba de agua produz-
ca algún ruido. Este fenómeno es normal y no se trata
de ninguna avería.
El indicador se ilumina cuando el aparato se haya precalentado. Trans-
curridos dos minutos, el aparato estará listo, el indicador parpadeará y
a continuación se iluminará ininterrumpidamente.
Pulse el botón “una taza” para dejar correr agua caliente y así limpiar
la máquina. Ahora puede comenzar a preparar el café.
Advertencia: la cafetera no incluye tazas o vasos de café. Para preparar el café, necesitará
un vaso o una taza.
Mientras la máquina se precalienta, llene el ltro con café molido expreso y
presiónelo con la prensa. Asegúrese de que el tipo de expreso que elija no
sea ni demasiado grueso ni demasiado no.
Limpie los restos de café esparcidos por el borde con un cepillo. Tenga en
cuenta la marca del ltro y llénelo con café para una o dos tazas.
Coloque el ltro en el embudo y este
en la marca y encájelo en el aparato.
Pulse el botón “una taza” o “dos ta-
zas” dependiendo de sus necesi-
dades.
Asegúrese de que las tazas se en-
cuentran justo debajo del embudo.
Cuando la máquina deje de verter el
café, puede retirar las tazas y apagar
el aparato.

17
Espumar leche para capuchino
1. Prepare un expreso grande en un vaso de suciente tamaño. Asegúrese de que el regu-
lador de vapor se encuentra en la posición OFF o “0”.
2. Gire el regulador de vapor hasta la posición “1” y espere hasta que el indicador se ilu-
mine. Si se apaga la luz verde durante el funcionamiento, gire el regulador de vapor de
nuevo a la posición OFF o “0”. Si desea más agua caliente o vapor, espere 30 segundos
hasta que la luz verde se vuelva a encender. Active de nuevo el vapor y continúe con
el proceso.
3. Vierta 100 ml de leche en un vaso. Utilice leche entera del frigoríco. La leche no debe
estar templada ni caliente. Seleccione un vaso que sea lo sucientemente grande, pues
al espumar la leche esta doblará su volumen.
4. Introduzca la boquilla 2 cm dentro de la leche y mueva el recipiente de arriba abajo.
Cuando la leche esté espumada, gire el regulador de presión hasta la posición OFF o
“0”. Limpie la boquilla inmediatamente después del proceso para evitar que se pegue.
5. Añada la espuma de leche al expreso y espolvoree la espuma con un poco de cacao.
6. Pulse el botón on/o y desconecte el enchufe. Deje que la máquina se enfríe durante 5
minutos antes de volver a preparar café. De lo contrario, el café podría tener un regusto
a quemado.
Cómo calentar agua
1. Pulse el botón on/o. Gire el regulador de vapor hasta la posición “0”. El indicador rojo
se encenderá. Espere un momento hasta que se encienda el indicador verde.
2. Gire el regulador de vapor de OFF a “0” en el sentido contrario de las agujas del reloj,
al menos 135 grados. Pulse el botón café/agua y el agua caliente saldrá por la boquilla.
Calentar bebidas con el vapor de agua
1. Abra la tapa del depósito, retírelo y llénelo e agua. Asegúrese de no sobrepasar la marca
MAX. Vuelva a colocar el depósito.
2. Coloque la tapa y conecte el aparato. Al encenderlo, el indicador rojo se encenderá.
3. Gire el regulador de vapor hasta la posición OFF o “0”. Coloque el botón café/agua en la
posición 1 y la bomba comenzará a funcionar. En cuanto el agua uya, vuelva a colocar
el interruptor en la posición “0”. Gire el regulador de vapor hasta “1” y espere un mo-
mento. El aparato comenzará a precalentarse. Cuando el indicador verde se encienda,
el aparato está listo.
4. Sumerja la boquilla en la bebida que desee calentar y gire el regulador de presión len-
tamente.
5. Cuando la bebida haya alcanzado la temperatura deseada, gire el regulador de vapor
hasta la posición “0”. Pulse de nuevo el botón on/o para apagar el aparato.

18
Limpieza y cuidado
• Desconecte el aparato y deje que se enfríe completamente antes de limpiarlo.
• Limpie la carcasa con un paño húmedo. Limpie el depósito de agua, la bandeja anti goteo y
el soporte para la taza y seque todas las piezas completamente. No utilice limpiadores que
contengan alcohol ni sumerja el aparato en agua ni en ningún otro líquido.
• Extraiga el embudo desenroscándolo en el sentido contrario de las agujas del reloj. Retire los
restos y lávelo debajo de un chorro de agua.
Descalcicar la máquina
1. Descalcique el aparato cada 2-3 meses.
2. Llene el depósito con una mezcla 4:1 de agua y limpiador anti cal. Siga las indicaciones
del envase del limpiador. Utilice solamente un limpiador apto para máquinas de expreso.
Como alternativa puede utilizar una mezcla de agua y vinagre.
3. Coloque el embudo (sin café molido) dentro del aparato y coloque un vaso debajo.
4. Pulse el botón on/o, la luz roja se encenderá. Coloque el regulador de vapor en “0” y
el interruptor café/agua en “1”. En cuanto el agua ya haya uido, coloque el botón de
selección en la posición “0” y espere un momento hasta que el aparato se caliente.
5. Cuando el indicador verde se encienda, el aparato estará caliente. Pulse el botón café/
agua y prepare dos tazas. Vuelva a colocar el interruptor de selección en la posición “0”
y espere 5 segundos.
6. Gire el regulador de vapor hasta la posición “1” y espere hasta que se ilumine la luz ver-
de. Deje salir del vapor durante 2 minutos y a continuación cierre el conducto. Apague
el aparato y deje que la mezcla anti cal actúe durante 15 minutos.
7. Vuelva a encender el aparato y repita los pasos 4-6 tres veces más.
8. Encienda de nuevo el aparato. Cuando este esté caliente, pulse el botón café/agua y
caliente el agua hasta que no quede ningún resto de solución anti cal.
9. Prepare café con agua fresca (sin café en el ltro) y repita los pasos 4-6 tres veces
(puede pasar del paso 6 hasta el 4 sin necesidad de esperar 15 minutos) hasta vaciar
el depósito.
10. Repita el proceso 9 tres veces para asegurarse de que no quedan restos dentro de la
máquina.

19
Detección y resolución de problemas
Problema Posible causa Solución
Sin agua o vapor. No hay agua en el depósito. Llene el depósito de agua,
encienda el aparato y pulse el
botón de selección café/agua.
El depósito no está colocado
correctamente.
El aparato no ha terminado de
calentarse.
No uye el líquido. El café molido es demasiado
grueso.
Utilice otro tipo de café.
No hay vapor. La boquilla está obstruida. Utilice un alambre no para
limpiar el ori cio del vapor.
El aparato no funciona aunque
hay agua caliente y el indicador
de vapor está encendido, pero
los otros dos indicadores no.
El regulador de vapor no está
cerrado.
Cierre el regulador de vapor.
El expreso no tiene un buen
sabor.
Cantidad excesiva o insu ciente
de café molido en el ltro.
Utilice una cuchara por taza y
presione el café molido con la
prensa dentro del ltro.
La leche no se espuma. No es leche entera. Utilice leche entera fría.
El indicador de precalentado
todavía no se ha apagado.
Espere hasta que el aparato se
haya precalentado, y a continuación
prepare la espuma de leche.
Indicaciones para la retirada del aparato
Si el aparato lleva adherida la ilustración de la izquierda (el contenedor de basura
tachado) entonces rige la normativa europea, directiva 2002/96/CE. Este producto
no debe arrojarse a un contenedor de basura común. Infórmese sobre las leyes
territoriales que regulan la recogida separada de aparatos eléctricos y electrónicos.
Respete las leyes territoriales y no arroje aparatos viejos al cubo de la basura domé-
stica. Una retirada de aparatos conforme a las leyes contribuye a proteger el medio
ambiente y a las personas a su alrededor frente a posibles consecuencias perjudi-
ciales para la salud. El reciclaje ayuda a reducir el consumo de materias primas.
Declaración de conformidad
Fabricante: Chal-Tec GmbH, Wallstraße 16, 10179, Berlín (Alemania).
Este producto cumple con las siguientes directivas europeas:
2014/30/UE (EMC)
2014/35/UE (baja tensión)
2011/65/UE (refundición RoHS)

20
Chère cliente, cher client,
Toutes nos félicitations pour l’acquisition de ce nouvel appareil. Veuillez lire attentivement
et respecter les instructions de ce mode d’emploi an d’éviter d’éventuels dommages. Nous
ne saurions être tenus pour responsables des dommages dus au non-respect des consignes
et à la mauvaise utilisation de l’appareil.
Sommaire
Données techniques 20
Consignes de sécurité 21
Aperçu de l’appareil 21
Mise en marche et utilisation 22
Nettoyage et entretien 24
Résolution des problèmes 25
Information sur le recyclage 25
Déclaration de conformité 25
Données techniques
Numéro d’article 10029282
Alimentation électrique 230 V ~ 50 Hz
Puissance 850 W
Consignes de sécurité
• Veuillez lire attentivement ce mode d’emploi, et conservez-le pour pouvoir vous y référer
ultérieurement.
• L‘appareil doit être branché uniquement à une prise de terre qui correspond à la tension
indiquée.
• Pour réduire les risques d’électrocution en cas de défaillance technique ou de dysfoncti-
onnement, brancher l’appareil à une prise de terre.
• N‘utiliser l‘appareil en présence d‘enfants que s‘ils sont sous surveillance.
• Débrancher l‘appareil avant de le nettoyer ou en cas d‘inutilisation prolongée. Laisser
l‘appareil refroidir complètement avant de retirer des éléments ou de les replacer.
• Les réparations doivent être eectuées uniquement par un personnel spécialisé et sont obli-
gatoires si l’appareil est endommagé, si le cordon ou la che d’alimentation sont endomma-
gés, si un liquide s’y est inltré ou si des objets sont tombés dessus, si l’appareil est exposé
à des liquides ou à l’humidité, s’il est tombé ou s’il présente des dysfonctionnements.
• Utiliser exclusivement les accessoires recommandés par le fabricant.
• Disposer l’appareil sur un plan de travail plat et ne pas laisser pendre le cordon
d’alimentation de ce plan de travail.
Other manuals for 10029282
2
Table of contents
Languages:
Other oneConcept Coffee Maker manuals