manuals.online logo
Brands
  1. Home
  2. •
  3. Brands
  4. •
  5. Onglematic
  6. •
  7. Cutter
  8. •
  9. Onglematic Thumb Cutter User manual

Onglematic Thumb Cutter User manual

Scheme 1. Global view
Scheme 2. Simple table and Appliances
Manufacturer :LM INNOVATIONS –29 bis, rue de la République F-38320 BRESSON
Tél : (33) 04 76 24 45 17 – Fax : (33) 04 76 25 86 02 – e.mail : [email protected] –www.onglematic.com
ONGLEMATIC THUMB CUTTER
INSTRUCTIONS FOR USE
10.11.2010
1. DESCRIPTION OF THE ONGLEMATIC THUMB CUTTER
The frame (1) covers the whole machinery of the Thumb Cutter. It allows the machine to be steady on a table or on its
adapted stand.
The simple table : It is meant to cut unbound sheets. To set this table : unscrew the 4 screws of the table with
clamping device and put the simple table.
The table with clamping device
It is meant to cut bound documents. It allows to hold the documents and
prevent them from sliding.
The right stop : The sheets or document must be against this right stop during the cut.
The keyboard (4) : It allows to use and program the working of the Onglematic Thumb Cutter.
The moving part (5) : It moves laterally. It includes the cutting parts and the back stop for the unbound sheets.
The pedal and its cord :When the protective cover is well set, the cutting is possible by a foot switch activation.
The security system When activating the foot switch,
the pawns go down and the cutting is possible only if the
security pawns are all on the same level.
The protective cover (6) It allows the working of the
machine in full conditions of safety for the users. The
Thumb cutter will operate only if the protective cover is set.
“Security contact button” insures the connection of the
engine when the cover is on.
The engine (9) The engine and its machinery drive the cutting plate to operate.
Cutting release button
In case if the knife will be blocked during the cutting please press and release this button situated on the backside of
the cutting moving part.
The back stops (11)
While cutting, the unbound sheets must be against the back stop.
The automatic or manual advance switch (10)
This switch is on the right side of the moving part.
It allows choosing either an automatic advance after each cut or a manual advance by pressing of the button VAL of
the keyboard.
The connecting cables They connect the fixed part and the moving part. They have to stay flexible in order not to block
the moving of the machine.
The feeding block
It owns an intake of current, an On-Off switch and a fuse.
The feeding cord connects the Onglematic Thumb Cutter with the mains.
Different cutting tools : They are interchangeable. Please see Chapter 4.
2. UNPACKING AND SETTING
Lift the Thumb Cutter out of its package by holding it by its frame : don’t hold it by the moving part.
Place the Thumb Cutter on its stand or on a flat table, leaving enough space available behind the machine to allow the
moving part to operate in good conditions.
Remove the 2 immobilizing parts :
-one with two screws on the right side (see image).
- one wooden part under the motor
Verify that the connecting cables are not jammed and that they can move freely.
Keep the packing for the case if the machine must be sent back to the factory.
Warning : for any return of the machine.
The machine has to be in its original packing,
The machine has to be in «0» position,
The immobilizing screw and wooden part under the motor must be set,
The shims must be positioned in the same way as when the machine had been receipt (indicated on the box).
3. Precautions for use –TO READ IMPERATIVELY!
3.1. Protect others and yourself from the knives.
Warning : the knives are very sharp. Protect your hands and your body to avoid blessing you.
During stand by or working on the machine don’t put your fingers under the knives. Never work
on the machine without security system.
3.2. Protection of the knives.
The knives are very brittle. To keep them in the perfect conditions of use:
Don’t cut a thickness more than 30mm with the Thumb Cutting and Corner Rounding.
Don’t cut a thumb cuts larger than 10 mm wide with Thumb Cutting.
With the perforating tool you can punch a paper book of maximum 16 sheets of 80g paper
or paper pile of equal thickness! Punching more than 16 sheets will damage the tool in an
irreversible way.
Don’t drop knives and counter knives. It will damage the tool in an irreversible way
Verify for each kind of paper that the paper scraps are draining off correctly without
blocking. Open the machine and blow out the paper scraps regularly to make sure they will
not interfere with the operating of the Thumb Cutter.
If the paper chips evacuation is no more perfect, we advise you to put a new Teflon coat on
the inside surface of the knife for Thumb Cutting. Product ref: Anti-Friction Coating Spray /
MOLYKOTE / PTFE-N-UV.
11. Error codes on Onglematic Thumb Cutter
Error Codes Signification Description Cause Solutions
996 Error contact
at the end of
crank
The captor for side
plate (black "U" shape)
at the beginning of
crank does not signal
the start of the cutting
part
1. The captor for side
plate is blocked up by
paper scraps or drop of
oil.
1. Remove the paper scraps or
clean the captor for side plate
with a dry cloth.
2. The captor for side
plate is out of use 2. Change the electronic card.
997 Motor on, but
the counting
captor (black
"U" shape)
does not see
the counting
disc turning.
1. The main screw
turns few times but the
counting captor does
not "see" it. The cutting
part moves slightly of
few mm when machine
turned on.
1.a. The counting captor
is blocked up by paper
scraps or drop of oil.
1.a. Remove the paper scraps
or clean the counting captor
with a dry cloth.
1.b. The counting captor
is defective 1.b. Change the electronic
card.
1.c.Change the fuse
2. The main screw
does not move at all.
The cutting part does
not move at all when
machine turned on.
2.a. Mechanical
jamming of the left stop
(O6) or the cutting part
(O7)
2.a. Unplug the machine. Have
the main screw turn manually
and check there isn't any
mechanical jamming. Check
that the moving part can move
freely and that the grey
connecting cable is not
jammed.
2.b. Defective motor 2.b. Motor unplugged, check
the "spade terminal" and
tighten them if necessary
2.c. Defective
transformator 2.c. Check the tensions.
2.d. Defective electronic
card 2.d. Change the electronic card
2.e. Defective pulleys or
strap 2.e. Check the pulley and the
strap between them (must be
tight enough but not too much).
998 Maximum
crank throw
exceeded
The cutting part
stopped at the
maximum position.
Defective electronic
card. Have the main screw turn
manually. Switch the machine
off and turn it back on to see if
the problem remains. If "yes",
change the electronic card.
12. SECURITY INSTRUCTIONS
Never work without the protective cover set. The protective cover has to be in place during the operating of
the Thumb Cutter.
Always use a power supply in conformity with the usual norms.
When the protective cover must be removed to change the cutting plates, unplug the machine and protect the main
knife, which is very sharp. All handling without the protective cover set have to be done with maximum caution, and
only by qualified people.
Do not leave the Onglematic Thumb Cutter within the reach of children.
Do not plunge the Onglematic Thumb Cutter in any liquid.
Warning : Keep the cardboard box for any return of the machine under warranty to the factory. (See also
paragraph 2)
10. CHANGE OF TOOLS ON THE ONGLEMATIC THUMB CUTTER
CAUTION ! For any handling of the knife and the counter knife, be very careful because the knives are
very fragile (very brittle). Any shock against each other or drop on the floor would damage them in an
irreversible way.
Switch off the power of the Onglematic Thumb cutter and unplug the machine.
Remove the protective cover off by unscrewing the 4 screws BHC 5x6.
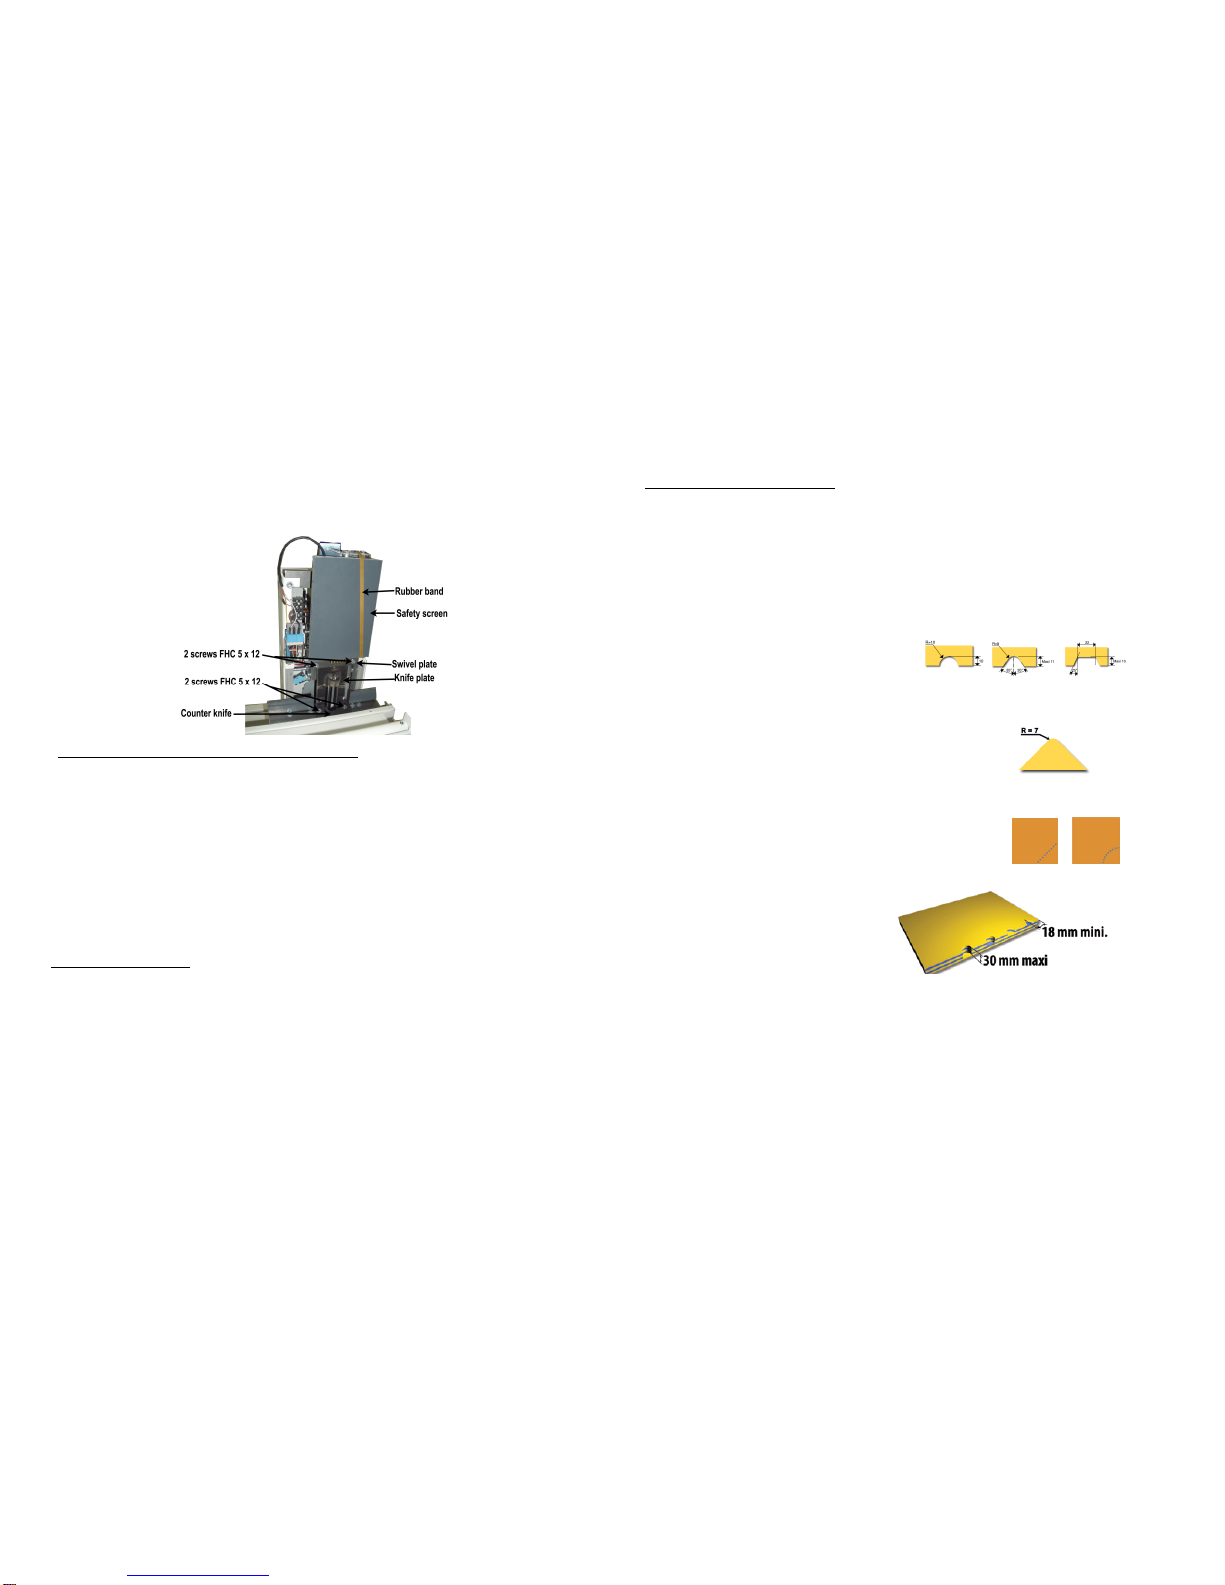
Lift up the “safety screen” at the maximum height and hold it thanks to a rubber band (see the picture below).
10.1 FOR THUMB CUTTING OR CORNER ROUNDING TOOLS
If the thumb cutting or corner-rounding tool is installed, remove first the “swivel plate” by unscrewing 2 screws FHC 5 x
12 located against the upper part of the knife plate. It is very important to hold the knife while unscrewing, so that
the cutting plate does not fall off as soon as you unscrewed the swivel plate.
Take out the cutting plate by lifting up the plate on its axle.
Remove the counter cutting plate by unscrewing 2 screws FHC 5 x 12.
Put the counter cutting plate corresponding to the new tool, by screwing 2 screws FHC 5 x 12.
Remember the knife is really fragile (very brittle). First place gently the new cutting plate inside the specific gap
in the counter cutting plate and second, place its axle in the axle support meant for that purpose.
Screw the swivel plate back on the upper part of the knife plate by screwing the 2 screws FHC 5 x 12.
If the paper chips evacuation is no more perfect, we advise you to put a Teflon coat on the inside surface of the
knife. Product ref: Anti-Friction Coating Spray / MOLYKOTE / PTFE-N-UV.
10.2 FOR PUNCHING TOOL:
If the punching tool is installed, remove first the punching tool by unscrewing 2 screws FHC 5x12, which are inside the
part.
Remove then the pushing tool in the upper part by unscrewing 2 screws CHC 6x60 inside the part.
Fix the pushing tool in the upper part with the help of 2 screws CHC 6x60 by pressing the 4 small springs at the same
time. ATTENTION: be sure that ends of screws don’t come out on the backside. Otherwise they will stir the
machine functioning and it can be damaged in the irreversible way.
Put the new punching tool by fixing 2 screws FHC 5x12, which are inside the part. We deliver a special screwdriver to
facilitate the access to these screws.
Remove the rubber band and hold the safety screen to go down.
Put back the protective cover using the 4 screws BHC 5 x 6. Plug in the machine.
4. STARTING
Connect the Thumb Cutter to a current supply with characteristics as indicated on the rating plate (earth connection).
Switch it ON by means of the switch: the knife will move slightly or stays at the «rest position » and the display
indicates « 0 ».
Then test the functioning of the machine :
Select «297 » for A4 paper. To do so, press successively “2”, “9” and “7”.
Then press the touch VAL to indicate the validation.
If you want 10 cuts, select 10, by pressing successively “1” and “0”.
Press the touch VAL.
The display must indicate «1»: the moving part is in position to cut the first tab.
Press again the button VAL to go to the second position.
The moving part must move up to the second position and the « 2 » must be indicated on the display.
5. Different cutting tools. Appliance AAppliance BAppliance C
Cutting tool for Thumb Cutting
Cutting tools for Thumb Cutting
consist of 2 cutting parts: the cutting knife (moving) and the counter knife (fixed).
The standard knife allows cutting up to 30 mm thickness.
Don’t cut more than 30mm of thickness and more than 10mm wide tabs.
Cutting tool for Corner Rounding (Appliance M)
Cutting tools for Corner Rounding consist of 2 cutting parts: the cutting
knife (moving) and the counter knife (fixed).
This tool allows cutting up to 30 mm thickness.
Don’t cut more than 30mm of thickness.
Corner Perforation tool –diary puncher (Punch A & C)
Cutting tool for perforation consists of a punching tool + a pushing tool. It
allows punching of paper book of maximum 16 sheets of 80g paper..
Don’t punch more than 16 sheets of 80g paper.
6. Thumb Cutting
6.1. Cutting of equal lengths tabs
(tabs shared uniformly)
Tabs will be shared uniformly. The middle of the first and of the last tabs will be on 18 mm from the document borders.
The other tabs will be shared uniformly.
First indicate the length of the sheet on which the cut will be made: for A4 paper (297mm)press successively “2”, “9” and “7”. Then
press VAL to validate.
Now indicate the number of tabs chosen for 10 tabs, press successively “1” and “0”. Press VAL.
The moving part moves up to the first tab to cut and the display indicates "1" : The Onglematic Thumb Cutter is ready to cut the first
chapter.
If the advance switch (10) is on "manual position" (high position), the moving part will remain in the same position after each cut. To
go to the following position, press VAL on the keyboard.
If the advance switch (10) is on "automatic position" (low position), the moving part will go to the following position after each cut
automatically.
To come back to a previous position, press SEL. Then the moving part comes back to the previous position.
At each cut, the display indicates the number of chapter to cut.
By thumb cutting, if the last sheet is cut not in the best quality you can add a thick paper band of 360x44mm with 2
holes on the both sides. Distance between the holes axes is 340mm in length and 25 mm in width.
6.2. Cutting tabs of variable length
Press SEL for about 3 seconds till the display indicates « 01 » and «000 » blinks.
Select the length of the first tab (length in millimetres from the top of the page to the middle of the tab). Press VAL.
Then the display shows « 02 » and «000 » blinks. Select the length of the second tab (length in millimetres from the
top of the page to the middle of the tab). Press VAL and so on... When you entered the last position, press VAL for
about 3 seconds till the moving part goes.
The moving part moves up to the first tab to cut and the display indicates "1" : The Onglematic is ready to cut the first
chapter.
If the advance switch (10) is on "manual position" (high position), the moving part will stay in the same position after
each cut. To go to the following position, press VAL on the keyboard.
If the advance switch (10) is on "automatic position" (low position), the moving part will go to the following position
after each cut automatically.
To come back to a previous position, press SEL. Then the moving part comes back to the previous position.
At each cut, the display indicates the length of the chapter to cut.
By thumb cutting, if the last sheet is cut not in the best quality you can add a thick paper band of 360x44mm with 2
holes on the both sides. Distance between the holes axes is 340mm in length and 25 mm in width.
6.3 PROGRAM STORAGE
64 different programs for tabs of variable length can be stored
6.3.1 To store a program : 2 & SEL
Press “2” and SEL at the same time 222 flickers
Enter the program number between 1 and 64 (*) (***)
Press VAL shortly
6.3.2 To delete a program : 3 & SEL
Press “3” and SEL at the same time 333 flickers
Enter the program number between 1 and 64 (**)
Press VAL shortly
6.3.3 To recall a program :4 & SEL
Press “4” and SEL at the same time 444 flickers
Enter the program number between 1 and 64 (**)
Press VAL shortly
6.3.4 To switch from one program to another
Press “0” long
Press “4” and SEL at the same time 444 flickers
Enter the program number between 1 and 64 (**)
Press VAL shortly
Error codes
(*) 992 = program number already taken
(**) 994 = this program doesn’t exist
(***) 995 = tab length error
7. Cutting of the single central tab (for the calendars for example)
Use the simple table.
Install the additional right stop if your document is larger than the simple table.
Put the advance switch (10) on "manual position" (high position), the moving part will stay in the same position after
each cut.
Put the following program :
Press SEL long (3 seconds) until « 01 » appears on display.
Program the tab position (length in millimetres from the top of the page to the middle of the tab)
Press long VAL to validate
The moving part will go to the position indicated.
Put your paper to stop and press the foot switch
By thumb cutting, if the last sheet is cut not in the best quality you can add a thick paper band of 360x44mm with 2
holes on the both sides. Distance between the holes axes is 340mm in length and 25 mm in width.
8. Corner rounding
Use the simple table.
Install the lateral side stops
Put the advance switch (10) is on "manual position" (high position), the moving part will stay in the same position after
each cut.
Put the following program :
Press SEL long (3 seconds) until « 01 » appears on display.
Put the length «207 »
Press long VAL to validate
The moving part will go to the position indicated. It must be exactly in the middle between 2 lateral stops.
There is a special mark on the table for this purpose. If it is not in the middle try to program your machine
for «203 » - « 207 » to match the mark.
Put your paper to the lateral stops and press the foot switch
By corner rounding if the last sheet is not cut perfectly you can add a paper strip of about 11-12mm that you can put in
the special opening made for this purpose.
9. Perforation
Use the simple table.
Install the lateral side stops
Put the advance switch (10) is on "manual position" (high position), the moving part will stay in the same position after
each cut.
Put the following program :
Press SEL long (3 seconds) until « 01 » appears on display.
Put the length «207 »
Press long VAL to validate
The moving part will go to the position indicated. It must be exactly in the middle between 2 lateral stops.
There is a special mark on the table for this purpose. If it is not in the middle try to program your machine
for «203 » - « 207 » to match the mark.
Put your paper to the lateral stops and press the foot switch

Popular Cutter manuals by other brands

Nordic BC-L0118 operating manual

Nordic

Nordic BC-L0118 operating manual

Trotec SpeedMarker 300 Operation manual

Trotec

Trotec SpeedMarker 300 Operation manual

Makita DPC6410 (UK) Instruction and safety manual

Makita

Makita DPC6410 (UK) Instruction and safety manual

Milwaukee M18 FCOS230 Original instructions

Milwaukee

Milwaukee M18 FCOS230 Original instructions

ChemInstruments RDS-100 operating instructions

ChemInstruments

ChemInstruments RDS-100 operating instructions

Craftsman 183.172521 owner's manual

Craftsman

Craftsman 183.172521 owner's manual

Husqvarna TS 400 F Operator's manual

Husqvarna

Husqvarna TS 400 F Operator's manual

KRUG+PRIESTER IDEAL 5560 operating instructions

KRUG+PRIESTER

KRUG+PRIESTER IDEAL 5560 operating instructions

Huskie Tools REC-660YC Operation manual

Huskie Tools

Huskie Tools REC-660YC Operation manual

Ilsco TaskMaster TR-CUT25 instruction manual

Ilsco

Ilsco TaskMaster TR-CUT25 instruction manual

ICS 701A Operator's manual

ICS

ICS 701A Operator's manual

MSW STYRO CUTTER 06 user manual

MSW

MSW STYRO CUTTER 06 user manual

Cembre HT-TFC Operation and maintenance manual

Cembre

Cembre HT-TFC Operation and maintenance manual

Makita 4190D/4190DW instruction manual

Makita

Makita 4190D/4190DW instruction manual

Huskie Tools S-16 Operating instructions manual

Huskie Tools

Huskie Tools S-16 Operating instructions manual

Huskie Tools REC-54M Operation manuals

Huskie Tools

Huskie Tools REC-54M Operation manuals

Woods RC3.5 Operator's manual

Woods

Woods RC3.5 Operator's manual

Würth MASTER FF 180-2 Translation of the original operating instructions

Würth

Würth MASTER FF 180-2 Translation of the original operating instructions

manuals.online logo
manuals.online logoBrands
  • About & Mission
  • Contact us
  • Privacy Policy
  • Terms and Conditions

Copyright 2025 Manuals.Online. All Rights Reserved.