Onkyo TX-NR609 User manual

AV Receiver
TX-NR609
Instruction Manual
Thank you for purchasing an Onkyo AV Receiver.
Please read this manual thoroughly before making
connections and plugging in the unit.
Following the instructions in this manual will enable
you to obtain optimum performance and listening
enjoyment from your new AV Receiver.
Please retain this manual for future reference.
Contents
Introduction ...................................2
Connections.................................12
Turning On & Basic Operations
......22
Advanced Operations .................43
Controlling Other Components
...63
Appendix ......................................69
E
n

4
En
For British models
Replacement and mounting of an AC plug on the power
supply cord of this unit should be performed only by
qualified service personnel.
IMPORTANT
The wires in the mains lead are coloured in accordance
with the following code:
Blue: Neutral
Brown: Live
As the colours of the wires in the mains lead of this
apparatus may not correspond with the coloured markings
identifying the terminals in your plug, proceed as follows:
The wire which is coloured blue must be connected to the
terminal which is marked with the letter N or coloured
black.
The wire which is coloured brown must be connected to
the terminal which is marked with the letter L or coloured
red.
IMPORTANT
The plug is fitted with an appropriate fuse. If the fuse
needs to be replaced, the replacement fuse must approved
by ASTA or BSI to BS1362 and have the same ampere
rating as that indicated on the plug. Check for the ASTA
mark or the BSI mark on the body of the fuse.
If the power cord’s plug is not suitable for your socket
outlets, cut it off and fit a suitable plug. Fit a suitable fuse
in the plug.
For European Models
Supplied Accessories
Make sure you have the following accessories:
*In catalogs and on packaging, the letter at the end of the product
name indicates the color. Specifications and operations are the
same regardless of color.
■Installing the batteries
Note
• If the remote controller
doesn’t work reliably,
try replacing the
batteries.
• Don’t mix new and old
batteries or different
types of batteries.
• If you intend not to use
the remote controller for a long time, remove the batteries to
prevent damage from leakage or corrosion.
• Remove expired batteries as soon as possible to prevent damage
from leakage or corrosion.
■Aiming the remote controller
To use the remote controller, point it at the AV receiver’s
remote control sensor, as shown below.
Declaration of Conformity
We, ONKYO EUROPE
ELECTRONICS GmbH
LIEGNITZERSTRASSE 6,
82194 GROEBENZELL,
GERMANY
GROEBENZELL, GERMANY
ONKYO EUROPE ELECTRONICS GmbH
K. MIYAGI
declare in own responsibility, that the ONKYO product
described in this instruction manual is in compliance with the
corresponding technical standards such as EN60065,
EN55013, EN55020 and EN61000-3-2, -3-3.
Indoor FM antenna (➔page 21)
AM loop antenna (➔page 21)
Power cord (Taiwan models) (➔page 21)
Speaker cable labels (➔page 13)
Speaker setup microphone (➔page 31)
Remote controller (RC-803M) and two batteries
(AA/R6)
(Note for China: The battery for the remote controller is not
supplied for this unit.)
Batteries (AA/R6)
Remote control sensor
AV receiver
Approx. 16 ft. (5 m)

5
En
Contents
Important Safety Instructions ......................................... 2
Precautions....................................................................... 3
Supplied Accessories...................................................... 4
Features ............................................................................ 6
Front & Rear Panels......................................................... 8
Front Panel..................................................................... 8
Display............................................................................ 9
Rear Panel ................................................................... 10
Remote Controller.......................................................... 11
Controlling the AV Receiver ......................................... 11
Connecting the AV Receiver ......................................... 12
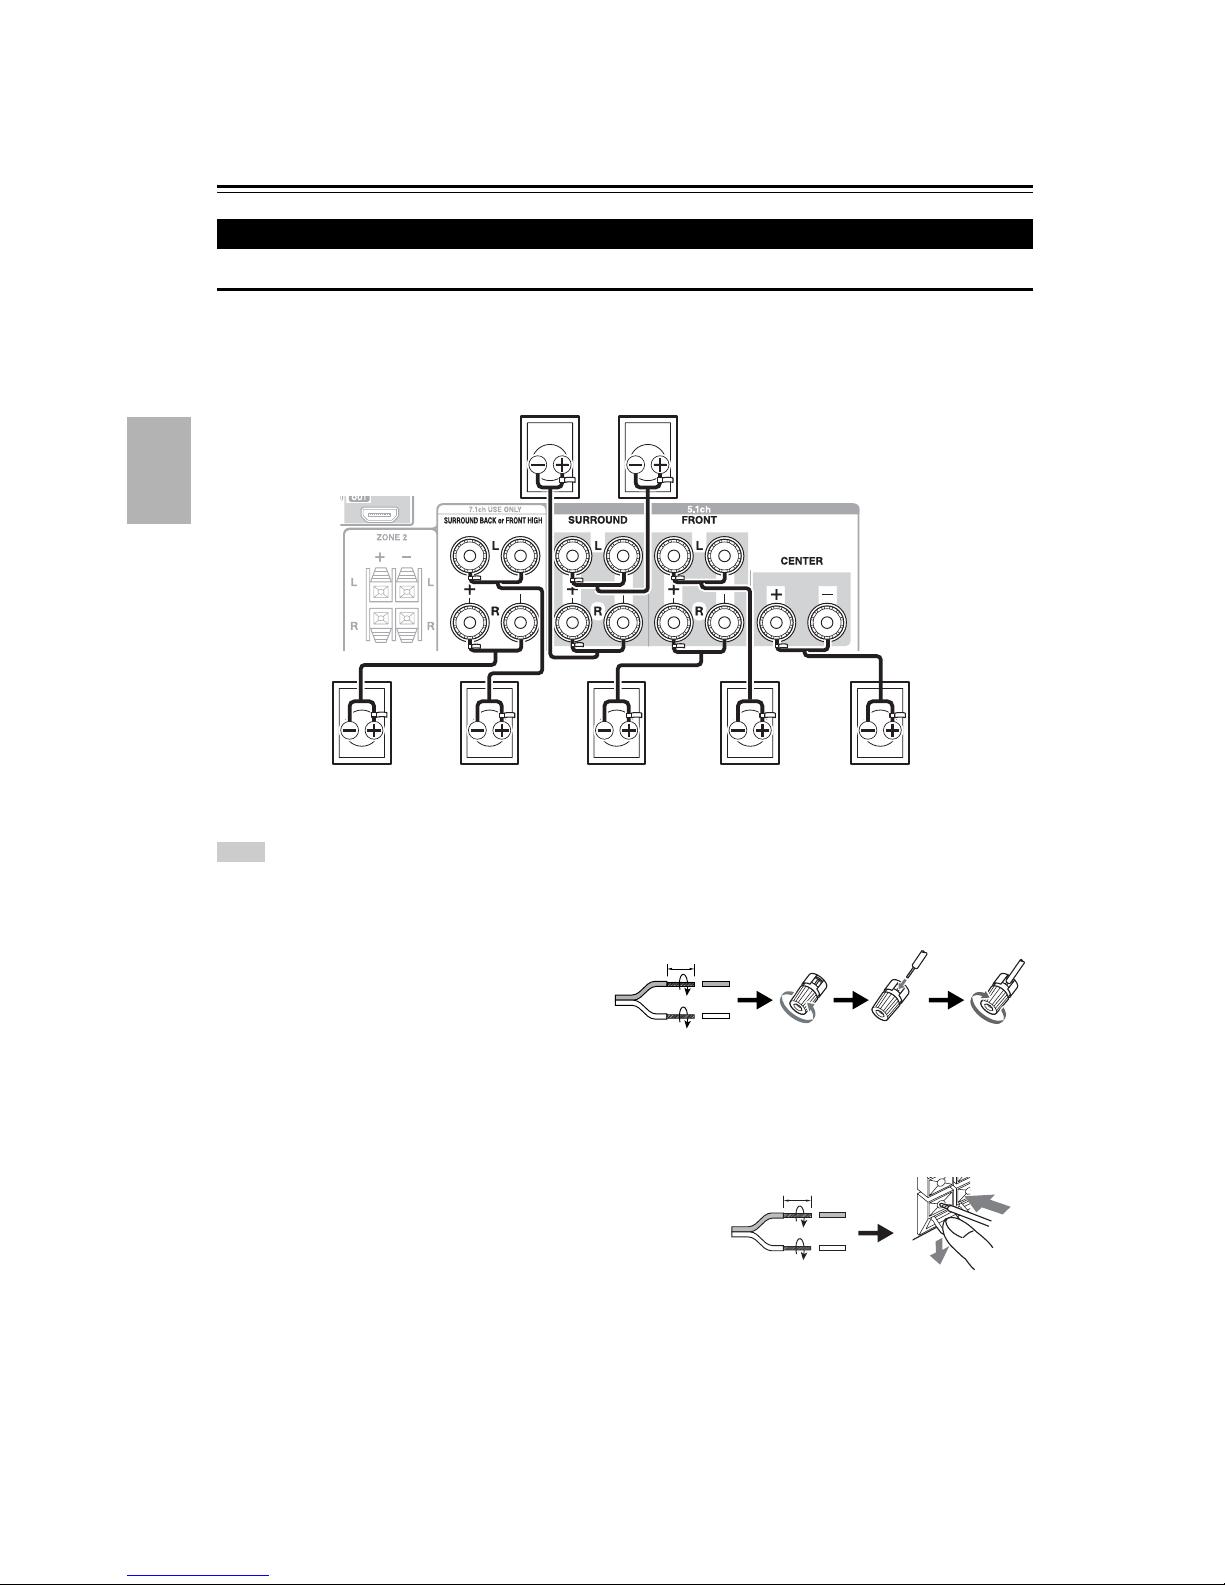
Connecting Your Speakers .......................................... 12
About AV Connections ................................................. 16
Connecting Components with HDMI ............................ 17
Connecting Your Components ..................................... 18
Connecting Onkyo uComponents ............................ 20
Connecting a Recording Component ........................... 20
Connecting the Antennas ............................................. 21
Connecting the Power Cord ......................................... 21
Turning On/Off the AV Receiver ................................... 22
Turning On ................................................................... 22
Turning Off ................................................................... 22
Playback.......................................................................... 23
Selecting the Language for the Onscreen
Setup Menus.............................................................. 23
Playing the Connected Component.............................. 23
Controlling Contents of USB or Network Devices ........ 23
Understanding Icons on the Display............................. 24
Playing an iPod/iPhone via USB .................................. 24
Playing a USB Device .................................................. 25
Listening to Internet Radio ........................................... 25
Playing Music Files on a Server ................................... 27
Remote Playback ......................................................... 27
Listening to AM/FM Radio ............................................ 28
Using Basic Functions .................................................. 31
Using the Automatic Speaker Setup ............................ 31
Using the Listening Modes ........................................... 34
Using the Home Menu.................................................. 40
Using the Sleep Timer.................................................. 40
Setting the Display Brightness ..................................... 40
Displaying Source Information ..................................... 41
Changing the Input Display .......................................... 41
Using the Music Optimizer ........................................... 41
Muting the AV Receiver................................................ 41
Using Headphones....................................................... 42
Recording ..................................................................... 42
Advanced Setup ............................................................. 43
On-screen Setup Menus............................................... 43
Common Procedures in Setup Menu ........................... 43
Input/Output Assign ...................................................... 44
Speaker Setup..............................................................45
Audio Adjust ................................................................. 49
Source Setup ................................................................ 50
Listening Mode Preset..................................................55
Miscellaneous ............................................................... 55
Hardware Setup............................................................56
Remote Controller Setup .............................................. 59
Lock Setup.................................................................... 59
Using the Audio Settings .............................................. 59
Zone 2.............................................................................. 61
Making Zone 2 Connections.........................................61
Controlling Zone 2 Components................................... 62
iPod/iPhone Playback via Onkyo Dock ........................63
Using the Onkyo Dock.................................................. 63
Controlling Your iPod/iPhone .......................................64
Controlling Other Components.....................................66
Preprogrammed Remote Control Codes ...................... 66
Looking up for Remote Control Code ........................... 66
Entering Remote Control Codes...................................66
Remote Control Codes for Onkyo Components
Connected via u...................................................... 67
Resetting REMOTE MODE Buttons .............................67
Resetting the Remote Controller .................................. 67
Controlling Other Components ..................................... 67
Troubleshooting .............................................................69
Network/USB Features................................................... 75
Firmware Update ............................................................ 78
Connection Tips and Video Signal Path ...................... 81
About HDMI..................................................................... 83
Using an RIHD-compatible TV, Player, or Recorder ... 84
Specifications ................................................................. 86
Video Resolution Chart.................................................. 87
Introduction
Connections
Turning On & Basic Operations
Advanced Operations
Controlling Other Components
Appendix
To reset the AV receiver to its factory defaults, turn
it on and, while holding down VCR/DVR, press
8ON/STANDBY (➔page 69).

6
En
Features
Amplifier
• 100 Watts/Channel @ 8 ohms (FTC)
• 160 Watts/Channel @ 6 ohms (IEC)
• 175 Watts/Channel @ 6 ohms (JEITA)
• Optimum Gain Volume Circuitry
• H.C.P.S. (High Current Power Supply) Massive High
Power Transformer
• Jitter Cleaning Circuit Technology
Processing
• THX Select2 Plus*1 Certified
• Incorporates Qdeo™*2 technology for HDMI Video
Upscaling (to 4K Compatible).
• HDMI (Audio Return Channel, 3D, DeepColor,
x.v.Color*3, Lip Sync, DTS*4-HD Master Audio,
DTS-HD High Resolution Audio, Dolby TrueHD*5,
Dolby Digital Plus, DSD and Multi-CH PCM)
• Dolby Pro Logic IIz*5 and Audyssey DSX™*6
• Non-Scaling Configuration
• A-Form Listening Mode Memory
• Direct Mode
• Pure Audio Mode (European, Australian and Asian
models)
• Music Optimizer*7 for Compressed Digital Music files
• 192 kHz/24-bit D/A Converters
• Powerful and Highly Accurate 32-bit Processing DSP
Connections
• 6 HDMI*8 Inputs (1 on front panel) and 1 Output
• Onkyo pfor System Control
• 4 Digital Inputs (2 Optical/2 Coaxial)
• Component Video Switching (2 Inputs/1 Output)
• Universal Port for the Dock for iPod®/iPhone®*9/HD
Radio™*10 tuner module (North American models)/
DAB+ tuner module (European, Australian and Asian
models)
• Banana Plug-Compatible Speaker Posts*11
• Powered Zone 2
• Bi-Amping Capability for FL/FR with SBL/SBR
• Analog RGB Video Input (D-sub 15) for PC
• Internet Radio Connectivity (SiriusXM Internet
Radio/vTuner/Last.fm/Pandora/Rhapsody/Slacker/
Mediafly/Napster)
*Services available may vary depending on the region.
• Network Capability for Streaming Audio Files*12
• Front-Panel USB Input for Memory Devices and
iPod®/iPhone®*9 models (Enables Display of Album
Artwork)
Miscellaneous
• 40 FM/AM Presets
• Audyssey 2EQ®*6 to correct room acoustic problems
• Audyssey Dynamic EQ®*6 for loudness correction
• Audyssey Dynamic Volume®*6 to maintain optimal
listening level and dynamic range
• Crossover Adjustment
(40/50/60/70/80/90/100/120/150/200 Hz)
• A/V Sync Control Function (up to 800 ms)
• Auto Standby Function
• On-Screen Display via HDMI
• Preprogrammed u-Compatible Remote

7
En
*1
THX and the THX logo are trademarks of THX Ltd. which
may be registered in some jurisdictions. All rights reserved.
*2 Qdeo and QuietVideo are trademarks of Marvell or its
affiliates.
*3 “x.v.Color” is a trademark of Sony Corporation.
*4
Manufactured under license under U.S. Patent #’s: 5,451,942;
5,956,674; 5,974,380; 5,978,762; 6,226,616; 6,487,535;
7,212,872; 7,333,929; 7,392,195; 7,272,567 & other U.S. and
worldwide patents issued & pending. DTS and the Symbol are
registered trademarks, & DTS-HD, DTS-HD Master Audio,
and the DTS logos are trademarks of DTS, Inc. Product
includes software.
© DTS, Inc. All Rights Reserved.
*5
Manufactured under license from Dolby Laboratories. Dolby,
Pro Logic, Surround EX and the double-D symbol are
trademarks of Dolby Laboratories.
*6
Manufactured under license from Audyssey Laboratories™,
Inc. U.S. and foreign patents pending. Audyssey 2EQ®,
Audyssey Dynamic EQ®, Audyssey Dynamic Volume®and
Audyssey DSX™ are registered trademarks and trademark of
Audyssey Laboratories, Inc.
*7 Music Optimizer™ is a trademark of Onkyo Corporation.
*8
“HDMI, the HDMI Logo, and High-Definition Multimedia
Interface are trademarks or registered trademarks of HDMI
Licensing LLC in the United States and other countries.”
*9
iPhone, iPod, iPod classic, iPod nano, iPod shuffle, and iPod
touch are trademarks of Apple Inc., registered in the U.S. and
other countries.
“Made for iPod” and “Made for iPhone” mean that an
electronic accessory has been designed to connect specifically
to iPod or iPhone, respectively, and has been certified by the
developer to meet Apple performance standards. Apple is not
responsible for the operation of this device or its compliance
with safety and regulatory standards.
Please note that the use of this accessory with iPod or iPhone
may affect wireless performance.
*10
HD Radio™, HD Radio Ready™, and the HD Radio Ready
logo are proprietary trademarks of iBiquity Digital
Corporation.
This HD Radio Ready™ receiver is ready to receive HD
Radio broadcasts when connected to the Onkyo UP-HT1 HD
Radio tuner module (sold separately).
*11 In Europe, using banana plugs to connect speakers to an audio
amplifier is prohibited.
*12 “DLNA®, the DLNA Logo and DLNA CERTIFIED™ are
trademarks, service marks, or certification marks of the
Digital Living Network Alliance.”
*12 Windows and the Windows logo are trademarks of the
Microsoft group of companies.
THX Select2 Plus
Before any home theater component can be THX Select2
Plus certified, it must pass a rigorous series of quality and
performance tests. Only then can a product feature the
THX Select2 Plus logo, which is your guarantee that the
Home Theater products you purchase will give you
superb performance for many years to come. THX
Select2 Plus requirements define hundreds of parameters,
including power amplifier performance, and pre-
amplifier performance and operation for both digital and
analog domains. THX Select2 Plus receivers also feature
proprietary THX technologies (e.g., THX Mode) which
accurately translate movie soundtracks for home theater
playback.

8
En
Front & Rear Panels
(North American and Taiwan models)
The page numbers in parentheses show where you can find the main explanation for each item.
a8ON/STANDBY button (22)
bZONE 2,OFF buttons (62)
cRemote control sensor (4)
dDisplay (9)
eLISTENING MODE buttons (34)
fDIMMER button (North American and Taiwan
models) (40)
gMEMORY button (29)
hTUNING MODE button (28)
iSETUP button (43)
jTUNING,PRESET (28 to 29), arrow and ENTER
buttons
kRETURN button
lMASTER VOLUME control and indicator (23)
mMUSIC OPTIMIZER button and indicator (North
American and Taiwan models) (41,60)
nPHONES jack (42)
oAUX INPUT HDMI jack (17)
pTONE and Tone Level buttons (59)
qInput selector buttons (23)
rDISPLAY button (41)
sVIDEO jack (18)
tUSB port (18)
uSETUP MIC jack (31)
vHDMI THRU indicator (57)
wPURE AUDIO button and indicator (European,
Australian and Asian models) (34)
xRT/PTY/TP button (European, Australian and
Asian models) (30)
Front Panel
qpsruv
t
no
m
abcdefghijkl
w x
(European, Australian and Asian models)

9
En
For detailed information, see the pages in parentheses.
aSpeaker/channel indicators
bZ2 (Zone 2) indicator (62)
cListening mode and format indicators (34,60)
d1,3and cursor indicators (24)
eNET indicator (25,58)
fTuning indicators
RDS indicator (excluding North American and
Taiwan models) (29)
AUTO indicator (28)
TUNED indicator (28)
FM STEREO indicator (28)
gAudio input indicators
hBi AMP indicator (15,46)
iAudyssey indicator (31,50)
Dynamic EQ indicator (50)
Dynamic Vol indicator (51)
jHeadphone indicator (42)
kMessage area
lMUTING indicator (41)
mVolume level (23)
nUSB indicator (24,25)
oSLEEP indicator (40,54)
Display
cb d fea g
jh k l m n
o
i

10
En
(North American, European, Australian and Asian models)
aDIGITAL IN COAXIAL and OPTICAL jacks
bCOMPONENT VIDEO IN and OUT jacks
cETHERNET port
dFM ANTENNA jack and AM ANTENNA terminal
ePC IN jack
fHDMI IN and OUT jacks
gPower cord (North American, European,
Australian and Asian models)
huREMOTE CONTROL jack
iComposite video and analog audio jacks
(BD/DVD IN,VCR/DVR IN and OUT,CBL/SAT
IN,GAME IN,PC IN,TV/CD IN)
jMONITOR OUT V jack
kZONE 2 LINE OUT jacks
lSUBWOOFER PRE OUT jacks
mUNIVERSAL PORT jack
nSPEAKERS terminals
(CENTER,FRONT,SURROUND,SURROUND
BACK or FRONT HIGH,ZONE 2)
oAC INLET (Taiwan models)
Rear Panel
ab fg
e
hijklm n
cd
o
(Taiwan models)
See “Connecting the AV Receiver” for connection
(➔pages 12 to 21).

11
En
Remote Controller
For detailed information, see the pages in parentheses.
a8RECEIVER button (22)
bREMOTE MODE/INPUT SELECTOR buttons
(23)
cArrow q/w/e/rand ENTER buttons
dSETUP button (43)
eListening Mode buttons (34)
fDIMMER button (40)
gMUTING button (41)
hDISPLAY button (41)
iVOL q/wbutton (23)
jRETURN button
kHOME button (40,59)
lSLEEP button (40)
■Controlling the tuner
To control the AV receiver’s tuner, press TUNER (or
RECEIVER).
You can select AM or FM by pressing TUNER
repeatedly.
aArrow q/wbuttons (28)
bD.TUN button (29)
cDISPLAY button
dCH +/– button (29)
eNumber buttons (29)
Controlling the AV Receiver
i
j
k
c
d
l
f
b
d
a
c
b
a
g
h
e
e
To control the AV receiver, press RECEIVER to
select Receiver mode.
You can also use the remote controller to control
Onkyo Blu-ray Disc/DVD player, CD player, and
other components.
See “Entering Remote Control Codes” for more
details (➔page 66).

12
En
Connections
Connecting the AV Receiver
Connecting the Speaker Cables
The following illustration shows which speaker should be connected to each pair of terminals. If you’re using only one
surround back speaker, connect it to the SURROUND BACK or FRONT HIGH L terminals.
Tip
• You can specify whether surround back or front high speakers are connected in the “Speaker Configuration” menu (➔page 46) or
during Audyssey 2EQ®Room Correction and Speaker Setup (➔page 31).
■Screw-type speaker terminals
Strip 1/2" to 5/8" (12 to 15 mm) of insulation from
the ends of the speaker cables, and twist the bare
wires tightly, as shown.
■Banana Plugs (North American models)
• If you are using banana plugs, tighten the speaker terminal before inserting the banana plug.
• Do not insert the speaker code directly into the center hole of the speaker terminal.
■Push-type speaker terminals
Strip 3/8" to 1/2" (10 to 12 mm) of insulation from the ends of the
speaker cables, and twist the bare wires tightly, as shown.
Connecting Your Speakers
Surround back/
Front high
right
Surround
left
Surround
right
CenterFront leftFront right
Surround back/
Front high
left
1/2" to 5/8" (12 to 15 mm)
3/8" to 1/2"(10 to 12 mm)

13
En
Speaker Configuration
The following table indicates the channels you should use
depending on the number of speakers that you have.
No matter how many speakers you use, a powered
subwoofer is recommended for a really powerful and solid
bass.
To get the best from your surround sound system, you
need to set the speaker settings automatically
(➔page 31) or manually (➔page 45).
*1 If you’re using only one surround back speaker, connect it to
the SURROUND BACK or FRONT HIGH L terminals.
*2 Front high and surround back speakers cannot be used at the
same time.
Attaching the Speaker Cable Labels
The speaker terminals are color-coded for identification
purpose.
The supplied speaker cable labels are also color-coded and
you should attach them to the positive (+) side of each
speaker cable in accordance with the table above. Then all
you need to do is to match the color of each label to the
corresponding speaker terminal.
Speaker Connection Precautions
Read the following before connecting your speakers:
•(North American and Taiwan models) You can
connect speakers with an impedance of between 6 and
16 ohms. If you use speakers with a lower impedance,
and use the amplifier at high volume levels for a long
period of time, the built-in amp protection circuit may be
activated.
•(European, Australian and Asian models) You can
connect speakers with an impedance of between 4 and
16 ohms. If the impedance of any of the connected
speakers is 4 ohms or more, but less than 6 ohms, be sure
to set the minimum speaker impedance to “4ohms”
(➔page 46). If you use speakers with a lower
impedance, and use the amplifier at high volume levels
for a long period of time, the built-in protection circuit
may be activated.
• Disconnect the power cord from the wall outlet before
making any connections.
• Read the instructions supplied with your speakers.
• Pay close attention to speaker wiring polarity. In other
words, connect positive (+) terminals only to positive (+)
terminals, and negative (–) terminals only to negative (–)
terminals. If you get them the wrong way around, the
sound will be out of phase and will sound unnatural.
• Unnecessarily long, or very thin speaker cables may
affect the sound quality and should be avoided.
• Be careful not to short the positive and negative wires.
Doing so may damage the AV receiver.
• Make sure the metal core of the wire does not have
contact with the AV receiver’s rear panel. Doing so may
damage the AV receiver.
Numberofchannels 2345677
Front speakers ✔✔✔✔✔✔✔
Center speaker ✔✔✔✔✔
Surround speakers ✔✔✔✔✔
Surround back speaker*1*2 ✔
Surround back speakers*2 ✔
Front high speakers*2 ✔
Speaker Color
Front left, Front high left, Zone 2 left White
Front right, Front high right, Zone 2 right Red
Center Green
Surround left Blue
Surround right Gray
Surround back left Brown
Surround back right Tan

14
En
• Don’t connect more than one cable to each speaker terminal. Doing so may damage the AV receiver.
• Don’t connect one speaker to several terminals.
Using Dipole Speakers
You can use dipole speakers for the surround and surround back speakers. Dipole
speakers output the same sound in two directions.
Dipole speakers typically have an arrow printed on them to indicate how they should be
positioned. The surround dipole speakers (A) should be positioned so that their arrows
point toward the TV/screen, while the surround back dipole speakers (B) should be
positioned so that their arrows point toward each other, as shown.
Using a Powered Subwoofer
To find the best position for your subwoofer, while playing a
movie or some music with good bass, experiment by placing
your subwoofer at various positions within the room, and
choose the one that provides the most satisfying results.
You can connect the powered subwoofer with two
SUBWOOFER PRE OUT jacks respectively.
The same signal is output from each jack.
Tip
• If your subwoofer is unpowered and you’re using an external
amplifier, connect the subwoofer pre out jack to an input on the
amplifier.
BB
AA
TV/screen
LINEINPUT
LINEINPUT
LINE INPUT
LINE INPUT
Powered subwoofer
Corner
position
1/3 of wall
position

15
En
Bi-amping the Front Speakers
Bi-amping provides improved bass and treble performance.
When bi-amping is used, the AV receiver is able to drive up
to a 5.1 speaker system in the main room.
Once you’ve completed the bi-amping connections as shown
and turned on the AV receiver, you must set the speaker
setting to enable bi-amping (➔page 46).
Important:
• When making the bi-amping connections, be sure to remove the
jumper bars that link the speakers’ tweeter (high) and woofer
(low) terminals.
• Bi-amping can be used only with speakers that support bi-
amping. Refer to your speaker manual.
Woofer (low)
Tweeter (high)
Front right Front left

16
En
Connecting AV components
• Before making any AV connections, read the manuals supplied with your AV components.
• Don’t connect the power cord until you’ve completed and double-checked all AV connections.
• Push plugs in all the way to make good connections (loose connections can cause noise or
malfunctions).
• To prevent interference, keep audio and video cables away from power cords and speaker cables.
AV Cables and Jacks
*Available sampling rate for PCM input signal is 32/44.1/48/88.2/96 kHz. In case of an HDMI connection, 176.4/192 kHz is also
available.
Note
• The AV receiver does not support SCART plugs.
• The AV receiver’s optical digital jacks have shutter-type covers that open when an optical plug is inserted and close when it’s removed.
Push plugs in all the way.
Caution
• To prevent shutter damage, hold the optical plug straight when inserting and removing.
About AV Connections
Signal Cable Jack Description
Video and
Audio
HDMI HDMI connections can carry digital video and audio.
Video Component video Component video separates the luminance (Y) and color
difference signals (PB, PR), providing the best picture
quality (some TV manufacturers label their component
video sockets slightly differently).
Analog RGB This is a conventional analog interface to connect a PC and
a display device (also called D-Sub or D-subminiature).
Composite video Composite video is commonly used on TVs, VCRs, and
other video equipment.
Audio Optical digital
audio
Optical digital connections allow you to enjoy digital
sound such as PCM*, Dolby Digital or DTS. The audio
quality is the same as coaxial.
Coaxial digital
audio
Coaxial digital connections allow you to enjoy digital
sound such as PCM*, Dolby Digital or DTS. The audio
quality is the same as optical.
Analog audio
(RCA)
Analog audio connections (RCA) carry analog audio.
HDMI cable Other cables
: Video & Audio : Video
: Audio
Game console
Blu-ray Disc/
DVD player
TV, projector, etc. Game console
Blu-ray Disc/
DVD player
TV, projector, etc.
AV receiverAV receiver
Right!
Wrong!
HDMI
Y
PB
PR
Green
Blue
Red
V
Yellow
OPTICAL
Orange
L
R
White
Red

17
En
Connect your components to the appropriate jacks. The default input assignments are shown below.
✔: Assignment can be changed (➔page 44).
See also:
• “Connection Tips and Video Signal Path” (➔page 81)
• “About HDMI” (➔page 83)
• “Using an RIHD-compatible TV, Player, or Recorder” (➔page 84)
■Audio Return Channel (ARC) function
Audio Return Channel (ARC) function enables an HDMI capable TV to send the audio stream to the HDMI OUT of the
AV receiver.
• This function can be used when:
– your TV is ARC capable, and
–theTV/CD input selector is selected, and
–“HDMI Control (RIHD)” is set to “On”(➔page 56), and
–“Audio Return Channel” is set to “Auto” (➔page 57).
Tip
• To listen to audio received by the HDMI IN jacks through your TV’s speakers:
– Set the “HDMI Control (RIHD)” setting to “On” (➔page 56) for an p-compatible TV.
– Set the “Audio TV Out” setting to “On” (➔page 57) when the TV is not compatible with p, or the “HDMI Control
(RIHD)” setting to “Off”.
– Set your Blu-ray Disc/DVD player’s HDMI audio output setting to PCM.
– To listen to TV audio through the AV receiver, see “Connecting Your Components” (➔page 18).
Note
• When listening to an HDMI component through the AV receiver, set the HDMI component so that its video can be seen on the TV
screen (on the TV, select the input of the HDMI component connected to the AV receiver). If the TV power is off or the TV is set to
another input source, this may result in no sound from the AV receiver or the sound may be cut off.
• As the “Audio TV Out” setting is set to “On” (➔page 57) to hear from your TV speakers, the sound will also be output from the AV
receiver’s speakers if you adjust the volume of the AV receiver. Similarly, as the “HDMI Control (RIHD)” setting is set to “On”
(➔page 56) to hear from the speakers of an p-compatible TV, the AV receiver’s speakers will produce sound if you adjust
the volume of the AV receiver, while the TV speakers will be muted. To stop the AV receiver’s speakers from producing sound, you
can either change the settings on the AV receiver or on the TV, or turn down the volume of the AV receiver.
Connecting Components with HDMI
Jack Components Assignable
Input HDMI IN 1 Blu-ray Disc/DVD player ✔
HDMI IN 2 VCR or DVD recorder/Digital Video Recorder ✔
HDMI IN 3 Satellite/cable set-top box, etc. ✔
HDMI IN 4 Game console ✔
HDMI IN 5 Personal computer ✔
AUX INPUT HDMI Camcorder
Output HDMI OUT TV, projector, etc.
Game console
VCR or DVD recorder/Digital Video Recorder
TV, projector,
etc.
Satellite/cable set-top box, etc.
Blu-ray Disc/DVD player
Camcorder
Personal computer

18
En
Connect your components to the appropriate jacks. The default input assignments are shown below. See “Connection
Tips and Video Signal Path” for more information (➔page 81).
✔: Assignment can be changed (➔page 45).
Note
*1 Do not connect the AV receiver’s USB port to a USB port on your computer. Music on your computer cannot be played through the
AV receiver in this way.
*2 When you connect your personal computer to PC IN and select the PC input selector, the video of the personal computer is output
from HDMI OUT. However, if you have assigned HDMI IN to the PC input selector, the AV receiver will output signals received
from HDMI IN instead of signals from PC IN. To have the signals output from PC IN, select “-----” for “PC” in the “HDMI
Input” setting (➔page 44).
*3 Connect a turntable (MM) that has a phono preamp built-in. If your turntable (MM) doesn’t have it, you’ll need a commercially
available phono preamp.
If your turntable has a moving coil (MC) type cartridge, you’ll need a commercially available MC head amp or MC transformer as
well as a phono preamp. See your turntable’s manual for details.
Connecting Your Components
The on-screen setup menus appear only on a TV that is connected to the HDMI OUT. If your TV is connected to
the MONITOR OUT V or the COMPONENT VIDEO OUT, use the AV receiver’s display when changing settings.
No. Jack/Port Components Assignable
AUSB, VIDEO iPod/iPhone (video playback)
BUSB*1 iPod/iPhone, MP3 player, USB flash drive
CDIGITAL IN OPTICAL 1 (GAME) Game console ✔
2 (TV/CD) TV, CD player ✔
COAXIAL 1 (BD/DVD) Blu-ray Disc/DVD player ✔
2 (CBL/SAT) Satellite/cable set-top box, RI dock, etc. ✔
DCOMPONENT
VIDEO
IN 1 (BD/DVD) Blu-ray Disc/DVD player, RI dock ✔
IN 2 (CBL/SAT) Satellite/cable set-top box, RI dock, etc. ✔
OUT TV, projector, etc.
EETHERNET Router
FMONITOR OUT TV, projector, etc.
BD/DVD IN Blu-ray Disc/DVD player
VCR/DVR IN VCR or DVD recorder/digital video recorder, RI
dock
CBL/SAT IN Satellite/cable set-top box, etc.
GAME IN Game console, RI dock
PC IN Personal computer
TV/CD IN TV, CD player, cassette tape deck, MD, CD-R,
Turntable*3, RI dock
GPC IN*2 Personal computer
HUNIVERSAL PORT Universal port option dock (UP-A1 etc.)
BA DCFHE G

19
En
• With connection C, you can enjoy Dolby Digital and DTS. (To record or listen the audio in Zone 2 as well, use Cand
F.)
• With connection F, you can listen to and record audio from external components while you are in Zone 2.
• With connection F, if your Blu-ray Disc/DVD player has both the main stereo and multichannel outputs, be sure to
connect to the main stereo.
■How to record a video source
With the connections described above, you cannot record the videos through the AV receiver. See “Recording” about
connections for video recording (➔page 42).

20
En
With u(Remote Interactive), you can use the following
special functions:
■System On/Auto Power On
When you start playback on a component connected via
uwhile the AV receiver is on Standby, the AV
receiver will automatically turn on and select that
component as the input source.
■Direct Change
When playback is started on a component connected via
u, the AV receiver automatically selects that
component as the input source.
■Remote Control
You can use the AV receiver’s remote controller to
control your other u-capable Onkyo components,
pointing the remote controller at the AV receiver’s
remote control sensor instead of the component. You
must enter the appropriate remote control code first
(➔page 67).
Note
•Useonlyucables for uconnections. ucables are supplied
with Onkyo components.
• Some components have two ujacks. You can connect either
one to the AV receiver. The other jack is for connecting
additional u-capable components.
• Connect only Onkyo components to ujacks. Connecting other
manufacturer’s components may cause a malfunction.
• Some components may not support all ufunctions. Refer to
the manuals supplied with your Onkyo components.
• While Zone 2 is on, the System On/Auto Power On and Direct
Change ufunctions do not work.
See “Recording” for details on recording (➔page 42). Note
• The AV receiver must be turned on for recording. Recording is
not possible while it’s in standby mode.
• If you want to record directly from your TV or playback VCR to
the recording VCR without going through the AV receiver,
connect the TV/VCR’s audio and video outputs directly to the
recording VCR’s audio and video inputs. See the manuals
supplied with your TV and VCR for details.
• Video signals connected to composite video inputs can be
recorded only via composite video outputs. For example, if your
TV/VCR is connected to a composite video input, the recording
VCR must be connected to a composite video output.
• The surround sound and DSP listening modes cannot be
recorded.
• Copy-protected Blu-ray Discs and DVDs cannot be recorded.
• Sources connected to a digital input cannot be recorded. Only
analog inputs can be recorded.
• DTS signals will be recorded as noise, so don’t attempt analog
recording of DTS CDs or LDs.
•(European, Australian and Asian models) While the listening
mode is set to Pure Audio, the video circuitry is turned off and
therefore no video signals are processed. If you want to make
recordings, select another listening mode.
Connecting Onkyo uComponents
1Make sure that each Onkyo component is
connected with an analog audio cable (connection
Fin the hookup examples) (➔page 18).
2Make the uconnection (see the illustration).
3If you’re using an RI Dock, or cassette tape deck,
change the Input Display (➔page 41).
LR
ANALOG
AUDIO OUT
LR
ANALOG
AUDIO OUT
e.g., CD player
RI Dock
Connecting a Recording Component
AUDIO
IN
LR
VIDEO
IN
VCR, DVD recorder,
cassette tape deck,
CDR, MD recorder, etc.

21
En
This section explains how to connect the supplied indoor FM antenna and AM loop antenna.
The AV receiver won’t pick up any radio signals without any antenna connected, so you must connect the antenna to use
the tuner.
Note
• Once your AV receiver is ready for use, you’ll need to tune into a radio station and position the antenna to achieve the best possible
reception.
• Keep the AM loop antenna as far away as possible from your AV receiver, TV, speaker cables, and power cords.
Tip
• If you cannot achieve good reception with the supplied indoor FM antenna, try a commercially available outdoor FM antenna instead.
• If you cannot achieve good reception with the supplied indoor AM loop antenna, try using it with a commercially available outdoor
AM antenna.
Note
• Before connecting the power cord, connect all of your
speakers and AV components.
• Turning on the AV receiver may cause a momentary power
surge that might interfere with other electrical equipment on the
same circuit. If this is a problem, plug the AV receiver into a
different branch circuit.
• Do not use a power cord other than the one supplied with the AV
receiver. The supplied power cord is designed exclusively for
use with the AV receiver and should not be used with any other
equipment.
• Never disconnect the power cord from the AV receiver while the
other end is still plugged into a wall outlet. Doing so may cause
an electric shock. Always disconnect the power cord from the
wall outlet first, and then the AV receiver.
Connecting the Antennas
Connecting the Power Cord
Thumbtacks, etc.
Insert the plug fully
into the jack.
Insert the plug fully
into the jack.
North American and
Taiwan models
European, Australian and
Asian models
Push. Insert wire. Release.
Assembling the AM loop antenna
Indoor FM antenna (supplied)AM loop antenna (supplied)
Caution
• Be careful not to injure yourself when using
thumbtacks.
1(Taiwan models)
Connect the supplied power cord to the AV
receiver’s AC INLET.
2Plug the power cord into an AC wall outlet.
To AC wall outlet

22
En
Turning On & Basic Operations
Turning On/Off the AV Receiver
Tip
• For details on power management settings, see “Auto Standby” (➔page 57).
Turning On
1Press 8ON/STANDBY on the front panel.
or
Press RECEIVER followed by 8RECEIVER on the remote controller.
The AV receiver comes on, the display lights.
Turning Off
1Press 8ON/STANDBY on the front panel.
or
Press RECEIVER followed by 8RECEIVER on the remote controller.
The AV receiver will enter standby mode. To prevent any loud surprises when you turn on the AV receiver, always
turn down the volume before you turn it off.
8RECEIVER
RECEIVER
8ON/STANDBY
Other manuals for TX-NR609
4
Table of contents
Other Onkyo Receiver manuals

Onkyo
Onkyo TX-SR706 - AV Receiver Manual

Onkyo
Onkyo TX-NR1008 Specification sheet

Onkyo
Onkyo TX-SR502 User manual

Onkyo
Onkyo TX-RZ730 Manual

Onkyo
Onkyo TX-NR709 User manual

Onkyo
Onkyo RFR-5 User manual

Onkyo
Onkyo HT-S5600 Mounting instructions

Onkyo
Onkyo CS-V720S - Micro System User manual

Onkyo
Onkyo HT-S9405THX Specification sheet

Onkyo
Onkyo TX-NR5008 User manual

Onkyo
Onkyo TX-NR838 User manual

Onkyo
Onkyo HT-R510 User manual

Onkyo
Onkyo HT-R490 User manual

Onkyo
Onkyo TX-NR709 User manual

Onkyo
Onkyo TX-SR508 User manual

Onkyo
Onkyo TX-NR3008 User manual

Onkyo
Onkyo TX-RZ800 User manual

Onkyo
Onkyo CNP-1000 User manual

Onkyo
Onkyo TX-NR525 User manual

Onkyo
Onkyo TX-RZ50 User manual