OPCOM Farm GrowBox User manual

User Manual
Version 2.0

WELCOME
Thank you for purchasing your OPCOM Farm GrowBox. Please follow this User
Manual to assemble your GrowBox and plant your first garden.
This manual is a guideline to help you quickly learn the basics on how to plant with
OPCOM Farm GrowBox. Final results may change according to the varietal of seeds
used, plant selection, and your indoor environment.
Your GrowBox will do much of the work and save your time in the process of
growing a crop of up to 50 plants. It is a tool to grow plants from seeds to harvest,
simply and in a clean environment. Have peace of mind that your food is grown in a
pollution and pesticide free environment under your control.
OPCOM Farm GrowBox helps automate the process of taking care of your plants
during their growth stages. With attention from you and a bit of experimentation,
you will quickly find out how to achieve the gardening result you want. For more
product information, to register your OPCOM Farm membership, to receive updates
on new products, and to purchase supplies and seeds, please visit our
website: www.opcomfarm.com
OPCOM Farm developed our line of indoor gardens in dedication to a healthy
environment with safe food. We invite you to become a professional indoor
hydroponic farmer!
Enjoy Your OPCOM Farm!
GrowBoxUser Manual

GrowBox
User Manual
Page
Contents
A: Assembly.......................................................................................................1
1-1. ~ 1-3 Accessories..............................................................................1
1-4. Grow kit................................................................................................2
1-5. Planting Accessories.........................................................................2
1-6. Manual..................................................................................................2
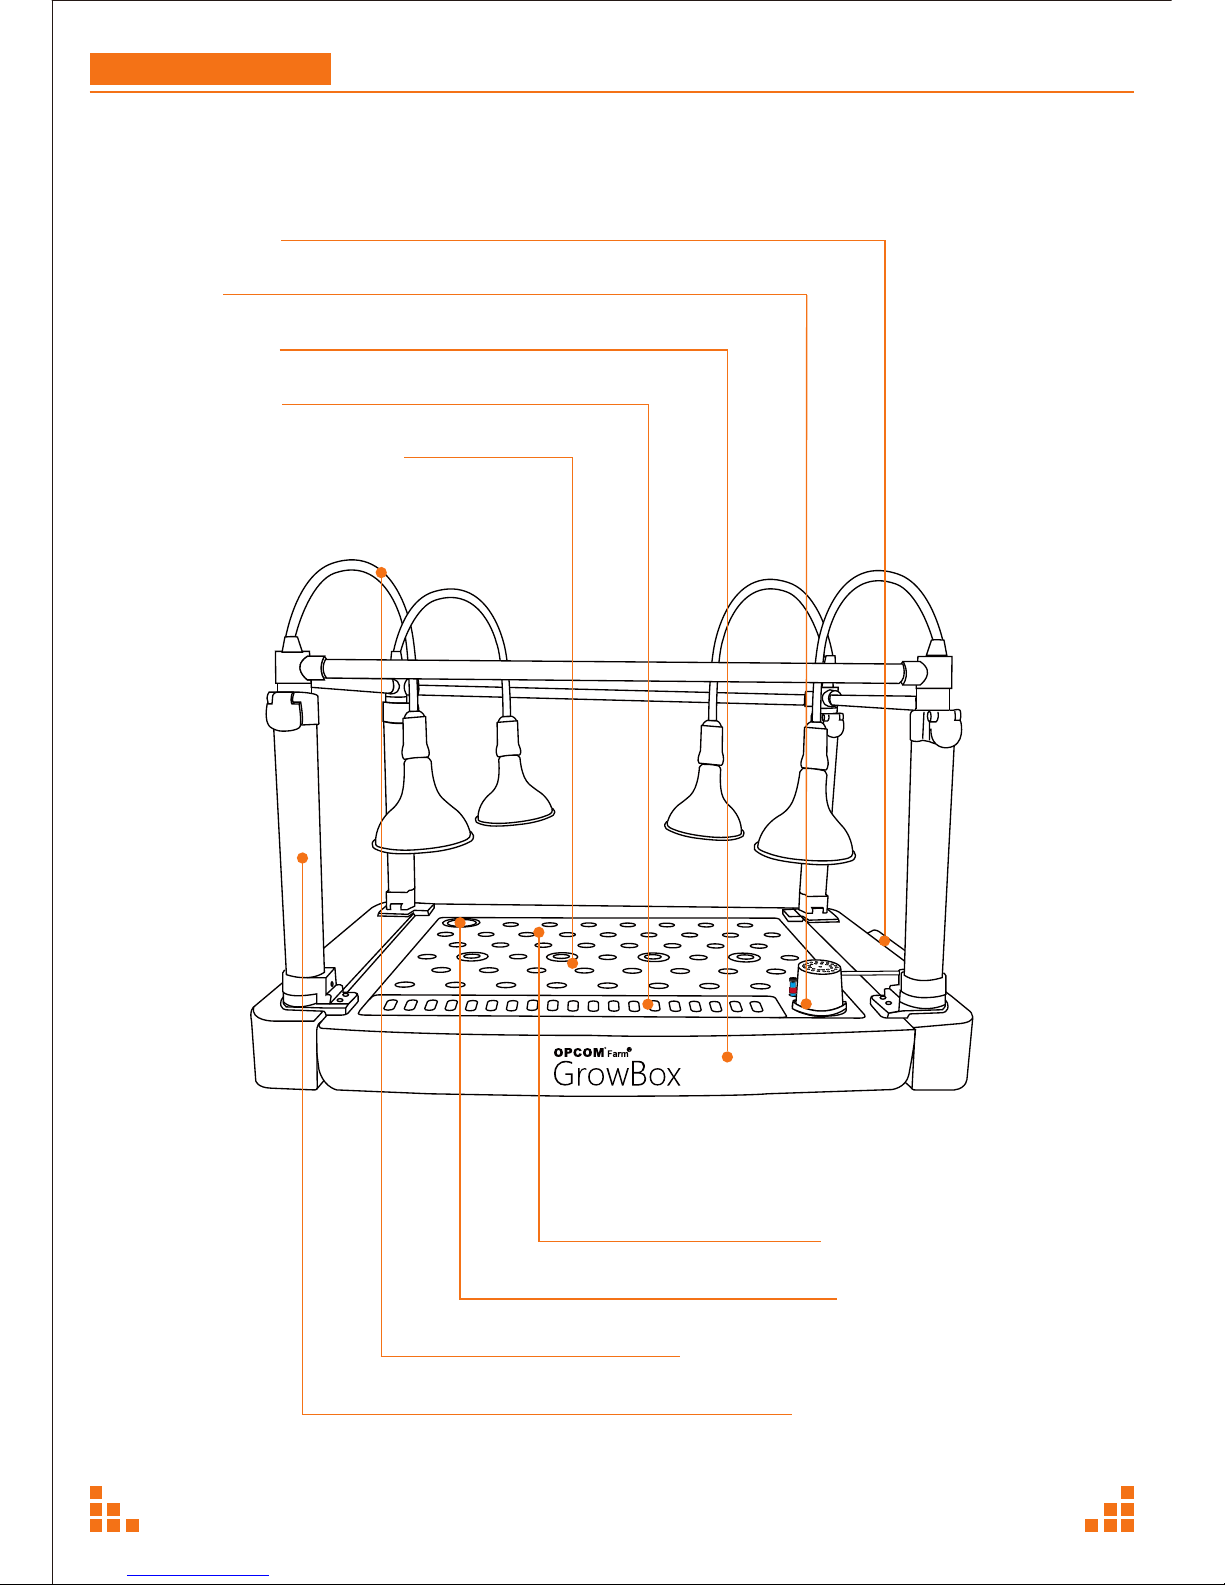
2. Description...............................................................................................3
3. !Caution.................................................................................................4
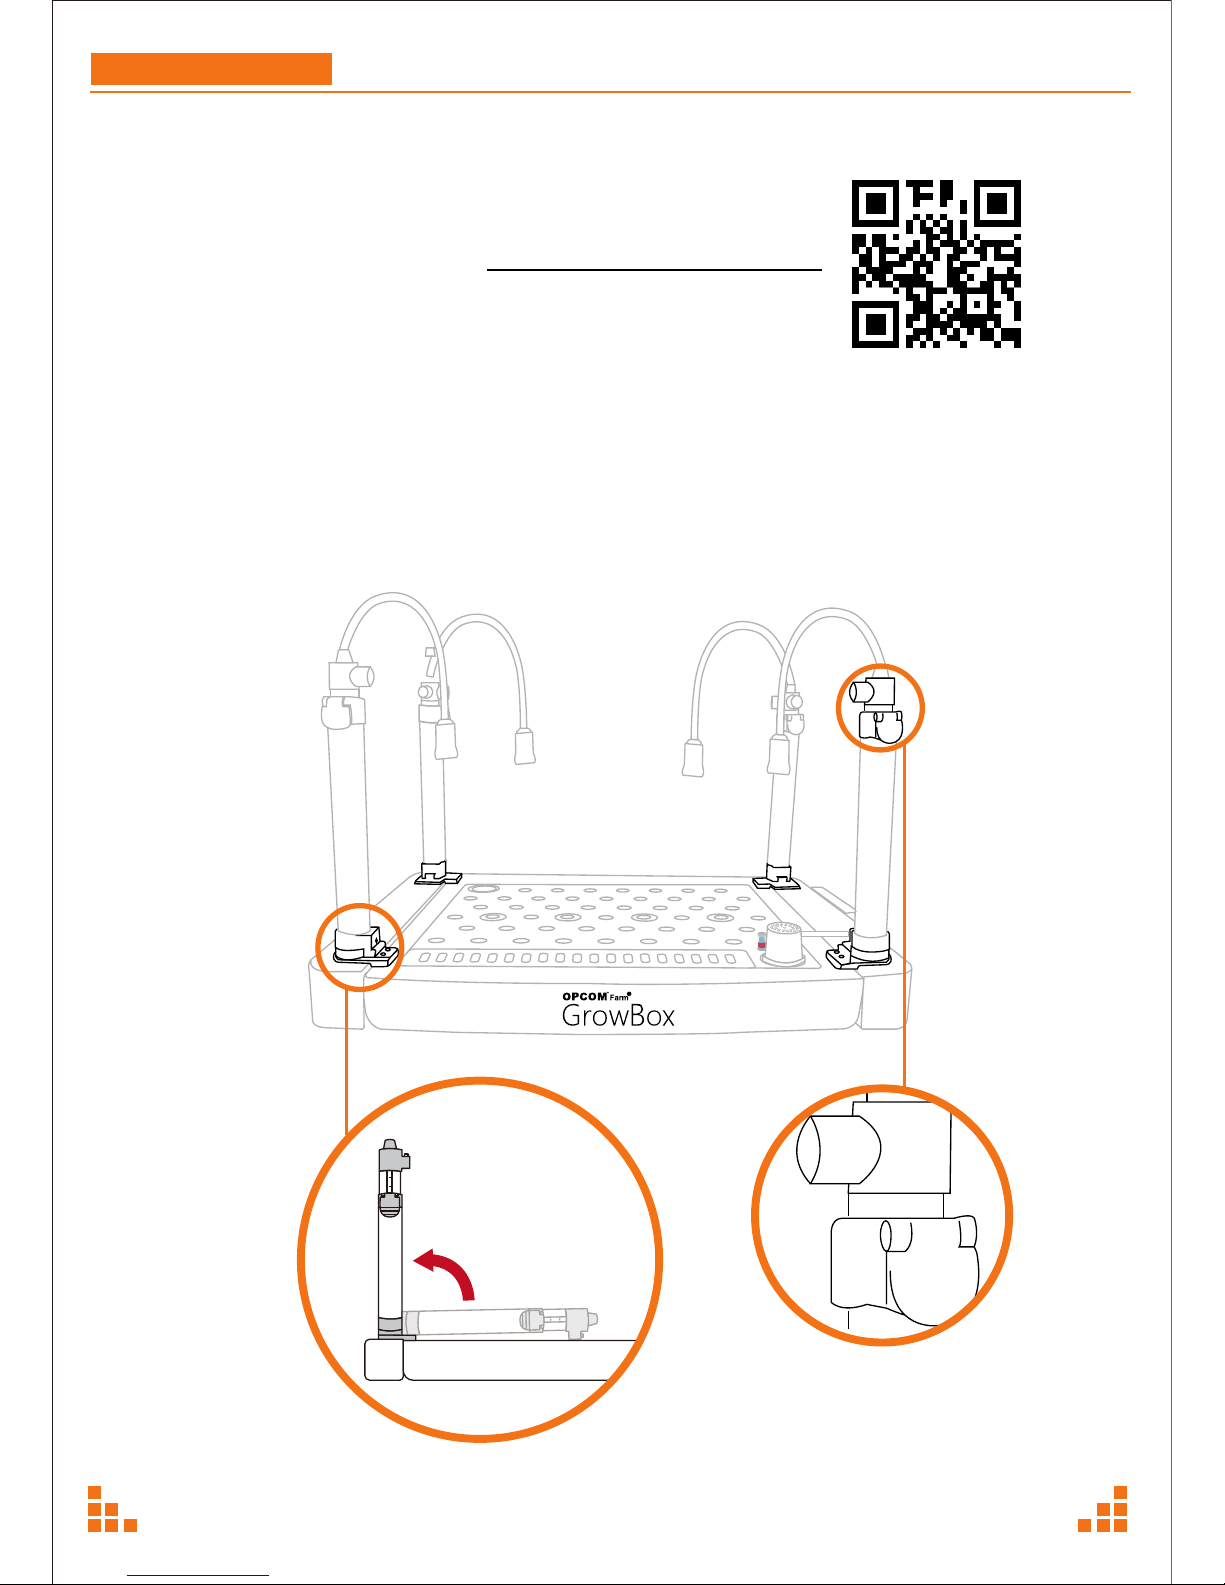
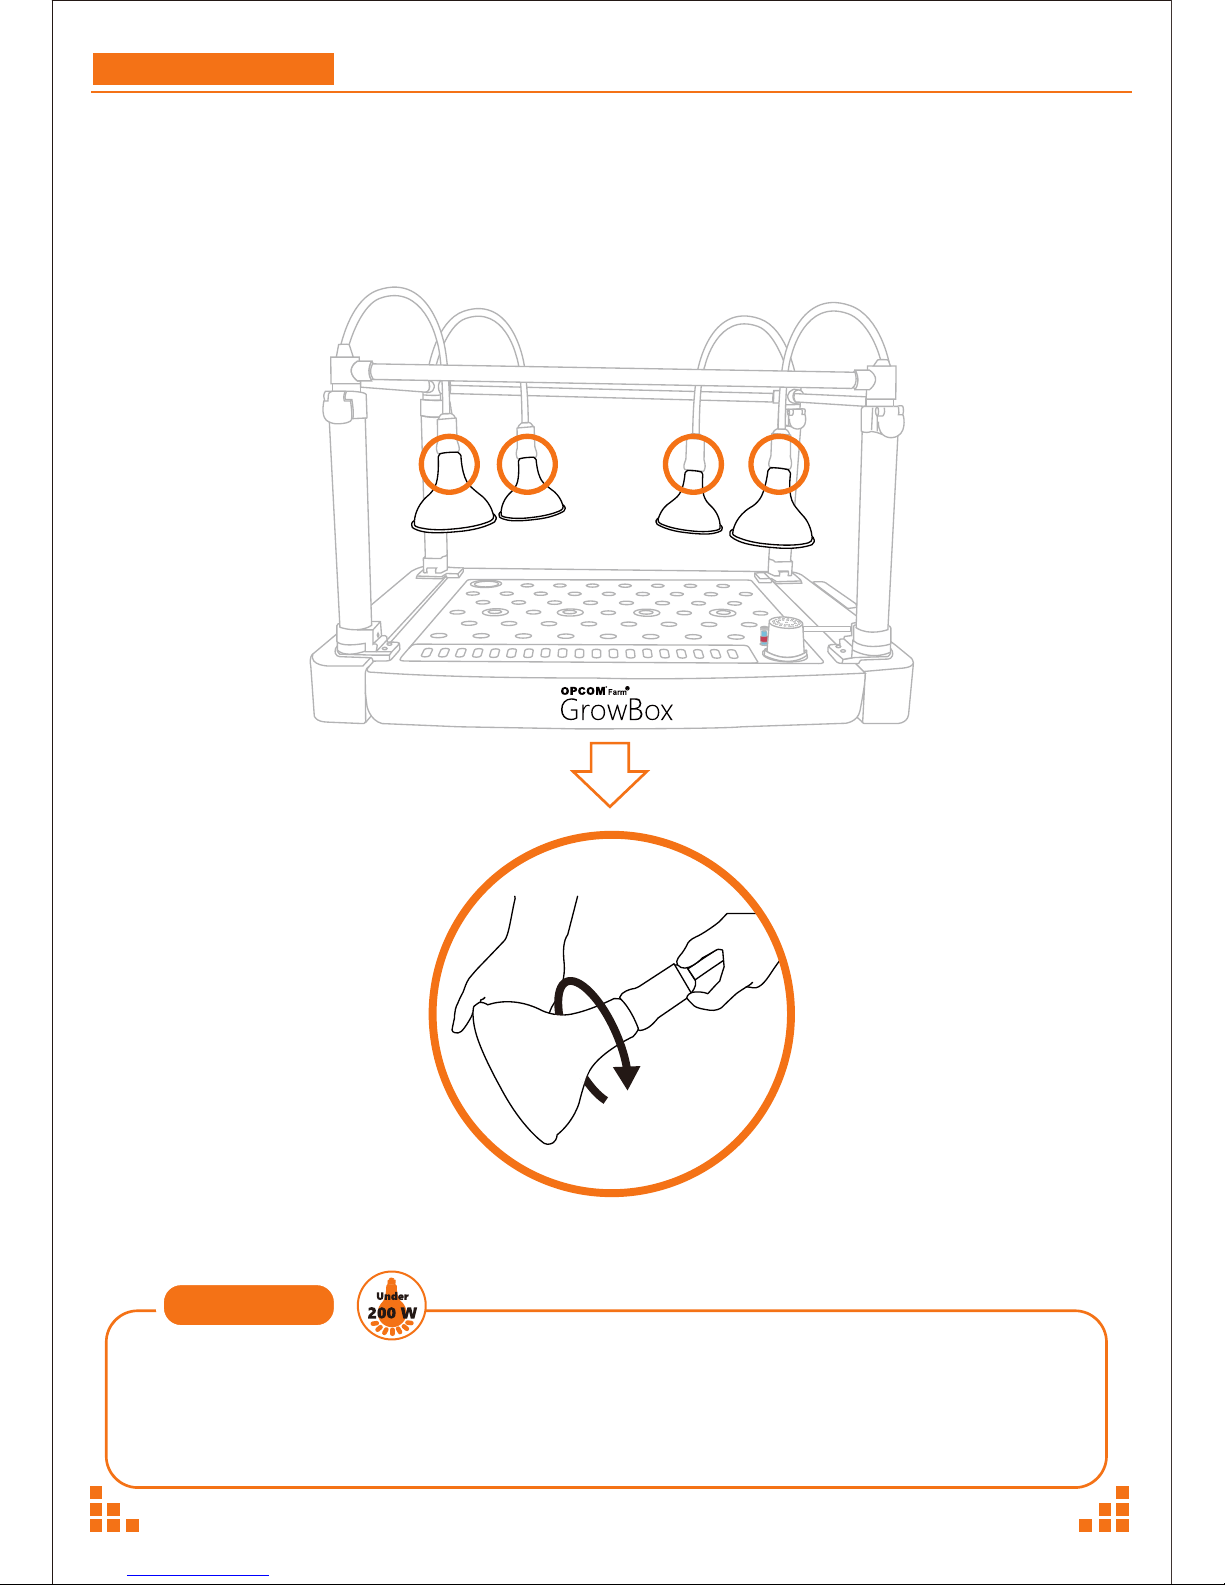
4. Set up Process.........................................................................................5
5. Preparing..................................................................................................8
B: Planting.......................................................................................................10
B1. Sowing Stage.....................................................................................10
B2. Seedling Stage..................................................................................12
B3. Growing Stage...................................................................................15
B4. Grow to Harvest................................................................................15
C: Optional......................................................................................................18
C1. Regrowing..........................................................................................18
C2. Growing Sprouts...............................................................................19
C3. Climbing Plants..................................................................................21
C4. Insect Protection...............................................................................22
D: Maintenance............................................................................................23
D1. Change Water..................................................................................23
D2. Check EC & pH................................................................................25
D3. EC / pH Meter Use and Calibration............................................26
E: .....................................................................................................................27
E1. Troubleshooting...............................................................................27
E2. GrowBox Q&A................................................................................28
Register with OPCOM...................................................................................29

GrowBoxUser Manual
A: Assembly:
Please check all accessories listed here before starting setup.
Growing Plate
(OANS01A)
Pump
(OAEE01A)
Water Filter
(OAMS01A)
P1
6
18W LED Growth Lamp
(L18B) x 4
(OAEE02A)
4
Climbing Tube Holder x 1
(OANS04A)
Dosing Cup
(OANS01A)
Water Level Indicator
(OANS03A)
2
Short Support Tube x 2
(OAAS02A)
1
Long Support Tube x 2
(OAAS01A)
5
Climbing Tube x 4
(OANS05A)
1-2. Lighting support kit
1-3. Climbing tube kit
3
Screw pack
(Screw Φ4 x 10mm x 8
& Screwdriver x 1)
(OAAS03A)
!
1-1. Main Body - pre-assembled parts
Control Box
(OAEE08A)

!Note
• We recommend keeping seed capsules refrigerated around (5°C / 41°F) with over 30% humidity after opening.
• Please use dry hands when taking out seed capsules.
•
Use OPCOM Farm grow kit supplies for best results. OPCOM cannot guarantee the results of seeds from other sources.
• A germination rate of seeds of 70% ± 10% is normal (depending on varietal of plant).
GrowBoxUser Manual
P2
Please check all accessories listed here before starting setup.
Insect Net
(OAAS05A)
Draining Tube x 1
(OAAS06A)
Quick Guide Manual
Sprout Cover
(OAAS04A)
Sprouting Sponges x 12
(OAMS02A)
Seedling Sponge (60 x 4)
(OAMS10A)
8 9
1-5 Planting Accessories
1-4 Grow Kit
Nutrient Starter Cup 15(±2)g x 3
(OAMS03A)
Nutrient Adjuster Cup 5(±1)g x 12
(OAMS04A)
7-C 7-D
7-A
pH+/- Capsules
(OAMS05A,OAMS06A)
7-F
EC and pH Meter Set with Bag
(OAEE03A,OAEE04A)
Tweezers
(OANS12A)
7-G
7-H
Seeds Capsules (105 pcs / per bottle)
Green Lettuce,Red Leaf Lettuce,Basil
(OSLT01A,OSLT02A,OSHB01A)
7-B
7-E
EC pH
75 seed capsules
Seed Capsules
Basil
Basil
OSHB01A
75 seed capsules
Seed Capsules
Red Leaf Lettuce
Red Leaf Lettuce
OSLT02A
75 seed capsules
Seed Capsules
OSLT01A
Lettuce
10 11
1-6 Manual
Warranty Card
12
Quick Guide
Manual
13
Optional
Accessories Kit
14
Planting Q&A
15
Replacement Filters x 3
(OAMS01A)
Optional Accessories Kit Planting Q&A

GrowBoxUser Manual
P3
2. Description
Growing Plate
Dosing Hole
Adjustable Lamp Holder x 4
Support Arms x 4
Control Box
Pump
Water Tank
Sprout Area
Climbing Tube Holes x 4

User Manual GrowBox
Keep indoors
at room temperature
41-90 °F (15-32°C).
Designed for
indoor use only.
Please use LED Growth Lamps
under 200W. Unplug unit
when changing LED Growth Lamps.
To avoid electric shock,
do not touch plugged-in
appliance while in contact
with faucet or water line.
Unplug unit if not in use.
Do not stack.
Mind children's use of unit,
and ensure that plant
nutrition and other supplies
are not ingested.
Place on stable surface
before assembly and
operation. Two people are
required to lift the unit.
The surface must support
70lbs, the weight of the
unit and water.
Keep away from fire
and chemicals.
P4
°C
°F
30%-85%RH
Under
200W
! 3. Caution

4. Set up Process
Please visit the GrowBox page at www.opcomfarm.com/growbox,
or scan the QR code on the right, to watch the assembly video.
Step 1. Using two people, remove the main unit from the box.
Pick up the unit from the bottom side and place on a flat surface.
Step 2. Raise the four Support Arms straight up.1.
GrowBoxUser Manual
P5
Ensure all 4 Arms are in their lowest
position by opening the lever,
checking that it is in the lowest
position, and locking the lever.

GrowBoxUser Manual
P6
Insert tubes into sockets, ensuring
that the holes line up. Use the
included screws and screwdriver.
Do not use power tools as this may
damage the plastic.
Set-up Instruction
Step 3. Install the Long and Short Tubes
REMIDER

Set-up Instruction
Step 4. Install the LED Growth Lamps
GrowBoxUser Manual
P7
Screw four LED Growth Lamps into holder clockwise.
Tighten until snug, but not too tight.
Lamps can be replaced by other brands of E26 lamp ( less than 200 W ) to accommodate
plant varietals' special needs.
We cannot guarantee the results when using non-OPCOM lamps.
Note

15L (3.96 gallon)
GrowBoxUser Manual
P8
5. Preparing
Step 1. Add Water
Add water until the water level indicator floats to the top. You will need approximately
3.96 gallons. Do not overfill. Make sure that the Growing Plate is resting against the main body
and not floating on the water.
Maintain water level and keep
the water level indicator on the top.
Refill evaporated water weekly.

GrowBoxUser Manual
P9
Step 2. Turn Power on and Test Unitt
Ensure the AC cable and pump cable are connected to the controbox, and press the POWER
button. Confirm that the LED lights are on and that the water pump motor is running. Do not
start the unit without water, as this will damage the pump.
Mode
AUTO
ON
HI
LOW
OFF
AUTO
ON
HI
LOW
OFF
Time (On / Off)
Normal
ON
High Duty Cycle
Low Duty Cycle
OFF
Normal
ON
High Duty Cycle
Low Duty Cycle
OFF
Control Panel
LED
Pump
Most plants can be grown using the AUTO mode. For specific varietals or if you want to
experiment on your own, you can manually control the timing of the LED Growth Lamps and
pump. The table below will explain the other manual settings that are available.
(12H / 12H)
(24H / 0H)
(16H / 8H)
( 8H / 16H)
( 0H / 24H)
12 cycles/day
24 cycles/day
4 cycles/day
2 cycles/day
0 cycles/day
* 30 mins/cycle
Please power and turn on GrowBox at 6-9 AM to meet daytime / night cycle time.
Note
Ensure pump cable plug into
the control box.

B: Planting
B1. Sowing Stage
Step 1.
1. Find the black seedling sponge from the Grow Kit, which is pre-cut for planting use.
Refer to below table for sponge quantity and planting numbers.
The germination rate of seeds is around 70%.
NOTE: The germination rate
may be affected by climate, environment and the variety of plants.
GrowBoxUser Manual
P10
Plant Size
Sponge Number
Planting number
How to Set up
Small
72
50
Plant Size
Sponge Number
Planting number
How to Set up
Medium-Large
36
25
Stage
Sowing
Stage
Time afer planting
Day 0~ Day 7
(Starting to sprout)
LED
OFF
Pump
OFF
Note
・Remove the top half of the seed capsules.
・Check the sprout every day and make
sure the sponges are always wet.

Plant Size
Sponge Number
Planting number
How to Set up
Very Large
25
18
2. Wet the sponges in the water at the Sprout area and gently squeeze to make fully wet.
GrowBoxUser Manual
P11

GrowBoxUser Manual
P12
Step 2. Seed Sowing
If using OPCOM Farm seed capsules:
1. With completely dry hands, take out seed capsules from capsule bottle.
2. Insert seed capsules vertically halfway into the middle of each cross-opening in the
seedling sponge.
3. Put any unused capsules back in bottle and store in the refrigerator immediately.
If using non OPCOM Farm seeds:
Insert 3-4 seeds into the middle of each cross-opening of each sponge. The seeds should be placed
just below the surface of sponge.
Step 3.
After 30 minutes, remove the top half of the seed capsules with tweezers. The bottom half will have
dissolved into the sponge, depositing the seeds in the perfect location for growing.
NOTE: If you don't remove the seed capsule tops, they may inhibit sprouting rate.
Press and open
105
Make sure cross-opening at the top
of the sponge is facing up.

GrowBoxUser Manual
P13
Step 4.
Cover the sprout cover for 0-7 days for sprouting and ensure sponge wet during this
stage.

Stage
Seeding
Stage
Time afer planting
Day 7~ Day 14
(Germination
rate>70%)
LED
ON
Pump
ON
Note
・Ensure seeds germination rate>70%.
・In each sponge, keep strong plants and
cut the other weak plants (refer to the
drawing below).
・Adjust LED lights position and keep
distance to cover all plants.
・Ensure EC & pH value.
GrowBoxUser Manual
P14
B2. Seedling Stage
The seedling stage should give young plants the best conditions to start their growth.
Please refer to the instruction below.
Step 1.
Separate the seedling sponges.Then move the sponges from sprout area to growing Hole.
Be careful not to push sponges into
the water, sponge surface should be just below the surface of the plate. You may want to
use the enclosed tweezers to adjust a sponge.Throw away the non-germinated one(s).
Gap for Air

GrowBoxUser Manual
P15
Step 2.
Adjust the Lamps. Ensure the whole growing plate are covered by LED light.
B3. Growing Stage
Stage
Growing
Stage
Time afer planting
After Day 14
LED
Auto
Pump
Auto
Note
・When young plants grow to 3-4 inches
height, change control box to AUTO mode.
・Maintain EC & pH value.
3-4 inch

P16
B4. Grow to Harvest
Once a week, check the water level and refill as needed. Also test the water's pH and EC levels
and adjust as necessary. For more information, see pages 21-22.
Below are images of what to expect as your plant progresses through the growth stages.
Have fun and enjoy experimenting with your plants at home!
Week 3-4
The picture shows the growth status of lettuce around the 3rd - 4th week.
(Growth pattern varies by seed type).
Week 5
The picture shows the growth status of lettuce around the 5th week.
(Growth pattern varies by seed type).
GrowBox
User Manual

P17
Harvest
When plants have reached full growth, you can enjoy your harvest. If plants start getting
crowded and interfere with each other, harvest the large ones, to give the others more space
to grow to full size.
GrowBox
User Manual
Other manuals for GrowBox
1
Table of contents
Other OPCOM Farm Greenhouse Kit manuals
Popular Greenhouse Kit manuals by other brands

Vitavia
Vitavia Apollo 6200 Assembly instructions

ACF Greenhouses
ACF Greenhouses GROW MORE GM13D Assembly instructions

Juliana
Juliana Premium 8,8 m2 Assembly instructions

HobbyGrower
HobbyGrower Enthusiast6"x8" Assembly instructions

Palram
Palram Octave 8x12 instructions

Exaco
Exaco HELIOS/EOS T Assembly instructions