OPGAL Therm-App MD Pro User manual

User Manual
Copyright © 2011 - 2020 Opgal LTD, all rights reserved.
The data contained in this document is proprietary to Opgal LTD. It is disclosed to the
receiving party only for the sole purpose stated herein, and shall not be disclosed by the
receiving party to any third party, and shall not be duplicated, used or disclosed in whole
or in part for any purpose other than the purpose specifically stated. This publication, or
any parts thereof, may not be reproduced in any form without the express written
permission of Opgal LTD.

Therm-App MD™ Pro User Manual
Confidential Opgal Propriety Page 1-2 of 43 Document P/N UM-TAH00AQ-MD-PRO| Rev B
Contents
Contents ............................................................................................................................................................... 1-2
1. Introduction .................................................................................................................................................. 1-4
1.1. Package Contents .................................................................................................................................. 1-4
1.2. Therm-App MD™ PRO User Manual ....................................................................................................... 1-5
1.3. Software updates................................................................................................................................... 1-5
2. Safety Instructions......................................................................................................................................... 2-5
3. Computer Description ................................................................................................................................... 3-6
4. System Overview........................................................................................................................................... 4-7
5. Disclaimer ..................................................................................................................................................... 5-7
6. Applications .................................................................................................................................................. 6-7
7. Tips and Recommendations........................................................................................................................... 7-8
7.1. Steady temperature............................................................................................................................... 7-8
7.2. Moisture on Skin.................................................................................................................................... 7-8
7.3. Angle ..................................................................................................................................................... 7-8
7.4. Steady State........................................................................................................................................... 7-8
7.5. Establishing a Baseline........................................................................................................................... 7-8
8. Getting started.............................................................................................................................................. 8-9
9. Browser Support ......................................................................................................................................... 9-10
10. Access the device .................................................................................................................................. 10-10
11. First time turning on.............................................................................................................................. 11-12
12. Webpage Overview ............................................................................................................................... 12-13
12.1. Reference ROI................................................................................................................................ 12-14
12.2. Color Palette.................................................................................................................................. 12-15
12.3. Settings.......................................................................................................................................... 12-16
13. Main settings menu............................................................................................................................... 13-17
13.1. NETWORK...................................................................................................................................... 13-18
13.1.1. IP Addresses Section .................................................................................................................. 13-18
13.1.2. Setting Auto IP Addresses and DNS Server Addresses (DHCP)..................................................... 13-19
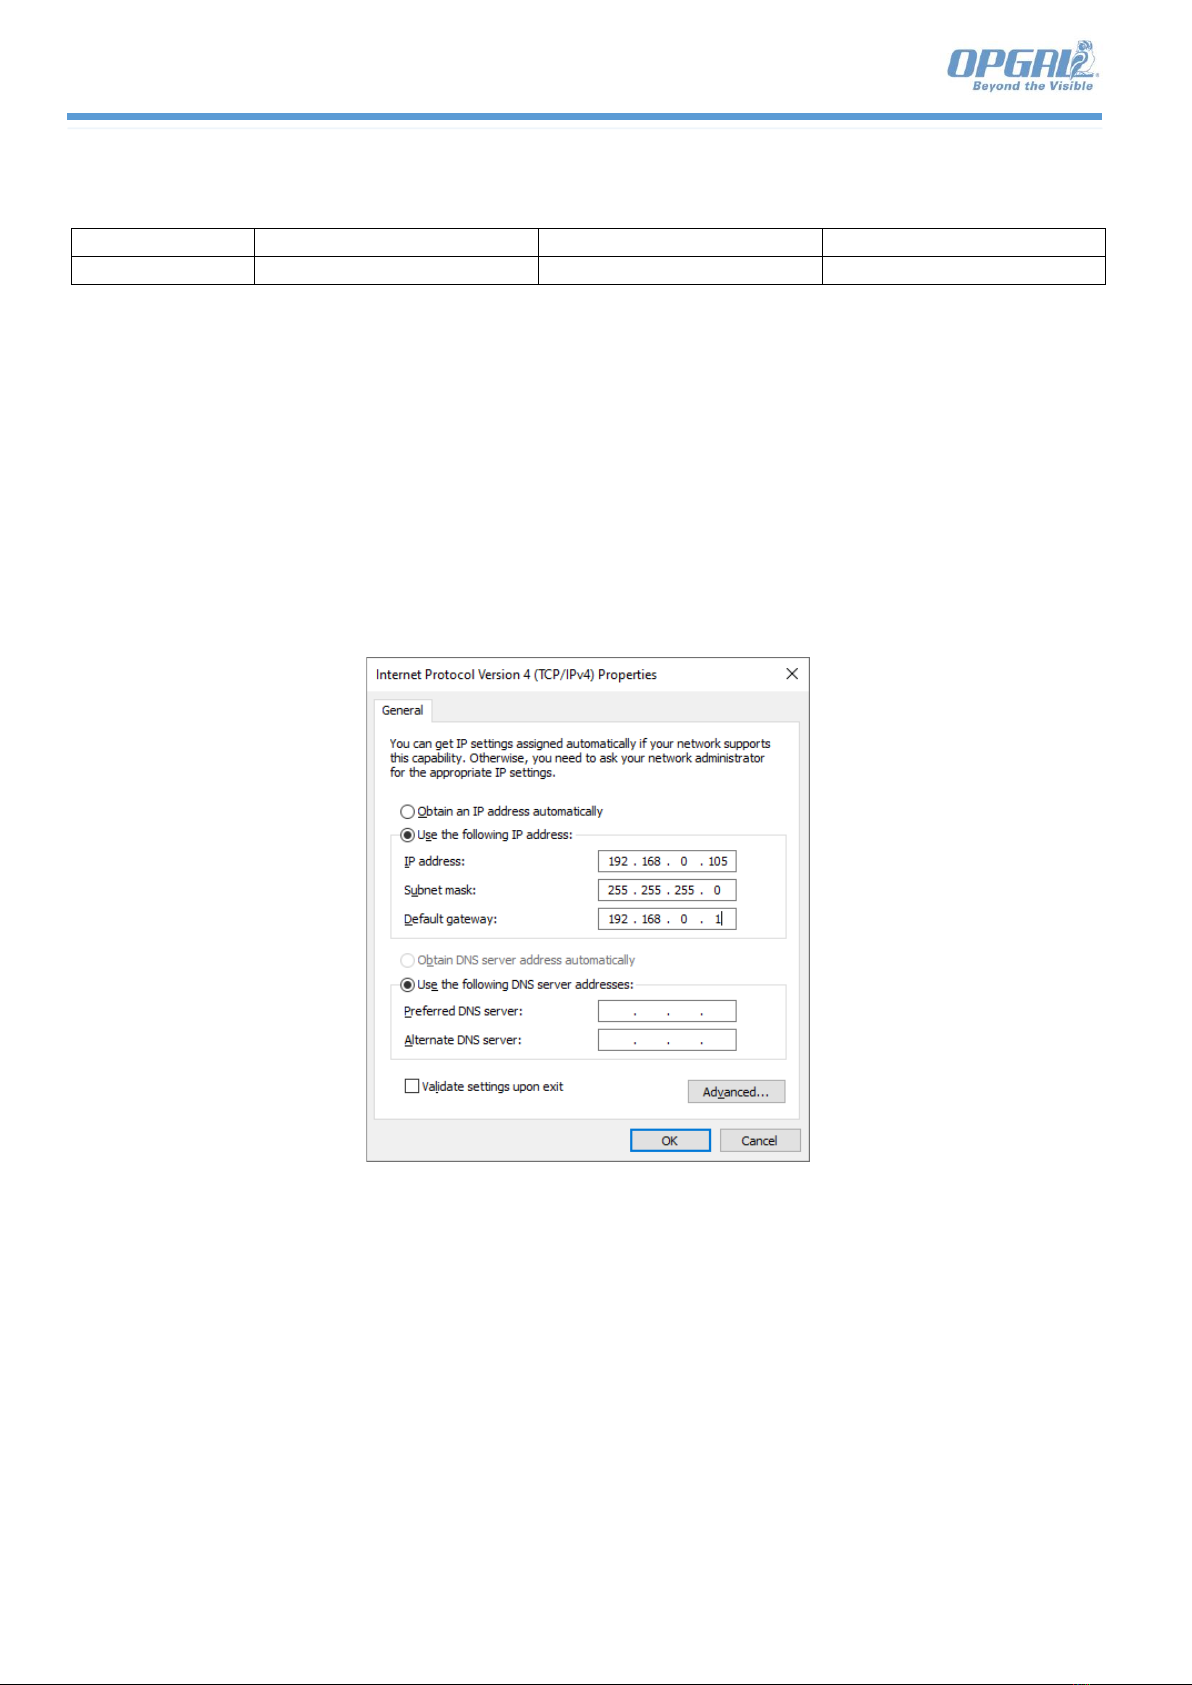
13.1.3. Setting Manual DNS Server Addresses........................................................................................ 13-19
13.1.4. HTTPS Connection Section.......................................................................................................... 13-20
13.2. Certificates Tab.............................................................................................................................. 13-21
14. SYSTEM ................................................................................................................................................. 14-24
14.1. ADMIN........................................................................................................................................... 14-24

Therm-App MD™ Pro User Manual
Confidential Opgal Propriety Page 1-3 of 43 Document P/N UM-TAH00AQ-MD-PRO| Rev B
14.1.1. DATE and TIME .......................................................................................................................... 14-25
14.1.2. FILE UPLOAD.............................................................................................................................. 14-26
14.1.3. USERS ........................................................................................................................................ 14-30
14.1.4. SUPPORT.................................................................................................................................... 14-31
15. Upgrading and Coupling a Therm-App MD BASIC Camera to PRO version System Computer.................. 15-32
16. Specification.......................................................................................................................................... 16-36
17. Computer Main Features....................................................................................................................... 17-37
18. Terms and Conditions............................................................................................................................ 18-39
Contact Information:........................................................................................................................................... 18-1

Therm-App MD™ Pro User Manual
Confidential Opgal Propriety Page 1-4 of 43 Document P/N UM-TAH00AQ-MD-PRO| Rev B
Congratulations!
You are now the owner of a new Therm-App® MD Pro system world-class thermal imaging device which includes
hardware and software components.
1. Introduction
Before starting to use, be sure to read the following
To avoid usage problems and accidents, first read the Safety Instruction and Handling Precautions. Also read this
user manual to ensure that you use the system correctly.
1.1. Package Contents
Before use, make sure the following are included in the package. If anything is missing, contact your dealer.
•Computer Unit
•Thermographic Camera including lens 6.8mm
•Power supply
•USB to micro USB cable
•HDMI cable
•Power cable
•Mini Tripod.

Therm-App MD™ Pro User Manual
Confidential Opgal Propriety Page 2-5 of 43 Document P/N UM-TAH00AQ-MD-PRO| Rev B
1.2. Therm-App MD™ PRO User Manual
For updated user manual refer to the following web site:
https://www.opgal.com/products/therm-app-MD-pro
1.3. Software updates
For software updates refer to the following web site:
https://www.opgal.com/products/therm-app-MD-pro
2. Safety Instructions
•Keep the system out of the reach of young children.
•Use only the original power supply.
•Do not disassemble or modify the system.
•Do not expose the system to strong shocks or vibrations.
•Do not touch any exposed internal components.
•Do not use organic solvents such alcohol, benzine or other thinners to clean the system.
•Do not get the product wet.
•Do not insert foreign objects or liquids into the product.
•Do not use the system where flammable gases may be present (This may cause an electric shock,
explosion or a fire).
•If not in use, do not leave the lens exposed without the lens cap attached.
•Do not touch the system while it is connected to a power outlet during lighting storms (This may cause
electric shock).
•Do not place any objects on the power cord or any other system parts.
•Do not unplug the product by pullin the power cord.
•The computer itself produces heat –During use, do not allow the computer to be in contact with human
skin for extended periods of time. It is recommended to hold the computer only from the side panels
when turned on.
•Do not touch the product with wet hands.
•Do not expose the system to extremely high or low temperatures
•Mount the camera only on a tripod using a quarter inch screw of with the adjustable clamp
•Do not expose the system to direct sunlight

Therm-App MD™ Pro User Manual
Confidential Opgal Propriety Page 3-6 of 43 Document P/N UM-TAH00AQ-MD-PRO| Rev B
3. Computer Description
Power Indicator
Green led indicates that the system is receiving power.
LAN
The RJ-45 connector enables connection to a network or a PC
USB 3.2
USB 3.2 x4 ports enables connection of USB devices such as keyboard, mouse and the
thermal camera
HDMI
HDMI connector enables connection of the Monitor or TV to this output. Sound alerts will
pass through this output and will trigger the monitor’s built in speakers.
Recovery
Pushing this input will erase the operation system.
Warning! Do not push this button unless specifically instructed to do so by an OPGAL
technical manager.
OS FLASH
Special micro USB input for a technician’s use only.
Warning! Do not use this port unless specifically instructed to do so by an OPGAL technical
manager.
Micro SD
A saving media option –for future use. (currently not available).???
GPIO
A physical 3.3v TTL output for triggering alerts such as buzzer/flashlight
USE only a Solid-State Relay to drive power devices.
COM
RS-232 DB-9P serial communication port - for future use. (currently not available).???
12V DC in
12V DC power input.
Only use the system’s supplied Power supply.
Pin
COM- (RS-232)
GPIO
Remarks
1
2
RXD
3
TXD
4
5
GND
6
7
GPIO (for internal use only)
8
GPO- Output only (3.3V)
Each time the detection threshold achieved (~38°c), GPIO pin
8 will triggered out an electrical signal on ‘1’. Pin 8 can be
connected to a ‘dry contact’, to drive an external bell or other
alert device.
9
Micro
SD
Recovery
USB 3.2
Gen 1 x4
LAN
GPIO
COM
12V DC
Power input
Power indicator
OS
FLASH
Front View
Rear View

Therm-App MD™ Pro User Manual
Confidential Opgal Propriety Page 6-7 of 43 Document P/N UM-TAH00AQ-MD-PRO| Rev B
4. System Overview
Therm-App MD™ PRO is Opgal’s thermographic imaging device for elevated body temperature (EBT)
measurement, specifically calibrated to measure temperature. The Therm-App MD™ PRO sensor is based on
QVGA, α- Si bolometer 17µ ,384x288 pixels.
Opgal’s processing capabilities have enabled the development of superior high-end algorithms including TECless
and shutterless operations.
5. Disclaimer
Therm-App MD™ PRO does not detect fevers or illness in any way. It is not a medical diagnostic tool and has not
been approved by a medical professional. Any individual tested and flagged should be double-checked using an
approved medical device.
Notes:
1) The measurement should not be solely or primarily relied upon to diagnose or exclude a diagnosis of
COVID-19, or any other disease.
2) Elevated body temperature in the context of use should be confirmed using secondary evaluation
methods (e.g., an NCIT or clinical grade contact thermometer)
6. Applications
Therm-App MD™ PRO is a standalone thermal imaging system that provides multiple hotspot detection and
tracking. It includes uniquely calibrated camera to measure temperature differences on human skin, real-time
based temperature auto-adjustment to compensate for localized climate change and is capable of scanning
multiple faces at once. The Therm-App MD™ PRO provides excellent high-end thermographic performance and is
designed for Elevated Body Temperature (EBT) screening. It can be used in:
•Financial Institutions
•Industrial Zones
•Border Crossings
•Public Transportation
•Healthcare Facilities
•Government Institutions
•Education & Science institutions
•Stores & Shopping Centers

Therm-App MD™ Pro User Manual
Confidential Opgal Propriety Page 7-8 of 43 Document P/N UM-TAH00AQ-MD-PRO| Rev B
7. Tips and Recommendations
While the Therm-App MD™ PRO has a compensating deep learning algorithm which is aimed to offset effects of
ambient temperature on human skin –there are some practices and actions which can improve or hinder the
systems optimal performance:
7.1. Steady temperature
Try and avoid sudden temperature changes such as sudden operation of an air conditioner. If unavoidable, allow
the camera to obtain a new steady state before use –normally 10 minutes.
7.2. Moisture on Skin
Make sure to wipe down or dry damp skin such as from rain or sweat.
7.3. Angle
The camera operates best when set up at a tilt angle of about 1-3°, looking down at the targets head.
7.4. Steady State
During startup or after sudden temperature changes (such as the air conditioner being turned on) make sure to
allow the camera 10 minutes of operation to reach a steady state before measurements.
7.5. Establishing a Baseline
To establish a baseline and to begin measurement, the Therm-App MD™ PRO needs at least 30 individuals to pass
in front of the camera.

Therm-App MD™ Pro User Manual
Confidential Opgal Propriety Page 8-9 of 43 Document P/N UM-TAH00AQ-MD-PRO| Rev B
8. Getting started
Therm-App MD Pro can be operated in two operation modes:
1. Remote mode, by connecting the system’s computer through a LAN to a remote PC; or
2. Kiosk mode by connecting HDMI LCD monitor, keyboard and mouse directly to the computer system.
Connect the system as it is suitable for your application
Remote mode configuration
μ-SD Card
USB
Port
RJ-45
HDMI
Port
Default IP:
192.168.0.100
Kiosk mode configuration
μ-SD Card
X4 USB
Port
RJ-45
HDMI
Port
KeyBoard
KEYBOARD

Therm-App MD™ Pro User Manual
Confidential Opgal Propriety Page 10-10 of 43 Document P/N UM-TAH00AQ-MD-PRO| Rev B
9. Browser Support
You can use the Therm-App MD™ Pro by using the following Browsers:
Operating System
Google Chrome™
Firefox®
Edge®
Windows®
Recommended
X
X
10. Access the device
How to find Therm-App MD™ Pro device on the network and assign IP addresses in Windows:
1) At the first you must set the same IP address subnet on your PC.
2) In Windows 10 open the Network and Internet Settings.
3) Select Ethernet and then open Change adapter options.
4) Perform right mouse button click on the Ethernet icon. and select the Properties menu.
5) Select Internet Protocol Version 4 (TCP/IPv4) and click Properties.
6) Select Use the following IP address and fill in the IP address, Subnet mask and the Default gateway as
shown in the example below.
7) Open Google Chrome™ browser and enter the IP address.
8) The default IP address is 192.168.0.100

Therm-App MD™ Pro User Manual
Confidential Opgal Propriety Page 10-11 of 43 Document P/N UM-TAH00AQ-MD-PRO| Rev B
9) Enter the username and password. If you access the device for the first time, you will need to set your
own default settings.
10) Create an administrator default username. For example, “admin”.
11) Create a default password for the administrator user. You can change the username and the password
any time.
12) It is recommended to set a secure password for the Administrator account.
13) The live view page will open in your browser.
14) After creating the Administrator username and password the following login screen will be displayed.

Therm-App MD™ Pro User Manual
Confidential Opgal Propriety Page 11-12 of 43 Document P/N UM-TAH00AQ-MD-PRO| Rev B
11. First time turning on.
Each time, after connecting the system to the power supply, an initial warming up procedure is started,
and may take several minutes. A live B&W video and a ‘Camera is warming up…’message will appear.
Only when the warm up ends, the system is ready for use.

Therm-App MD™ Pro User Manual
Confidential Opgal Propriety Page 12-13 of 43 Document P/N UM-TAH00AQ-MD-PRO| Rev B
12. Webpage Overview
1
Login, Logout, change password menu
2
Address bar (URL)
3
Therm-App™ MD Pro product brand name
4
Live View
5
HAMBURGER setting menu
6
Time & Date Display
7
Quick access menu
Voice Alarm Is Disable
Voice Alarm Is Enable
Reference ROI
Color Palette
Take a Snapshot
Full Screen live view
Settings
Hide Detection
Show Detection
About
2
3
1
6
7
5
4

Therm-App MD™ Pro User Manual
Confidential Opgal Propriety Page 12-14 of 43 Document P/N UM-TAH00AQ-MD-PRO| Rev B
12.1. Reference ROI
The Therm-App MD Pro has an optional Reference ROI to improve performance in locations with unstable ambient
temperature. The reference ROI allows you to select a STABLE AREA to enable the camera to perform steadily. This
will allow the camera’s advanced algorithm to monitor sudden changes in the ambient temperatures and offset
them.
Note: This option is available only for admin user.
1) Select the ROI REFERANCE icon.
2) Press on ADD ROI REFERANCE button.
3) A small yellow square X V (ROI) will appear.
4) The Icon should be placed on a location which has a stable uniform temperature (such as a wall). Make sure
to avoid glossy surfaces, or surfaces which change their temperature during the day. Drag and drop the
ROI box to the selected location.
5) Check mark the V symbol when positing done.
ROI
REF.
ROI
REF.
The Refence ROI must be located in a place that will keep ALWAYS line of sight with the camera
without any momentary interruption, interference or concealment between Reference ROI and camera.
Make sure that nobody is crossing the Reference ROI

Therm-App MD™ Pro User Manual
Confidential Opgal Propriety Page 12-15 of 43 Document P/N UM-TAH00AQ-MD-PRO| Rev B
12.2. Color Palette
NONE
GREEN
INFERNO
RAINBOW
LAVA
IRON
VIRIDIS
PSY

Therm-App MD™ Pro User Manual
Confidential Opgal Propriety Page 12-16 of 43 Document P/N UM-TAH00AQ-MD-PRO| Rev B
12.3. Settings
Press on the settings icon and the following PRO SETTINGS menu will pop up.
Font size:
Allows you do define the face bounding box label temperature font size
Show only detection above threshold:
Checking the box will present the face bounding box only when threshold temperature achieved.
Unit:
Allows you do define the temperature units for settings and display (Celsius, Fahrenheit, Kelvin).
Automatic background temperature:
Checking the box will perform Automatic (default) background temperature compensation
Background temperature [-25, 100] (°c):
You can define the background temperature manually by unchecking the box and set the temp
manually.
Threshold [20, 45] (°c):
Allows you do define the threshold temperature for the alarm.
Detection sensitivity [0, 100] (%)
Allows you do define the detection sensitivity (default = 30%)
Min display temperature [0(Auto), 30] (°c):
Allows you do define the minimum temperature to display.
Max display temperature [35, 60(Auto] (°c):
Allows you do define the maximum temperature to display.
Orientation:
Allows you do define the camera orientation.

Therm-App MD™ Pro User Manual
Confidential Opgal Propriety Page 13-17 of 43 Document P/N UM-TAH00AQ-MD-PRO| Rev B
13. Main settings menu
When pressing on the Hamburger icon on the left upper corner the left menu will pop up. Pressing on THERM-
APP MD PRO will close this menu.

Therm-App MD™ Pro User Manual
Confidential Opgal Propriety Page 13-18 of 43 Document P/N UM-TAH00AQ-MD-PRO| Rev B
13.1. NETWORK
The Network window allows for configuring Ethernet communication between the host and Therm-App MD™ PRO
system. To open the Network window, click NETWORK in the main menu.
Under the Network sub menu, you will find the following tabs:
IP Addresses Section: allows the user to change and set the IP addresses and DNS server addresses.
HTTPS Connection Section: allows the user to set the HTTPS connection values.
13.1.1. IP Addresses Section
To change and set the IP addresses and DNS server addresses, press on IP ADDRESSES button. The following
window will appear. Change the IP address and press APPLY to save, or CANCEL to dismiss the changes.

Therm-App MD™ Pro User Manual
Confidential Opgal Propriety Page 13-19 of 43 Document P/N UM-TAH00AQ-MD-PRO| Rev B
13.1.2. Setting Auto IP Addresses and DNS Server Addresses (DHCP)
Turn on Obtain IP address automatically checkbox.
Turn on Obtain DNS servers automatically checkbox.
Press APPLY to save or CANCEL to dismiss the changes
13.1.3. Setting Manual DNS Server Addresses
Please note: This is applicable when synchronizing the time and date with a DNS server.
Press ADD in the DNS server addresses section
Enter the DNS server address by either using the buttons which appear when hovering over the empty fields or by
typing values into the fields using the keyboard.

Therm-App MD™ Pro User Manual
Confidential Opgal Propriety Page 13-20 of 43 Document P/N UM-TAH00AQ-MD-PRO| Rev B
Press APPLY to save or CANCEL to dismiss the changes.
13.1.4. HTTPS Connection Section
Please Note: This option is applicable when either selecting a self-signed certificate or uploading an existing
certificate.
Press on HTTPS Connection in the Settings page to expand the HTTPS Connection section.
Set the HTTPS Port slider to the desired value (1 to 65535).
Note: The HTTPS Port default value is 443.
Press APPLY to save or CANCEL to dismiss the changes.
Table of contents
Other OPGAL Thermal Camera manuals