Orbit Armour User manual


Multifunctional Food Processor
ARMOUR
INSTRUCTION MANUAL
Please read carefully and keep the instruction well

DE
SC
RIPTI
O
N
1. Food pusher
2. Hopper plate
3. Kibbe cover
4. Kibbe plate
5. Sausage
6. Fixing ring
7. Cutting plate(fine)
8. Cutting plate(mediun)
9. Cutting plate(large)
10. Blade
11. Snake
12. Head
13. Safety cover 1#
14. Head inlet
15. Two-way switch
16. ON/O/R(Switch)
17. Body
18. Button
19. Safety cover 2#
20. Jar base
21. Jar cover
22. Blade assembly
23. Sealing ring
24. Jar
25. Handle
26. Jar lid
27. Measuring cup

IMPORTANT SAFEGUARDS
When using the electrical appliance, the below basic safety precautions should be followed:
1.Read all instructions.
2. Before using check that the voltage power corresponds to the one shown on the appliance nameplate.
3.Home use only. Do not use for industrial purpose.
4. Do not let cord hang over edge of table or counter.
5.Unplug when assembling and disassembling the unit.
6. Do not operate any appliance with a damage cord or plug or after the appliance malfunction or has been damaged in
any manner. Return the appliance to the nearest authorized service facility for examination, repair or adjustment.
7.If the supply cord is damaged,it must be replaced by the manufacturer or its service agent or a similarly qualified person
in order to avoid a hazard .
8. Close supervision is necessary when any appliance is used by or near children.
9. Avoid contacting moving parts.
10. Blades are sharp, so handle carefully.
11. Do not use this product outside of the accessories and fittings, so as not to cause fire and personal injury.
12. The appliance can not be used for blending hard and dry substance, otherwise the blade could be blunted.
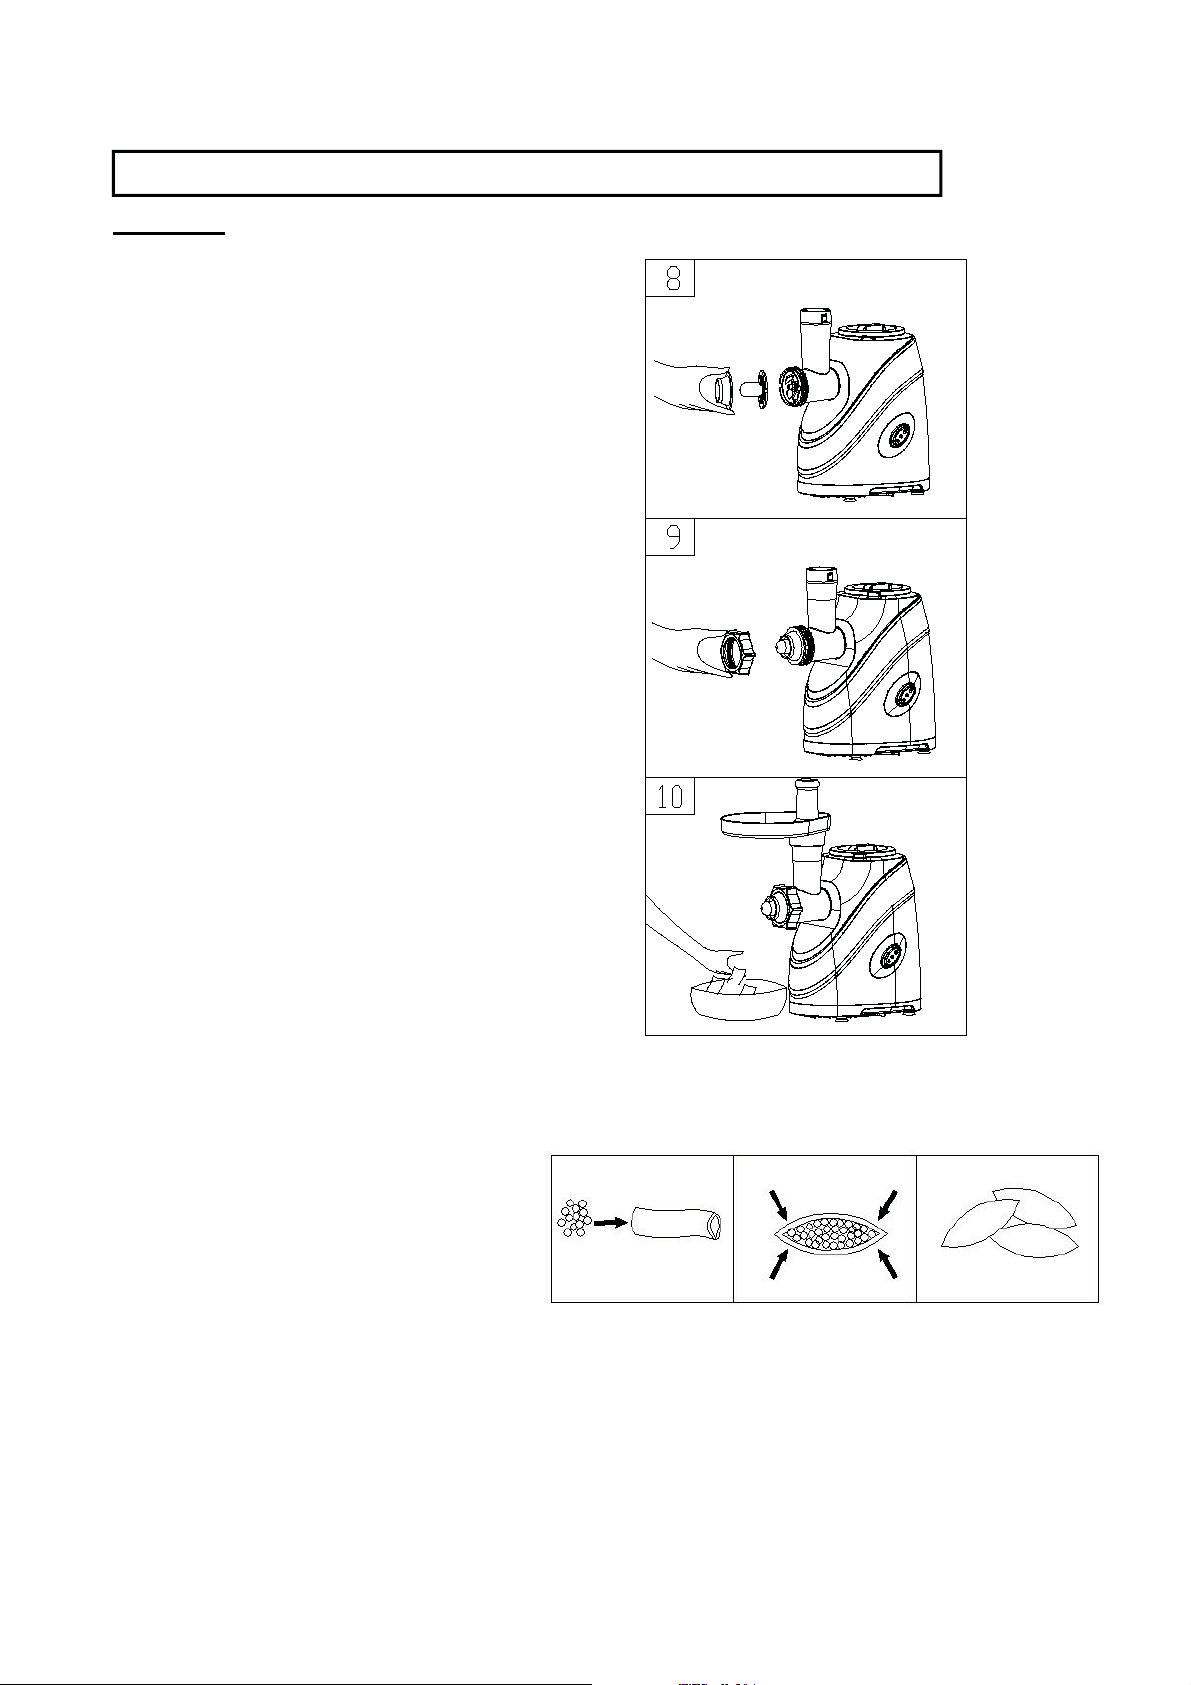
13.Do not grind hard food such as bones, nuts, etc.
14.Do not grind ginger and other materials with hard fiber.
15. Unplug from outlet when not in use, before putting on or taking off parts, and before cleaning.
16. To protect against risk of electrical shock do not put motor unit in water or other liquid.
17. Keep hands and utensils out of container while blending to reduce the risk of severe injury to persons or damage to
the blender. A scraper may be used but must be used only when the blender is not running.
18. To reduce the risk of injury, never place cutter-assembly blades on base without jar properly attached.
19. Always operate blender with cover in place.
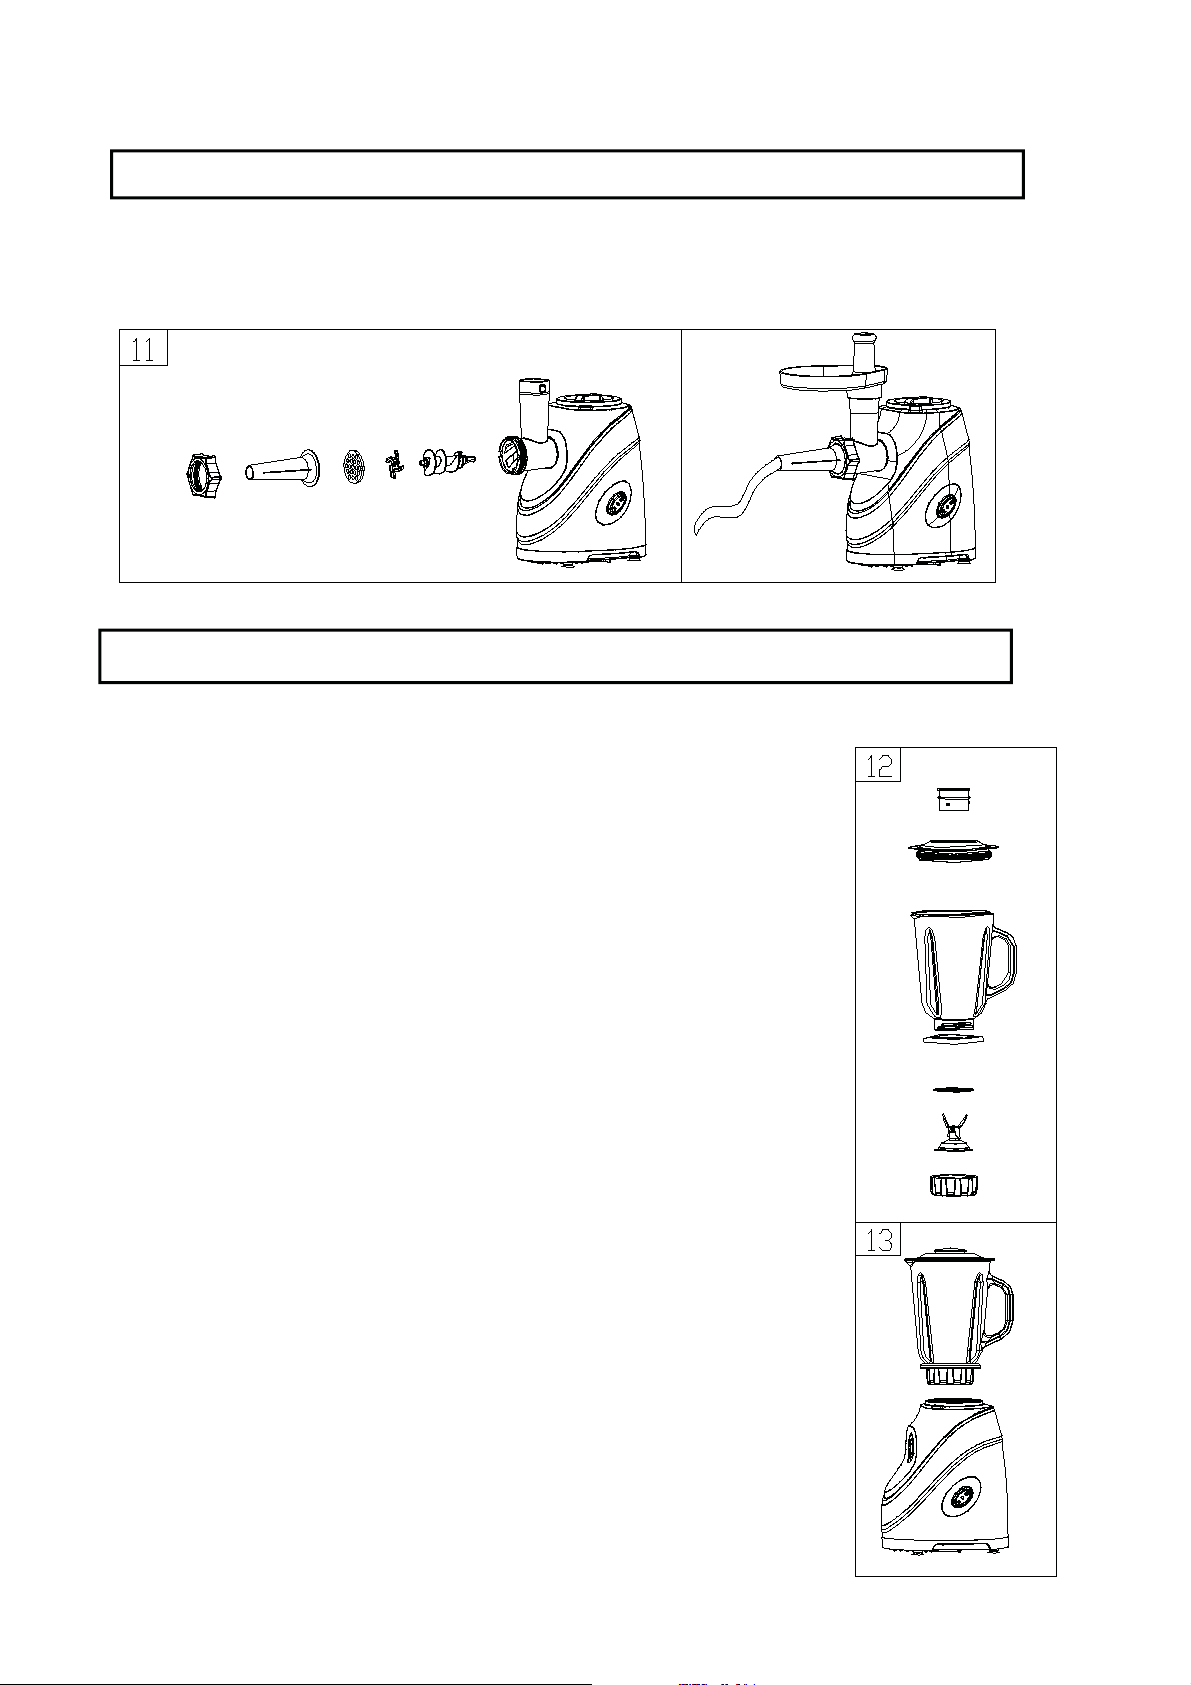
20.When carrying the unit be sure to hold the body with both hands. Do not carry the unit by the hoppper plate or head.
21.Do not fix the cutting blade and cutting plate when using kibbe attachment.
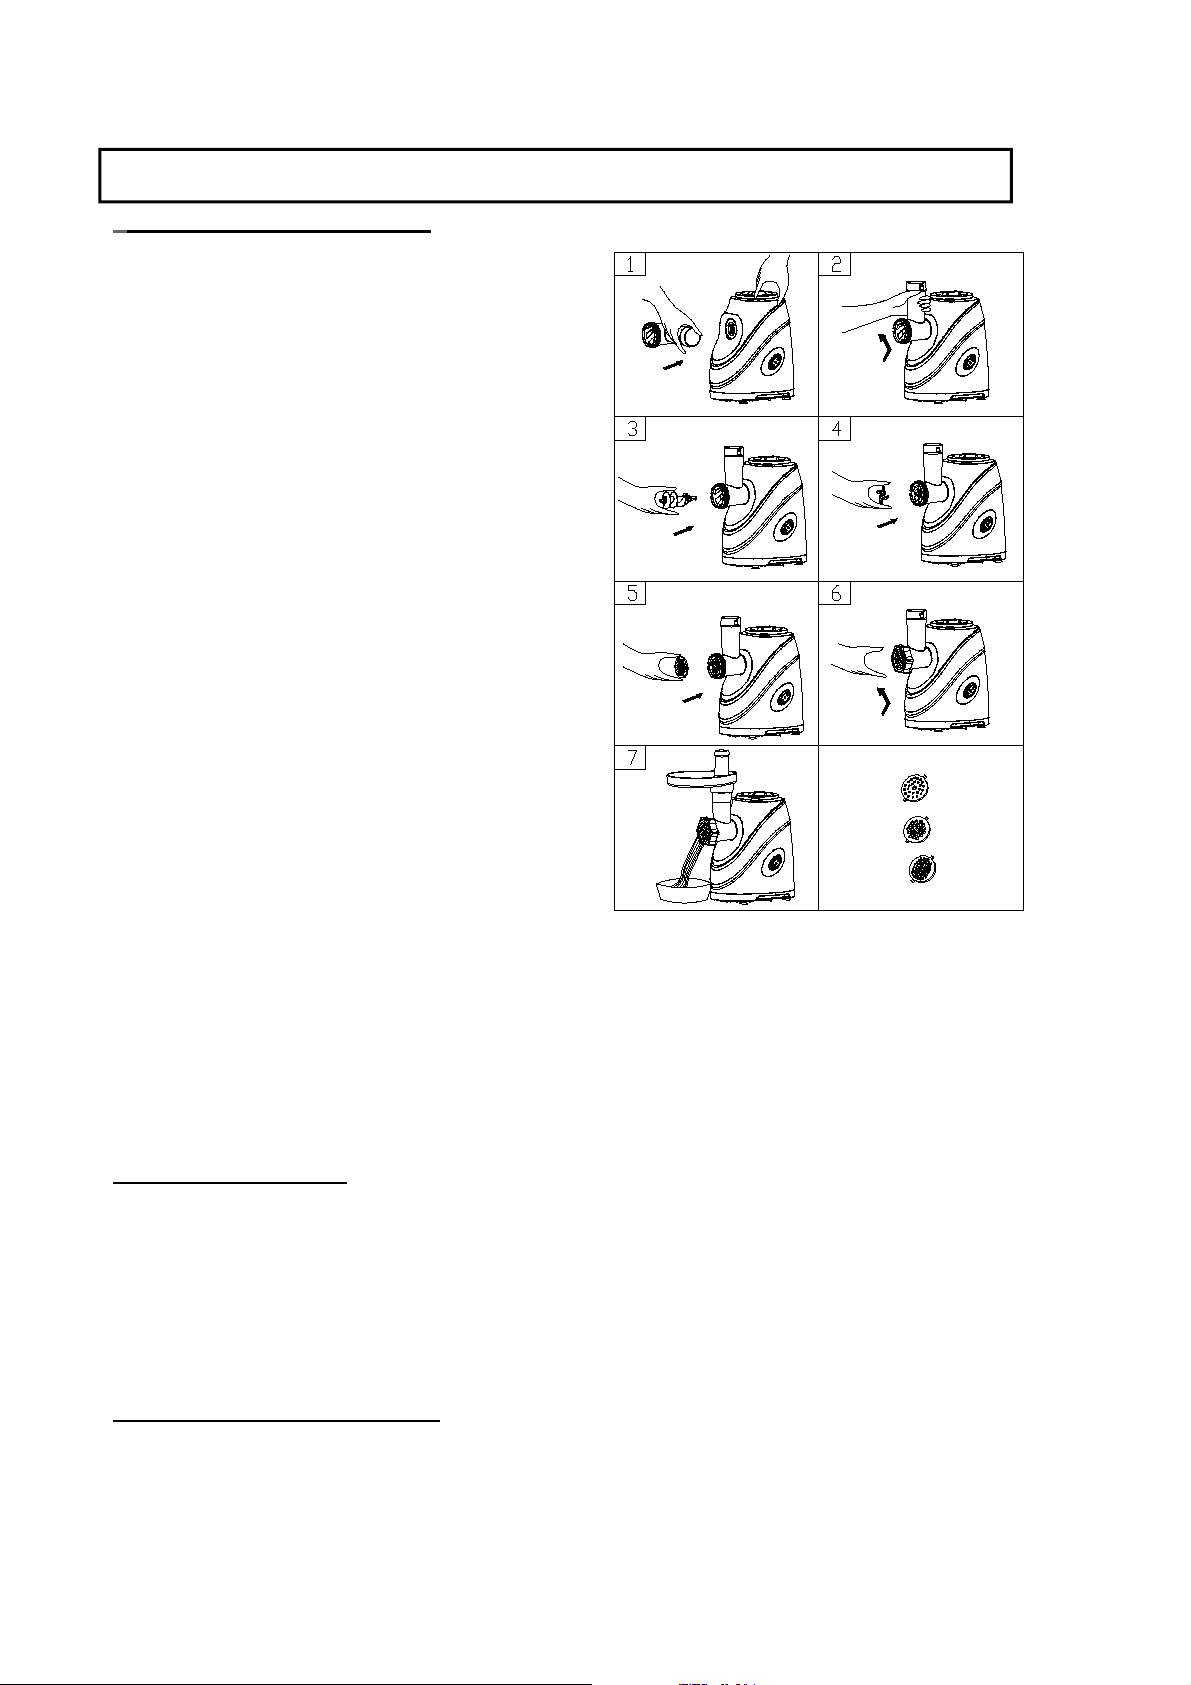
22.Never push products by hand. Use food pusher.
23.Continuous running of meat grinder should be not more than 10 minutes with the following 10 minutes interval for
motor cooling.
24.Operate the unit from “ON” to “R” or from “R” to “ON” after the previous working condition stops more than 30 seconds,
or it may cause some abnormal case such as moving up and down and easily destroy the unit.
25.To avoid jamming, do not force to operate the unit with excessive pressure.
26.When the circuit breaker activates, do not switch on.
27.Never try to replace the parts and repair the unit by yourself.
28.This appliance is not intended for use by persons(including children) with reduced physical, sensory or mental
capabilities, or lack of experience and knowledge, unless they have been given supervision or instruction concerning use
of the appliance by a person responsible for their safety
29.Children should be supervised to ensure that they do not play with the appliance.
30.Save this instruction.

FOR THE FIRST TIME
Check that voltage indicated on the rating label corresponds the mains
voltage in your home.
Wash all parts (except body) in warm soapy water.
Before plug in, ensure the ON/0FF/R switch is in "0FF" position.
Installation considerations before use
When using meat grinder only,
Insert the safety cover 2 #
screwed shut direction(fig.
Left).when using Blender,
Please unscrew cover 2#.
When using meat grinder only
can use “ON”and “R” Stalls
When using blender only,
Tighten the safety cover 1 #(fig.
Left)
When using blender only,can
use “ON” stalls only.

INSTRUCTION FOR USE
Meat grinder assembly
Press the fasten button,hold the
head and insert it into the
inlet(when inserting pls pay
attention the head must be slanted
as per arrow indicated on the
top,see fig.1),then move the head
anticlockwise so that the head
being fastened tightly . (fig.2)
Place the snake into the head,
long end first, and turn to feed the
screw slightly until it is set into the
motor housing (fig.3).
Place the cutting blade onto the
snake shaft with the blade facing
the front as illustrated (fig.4).If it is
not fitted properly, meat will not be
grinded.
Place the desired cutting plate
next to the cutting blade, fitting
protrusions in the slot (fig.5).
Support or press the centre of the
cutting plate with one finger then screw the fixing ring tight with another
hand (fig.6). Do not over tighten.
Place the hopper plate on the head and fix it into position.
Locate the unit on a firm place.
The air passage at the bottom and the side of the motor housing should be
kept free and not blocked.
MINCING MEAT
Cut all foods into pieces (Sinewless, boneless and fatless meat is
recommended, approximate size :20 mm x 20 mm x 60 mm) so that they fit
easily into the hopper opening.
Plug the unit on and switch ON/0FF/R knob to "ON" position.
Feed foods into the hopper plate. Use for it only the food pusher (fig.7).
After use switch the unit off and unplug it from the power supply.
REVERSE FUNCTION
In case of jamming switch off the appliance ,position ON/0/R switch to
"R" position and position “ON/R”switch to “R” position.
Snake will be rotating in the opposite direction, and the head will get empty.
If it doesn't work, switch off the unit and clean it.

MAKING KIBBE
RECIPE
STUFFING
Mutton 100g
Olive oil 1 1/tablespoons
Onion (cut finely) 1 1/tablespoons
Spices to your taste
Salt to your taste
Flour 1 1/tablespoons
Mince mutton once or twice.
Fry onion until brown and add minces
mutton, all spice, salt and flour.
OUTLET COUVER
Lean meat 450g
Flour 150-200g
Spices to your taste
Nutmeg (cut finely) 1
Powdered red pepper to your taste
Pepper to your taste
Mince meat three times and mix all
ingredients together in a bowl. More
meat and less flour for outlet cover
create better consistency and taste.
Grind the mixture three times.
Disassemble by reversing the steps
from 5-3 to remove the cutting plate
and cutting blade.
Place kibbe attachments A and B onto the feed screw shaft together, fitting
protrusions in the slots (fig.8).
Screw cap into place until
tight. Do not over tighten
(fig.9).
Make the cylindrical outlet
cover (fig.10).
Form kibbe ad illustrated below and deep fry.

MAKING SAUSAGE
◆Before starting please assemble sausage attachment as per following
(fig.11)
Blender assembly
The blender jar is suitable for making mixture which the juice and pulp
are mixed.
For attaching jar, firstly place the blade assembly into
the jar base properly, then place Sealing ring under
the blade assembly,then place Jar cover into the
jar,then place the jar into the jar base properly, hold
the jar base with one hand, and the other hand turns
the jar in clockwise until it locks in place (see fig.12)If
the dot on the motor unit is aligned with the dot on the
jar base ,it mean that it is assembled properly.Then
place the jar and jar base together into the motor
unit (see fig.13)
Note: make sure all the assembly is placed properly.
Blending fruit and vegetable:
1. Before attaching the power cord into the outlet,
make sure the speed selector is in the OFF position.
2. Peeled or cored the fruit or vegetables and then cu
t
it into small dices, put the food pieces into the jar
.
Usually certain amount of purified water has to b
e
added to facilitate the smooth running of appliance
.

The proportion of the food and water is 2:3.The amount of mixture should not
exceed the max level as indicated on the jar
Note: never use boiling liquids or run the appliance empty.
3. Replace the lid on the jar. Only directly place the lid into the jar.
4. You may add ingredients into the jar through the center opening of jar lid
during operation, then replace Measuring Cup if necessary. Let the tab of
Measuring Cup aligns with the groove of jar lid, put down and turn
anti-clockwise until it is locked.
5. The consecutive operation time shall not exceed 3 minutes. The appliance
can be operated again only it has been cooled down.
6. Turn the Speed control knob to OFF position once the mixture has been
blended to your desired consistency.
7. Remove the jar base with jar from the Motor Unit (only remove it by lifting
handle directly), carefully take off the jar lid, then pour and serve.
CLEANING AND MAINTENACE
DISASSEMBLING
Make sure that the motor has stopped completely.
Disconnect the plug from the power outlet.
Disassemble by reversing the steps from 1-6 pictures.
To remove the cutting plate easily, place a screwdriver between the cutting
plate and the head as illustrated and lift it up
Press the fasten knob,move the head as per direction illustrated on fig
14,then you can take out the head.
CLEANING
Remove meat, etc. Wash each part in warm soapy water.
A bleaching solution containing chlorine will discolor aluminum surfaces.

Do not immerse the motor housing in water, but only wipe it with a damp
cloth.
Thinners and petrol will crack or change the color of the unit.
Wipe all the cutting parts by vegetable oil -wet cloth.
SPECIFICTION
Power supply 220-240VAC,50/60Hz,500W
Max. Locked motor approx. wattage 1000W
Net/Gross weight 5.3Kg/4.6Kg
Overall dimension(L×D×H) 360mm×165mm×480mm
You can help protect the environment!
Please remember to respect the local
regulations: hand in the non-working
electrical equipments to an appropriate
waste disposal center.

:ARMOUR

:
1./ .
15. .
. 2./16. )ON/OFF.(
3. .
17. .
4. .
18..
19.
#1 5. /.
20. /. 6. .
21. /. .( 7. )
22. . 8. )
.(
.(
23. . 9. )
10.
/ .
24./ .
11./ .
25..
26.12. .
.
13. #1
27.
14. .
.

:
:-
1.
.
2. .
3.
.
4.
.
5. .
6.
.
7. ) (
, , ,
.
8.
.
9. .
10.
.
11.
.
12. /
.
13.
.
14.
.
15.
.
16.
.
20 .
.
17. )(
.
18.
.
19.
) .(

20. .
21.
.
22.
.
23. .
24. ON )R( )R(
)ON( 30.
25. .
26.
.
27. .
28. ) (
, , ,
.
29. .
30. .
:
)(
) (
.
)OFF.(
:
2#
)
.(
2#.
"
ON""R"
.

1#
)
.(
"
ON" .
:
:
)
1(
) .2(.
/
) . 3.(
)4(
.
) 5.(
) 6(
/ .
.

.
:
)
:20×20×60(
.
)ON.(
/
) 7.(
.
:
)
ON/0/R(
)
R.(
.
.

:
:
)(100.
1.1/2
)(1.1/2
.
.
1.1/2
:
.
.
:
450.
150/200
.
1.1/2
) (1
.
:
.
.
.
3-5
.
)A()B(
) 8.(
/.
) 9.(
) 10.(
.

): (
/
) 11.(
:
/ .
/
) 12(
. ) 13.(
: .

:
1. .
. 2. /
3.
) .(
4.
.
5.
.
6. –
.
7. ) (
.
.
& :
.
.
1-6
.
.
)14(

.
:
....
.
.
.
.
.
)/(
.
:
:
220–240 50/60. :500.
:
1000
/
:
4.6/5.3
:
360×165×480
/ :
. .
Table of contents
Popular Food Processor manuals by other brands

Cuizimate
Cuizimate RBSCHOPPERWH instruction manual

Dualit
Dualit XL900 Instruction manual & guarantee

Prince Castle
Prince Castle Dice Witch 910-A Series Specifications

Taurus
Taurus MYCOOK 1.8 instruction manual

Bifinett
Bifinett KH 700 Operating and safety instructions

Linea 2000
Linea 2000 DOMO DO9175KR Instruction booklet