organic transit ELF User manual

Rev. 010615-001
Organic Transit, Inc. •311 West Corporation Street •Durham, NC 27701
organictransit.com • [email protected] • 919/908-1599
ELF
OWNER’S MANUAL
Copyright 2015
We’re glad to have you as a member of the Organic Transit family!

1
Table of Contents
Foreword ......................................................................................................................... 3
The Structure of This Manual ......................................................................................... 4
Safety............................................................................................................................... 5
General Notes on Safe Driving ..................................................................................... 5
Adverse Conditions...................................................................................................... 6
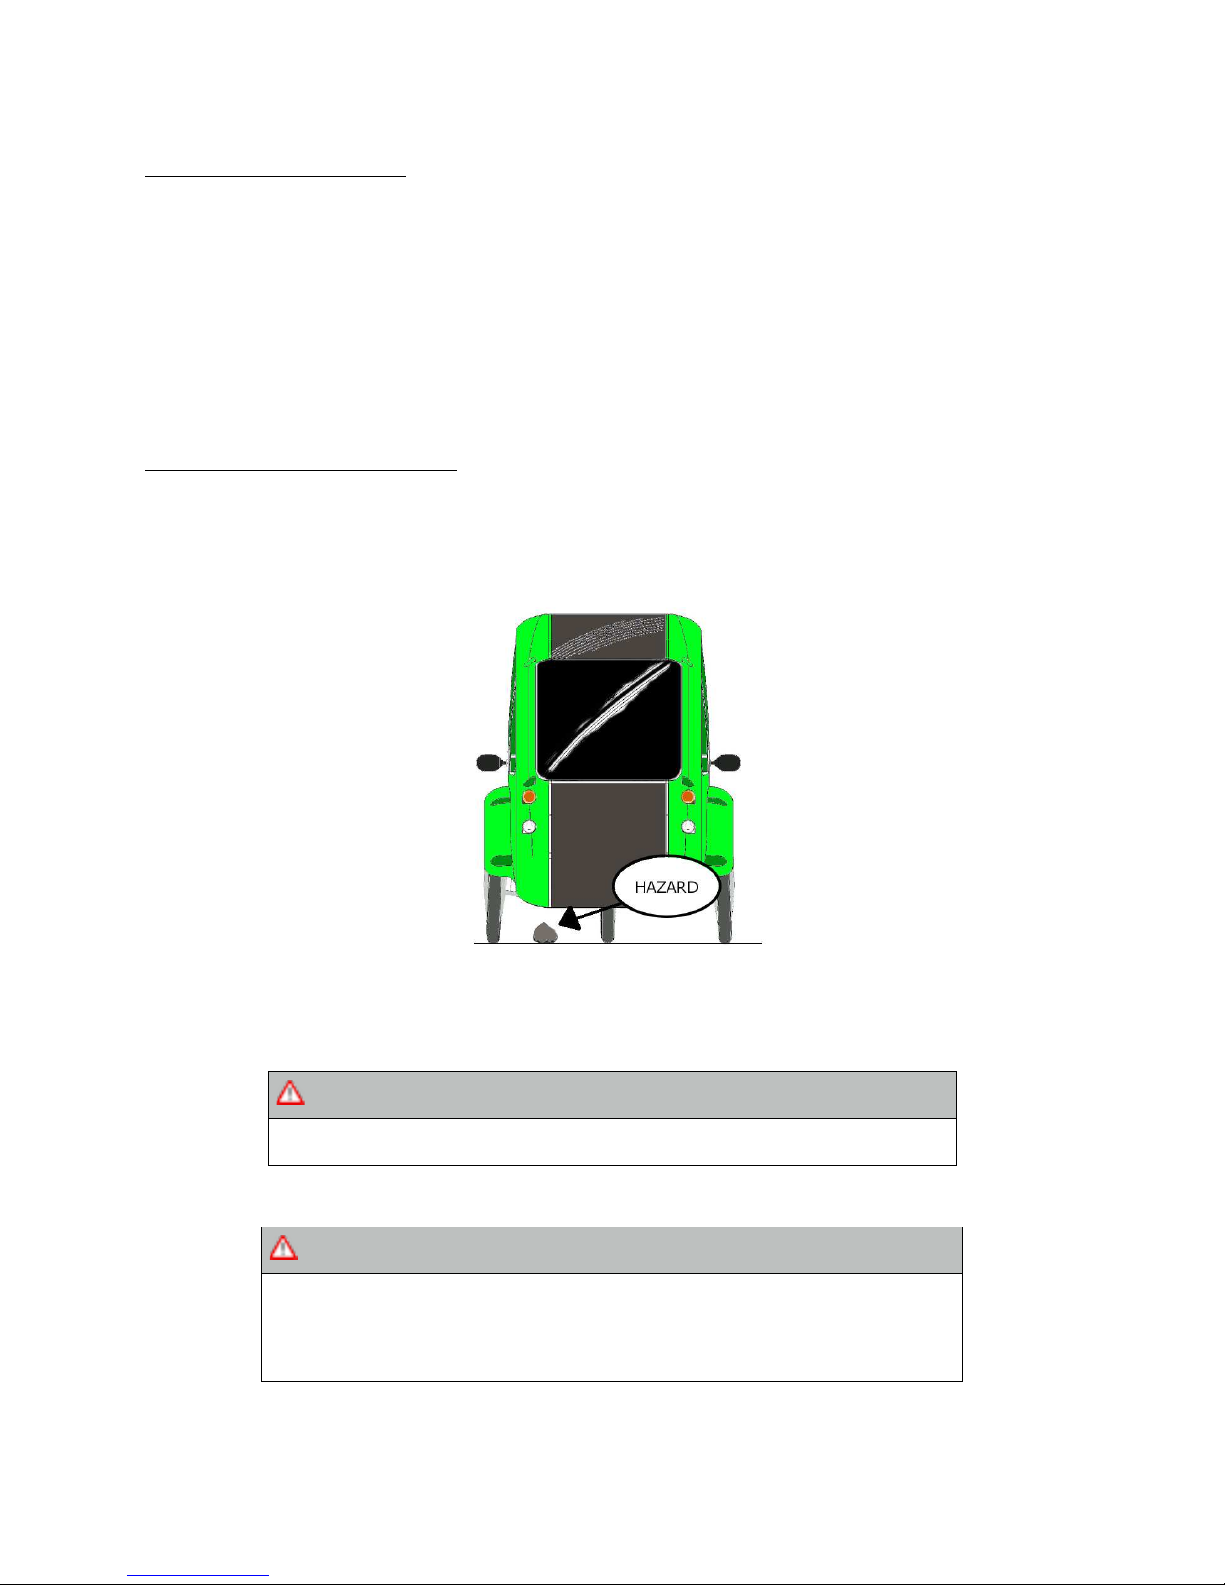
Avoiding Road Hazards ............................................................................................... 6
Equipment and Controls................................................................................................. 7
The ELF: Overview....................................................................................................... 7
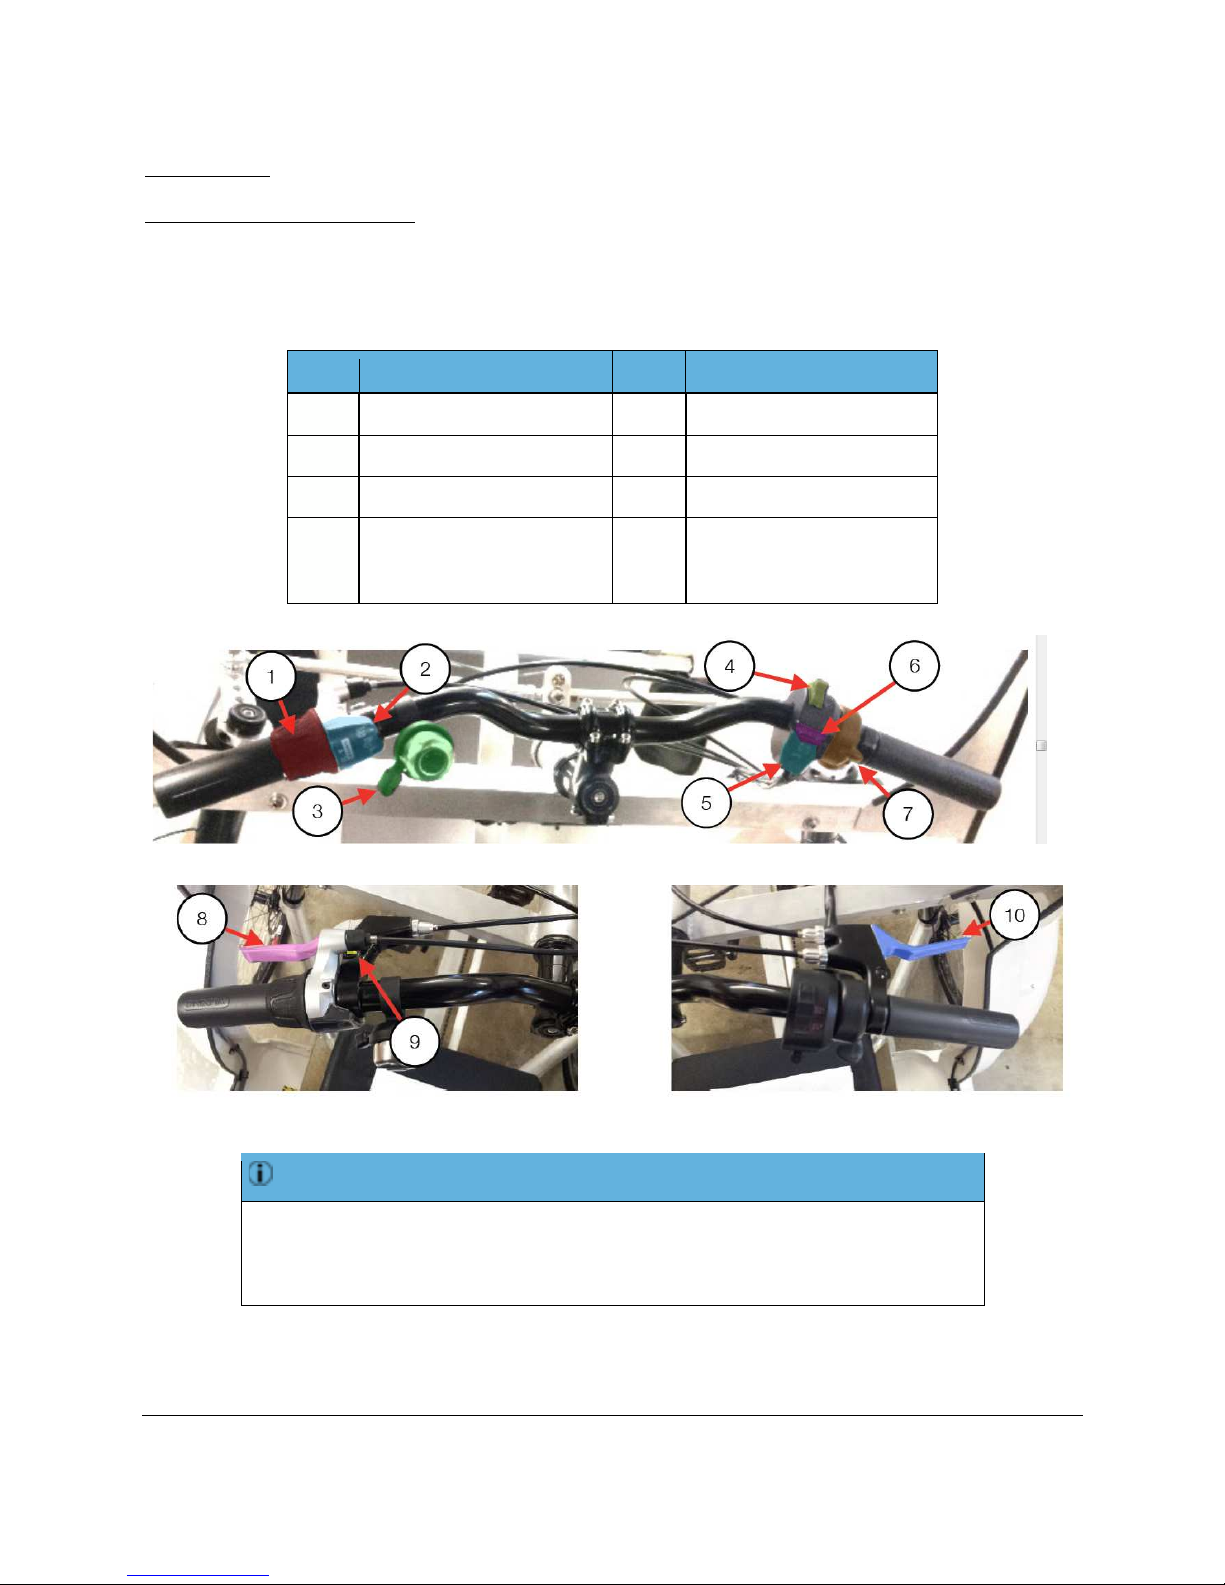
Know Your Controls .................................................................................................... 8
Vehicle Operation............................................................................................................ 9
Before You Get In ........................................................................................................ 9
Getting into the Vehicle................................................................................................ 9
Before Riding............................................................................................................. 10
Taking Your First Ride................................................................................................ 10
Adjusting the Seat ................................................................................................ 10
Riding Your ELF ................................................................................................... 12
Understanding the 3-Speed Hub ............................................................................... 12
Shifting to Higher Gears ....................................................................................... 12
Down Shifting....................................................................................................... 12
Understanding the Optional NuVinci 360 Continuously Variable Transmission............ 13
Shifting to Higher Gears ......................................
Error! Bookmark not defined.
Down Shifting......................................................
Error! Bookmark not defined.
Using the CycleAnalyst® (If Equipped) ....................................................................... 13
Basic Button Navigation ....................................................................................... 13
Status Screens..................................................................................................... 13
Setup ................................................................................................................... 14
Handling the ELF ....................................................................................................... 14
Turning................................................................................................................. 14
Reversing ............................................................................................................. 14
Stopping .............................................................................................................. 15
Parking................................................................................................................. 15
Understanding Your Battery....................................................................................... 16
Battery Connections............................................................................................. 16
Charging Your Battery .......................................................................................... 17
Using the Wall Charger ................................................................................... 17
Using the Solar Panel...................................................................................... 17
Carrying and Using Two Batteries ........................................................................ 19
How to Get the Most Out of Your Battery............................................................. 19
Care Instructions........................................................................................................... 20
Drivetrain ................................................................................................................... 20
Wheels and Tires ....................................................................................................... 20
dsad
..................................................... 13
..
........................................................13

2
Battery....................................................................................................................... 20
Brakes....................................................................................................................... 20
Shifting ...................................................................................................................... 20
Cleaning .................................................................................................................... 21
Transport................................................................................................................... 21
Security ..................................................................................................................... 22
Roadside Assistance .................................................................................................... 23
Notes ............................................................................................................................. 24
Notes ............................................................................................................................. 25
Legal .............................................................................................................................. 26

3
Foreword
The ELF is built by Organic Transit, Inc. in Durham, North Carolina, USA. It is
constructed with rugged, but ultra-light materials used in boats, aircraft, and bikes and
should be ridden gently and with care to ensure a long and efficient life. This guide is
constructed to help you get to know your ELF model smart-bike and enjoy it safely for
years to come.
To meet other ELF owners and stay up to date with the latest in the ELF community,
join the ELF owners Facebook page at https://www.facebook.com/groups/ot.elf.owners/

4
The Structure of This Manual
Before reading the manual, please understand the following:
This manual describes the vehicle equipment at the time of printing. Some equipment
may not be available until a later date or may only be available in certain markets.
Because this is a general manual for the ELF, some of the equipment described in this
manual may not be included in all variants of the vehicle. Figures and illustrations may be
slightly different from your vehicle. Please use all figures and illustrations as a general guide
for all configurations of the ELF.
On pages 1 and 2 you will find the Table of Contents listing all the topics found in this
manual in the order in which they appear.
Directions and positions (left, right, front, and rear) will always refer to the orientation of
the vehicle as seen from the rider’s position.
WARNING
Any text with this symbol will indicate important information
concerning safe operation of your vehicle and how to reduce
the risk of personal injury.
Note
This symbol will help to clarify some of the text in this manual
as well as give more insight into the nature of the equipment
installed in the ELF.

5
Safety
General Notes on Safe Driving
The ELF is an ultra-efficient transportation device unlike anything else you have ever
ridden. It is essential that you take the time to get to know your ELF inside and out before
attempting your first ride.
WARNING
Do not attempt to ride your ELF until you have read and understood all
instructions and warnings in this manual. Operators must exercise good
judgement and common sense to detect and avoid hazards and dangers.
WARNING
If you have health concerns please discuss with your doctor before driving
the ELF. If they give you the go-ahead, work up your endurance with
moderate goals until you are able to cover the distance you want.
To reduce the risk of serious injury or death, please adhere to the following guidelines:
•Never operate your ELF while under the influence of drugs or alcohol.
•When coasting down hills, use brakes to maintain a safe speed.
•Make sure sliding seat screws are tightened prior to riding.
•Familiarize yourself with the controls before operation.
•Maintain appropriate and safe speeds for the given conditions. See Adverse
Conditions on page 6 for more information.
•Reduce speed when cornering and make gentle arcing turns to avoid loss of
control. The ELF can roll if turned sharply, even at low speeds.
•Be aware that releasing the throttle may not slow the vehicle.
•Wear closed toed shoes with wraparound heel (no sandals or flip flops). Do not
wear high heels.
•Make sure shoelaces are tied and cannot be caught in the chain.
•Use mirrors; be aware of pedestrians and other vehicles.
•Check that tires are inflated to designated tire pressure printed on tire wall.
•Always wear a protective helmet.
•Make sure nothing is on the roof and that all hatches and items are secured.
•Always obey the rules of the road and respect your fellow travelers.
•Always keep feet on pedals while the vehicle is in motion. Placing feet on
the ground while riding could result in serious injury.

6
Adverse Conditions
We recommend that you avoid riding in the conditions listed below, but if
necessary, use caution and pay attention to the possible dangers listed.
•High Winds: may cause swerving and loss of control
•Heavy Rain: may impede visibility and create hazardous conditions
•Snow and Ice: conditions may make road surfaces slippery and increase
stopping time.
•Fog or humid conditions: can obscure visibility.
Avoiding Road Hazards
When encountering road hazards, steer the ELF so the hazard passes beneath either
pedal (left or right). This will allow the rear wheel to avoid contact with the hazard and give
you a more comfortable ride.
Avoid deep puddles and moving water. If riding in wet conditions, check to make sure
the battery is dry when you complete your ride, wiping dry if necessary.
WARNING
This vehicle is not intended for use in off road conditions.
WARNING
It is not possible to list every potential hazard or circumstance you
may encounter while riding your ELF. Exercise common sense
and good judgement to avoid causing harm to yourself or others.

7
Equipment and Controls
The ELF: Overview
ELF
Gear Hub
Brake Lights
Rearview Mirror
Battery
Tray
Front Disc Brakes
Headlights
Turn Signals
Side Mirror
Controls
Sliding Seat
Solar Panel
Turn Signals
Tail Lights
Hatchback
Bulkhead

8
Bulkhead
Know Your Controls
The ELF uses only a few, easy to use controls, but it is important that you take the time
to familiarize yourself with them before attempting your first ride. Use the diagrams below
to identify and locate the following items:
#
Control
#
Control
1
Gear Shifter
6
Turn Signal Switch
2
Gear Indicator
7
Throttle
3
Bell
8
Rear Brake Lever
4
Light Switch
9
(N/A)
5
Horn
10
Front Brake Lever
Controls Front View
Controls Top View
Note
The front disc brake lever (right) provides most or all of your stopping
power. The optional rear brake lever (left) provides additional stopping
power.

9
Vehicle Operation
Before You Get In
Once you have your ELF and it fits you do a simple ABCDEF safety check:
1. Air Pressure: Check tire pressure and inflate as needed to the recommended
pressure listed on the tire wall.
2. Brakes: Make sure that squeezing the brake lever(s) about half way completely
stops the ELF.
3. Chain: Make sure the chain moves smoothly, is well lubricated, and is free of rust.
4. Damage: Look for loose or damaged parts, foreign objects, or other potential
hazards.
5. Electricity: Make sure the battery is properly connected and secured in the vehicle.
6. Familiarize: Familiarize yourself with the location of the horn, bell, lights, turn signals,
throttle, and gear shifter (see Know Your Controls on Page 8).
If you have problems with any of the ABCDEF checks, take your ELF to a bike mechanic
or Organic Transit technician.
Getting into the Vehicle
1. Make sure the seat is far enough toward the rear to be out of the way but not so far
that you cannot sit down easily. Refer to Adjusting the Seat on page 10.
2. Step in with your foot nearest to the ELF and place your foot on the drop axle or
ground, whichever is more comfortable. The axle can easily support the weight, but
taller riders may find it more comfortable to use the ground. See location of drop
axle in photo below.
3. Sit down and bring other foot in.
4. Place both feet securely on pedals.
5.
WARNING
Do not step on plastic panel inside door (labeled “Do Not
Step”)

10
Before Riding
1. Remove all loose items from your pockets and stow securely.
2. Always wear a helmet.
3. Check side-view and rear-view mirrors for positioning.
4. Turn key to engage battery. (located to the left of control box on bulkhead behind
seat)
5. Test horn and bell.
6. Disengage parking brake.
7. Check for hazards, obstacles, pedestrians, traffic, etc.
Taking Your First Ride
Adjusting the Seat
Sit in the vehicle and pedal backwards to check that your feet comfortably reach the
pedals and that your knees do not bump the dash strut. Adjust the seat as needed until
you find a secure and comfortable position for your.
•To adjust your seat position fore and aft, turn the two seat adjuster handles
counterclockwise to loosen.
•Slide the seat forward or backward until it is in the desired position
•Turn the two handles clockwise to tighten.
Turn counterclockwise to loosen the seat

11
Turn clockwise to tighten the seat
Note: Seat adjuster handles should go from fully tight to fully loose in only one
half rotation (a 180 degree turn). If an adjuster handle is too loose to fully tighten
in one half turn, lift the spring-loaded handle straight upwards and rotate it
slightly counterclockwise (while holding in lifted position) to allow additional
tightening onto clamp bolt.

12
Riding Your ELF
1. Start out slowly, using the pedals and/or the throttle to move forward.
2. Make slow arcing turns to feel how the ELF handles and get comfortable with the
steering.
3. Test the brakes at slow speed at first. While the ELF’s dual disc brakes offer
superior stopping power to calipers, sudden or excessive braking will make for an
uneasy ride and can shorten the life of your brakes. Applying brakes too hard in wet
conditions may cause the tires to skid.
4. Apply gentle and even pressure to the thumb throttle to accelerate using the motor.
Releasing the throttle will stop the motor but may not slow the vehicle. Use caution
and do not exceed a speed appropriate for the conditions and terrain. Always
reduce speed for turns.
WARNING
Always keep feet on pedals while the vehicle is in motion.
Placing feet on the ground while riding could result in serious
injury.
Understanding the 3-Speed Hub
The standard ELF comes equipped with a 3-speed sealed gear hub which is controlled
by the gear shifter on the left handlebar. Position 1 is the lowest, slowest, or easiest gear,
and position 3 is the highest, fastest, or hardest gear.
The gear you are currently using is indicated by a red coloration of the number. As you
change gears, the numbers will change from clear/grey to red. The gears can be changed
while the ELF is at a full stop, or while moving, but it is recommended that you ease off the
pedals while shifting. Do not remove your feet from the pedals, but do reduce pedaling
pressure or momentarily pause pedaling.
On non-electric bikes, the gear shifter is usually located on the right handlebar grip.
Because the ELF has a throttle on the right handlebar grip, the gear shifter is positioned on
the left handlebar grip and the gear indicator display is upside down.
Shifting to Higher Gears
Shifting to a higher or faster gear increases the resistance and makes the ELF harder to
pedal (good for cruising on flat ground or downhill). Shift to a higher gear by rotating the
shifter grip away from you while pedaling. You may notice that it is harder to pedal at low
speeds and on hills when in a higher gear.
Down Shifting
Shifting to a lower or slower gear makes the ELF easier to pedal, so it is great for
starting out or climbing hills. Down shift by rotating the shifter grip toward you while
pedaling. The display will indicate a red “1” showing that you are in the lowest gear.

13
Understanding the optional NuVinci 360 Continuously Variable
Transmission
Changing gears with your N360 hub is as simple as rotating the shifter grip. The
graphic display shows a hill for slower speeds and a flat line for faster speeds. Please note
that the display is inverted on the ELF. For more detailed information on the NuVinci N360,
visit: www.fallbrooktech.com/cycling/n360
WARNING
Do not over-rotate the shifter. If you feel a lot of friction, stop
to avoid mechanical failure. It is always best to use shifter
while pedaling.
Shifting to Higher Gears
Shifting to a higher or faster gear increases the resistance and makes the ELF harder to
pedal (good for cruising on flat ground or downhill). Shift to a higher gear by rotating the
shifter grip away from you while pedaling. You may notice that it is harder to pedal at low
speeds and on hills when in a higher gear. The line on the shifter display will show a flatter
line (like flat ground).
Down Shifting
Shifting to a lower or slower gear makes the ELF easier to pedal, so it is great for
starting out or climbing hills. Down shift by rotating the shifter grip toward you while
pedaling. The line on the shifter display will show a more curved line (like a hill).
Using the CycleAnalyst® (If Equipped)
The CycleAnalyst® is an advanced bicycle computer that can help you track your
speed, mileage, battery level and energy consumption.
Basic Button Navigation
•Press right/left buttons to navigate Status or Setup Screens.
•Press/hold left button to enter Setup.
•Press/hold right button to reset trip statistics.
•From the 'Trip Regen Stats' status screen, press/hold right button to reset peak
trip statistics.
Status Screens
There are eleven Status screens which display information grouped by function. Some
information (e.g. speed, Amps) is displayed on more than one screen to give the operator
a more comprehensive view without changing screens. Due to the design of the ELF,
screens 3 and 5 do not apply and should be ignored. The status screens are shown below
and can be navigated through by pressing the left or right buttons on the CycleAnalyst®.

14
Setup
The CycleAnalyst® will arrive completely set up if it was factory-installed. If the
CycleAnalyst was user-installed, refer to the CycleAnalyst User Installation Manual for
setup instructions.
Handling the ELF
Turning
Make gentle arcing turns at low speed. Avoid making sharp turns at speed. Failure to
follow these guidelines may result in a dangerous loss of control. Take the time to
familiarize yourself with how the ELF handles and turns in a controlled environment before
joining traffic.
The ELF has a large turning radius. Make sure to plan accordingly when riding as it
may be difficult to get out of tight spaces.
Always use the turn signals when making turns. Make sure to return the turn signal
switch to the middle (off) position once you have completed the turn as the signal will stay
on until you change it.
Always ride at appropriate speeds for the road conditions. Increased speed can
increase risk — exercise good judgment to stay safe.
Reversing
The ELF does not have a reverse gear. To reverse, make sure the vehicle has come to
a complete stop and place your feet on the ground. Then simply push the vehicle
backward using your feet (like The Flintstones).

15
Stopping
Engage the brakes by squeezing the brake lever. Try to use even pressure to avoid
jarring stops. Under wet conditions, stopping distance is increased because tires do not
grip as well. Ride more slowly and brake earlier in wet or icy conditions.
Parking
Remember to always engage the parking brake and turn the wheels toward curb when
parking the ELF. The parking brake should aid in immobilizing your ELF, but additional
steps may need to be taken to prevent rolling, particularly on steep or slippery terrain.
Always make sure your ELF is securely parked before leaving.
The parking brakeis a simple loop on the end of the right-side handgrip. To activate
the parking brake, squeeze the brake lever, then slide the loop around the end of the
brake lever to keep the brakes engaged.

16
Understanding Your Battery
The 11Ah battery pack and the 15 Ah battery pack both come in the plastic case
shown below. Each battery pack is made of Li-ion NMC batteries and has a built-in Battery
Management System (BMS).
Battery Connections
In order to power the ELF and allow the solar panel to charge the battery, you must
plug the black plug located on the ELF into the corresponding plug on the battery. Do so
by grabbing both terminals at their base and pressing them firmly together until you hear a
click. The two connectors are designed to mate only one way. Be sure to secure cables
away from the chain and do not allow them to drag.
WARNING
When disconnecting the main power connection, avoid
personal injury on the surrounding elements by disconnecting
the connectors using a gentle wiggle/pull motion.

17
Charging Your Battery
Using the Wall Charger
1. Disconnect the battery from your ELF by holding the base of both plugs and gently
wiggling and pulling the connection apart. Once the battery is disconnected,
carefully lift it from the battery box.
2. Make sure the battery charger is NOT connected to a wall outlet yet! If it is, simply
unplug it before continuing.
3. To charge your battery, connect the plug on the battery to the plug on the charger.
Do so by holding the base of both plugs and gentling pushing them together until
they click into place.
4. Plug the battery charger into a standard wall outlet. You may need an adapter for
use in countries outside the United States. While the battery is charging, both
indicator lights will be red.
5. Once the battery is fully charged, one indicator light will show red and one indicator
light will show green. First, disconnect the battery charger from the wall outlet.
Then, disconnect the battery from the battery charger.
Note
The battery wall charger must be unplugged between charges to
work properly during charging.
Note
The 11Ah battery should charge in roughly 2.5 hours
and the 15Ah battery should charge in roughly 3 hours.

18
Using the Solar Panel
Once the battery is plugged in to the ELF, the solar panel will begin to charge your
battery.
Keeping the solar panel clean is crucial in efficiently harnessing the power of the sun.
Please refer to Cleaning on page 31 for more information.

19
Carrying and Using Two Batteries
The ELF battery box is designed to carry two batteries. The ELF comes standard with
one battery and additional batteries are available for purchase at www.organictransit.com.
When carrying a spare battery, please note that it is necessary to manually switch the
cables from the depleted battery to the full one (the two batteries are not connected to
each other).
How to Get the Most Out of Your Battery
The ELF battery will carry you and your ELF for many miles per charge, often enough
for most commutes and trips around town. If you would like to maximize the miles you get
out of each charge, try these helpful tips:
•Using the throttle to start from a dead stop requires a lot of energy and may
quickly reduce the charge in your battery. It may take a lot of effort, but try using
the pedals to start your ELF rolling before engaging the throttle to save battery
power.
•Use the pedals to maintain speed as much as possible, saving the motor for
uphill climbs.
•Look for opportunities to coast or pedal to maintain speed without using the
throttle.
•When approaching stop lights/signs, coast to a stop.
Note
Temperature change can affect battery efficiency. Battery capacity
may be reduced when used in cold temperatures. If you park your
ELF in the cold, you might want to take your battery in at night to
keep it warm.
Remember to pedal. It’s fun, good for you, and extends the range of your battery.
Table of contents
Popular Bicycle manuals by other brands

Specialized
Specialized ROAD & GRAVEL Assembly guide

Prevelo
Prevelo Alpha Zero owner's manual

Denver
Denver Orus E-Times City 8000HM-X7 Instructions for use and maintenance

Husky
Husky CRUISEMASTER Owner's manual & assembly guide

Kalkhoff
Kalkhoff Kalkhoff Instruzioni per l’uso

Civibikes
Civibikes Runabout user manual