Exterior Bracket Light
Instruction Manual
7672 / 7677
Safety & Installation Instructions
1. If you are in any doubt consult a qualified electrician as to the installation of the fitting. Install in accordance with current
IEE wiring regulations. It is recommended that this fitting is installed by a qualified electrician.
2. Ensure that the electrical supply is OFF. Disconnect the electrical supply at the fuse-board.
3. If removing an existing fitting first, note all wiring connections: record which of the house wires is connected to the live,
neutral and earth terminals.
4. Carefully identify where the supply cable is (and check there are no other cables in the area) to avoid damage to concealed
wiring during installation.
5. Position the light where desired ensuring that there is suitable support adjacent to where you will connect to the house
supply and mark position of fixing holes, before drilling appropriate holes as below.
6. a. Brick or masonry: Drill holes into which the wall plugs tightly fit, then insert wall plugs.
b. Wood: No hole necessary (unless small pilot hole required), screws can be screwed directly into the timber.
c. Plaster/Cavity: Special cavity wall fittings are required, rather than provided fixings. These are widely available from
good hardware or DIY store and should come with their own instructions that must be followed. It may be easier to
relocate the fitting so that you screw directly into a timber joist or beam.
7. Support the fitting so that no strain is applied to the wiring when making the electrical connections. If necessary get a
colleague to help.
8. Electrical connection: this light fitting must be earthed. Make connections following the diagram below using the terminal
block provided. A small flat-head screwdriver is required.
9. To maintain the IP rating of this fitting, you must ensure that the electrical connection has suitable protection from water
ingress, housing the connection in an IP rated junction box or sealing the backplate with silicone.
10. Ensure that all electrical connections are tight, with no loose strands of wire left out of the connectors and the lid of the
connector is securely closed. Ensure there are no wires are trapped behind or within the fitting and complete the
installation, screwing the fitting to the mounting surface.
11. Fit the correct type and wattage of lamp (or less). Be careful not to overtighten the lamp.
12. Switch on at the fuse-board. Your light fitting is now ready for use.
Other Important Information
Switch off at mains before changing lamp(s). Never fit a lamp of greater wattage than recommended. Ensure children do not
play with the light fitting. Dispose of old lamps carefully. Never leave a fitting without a lamp in position (or someone can
accidentally touch the contacts). Adjust fitting only when power to the fitting is off and has been left to cool. If the external
flexible cable or cord of this luminaire is damaged, it shall exclusively be replaced by the manufacturer or his service agent, or a
similar qualified person, in order to avoid a hazard.
These instructions are provided for your safety in order to prevent the risk of Fire, Electric shock or Injury. It is vitally
important that they are read in their entirety before installing your fitting. Please retain for future reference.
MADE IN BRITAIN
ORIGINALBTC.COM
+44 (0)1993 882 251
UNIT 21 / 22 AVENUE ONE, STATION LANE, WITNEY, OX28 4XZ, ENGLAND
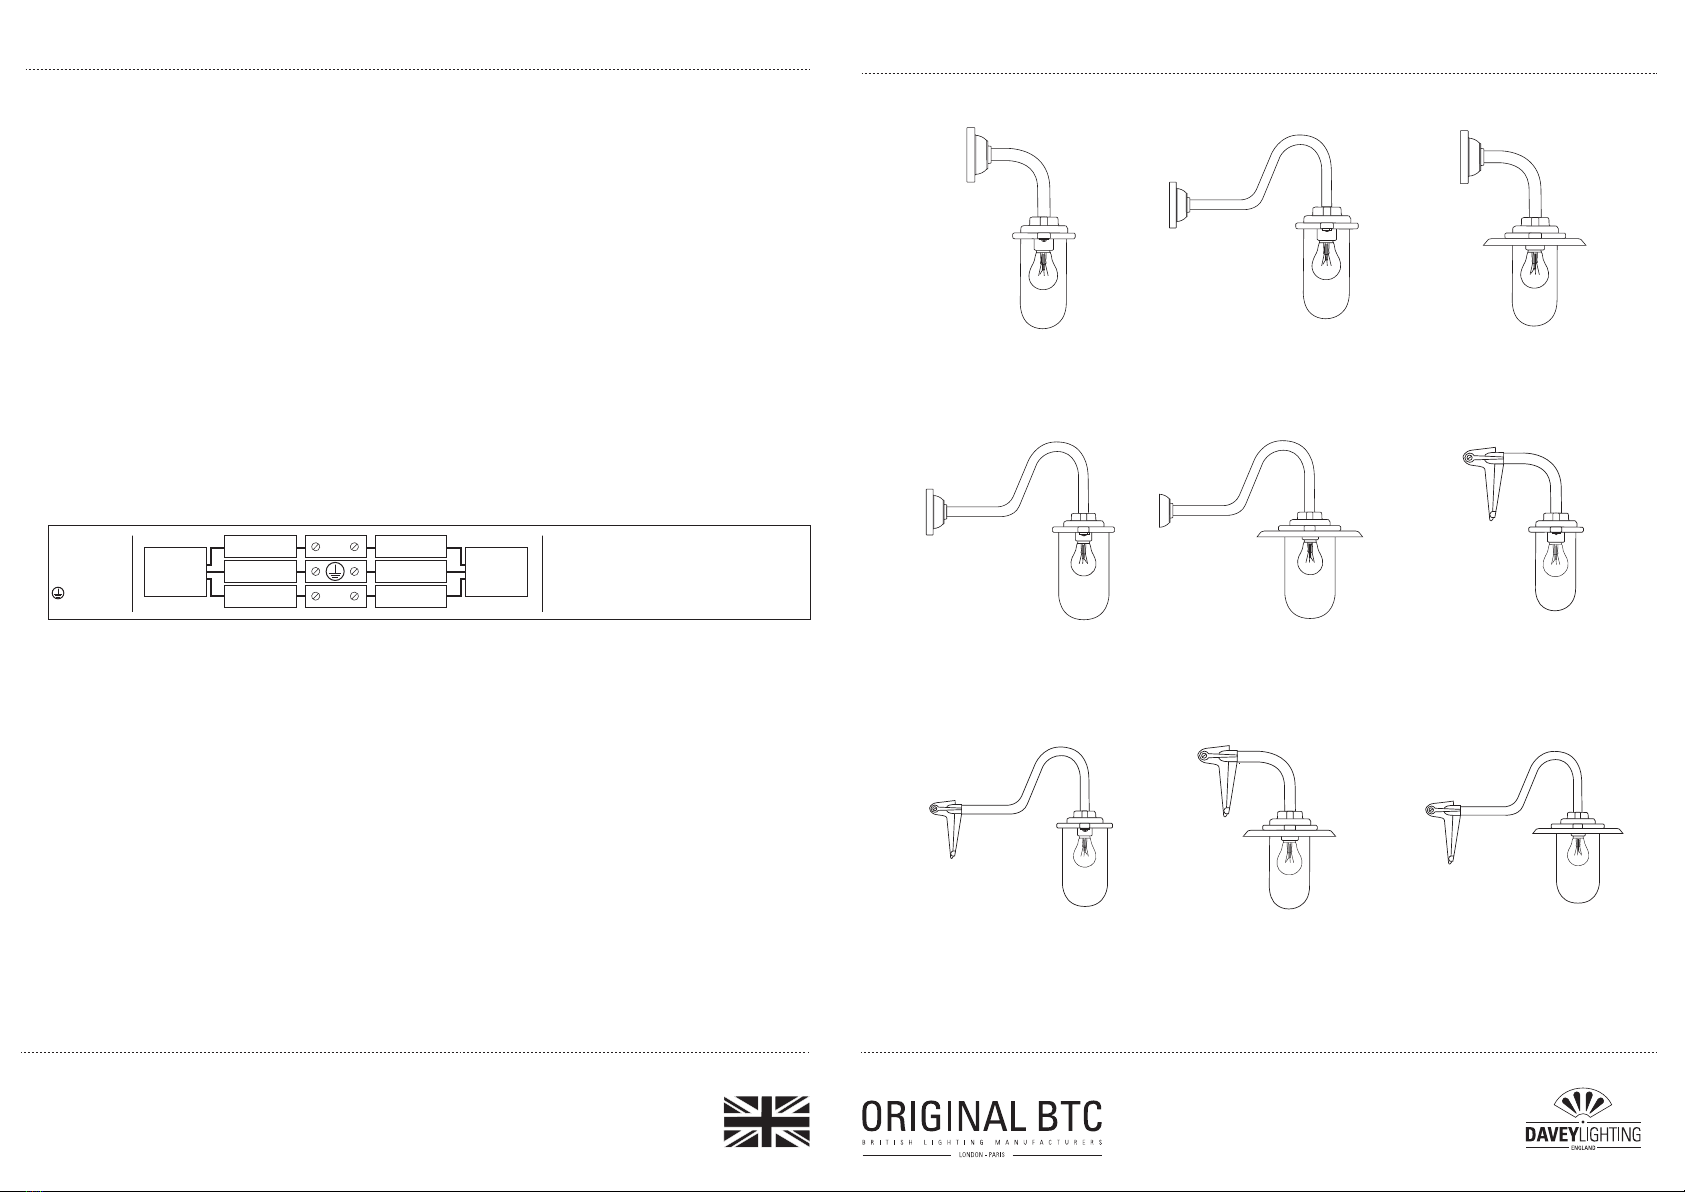
Exterior Bracket Light, 60W
Round Backplate
7677/060
Exterior Bracket Light, 100W,
Round Backplate, Swan Neck
7672/100
Exterior Bracket Light, 60W,
Round Backplate
7672/060
Exterior Bracket Light, 100W,
Round Backplate, Swan Neck
7677/100
L
N
Live
KEY
Neutral
Earth
L =
N =
=
*Mains
Supply
Fitting
*After 2004, wiring installation colours changed:
LIVE Brown replaces Red
EARTH Green/Yellow sleeving
NEUTRAL Blue replaces Black
BROWN
GRN/YEL
BLUE
BROWN
GRN/YEL
BLUE
Established in 1990, Original BTC manufactures relaxed, familiar lighting for traditional and contemporary homes.
All products are hand-assembled in Oxfordshire from high quality components, produced in the UK.
Cleaning and Maintenance
Metal finishes should only be cleaned with a soft, dry cloth. Do not use polishes or abrasives. Glass can be cleaned by hand,
using a soft damp cloth with a diluted mild detergent (nonabrasive) or sutiable glass cleaner if necessary. Switch off power to
the fitting before cleaning. Spare parts are available for this product, please contact us on the details below.
Exterior Bracket Light, 60W,
Corner Fork
7672/060/AC
Exterior Bracket Light, 100W,
Corner Fork, Swan Neck
7672/100/SC
Exterior Bracket Light,
60W, Corner Fork
7677/060/AC
Exterior Bracket Light,100W,
Corner Fork, Swan Neck
7677/100/SC
Exterior Bracket Light,60W,
Round Backplate, Swan Neck
7677/060/SN
v1.3-02.22


