7
4 INSTRUMENT SPECIFICATIONS
4.1 Photometer
● Light source:
3 light-emitting diodes
● Optics: glass light guide, a condenser lens
system and an objective lens system
4.2 Dimensions and
Power Requirements
● Weight: 1.3 kg
without batteries or power supply
● Size: 20 x 13 x 7 cm
● Power requirements:
100–240 V AC, 50–60 Hz power supply or
batteries, power consumption 2 W
● Batteries: 8 x size AA (1.5 V),
alkaline batteries recommended
● Power supply: supplied with the instrument
4.3 Instrument Software
These instructions describe the use of the Quik-
Read 101 Instrument for embedded software
versions 6.0 and upwards.
To upload new software to QuikRead 101
Instrument use a specific device QuikLink.
Ask your local supplier for more details.
5 INSTALLATION
AND ASSEMBLY
5.1 Unpacking
Open packaging box and remove power supply,
dispenser and the QuikRead 101 Instrument.
Carefully examine the instrument to ascertain
that it has not been damaged during shipment.
The shipping carton should contain one (1) each
of the following:
● Instrument
● Instructions for use
● Power supply
● QuikRead 1 ml Dispenser with one lling
tube (06040, 06040-UK)
Note: If damage has occurred or any parts are
missing, immediately notify your supplier.
5.2 Location
The instrument should be placed on a clean,
horizontal surface, and the following points should
be observed:
1. The ambient temperature must be between
15°C and 35°C.
2. The relative humidity must be less than
85% (non-condensing).
3. Do not place the instrument in direct sun-
light.
4. Use of a dedicated power outlet is recom-
mended.
5. Do not place near X-ray machinery.
6. Store magnetic cards away from strong
magnetic elds.
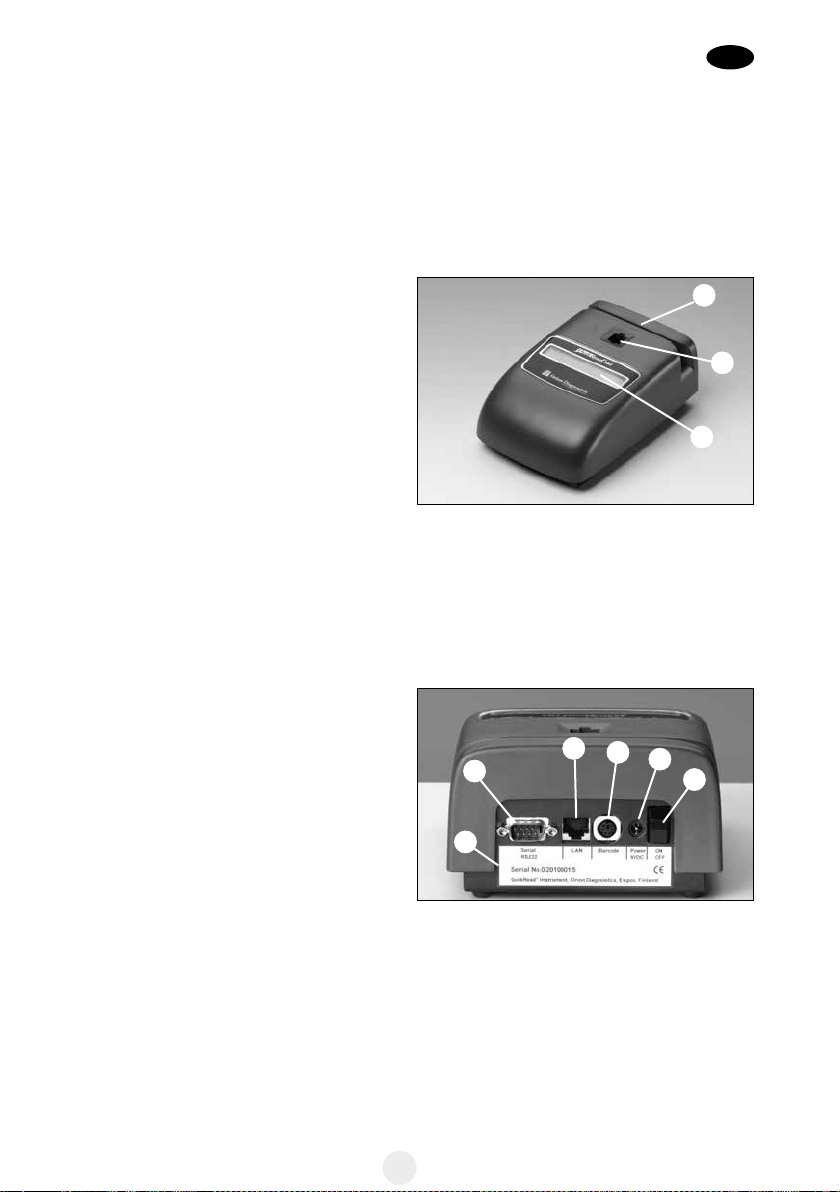
5.3 Installation
Plug the power supply cable into the back of
the instrument. Plug the power supply into a
power outlet and then switch ON the instru-
ment.
Alternatively, insert eight AA-size batteries.
For instructions on how to install the batteries,
see Appendix D. The instrument will not operate
with the batteries unless the power supply cable
is detached from the back of the instrument.
5.4 Maintenance and Service
The QuikRead 101 Instrument has been
designed for extreme ease of use and main-
tenance freedom. The only service or main-
tenance required is change of batteries (as
described in Appendix D).
For instructions on how to service the dispenser,
see QuikRead Dispenser Operating manual. Use
a separate dispenser for each type of QuikRead
assay.
Periodically clean the exterior of the instrument,
including the display panel, using a lint-free
cloth dampened with water. If necessary, a mild
detergent may be used. Do not use organic
solvents or corrosive substances when cleaning
the instrument. Accidental spillage of biological
material should be wiped with a lint-free cloth
dampened with 70% ethyl alcohol.
For any repair requirement, contact your local
supplier.
6 OVERVIEW OF INSTRUMENT
OPERATION
To begin a test, the user passes the magnetic card
of the QuikRead kit through the card reader slot.
A message indicating that the analyser is ready to
start the specic test will be displayed on the LCD.
The user then performs the appropriate steps with
the reaction cuvette as indicated by the reagent kit
instructions. The user then inserts the cuvette with
sample into the measurement well. This activates
the processor, which starts a measurement run.
Blank or sample measurement time will depend
on the specic analyte kit used.
On completion of blank or sample measure-
ment, beeps inform the user that this assay
step is complete. The photometer measures