Orion Diagnostica QuikRead go User manual

QuikRead go®
Instrument
135936-5
• English
• Deutsch
• Français
• Italiano

2
Explanation of symbols Zeichenerklärung Explication des symboles Spiegazione dei simboli
In vitro diagnostic medical device In-vitro-Diagnostikum Dispositif médical de diagnostic in vitro Dispositivo medico-diagnostico in vitro
Serial number Seriennummer Numéro de série Numero di serie
Catalogue number Bestellnummer Référence du catalogue Riferimento di Catalogo
Manufacturer Hersteller Fabricant Fabbricante
Date of manufacture Herstellungsdatum Date de fabrication Data di fabbricazione
Contents Inhalt Contenu Contenuto
Instrument Gerät Appareil Strumento
Power supply Netzteil Alimentation Alimentatore
Mains cable Netzkabel Câble d’alimentation Cavo di collegamento alla rete
Consult instructions for use Gebrauchsanweisung beachten Consulter la notice d’utilisation Consultare le istruzioni per l’uso
Caution Achtung Attention Attenzione
Biological Risks Biogefährdung Risques biologiques Rischio biologico
Temperature limitation Temperaturbegrenzung Limites de température Limiti di temperatura
Fragile, handle with care Zerbrechl ich, mit Sorgfalt behandeln Fragile, manipuler avec
précautions Fragile, maneggiare con cura
Keep dry Vor Nässe schützen Conserver au sec Conservare a secco
China RoHS GB/T 26572 China RoHS GB/T 26572 China RoHS GB/T 26572 China RoHS GB/T 26572
15

3
Cat. No. 133893
Cat. No. 149915
Instructions for use • English 4
Bedienungsanleitung • Deutsch 36
Mode d’emploi • Français 70
Istruzioni per l’uso • Italiano 104
English

4
CONTENTS
1 INTRODUCTION.............................. 5
Intended use ................................................ 5
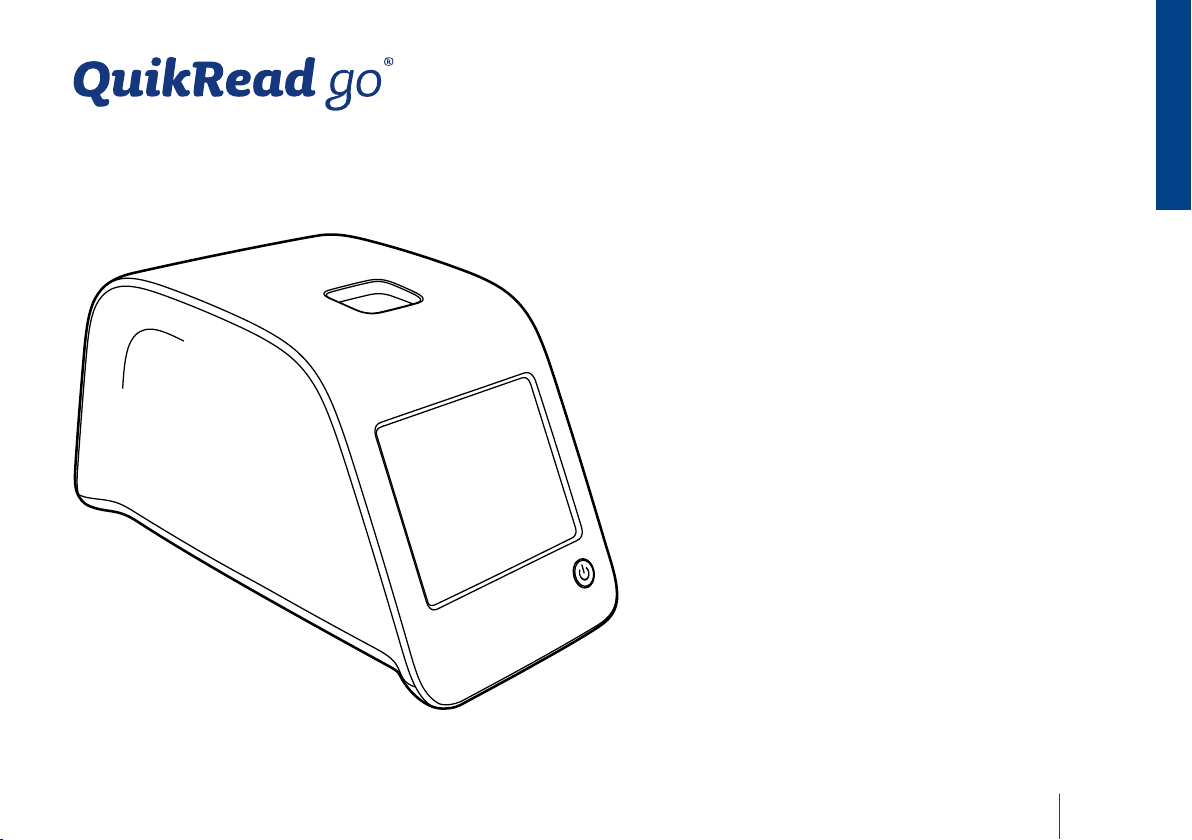
QuikRead go instrument .............................. 5
Safety information ....................................... 5
Precautions and limitations .................... 5
2 GETTING STARTED ......................... 6
Unpacking ................................................... 6
Accessories .................................................. 6
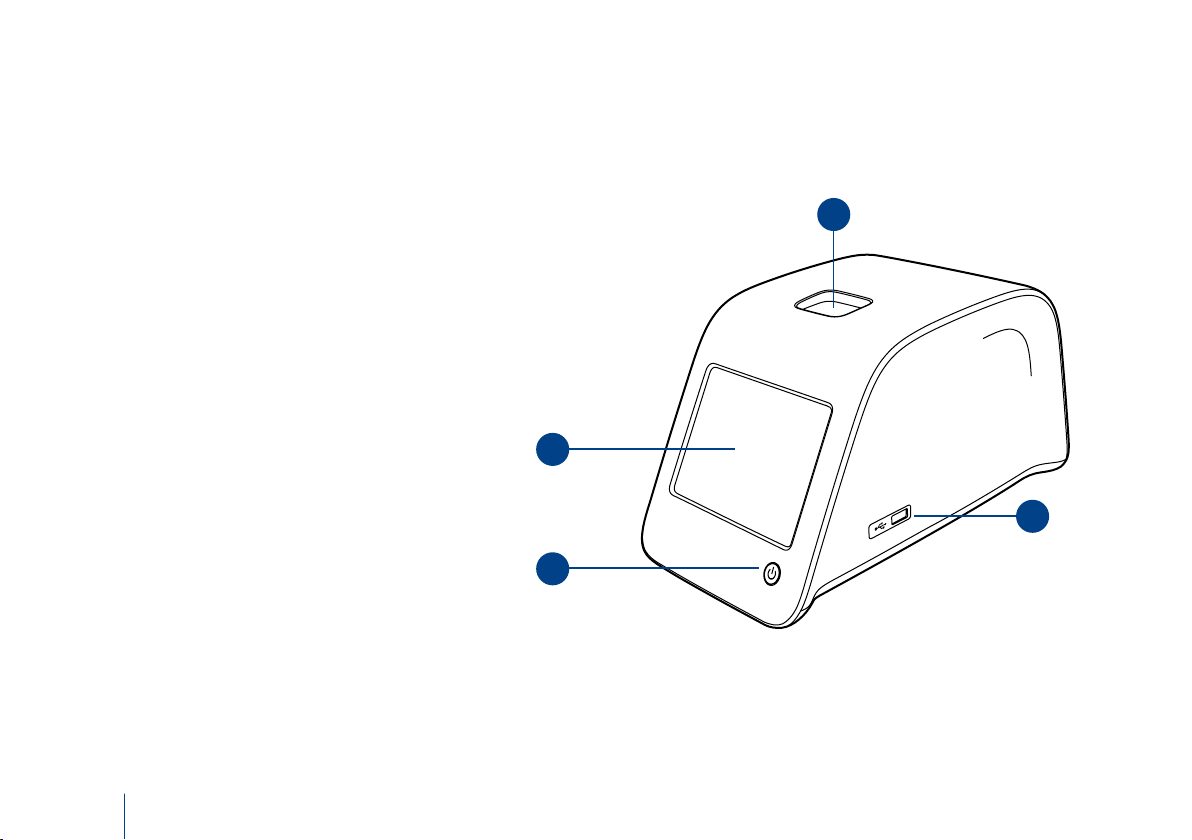
QuikRead go parts ....................................... 6
Lifting/transporting the instrument............... 8
Location and environment............................ 8
During use............................................. 8
During transport and storage................. 8
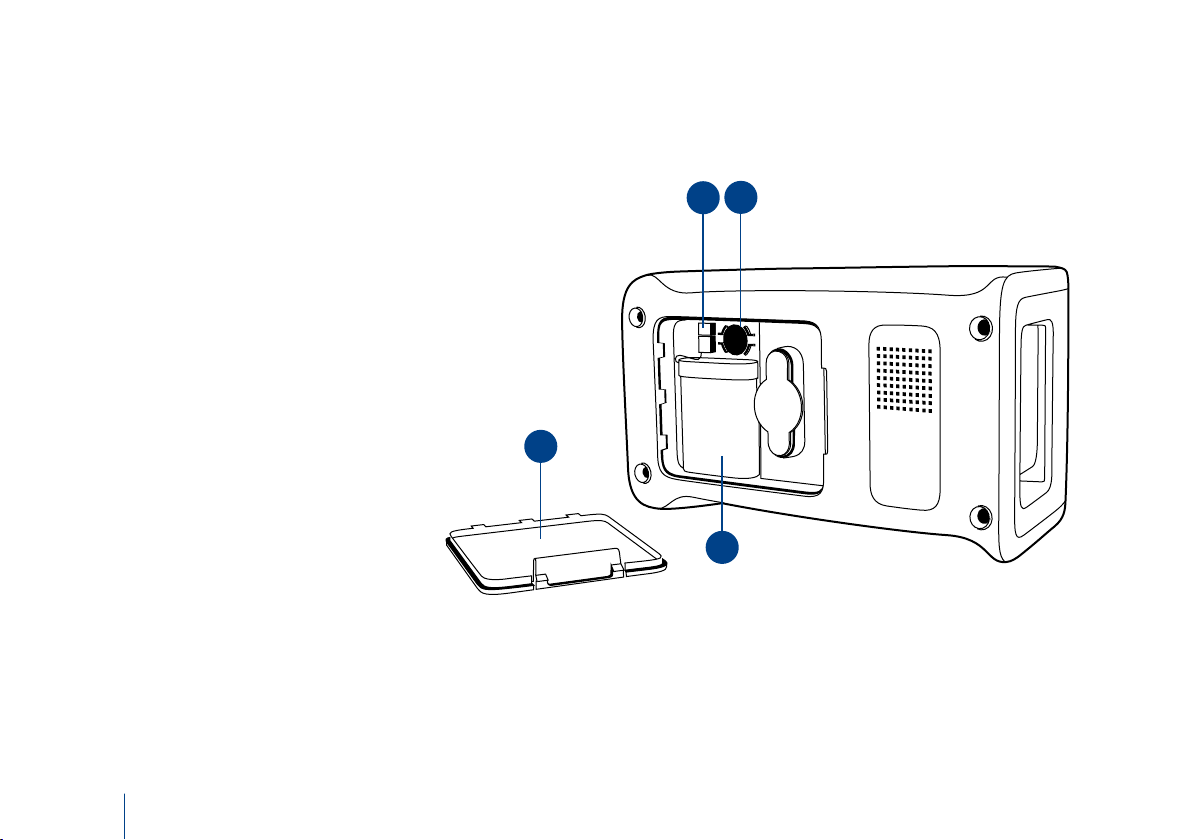
Power supply cable & accumulator unit ........ 9
Connectors and cables........................... 9
Plugging the power supply cable............ 9
Inserting the accumulator unit ............. 10
Power (on, off, sleep mode) ....................... 11
Turning power on ................................ 11
Turning power off................................ 11
Sleep mode.......................................... 11
Use of the touch screen..............................11
Set-up wizard............................................. 12
Language............................................. 13
Date and time...................................... 14
Screen brightness................................. 14
Audio volume ...................................... 15
Power save .......................................... 15
Finishing the Set-up wizard.................. 15
User interface in general ............................ 16
Main menu.......................................... 16
Status area symbols ............................. 16
Layout ................................................. 17
Structure of the user interface.............. 18
3 USAGE .......................................... 19
Performing an assay ................................... 19
Basic measuring mode ......................... 20
Quality control ..................................... 21
Other measuring modes ...................... 21
Results .................................................... 21
Viewing results .................................... 21
Deleting result history .......................... 21
Printing results ..................................... 21
Transferring results to USB-storage....... 21
Sending offline results to LIS/HIS .......... 21
Settings .................................................... 22
Personal settings.................................. 22
Measurement flow............................... 23
Maintenance settings........................... 25
Admin settings..................................... 25
Manufacturer settings.......................... 27
Profiles .................................................... 27
Creating a profile................................. 27
Applying a profile ................................ 27
Basic settings ....................................... 27
4 MAINTENANCE ............................ 27
Instrument calibration ................................ 27
Cleaning the instrument............................. 27
Software update ........................................ 27
Changing the clock battery ........................ 27
5 TROUBLESHOOTING .................... 28
6 INSTRUMENT SPECIFICATION ...... 31
Declaration of conformity........................... 31
Technical specification ................................ 31
Photometer.......................................... 31
Touch screen display ............................ 31
Dimensions & power requirements....... 31
Software update .................................. 31
Instrument identifier ............................ 31
Memory............................................... 31
Power supply ....................................... 31
LIS connection ..................................... 31
USB connection ................................... 31
Service .................................................... 32
Warranty.................................................... 32
Recycling.................................................... 32
QuikRead go user levels and rights
when Security login is enabled ................... 33
CONTENTS
English

5
1 INTRODUCTION
Intended use
Orion Diagnostica QuikRead go®is an easy to
use in vitro diagnostic test system. It has been
designed to measure various analytes from pa-
tient samples needed as an aid in diagnosis and
treatment monitoring. The system consists of the
QuikRead go Instrument and the QuikRead go
reagent kits.
QuikRead go instrument
QuikRead go is a photometer capable of pro-
ducing quantitative and qualitative results. The
instrument has been designed and calibrated
for both photometric and turbidimetric measure-
ments. The instrument will guide you through
the assay procedure by means of a series of mes-
sages and animations shown on the display.
The QuikRead go instrument measures the ab-
sorbance of the cuvette contents and converts
the absorbance value into a concentration value
or positive/negative result on the basis of preset
test calibration data. The calibration data defin-
ing the overall assay curve or cut-off value for
each test is encoded on each cuvette label. This
information is transferred to the QuikRead go in-
strument automatically during the measurement.
The assays are performed according to the user
instructions accompanying each QuikRead go
reagent kit. The results are available in minutes.
The instrument can be operated on the mains
power or with an accumulator unit, it has USB
connections for an external printer or keyboard,
or barcode reader.
The QuikRead go instrument can be connected
to a remote Laboratory and Hospital Information
System (LIS/HIS). The instrument uses a standard-
ised data transfer protocol. Contact your local
supplier for more details.
Safety information
For your own safety, comply with all warning and
caution statements. To alert you to potential elec-
trical or operational hazards, warning and cau-
tion statements are provided where applicable.
Before taking QuikRead go into use, please read
the following precautions and limitations carefully.
Precautions and limitations
• Do not spill any liquids or drop any objects
onto or into the instrument.
• Spillage of potentially infectious material
should be wiped off immediately with ab-
sorbent paper tissue and the contaminated
areas swabbed with a standard disinfectant
or 70% ethyl alcohol. Material used to clean
spills, including gloves, should be disposed of
as biohazardous waste.
• Read beforehand and carefully follow the
QuikRead go reagent instructions for use sup-
plied with each reagent kit.
• Only QuikRead go reagents can be used.
• Do not mix components with different lot
numbers or different assays.
• Never place a cuvette without a tightly placed
cap into QuikRead go.
• Ensure that the cuvette sealing foil is totally
removed.
• Use only the power supply supplied with the
instrument and make sure that the plug is
placed so that it is removable.
• Use only the official QuikRead go accumula-
tor supplied by Orion Diagnostica.
• Do not put your fingers or any external devices
into the QuikRead go during measurement.
• Do not remove or shut down a USB-device
during data transfer.
• Do not open the instrument’s covers by open-
ing any screws. If the warranty seal is broken,
the instrument warranty is not valid.
• Use a secure internal network or Virtual Pri-
vate Network (VPN) when connecting the
QuikRead go to a LIS/HIS using LAN.
• Do not use or connect the instrument to LAN
if the warranty seal is broken.
INTRODUCTION

6
2 GETTING STARTED
Unpacking
Open the packaging box and check that it con-
tains all the necessary items:
• Instrument
• Instructions for use
• Power supply
• Mains cable
• Certificate of analysis
Carefully examine the instrument to ascertain
that it has not been damaged during shipment.
If damage has occurred or any parts are missing,
immediately notify your local supplier.
Accessories
Printer
The instrument can be connected to an external
printer. A list of compatible printers and
configuration parameters can be found at
www.quikread.com.
Connect the compatible printer to a USB port
and follow the instructions on the display.
Barcode reader
An external barcode reader can be connect-
ed to the QuikRead go instrument. A list of
compatible barcode readers can be found at
www.quikread.com.
Connect the compatible barcode reader to a USB-
port and follow the instructions on the display.
Picture 1
1. Measurement well for cuvette
2. Touch display
3. Power button
4. USB-port 1 (type A)
GETTING STARTED
QuikRead go parts
The components of QuikRead go are shown in
Picture 1 (instrument from above), Picture 2
(instrument from the rear) and Picture 3
(instrument from below).
1
3
2
4
WLAN adapter
For a wireless network connection. Use only
an adapter supplied by Orion Diagnostica.
Insert the adapter to any free USB port.

7
Picture 2
1. USB-port 2 (Type A)
2. USB-port 3 (type A)
3. USB-port 4 (Type B)
4. RJ-45 port
5. Connector for power supply
Picture 3
1. Accumulator unit cover
2. Instrument label with serial number
3. Warranty seal
GETTING STARTED
4
5
1
2
3
1
23
---- ---
-- ----

8
Lifting/transporting
the instrument
When lifting or transporting the QuikRead go in-
strument, always handle it carefully. In the back
of the instrument there is a handle to enable lift-
ing it by one hand (Picture 4).
A recess is added to the instrument side surfaces
to help the grasp (Picture 5).
Picture 4
Lifting the instrument by one hand.
Picture 5
Lifting the instrument by two hands.
Location and environment
During use
The instrument should be placed on a flat clean,
horizontal surface, and the following points
should be observed:
• Indoor use
• Altitude up to 2000 m
• The ambient temperature must be between
15°C and 35°C.
• Maximum relative humidity 80 % for temper-
atures up to 31°C decreasing linearly to 67 %
relative humidity at 35°C (non-condensing).
• Mains supply voltage fluctuations up to
±10 % of the nominal voltage.
• Installation category II (2500 V transient).
• Do not place the instrument in direct sunlight.
• Do not place the instrument into a strong
magnetic or electric field.
• Do not move the instrument while a test is
being measured.
• Do not measure in a moving vehicle.
• Pollution degree 2.
During transport and storage
• The ambient temperature must be between
2°C and 35°C.
• Protect from rain and humidity.
• Handle the instrument with care.
GETTING STARTED

9
Power supply cable &
accumulator unit
The QuikRead go instrument can be used either by
the power supply cable or the accumulator unit.
The accumulator unit is charged automatically
when the power cable is plugged in.
Connectors and cables
In the back of the instrument there are five
connectors with symbols describing their use.
One USB connector is placed on the right side
of the instrument. All symbols are described in
Picture 6.
The RJ-45 connector can be used for serial and
LAN connections. Wiring diagram of the cable is
described at www.quikread.com.
USB
RJ-45
Please consult
instructions for use
Power
On-Off switch
Picture 7
Connecting Power Supply Cable
Picture 6
Symbols on QuikRead go
GETTING STARTED
Plugging the power supply cable
Plug the power supply cable into the back of the
instrument. Plug the power supply into a power
outlet.

10 GETTING STARTED
Picture 8
1. Accumulator unit cover
2. Accumulator connector
3. Accumulator unit
4. Clock battery
Inserting the accumulator unit
Please follow carefully the steps below for insert-
ing the accumulator unit to the QuikRead go
instrument.
1. Turn off the instrument (if on).
2. Unplug the power supply cable.
3. Turn the instrument onto its side on a table.
4. Open the accumulator unit cover.
5. Attach the accumulator connector to the ac-
cumulator unit.
6. Press the accumulator unit into its place and
ensure that it is placed properly.
7. Close the accumulator unit cover.
8. Turn the instrument back to a standing
position.
2
1
3
4

11
Power (on, off, sleep mode)
The QuikRead go instrument can be in three
modes: on, off or sleep mode.
Turning power on
To turn the instrument on, press the Power but-
ton on the front panel. The light on the Power
button will indicate that the instrument is pow-
ered on.
If nothing happens, ensure that the power outlet is
connected, or if the instrument is on accumulator
usage, that the accumulator is charged.
After pressing the Power button, the backlight of
the display will light up, the instrument will start
and the main menu will appear.
Starting the QuikRead go instrument for the first
time will open a Set-up wizard (see chapter Set-
up wizard).
Turning power off
To turn the instrument off, press the Power but-
ton for approx. two seconds. The instrument
will ask you to confirm the shut down by asking
“Do you want to shut down?”. If Yes is chosen
on the touch display, the instrument will turn off.
In case a cuvette was inside the instrument while
shutdown, the cuvette will be lifted up and the
instrument will ask you to remove it.
Sleep mode
The purpose of the sleep mode is to save accu-
mulator charge in accumulator usage. The sleep
mode will activate automatically when the instru-
ment has been inactive for longer than the time
chosen in personal settings (see chapter Settings
–> Power save). The sleep mode functionality can
be “Full standby” or “Close lid only”.
The instrument indicates the sleep mode by
blinking the Power button light.
To wake the instrument up, press the Power but-
ton.
Picture 9
Using the touch screen by pressing the screen gently using a finger.
GETTING STARTED
Use of the touch screen
The QuikRead go instrument has a colour touch
screen. It is operated by touching the virtual but-
tons by fingers. The screen can be used both
with bare fingers and with gloves on. The touch
screen does not require much pressure, and
pressing too hard or using sharp items may dam-
age the screen.
There is always a multisensorial feedback to
touching a button: The button will indicate the
touching both visually by changing appearance
and with an audible sound.
A command is registered when the finger is re-
leased from the button touched. If the release
happens outside the initial button area, no com-
mand is given.

12 GETTING STARTED
Picture 10
To start the Set-up wizard, choose Start in the Set-up screen.
Set-up wizard
When starting the QuikRead go instrument for
the first time, you will be asked to complete a
Set-up wizard. During the Set-up wizard you will
be asked to select the language, and to set the
date and time.
The default language is English. The language
can be changed on the first step on the Set-up
wizard.
Start the Set-up wizard by choosing Start (see
Picture 10).
Note
The Set-up wizard can be started also manu-
ally from Settings –> Measurement flow –>
Maintenance –> Basic Settings.
Welcome to QuikRead go!
To start using the instrument we kindly ask you to complete
the following setup. This will take only a few minutes.
On the next screen you are asked to choose the language
for the instrument.
Please choose Start below to start the set-up.
WELCOME
Set-up
10:30
Start

13
Picture 11
The first step in the Set-up wizard is to choose the operating language for the QuikRead go instrument.
GETTING STARTED
Language
Choose the language you wish to use on the in-
strument. If you cannot see the desired language
on the list, choose More languages for more
options. Select the language by touching the
corresponding button.
You will then be asked to confirm your language
choice. You will see the confirmation request
both in English and in the chosen language.
If the chosen language is correct choose Yes, if
not, choose No.
The chosen language can be changed anytime
later.
SL
FR
NO
CZ
ES
SR
EN
FI
SK
PT
HR
DE
SV
HU
NL
EL
IT
DA
PL
More languagesBack
Set-up LANGUAGE
10:30

14
Picture 12
The second step in the Set-up wizard is to adjust the time and date for the instrument.
Date and time
The second step in the Set-up wizard is to
adjust the date and time. To do this follow the
instructions below:
1. Choose Edit on the Time row.
2. Adjust time with the arrow buttons.
3. Choose between a 12-hour and 24-hour
clock.
4. Accept with OK.
5. Press Edit on the Date row.
6. Adjust date with the arrow buttons.
7. Select the format of date.
8. Accept by OK.
9. Choose Next to continue.
10. Choose Next.
Screen brightness
The third step in the Set-up wizard is to adjust
screen brightness. To do this follow the instruc-
tions below:
1. Adjust screen brightness with the arrow
buttons.
2. Accept by choosing Next.
GETTING STARTED
NextBack
Set-up
Edit
Edit
Time:
Date:
10:30 am
2015-05-03
Edit time and date. The instrument does not automatically
take daylight saving time into account but it should be
adjusted manually.
DATE & TIME
10:30

15
Picture 13 Power save
GETTING STARTED
Audio volume
The fourth step in the Set-up wizard is to
adjust audio volumes:
1. Adjust the keypad tone volume with the
arrow buttons.
2. The sound volume can be tested using the
Test button.
3. Adjust the Alert tone volume with the arrow
buttons.
4. The sound volume can be tested using the
Test button.
5. Accept by choosing Next.
Power save
Adjust the power save time to reduce power con-
sumption when the instrument is being powered
from the battery pack. A lower time increases the
operation time.
1. Choose the time after which the QuikRead go
instrument will enter sleep mode (hibernate).
2. Choose the functionality of the sleep mode.
In Full standby QuikRead go will enter the
sleep mode and turn off the backlight of the
display after the time specified. In the Close
lid only mode only the lid will be closed.
Finishing the Set-up wizard
You have now completed the Set-up wizard.
You may start using the instrument or continue
making additional settings in Advanced Set-up,
which takes you to Measurement flow where
you can adjust laboratory- or work-routine ori-
ented settings.
OKCancel
PERSONAL SETTINGS :: POWER SAVE
Settings
Hibernate after:
20 min
Close lid only
Hibernate functionality:
Adjust power save time to save power consumption. Lower time
increases reader operation time on accu use.
12:20

16 GETTING STARTED
1
User interface in general
The QuikRead go instrument is used via a
graphical user interface. In this chapter the main
principles of the user interface are explained.
Main menu
All the features of the user interface can be
accessed via the main menu (see Picture 14).
Status area symbols
The status area may contain the following
symbols:
LIS Connection state: Power state: Others:
LIS online Mains condition ok Barcode
LIS offline Mains condition disorder
(symbol red) Printer
LIS pending Accu power condition ok USB storage
POCT state: Accu power condition low
(symbol red) Keyboard
Messages in queue
Real-time clock battery power
condition low
(symbol red)
Feeder Connected to
QR go Feeder
Instrument locked
Picture 15
Status area symbols
PROFILE
Picture 14
Measure
Quality control Results
Settings Profiles
10:30

17
GETTING STARTED
Layout
The screen area of the user interface is divided
into five functional areas (see Picture 16a & 16b):
1. Status area
Indicates the status of the QuikRead go in-
strument via symbols.
Picture 16a Result screen Picture 16b Result info screen
4. Information area
On most screens there is additional informa-
tion for guidance.
5. Navigation area
Standard buttons for navigation can be
found at the bottom of the screen.
1
2
3
4
5
2. Notification area
Indicates the current stage of the process
via colour. The default colour is grey, while
green means that something is currently be-
ing performed, yellow means that a user ac-
tion is needed and red indicates an error.
3. Content area
The actual data is at the centre of the screen
New measurementExit Print
PROFILE
RESULT
Measure
Patient ID: Measurement time:
xxxxxxxxxx 2017-05-03 12:19
mg/l
20
CRP
Choose Result info to view result information.
Remove cuvette to perform a new measurement.
Result info
Test:
CRP
12:20
Exit
PROFILE
QuikRead go:
Measurement ID:
Operator ID:
A17044I01234
30/A17044I01234
12345
Test:
CRP
New measurementPrint
RESULT
Measure
2019-03-05
HS47
DOC1
Choose Result to view measurement result.
Remove cuvette to perform a new measurement.
Result
Additional ID:
HS04
12:20

18
Structure of the user interface
The structure is different depending on whether
the Security login is enabled in Settings -> Meas-
urement flow -> Maintenance -> Admin settings
-> Security settings. (see Picture 17a and 17b):
Their functionality is described in the next
chapter.
Measure Quality Control
Results
Last results
Last QC results
LIS offline
results
Delete result
history
Settings
Personal
settings
Measurement
flow
Admin settings
Manufacture
settings
Main menu
Profiles
Apply profile
Save as profile
Basic settings Maintenance
Picture 17a
The user interface structure without the Security login feature.
GETTING STARTED
Picture 17b
The user interface structure with Security login enabled.
User interface structure without the Security
login feature:
1. Measurement
2. Quality control
3. Results
4. Profiles
5. Settings
User interface structure with Security login ena-
bled:
1. Measurement
2. Quality control
3. Results
4. Settings
5. Logout
Measure
Results
Last results
Last QC results
Quality Control
Logout
Login
Emergency
measure
Main menu
LIS offline
results
Delete result
history
Settings
Personal
settings
Measurement
flow
Maintenance
Admin Settings

19
Picture 18
Start a basic measurement by choosing Measure on the main menu
USAGE
3 USAGE
The usage of the QuikRead go instrument can be
divided into 3 main operations:
• Performing an assay
• Viewing results
• Changing instrument settings
Performing an assay
The instrument can be set to different measur-
ing modes as needed. The basic measuring mode
uses the simplest measuring protocol and is set
as default in a new instrument if settings have
not been changed when taking the instrument
into use.
Only QuikRead go reagent kits can be used to
perform an assay. Read the instructions for use
of the corresponding QuikRead go reagent kit
before use. The instructions provide more de-
tailed information on carrying out tests and han-
dling samples.
PROFILE
Measure
Quality control Results
Settings Profiles
10:30

20
Performing an assay
in basic measuring mode
In the basic measuring mode the QuikRead go
instrument performs an assay measurement and
shows the result on the display with reagent lot
data.
To perform a measurement do the following:
1. Choose Measure on the main menu and
follow the instructions on the display (see
Picture 18).
2. Drop a cuvette into the measurement well
in the right position. The barcode of the
cuvette must be facing towards you (see
Picture 19).
Note: do not place a finger or any other
object into the measurement well.
3. The lid closes and the instrument starts the
measurement.
4. After the test is completed, the result is
shown on the display and the cuvette lifted
up for removal.
5. Remove the cuvette. The result disappears
from the display. It can be displayed again by
choosing See previous result.
6. If you wish to make another measurement, in-
sert a new cuvette into the measurement well.
Choosing Cancel takes you to the main menu.
Picture 19
Drop a cuvette into the measurement well so that
the barcode is facing towards you.
USAGE
Table of contents
Languages:
Other Orion Diagnostica Medical Equipment manuals
Popular Medical Equipment manuals by other brands

OpeMed
OpeMed Nursing Bench 3000 owner's manual

Paragon
Paragon Pro 4460 owner's manual

bort medical
bort medical 055 500 Instructions for use

Konsung
Konsung SONOSAT-F01T user manual

DENTSPLY
DENTSPLY Cavitron Prophy-Jet Directions for use

Chattanooga
Chattanooga INTELECT RPW LITE Operation / installation instruction

Top shelf Orthopedics
Top shelf Orthopedics RecoveryWrap AC Application guide

ElectroCore
ElectroCore gammaCore Sapphire SLC instructions

FriCARE
FriCARE STP01001 Instructions & Lifetime Warranty

Tecno-gaz
Tecno-gaz H100B user manual

Orliman
Orliman LUMBITEC FX-212 INSTRUCTIONS FOR USE AND PRESERVATION

Cardinal Health
Cardinal Health ALLY TO GO NPWT Patient User Manual