manuals.online logo
Brands
  1. Home
  2. •
  3. Brands
  4. •
  5. Orion
  6. •
  7. Accessories
  8. •
  9. Orion 4411 User manual

Orion 4411 User manual

Orion®Collimating Eyepiece
#4411
Congratulations on your purchase of an Orion Collimating Eyepiece! It’s a
practical and easy-to-use tool for insuring that your telescope’s optics are always
in precise alignment, and therefore capable of rendering the best possible resolu-
tion and contrast.
What is Collimation?
Collimation is the process by which an instrument’s optical components are
brought into precise alignment with its optical axis and mechanical axis. In
other words, all the mirrors and/or lenses should be centered and angled so
that light entering the telescope forms a sharp image precisely in the center
of the eyepiece. If the optics are not properly aligned, stars will appear not
as pinpoints as they should, but rather as ared, teardrop-shaped “comets”
or “sea gulls.”
Collimation of Different Telescope Types
Refractor and Maksutov telescopes are collimated at the factory and
generally should not need further adjustment. If collimation does become
necessary later, it is best to have it done at the factory, since these scopes
usually possess no user-adjustable collimation settings.
Collimation is more of an issue with Newtonian reectors and Schmidt-
Cassegrains. Good collimation is particularly critical for “faster” Newtonians,
those with f-ratios of f/6 or lower. Once the collimation is set, it will hold if
care is taken in transporting and handling the optical tube. However, any
sharp jolts can knock the mirrors out of alignment, as can jostling of the
scope in the trunk of a car or temperature changes over a period of time.
Fortunately, these telescopes are equipped with adjustment screws that
permit easy recollimation.
Testing Your Telescope’s Collimation
You can quickly determine whether your telescope is properly collimated.
Just point it at a bright star and slowly rack the image out of focus by with
the focusing knob. If the telescope is correctly collimated, the expanding
disk should be a perfect circle. If it is unsymmetrical, the scope is out of
collimation. In reectors and Schmidt-Cassegrains, the dark shadow cast by
the secondary mirror should appear in the very center of the out-of-focus
circle, like the hole in a doughnut. If the “hole” appears off-center, the tele-
scope is out of collimation.
Purpose of the Collimating Eyepiece
Aligning the mirrors seems easy enough, in theory, but in practice it can be
difficult without the proper tools.
A common way of collimating—the “quick and dirty” method—is to simply
remove the eyepiece and look down the focuser tube to center the mirror
reections. The accuracy of this method, however, is not reliable. For one
thing, there is no way to know whether you are looking straight down the
focuser tube; your line of sight could be off by a degree or two. Another
problem is knowing when the reections of the mirrors are exactly centered.
Just “eyeballing it” isn’t precise enough; the reections may appear to be
centered when in fact they are not.
The Collimating Eyepiece will take care of both of these problems, allowing
you to achieve precise collimation without “guessing,” and thus improve your
telescope’s performance. The Collimating Eyepiece is a combination of a
“sight tube” and a “Cheshire eyepiece.” The sight tube’s narrow eld of view
and crosshairs provide a reference for centering the optical elements during
the collimation process. A Cheshire eyepiece has a polished at set in the
barrel at a 45° angle, which directs light entering from a cutout in the side
of the barrel down into the optical path. The Cheshire allows quick and easy
collimation of the primary mirror, assuming the mirror has been marked
with a spot exactly in its center. (This can be done by rst measuring to
determine the exact center of the mirror, then marking it with a 1/4"-diameter
spot with a black permanent felt-tip marker. (Another alternative is to affix a
white paper hole “reinforcement” at the center, if the black spot is difficult to
see behind the crosshairs of the Collimating Eyepiece.) Because the spot
is positioned where the shadow of the secondary mirror falls, it does not
cause light loss or diffraction. The polished at projects a bright annulus
(doughnut) of light into the optical path, providing a “target” for aligning the
primary mirror.
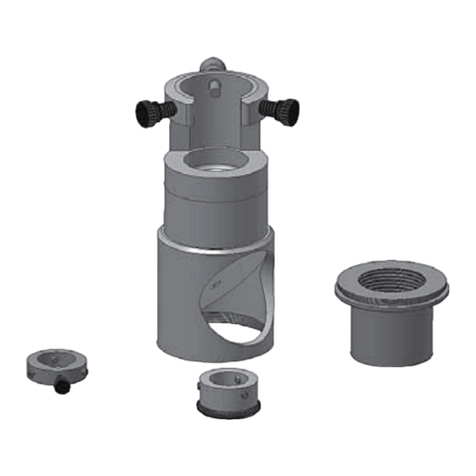
Anatomy of the Collimating Eyepiece
Using the Collimating Eyepiece
Collimation can be performed in daylight, when it is easier to see what
you’re doing. However, never point the telescope or the cutout side of the
Collimating Eyepiece at, or anywhere near, the Sun, or serious and instant
eye damage could result! Insert the Collimating Eyepiece directly into the
1.25" focuser. When using a 2" focuser, place the Collimating Eyepiece
into a 1.25" adapter. If you use a star diagonal with your telescope, as is
common for Schmidt-Cassegrain telescopes, remove it before inserting the
Collimating Eyepiece. The eyepiece should be inserted to a depth such that
the bottom edge of the eyepiece tube appears slightly wider than the outer
edge of the secondary mirror when you look through the sight hole. Rotate
the eyepiece so that the cutout side is directed toward any available external
light. Make sure there is adequate light in the room or outside so that when
you look through the sight hole, you can see the edges of the secondary
mirror clearly (refer to the diagram). Tighten the thumbscrew on the focuser
tube to secure the Collimating Eyepiece in place. Now, you are ready to
proceed with collimation.
Newtonian Reflectors
1. With the telescope pointed away from the Sun, look into the front of
the telescope tube. Check that the secondary (or diagonal) mirror is
positioned in the center of the tube; use a ruler if necessary to measure
the distance from the center of the secondary mirror holder to the inside
of the tube on different sides. You may have to adjust the spider vanes
or stalk. Also, check to see that the primary mirror is centered in the
optical tube. A quick visual inspection usually suffices. If the primary is
obviously not centered, it will need to be repositioned in its mirror cell.
2. Next, if there is an eyepiece in the telescope, remove it. Look down into
the open focuser tube. You will see the secondary mirror and mirror
holder as well as reections of the secondary mirror and its holder, the
primary mirror, and your eye. It’s pretty confusing, so refer to Figure 1
to sort them all out. (This gure shows what you would see if both the
primary and secondary mirrors were out of alignment and the second-
ary mirror were not centered below the focuser tube.)
IN 070 Rev B 07/17
Rubber fold
down eye
guard
Sight hole
Metal insert
Polished, 45°-angled at
Corporate Offices: 89 Hangar Way, Watsonville CA 95076 - USA
Toll Free USA & Canada: (800) 447-1001
International: +1(831) 763-7000
Customer Support: [email protected]
Copyright © 2022 Orion Telescopes & Binoculars.All Rights Reserved. No part of this product instruction or any of its contents
may be reproduced, copied, modied or adapted, without the prior written consent of Orion Telescopes & Binoculars.
AN EMPLOYEE-OWNED COMPANY
Barrel (ts 1.25" focusers)
Crosshairs (for centering)

3. Now insert the Collimating Eyepiece into the focuser and look into the
sight hole.You’ll notice that the eld of view is narrower than it was when
you were looking through the open focuser tube. You’ll also notice that
instead of seeing a reection of your eye, you now see a bright annulus
in the reection of the secondary mirror. The annulus is the reection of
the polished 45° at of the Collimating Eyepiece.
Check whether the secondary mirror is centered underneath the focuser.
Use the crosshairs at the bottom of the Collimating Eyepiece as a reference.
The center of the secondary mirror should lie right at the intersection of
the crosshairs. If it doesn’t, adjust the position of the mirror holder until it is
centered (Figure 2). For “spider-type” holders, this is usually done by turning
the threaded rod that the secondary mirror mount is attached to. For single
stalk-type holders, you may have to bend the stalk to center the mirror. Refer
to your telescope’s manual for more specic instructions.
4. Now you need to adjust the tilt of the secondary mirror so that the entire
reection of the primary mirror is precisely centered in the secondary
mirror (and, thus, also on the crosshairs of the Collimating Eyepiece).
Use the three collimation screws on the secondary holder to adjust the
tilt. The reection of the primary mirror is centered when there is an even
ring of space between it and the outer edge of the secondary mirror
(Figure 3). Don’t worry that the reection of the secondary mirror is off-
center; you’ll x that in the next step. If you do not see the reection of
the primary at all, the tilt of the secondary is way off, and more tinkering
with the collimation screws will be necessary. If the mount is a single
stalk, you will have to bend it to the correct position.
5. Now it’s time to adjust the tilt of the primary mirror. Using the three collimation
bolts at the bottom of the optical tube, located behind the primary mirror, turn
one at a time until the secondary mirror reection moves into the center of the
primary mirror reection. The spot in the middle of the primary mirror should
be exactly centered in the bright annulus.
Now, the view through the Collimating Eyepiece should resemble Figure
4. The reection of the primary mirror is centered in the secondary mirror,
and the reection of the secondary mirror is centered in the reection of the
primary mirror. If everything is centered on the crosshairs of the Collimating
Eyepiece, the telescope is in collimation—tuned up and ready for action!
Schmidt-Cassegrains
With Schmidt-Cassegrain telescopes, collimation is best performed using a
“star test,” but reasonable collimation can be achieved with the Collimating
Eyepiece.There is only one collimation adjustment for Schmidt-Cassegrains:
the tilt of the secondary mirror. Insert the Collimating Eyepiece directly into
the visual back of the telescope. The shadow of the secondary mirror will
appear as a dark circle near the middle of the eld-of-view. Adjust the three
Allen-head screws located in the center of the front corrector plate to cen-
ter the secondary mirror on the crosshairs. Do not loosen the screws more
than two turns, or the secondary mirror could fall off its mount! Likewise,
do not adjust the screw in the middle of the secondary mirror cell. It holds
the mirror in place.
Final ne-tuning of collimation on reectors or Schmidt-Cassegrains can be
done with a “star test” using a high-power eyepiece.
Care and Maintenance
Because there are no lenses in the Collimating Eyepiece, care and mainte-
nance is minimal. It is a good idea to remove any obvious dirt on the inside
or outside of the eyepiece so that the dirt does not get into the telescope
tube during the collimation process. To clean the eyepiece, use a blower
bulb or a moist cotton swab to remove dirt from inside the barrel, and simply
wipe the outside with a damp cloth. Make sure not to disturb the crosshairs,
as bending or breaking may result. Your best bet is to store the Collimating
Eyepiece in a case for easy access. If you drop the eyepiece, don’t worry.
It’s made of machined metal, so it’s very durable, and small scratches or
dents will not affect usage.
Figure 2. Secondary mirror centered under
focuser tube, viewed through the Collimating
Eyepiece (as are the next two illustrations).
Figure 3.Secondary mirror correctly
aligned (tilted).
Figure 4. Primary mirror correctly
aligned. The telescope’s optical system
is now collimated.
Bottom edge of
Collimating Eyepiece
Crosshairs of
Collimating Eyepiece
Reflection of
Collimating
Eyepiece
crosshairs
Annulus (Reflection
of 45 polished flat)
Bottom end
of focuser tube
Edge of
secondary mirror
Reflection of
primary mirror
Primary mirror clip
Primary
mirror spot
Reflection of secondary
holder with four spider vanes
Secondary mirror holder
Reflection of
your eye
Figure 1. The view
down the focuser
tube of a Newtonian
reector with
eyepiece removed.
In this example,
the optical system
is badly out of
collimation.
One Year Limited Warranty
This Orion product is warranted against defects in materials or workmanship
for a period of one year from the date of purchase. This warranty is for the
benet of the original retail purchaser only. During this warranty period Orion
Telescopes & Binoculars will repair or replace, at Orion’s option, any war-
ranted instrument that proves to be defective, provided it is returned postage
paid. Proof of purchase (such as a copy of the original receipt) is required.
This warranty is only valid in the country of purchase.
This warranty does not apply if, in Orion’s judgment, the instrument has been
abused, mishandled, or modied, nor does it apply to normal wear and tear.
This warranty gives you specic legal rights. It is not intended to remove or
restrict your other legal rights under applicable local consumer law; your state
or national statutory consumer rights governing the sale of consumer goods
remain fully applicable.
For further warranty information, please visit www.OrionTelescopes.com/
warranty.
Corporate Offices: 89 Hangar Way, Watsonville CA 95076 - USA
Toll Free USA & Canada: (800) 447-1001
International: +1(831) 763-7000
Customer Support: [email protected]
Copyright © 2022 Orion Telescopes & Binoculars.All Rights Reserved. No part of this
product instruction or any of its contents may be reproduced, copied, modied or
adapted, without the prior written consent of Orion Telescopes & Binoculars.
AN EMPLOYEE-OWNED COMPANY

Other Orion Accessories manuals

Orion 13039 User manual

Orion

Orion 13039 User manual

Orion Stargazer 5590 User manual

Orion

Orion Stargazer 5590 User manual

Orion StarShoot 52097 User manual

Orion

Orion StarShoot 52097 User manual

Orion BinoViewer 52045 User manual

Orion

Orion BinoViewer 52045 User manual

Orion 52062 User manual

Orion

Orion 52062 User manual

Orion VersaGo GX 80 User manual

Orion

Orion VersaGo GX 80 User manual

Orion HT500 RBS User manual

Orion

Orion HT500 RBS User manual

Orion SKYLINE 5673 User manual

Orion

Orion SKYLINE 5673 User manual

Orion OWP10UBT User manual

Orion

Orion OWP10UBT User manual

Orion 9768 User manual

Orion

Orion 9768 User manual

Orion PinPoint 40004 User manual

Orion

Orion PinPoint 40004 User manual

Orion HCCA G27902 User manual

Orion

Orion HCCA G27902 User manual

Orion 8450 User manual

Orion

Orion 8450 User manual

Orion TeleTrack 9441 User manual

Orion

Orion TeleTrack 9441 User manual

Orion DC55HA 2 Series User manual

Orion

Orion DC55HA 2 Series User manual

Orion EQ-1 Equatorial Mount 9011 User manual

Orion

Orion EQ-1 Equatorial Mount 9011 User manual

Orion Atlas Pro AZ/EQ-G GoTo Mount User manual

Orion

Orion Atlas Pro AZ/EQ-G GoTo Mount User manual

Orion 5520 User manual

Orion

Orion 5520 User manual

Orion ASTROVIEW 9822 User manual

Orion

Orion ASTROVIEW 9822 User manual

Orion EQ-1 Equatorial Mount 9011 User manual

Orion

Orion EQ-1 Equatorial Mount 9011 User manual

Orion StarShoot 52053 User manual

Orion

Orion StarShoot 52053 User manual

Orion StarShoot Autoguider PRO User manual

Orion

Orion StarShoot Autoguider PRO User manual

Orion STARSHOOT 52174 User manual

Orion

Orion STARSHOOT 52174 User manual

Orion Express 80mm refractor telescope User manual

Orion

Orion Express 80mm refractor telescope User manual

Popular Accessories manuals by other brands

Hubbell NX Distributed Intelligence NXSMP-OMNI Installation and operation instructions

Hubbell

Hubbell NX Distributed Intelligence NXSMP-OMNI Installation and operation instructions

ZALMAN ATI Radeon HD 5830 user manual

ZALMAN

ZALMAN ATI Radeon HD 5830 user manual

Balluff Micropulse BTL5 Series user guide

Balluff

Balluff Micropulse BTL5 Series user guide

General Measure CW-100G-101A user manual

General Measure

General Measure CW-100G-101A user manual

Secure Home SH-5105 user manual

Secure Home

Secure Home SH-5105 user manual

Kompernass BA 105 A1 operating instructions

Kompernass

Kompernass BA 105 A1 operating instructions

Cedes ELS 263 quick guide

Cedes

Cedes ELS 263 quick guide

Philips LivingWhites 69165/31/PH manual

Philips

Philips LivingWhites 69165/31/PH manual

SiCEP BiTech BT-MX2P Installer manual

SiCEP

SiCEP BiTech BT-MX2P Installer manual

Baumer UNDK 09U6914/KS35AD1 quick start guide

Baumer

Baumer UNDK 09U6914/KS35AD1 quick start guide

RADEMACHER DuoFern Installation and commissioning manual

RADEMACHER

RADEMACHER DuoFern Installation and commissioning manual

Gorilla Playsets 1500CW instructions

Gorilla Playsets

Gorilla Playsets 1500CW instructions

Knick SE101-MS Series manual

Knick

Knick SE101-MS Series manual

Levenhuk T NG Series manual

Levenhuk

Levenhuk T NG Series manual

BBE 482I - REV 2 User guide and reference manual

BBE

BBE 482I - REV 2 User guide and reference manual

Viking SR-1 Technical practice

Viking

Viking SR-1 Technical practice

Cornelius P/N 3626 installation instructions

Cornelius

Cornelius P/N 3626 installation instructions

POLUX 315922 manual

POLUX

POLUX 315922 manual

manuals.online logo
manuals.online logoBrands
  • About & Mission
  • Contact us
  • Privacy Policy
  • Terms and Conditions

Copyright 2025 Manuals.Online. All Rights Reserved.