Orphan espresso Lido OG User manual

Lido OG Manual
This instruction manual covers the basics that you need to get started using the Lido OG grinder. There is a second
document called the “Deep Dive Manual” (DDM) which gives in depth detail and expanded information from this basic
manual. The manuals, schematic and links to videos are available here: https://www.oehandgrinders.com/og-manuals
There is a 3rd area for people who never read manuals - it is called the Hand Grinder Parts section on our website,
oehandgrinders.com, where you can find repair parts... :)
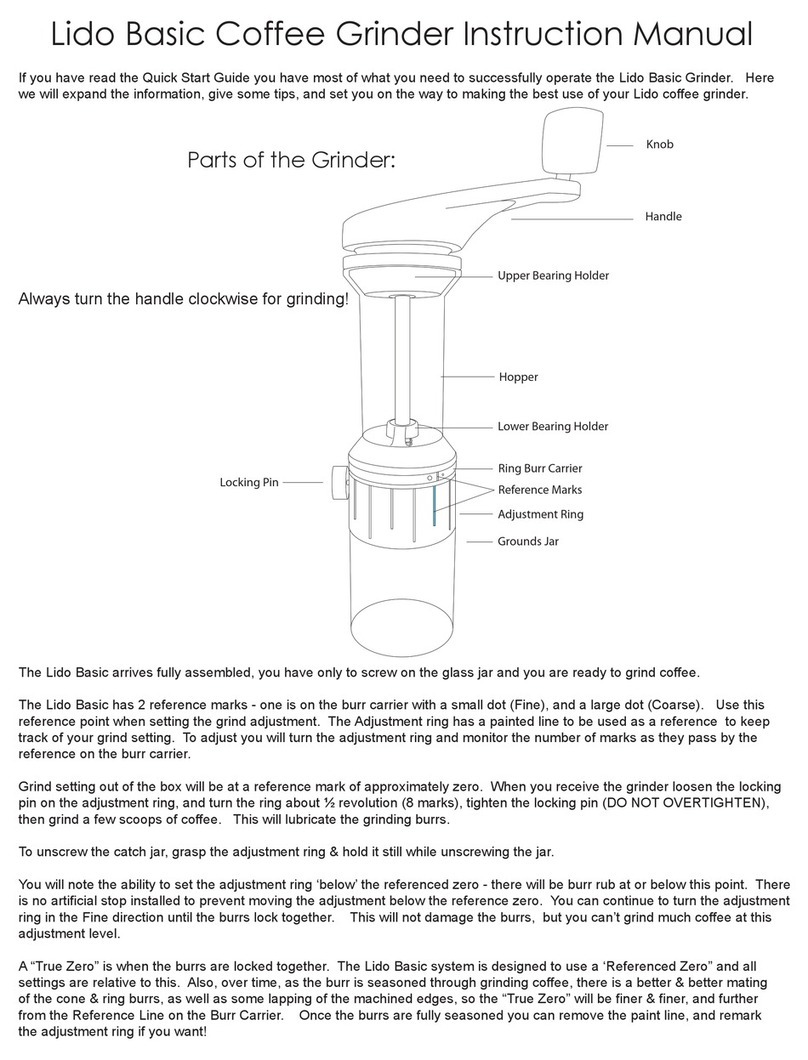
Parts of the Grinder:
Adjustment Module
Micro Adjustment Disk (MD)
Stepped Adjustment Disk (SD)
Top Cap
Burr Module
Lower Bearing Holder
Ring Burr Carrier
Jar Holder
Top Nut
Handle
Micro Adjustment Disk (MD)
Stepped Adjustment Disk (SD)
Top Cap
Hopper
Bean Port / Plug
Ring Burr Carrier
Lower Bearing Holder
Jar Holder
Grounds Jar
Micro Adjustment Locking Pin
Knob
{
{
Install the handle so it points in the direction away from the locking pin.
Do NOT change the brass Micro Adjustment Disk setting at this time.
Your grinder arrives with the adjustment set at Micro Adjustment Disk (MD) = zero, Stepped Adjustment Disk (SD) = zero.
Note: Numbers on the Top Cap equal Microns (µm) of Verical Cone Burr Movement (VBM), not burr gap or particle size.
1000µm equals 1millimeter.
Set SD = 500, grind 10 grams of Coffee beans to lubricate the burrs.
Set SD back to zero, turn handle clockwise (CW) to observe what zero feels like.
This tactile information will be important later...
→ALWAYS turn handle in clockwise direction ←
1

Adjusting the Grind Size
Large changes in grind size are made by turning the Stepped Adjustment Disk (SD) to the desired number.
Each step is 100 Microns (µm) VBM. The SD is self locking.
Micro Disk (MD) adjustment Procedure:
Small changes in grind size are made by loosening the Micro Adjustment Locking Pin and turning the MD in the desired
direction - Align the Micro Disk Reference Mark (MDR) to the Micro Scale Center Mark (CM). Hold the handle still
with one hand, and move the disk with the other. Tighten pin firmly after adjustment.
Each MARK on the Micro Adjustment Disk Scale equals 5µm of VBM.
Moving the MDR in the COARSE direction (C) ADDS to the MD setting (+µm).
Moving the MDR in the FINE direction (F) SUBTRACTS FROM the MD setting (-µm).
Dialing in for your target grind size is like any other
grinder - set, grind, observe, test, & adjust.
Fine tuning between the SD Setting is done
using the Micro Adjustment Disk (MD)
Example1:
SD= 500µm
MD= 2 marks C (10µm Coarse direction)
Setting = 500µm + 10µm = 510µm
Example 2:
SD= 500µm
MD= 4 marks F (20µm Fine direction)
Setting = 500µm - 20µm = 480µm
The MD Scale has a total of 100µm of marked adjustment: - 50µm in the Fine, and 50µm in the Coarse direction.
For larger changes use the SD to move a step, then adjust the MD.
Over extending the MD setting beyond the 50µm on each side makes all of your VBM numbers less meaningful...
Example 3:
Target 580µm Use 600µm SD minus 20µm F MD adjustment. NOT 500µm SD plus 80µm C MD.
You will generally be using the stepless Micro Disk for espresso. The layout of the Micro Disk Adjustment Scale is a
reflection of the use of this Disk in dialing in an espresso grind. We recommend you write down your setting as you
dial in. If you have changed the Micro setting keep track of how far you have moved it, and in which direction.
In order to maintain meaningful numbers you will need to move the MDR Mark BACK to the Center Mark - in other
words, if you subtracted microns by moving the Micro Disk in the fine direction you need to move back in the coarse
direction the same amount to maintain a relevant zero.
Example 4:
OG is set at 540µm (500µm SD+ 40µm MD C) You want to change it to 570µm. You NEED to move the MD back 40µm in
the F direction to the original position, THEN move the SD to 600µm, and the MD to 30µm F.
600µm - 30µm = 570µm (the desired target).
It really is a lot easier to do it than it is to write about it...
Changes made on the MD will always be reflected in the overall setting - SD & MD always work together.
Example 5:
Espresso Setting 540µm. If you change ONLY the SD from 500µm to 900µm, and do not move the MD setting,
the total setting will move from 540µm to 940µm.
If you lose track of your settings it’s very easy to rezero the Micro Disk - See page 5.
Micro Disk Reference Mark (MDR)
Micro Scale Center Mark (CM)
-µm +µm
Stepped Disk (SD)
Micro Disk (MD)
2

Take it apart...
The basic motivation for taking the grinder apart, and putting it back together is cleaning. Keep in mind that anytime
you take the grinder apart you will need to ReZero the adjustment system. You will not need to realign the burrs, just
ReZero the adjustment system.
Cleaning the Lido OG may require various levels of disassembly. Without disassembling you can simply brush off the
external parts from below, and blow out the grinder with compressed air or a hand blower.
Taking the grinder apart requires no tools.
Remove the Top Nut, handle, and the Jar.
Loosen the MD Locking Pin a couple of turns while holding the burr still with one hand from below.
While holding the burr still from the below, turn the MD a few full turns, Counter Clockwise (CCW - Left).
While the MD is still threaded on the axle push the brass MD downwards against the Top Cap of the grinder and hold it
firmly. While holding the MD against the Top Cap, continue unthreading by turning the axle/cone burr CCW (Left) and
giving a slight pull of the axle/cone burr until the Micro Adjustment Disk is unthreaded from the axle.
Once the axle is free pull it out through the bottom of the grinder and set aside.
Remove the MD and the Needle Bearing Thrust Washer Set.
Now you may brush off the cone burr, and brush out the ring burr. Blow out with air, etc.
If you choose to proceed further, you may unscrew the Burr Module from the bottom of the Hopper Tube.
The Burr Module is Reverse Threaded, to remove, turn it Clockwise (CW - Right) while holding the Hopper still.
Clean with brush / air as desired.
The Grind Adjustment Module may also be removed from the Hopper, it has a Right Hand Thread so may be removed by
turning CCW (Left), while holding the Hopper still.
You may brush out, wipe out, or wash the Hopper Tube.
DO NOT PUT ANY PART of the OG Grinder in the dishwasher.
There is NO cleaning or maintenance issue that requires disassembly of the Grind Adjustment Module.
Caveat: Given the wide variations in beans (freshness, origin, processing, roast level, etc.), machines, techniques, trends,
fads, and expectations, we can ONLY provide some general recommendations of the initial SD settings to use for dialing
in your grind - YMMV.
General Grind Setting Guide
Extraction Method Initial SD setting before Dial In
Turkish / Ibrik
Espresso
Pump
Manual Level
Spring Lever
Moka Pot
Aeropress
Percolation
V60
Kalita / Kono
Full Immersion*
100-200
300-400
300-400
500-600
600
700
1200
1600
1900
*If you need a full immersion grind, coarser than the 2000µm setting, this can be achieved by creating
a grind range offset See DDM for details.
3

Hold Micro Adjustment Disk in place on Axle
TURN Axle
Into Micro Adjustment Disk
Hold MD Firmly
in place
Install Axle
through Roller Bearings
Install Washers & Needle Bearings onto Axle
Turn Axle INTO MD
Put it together... Reassembly is the reverse:
Install the Grind Adjustment Module on top of the Hopper by turning CW (Right).
Install the Burr Module on bottom by turning CCW (Left).
Tighten both the Modules securely onto the Hopper.
Set the SD to Zero.
Install the axle/cone burr assembly carefully through the Roller Bearings. (see fig. 1)
Install the Thrust Washer Set on the axle (Needle Bearing goes between the washers) (see fig. 2)
IMPORTANT: This process is critical to avoid/prevent any cross threading of the fine threads of the Micro Disk, or axle.
This procedure avoids damaging the threads:
Lay the grinder on its side.
Install the MD (Locking Pin should be loose) and push it into place on the top of the grinder, holding it firmly against the
top with your fingers - Do not turn the disk, or attempt to thread onto the Axle.
Push & turn the axle/cone burr assembly CW to thread the axle INTO the Micro Adjustment Disk thread. (see fig. 3)
Continue turning the axle/cone burr about 5-10 revolutions until the threads have FULLY entered the Micro Adjustment Disk
- this will start the theads properly and avoid thread damage.
Once fully started on the axle, press the cone burr/axle up into the ring burr and hold firmly in place with one hand and
smoothly spin the Micro Adjustment Disk CW (Right) with one finger (using the locking pin as the tool), until it naturally stops
-- Do NOT Force or overtighten the Disk - just spin until it stops.
Tighten the Micro Adjustment Locking Pin, install the Jar, Handle, and Top Nut. Make sure the Micro Adjustment Locking
Pin is tight.
fig. 1
fig. 2
fig. 3
4

When setting up the adjustment system, this should be the status of the Adjustment Module componenets:
1. Micro Disk should be turned all the way down until it stops on the axle thread and the locking pin should be tightened
firmly.
2. Stepped Disk is set at zero.
3. Handle and Top Nut are in place.
Then, follow this procedure:
Using normal force, turn the SD one full click below zero.
If you Cannot turn the SD one full click below zero, hold the handle still, loosen the MD Locking pin and turn the MD a
few marks in the Coarse direction. Then check if you can turn the SD one click below zero (make sure you tighten
the locking pin each time you check!)
Keep doing this until you achieve one full click of the SD below zero.
This is the starting point of the adjustment range. Click back to zero & your grinder is ready to use.
Be sure to tighten the locking pin each time you make an adjustment to the Micro Disk.
You can check, or ReZero at any time, by repeating the above procedure (this is in case you lose track of your MD
setting on Fine Dialing in situations)
Other concepts, such as alignment, theory, and special cases are presented in the Deep Dive Manual.
Final Checkup (Setting Adjustment Range):
Orphan Espresso
4-19-2021
5
Other Orphan espresso Coffee Grinder manuals
Popular Coffee Grinder manuals by other brands
Silvercrest
Silvercrest SKME 150 C2 operating instructions
Flair Espresso
Flair Espresso intactidea Royal Grinder quick start guide
Vitesse
Vitesse VS-261 user manual

Hamilton Beach
Hamilton Beach E160B - Proctor Coffee Grinder WHT 15 Cup Read before use
OXO
OXO BREW Conical Burr instruction manual
OPTION-O
OPTION-O LAGOM Mini manual
