RoH S
C O M P L I A N T
All OSD AUDIO electronics have (2) year Limited Warranty against defects
in materials and workmanship. Proof of purchase must accompany all
claims. During the warranty period OSD AUDIO will replace any defective
part and correct any defect in workmanship without charge for either parts or
labor
OSD AUDIO may replace returned electronics with a product of equal value
and performance. In such cases, some modifications to the mounting may
be necessary and are not OSD AUDIO’s responsibility.
For this warranty to apply, the unit must be installed and used according to
its written instructions. If necessary, repairs must be performed by OSD
AUDIO. The unit must be returned to OSD AUDIO at the owner’s expense
and with prior written permission. Accidental damage and shipping damage
are not considered defects, nor is damaged resulting from abuse or from
servicing performed by an agency or person not specifically authorized in
writing by OSD Audio
OSD AUDIO sells products only through authorized dealers and distributors
to ensure that customers obtain proper support and service. Any OSD
AUDIO product purchased from an unauthorized dealer or other source,
including retailers, mail order dealers and online sellers will not be honored
or serviced under existing OSD AUDIO warranty policy. Any sale of product
by an unauthorized source or other manner not authorized by OSD AUDIO
shall void the warranty on the applicable product.
Damage to or destruction of components due to application of excessive
power voids the warranty on those parts. In these cases, repairs will be
made on the basis of the retail value of the parts and labor. To return for
Returned Merchandise Authorization (RMA) number then the unit must be
shipped to OSD AUDIO at the owner’s expense, along with a note explaining
the nature of service required. Be sure to pack the product(s) in a corrugated
container with at least 3 inches of resilient material to protect the unit from
damage in transit.
This Warranty Does Not Cover: Damage caused by abuse, accident,
misuse, negligence, or improper operation (installation) • Any products that
have been altered or modified • Any product whose identifying number of
decal, serial #, etc. has been altered, defaced or removed • Normal wear
and maintenance.
OSD Audio | 775 Columbia Street Brea, CA. 92821 | osdaudio.com
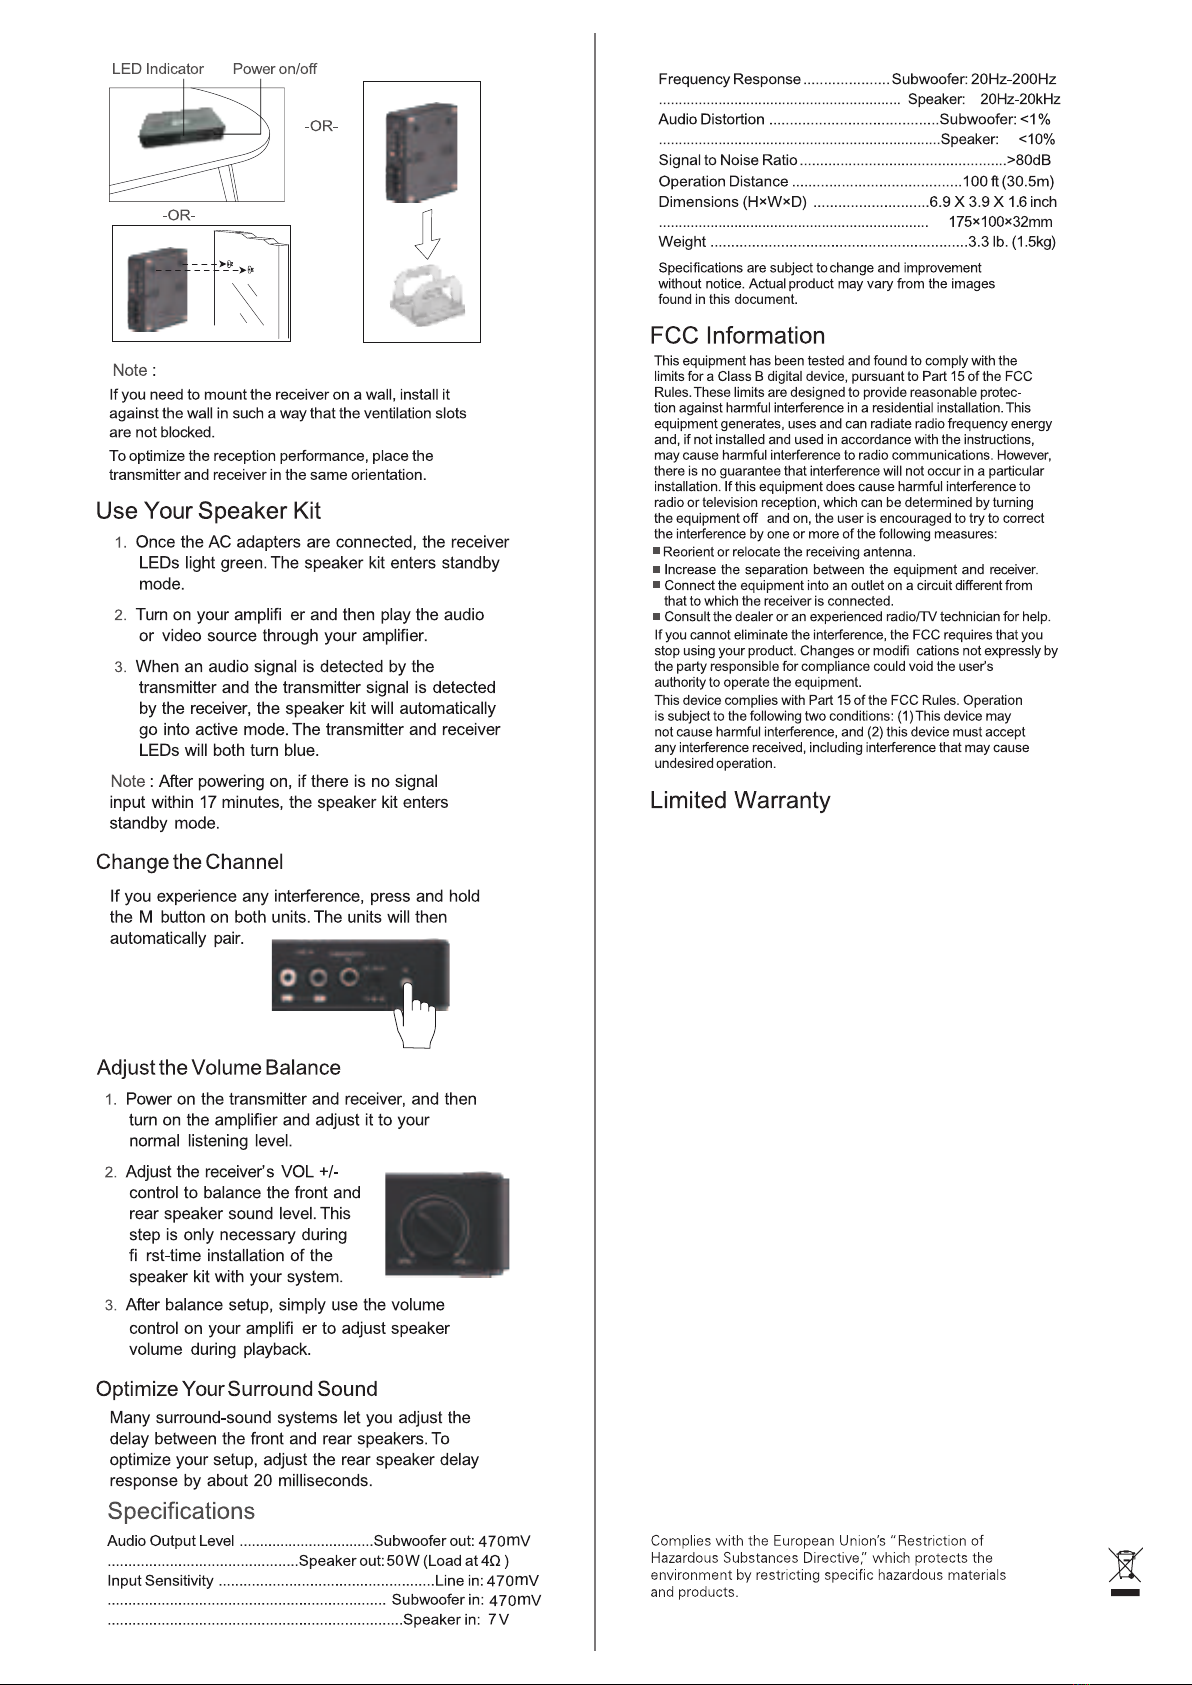
LED Indicator Power on/off
-OR-
-OR-
Note
:
If
you need to mount the receiver on a wall, install it
against the wall in such a way that the ventilation slots
are not blocked.
To optimize the reception performance, place the
transmitter and receiver
in
the same orientation.
Use Your Speaker Kit
1.
Once
the
AC
adapters
are
connected,
the
receiver
LEDs
light
green.
The
speaker
kit
enters
standby
mode.
2.
Tum
on
your
amplifi
er
and
then
play
the
audio
or
video
source
through
your
amplifier.
3.
When
an
audio
signal
is
detected
by
the
transmitter
and
the
transmitter
signal
is
detected
by
the
receiver,
the
speaker
kit
will
automatically
go
into
active
mode.
The
transmitter
and
receiver
LEDs
will
both
turn
blue.
Note
:
After
powering
on,
if
there
is
no
signal
input
within
17
minutes,
the
speaker
kit
enters
standby
mode.
Change the Channel
If
you
experience
any
interference,
press
and
hold
the
M
button
on
both
units.
The
units
will
then
automatically
pair.
Adjust the Volume Balance
1.
Power
on
the
transmitter
and
receiver,
and
then
turn
on
the
amplifier
and
adjust
it
to
your
normal
listening
level.
2.
Adjust
the
receiver's
VOL
+/-
control
to
balance
the
front
and
rear
speaker
sound
level.
This
step
is
only
necessary
during
fi
rst-time
installation
of
the
speaker
kit
with
your
system.
3.
After
balance
setup,
simply
use
the
volume
control
on
your
amplifi
er
to
adjust
speaker
volume
during
playback.
Optimize YourSurround Sound
Many
surround-sound
systems
let
you
adjust
the
delay
between
the
front
and
rear
speakers.
To
optimize
your
setup,
adjust
the
rear
speaker
delay
response
by
about
20
milliseconds.
Specifications
Audio Output Level .................................Subwoofer out: 4
?0mv
..............................................
Speakerout:50W
(Load
at4O)
Input Sensitivity ....................................................Line in:
470mV
................................................................... Subwoofer in:
47omv
.......................................................................
Speaker
in:
7V
Frequency Response ..................... Subwoofer: 20Hz-200Hz
....
..
..
..
.
..
..
..
..
..
.....
..
..
..
.....
..
..
..
..
..
.
..
..
..
.
... ...
Speaker: 20Hz-20kHz
Audio Distortion .........................................Subwoofer:
<1
%
.......................................................................Speaker: <10%
Signal to Noise Ratio ...................................................>80dB
Operation Distance .........................................100
ft
(30.5m)
Dimensions
(HxWxD)
............................6.9 X 3.9 X 1.6 inch
.................................................................... 175x100x32mm
Weight ..............................................................3.3 lb. (1.5kg)
Specifications
are
subject
to
change
and
improvement
without
notice.
Actual
product
may
vary
from
the
images
found
in
this
document.
FCC Information
This
equipment
has
been
tested
and
found
to
comply
with
the
limits
for
a Class B
digital
device,
pursuant
to
Part
15
of
the
FCC
Rules.
These
limits
are
designed
to
provide
reasonable
protec-
tion
against
harmful
interference
in
a
residential
installation.
This
equipment
generates,
uses
and
can
radiate
radio
frequency energy
and,
if
not
installed
and
used
in
accordance
with
the
instructions,
may
cause
harmful
interference
to
radio
communications.
However,
there
is
no
guarantee that
interference
will
not
occur
in
a particular
installation.
If
this
equipment
does
cause
harmful
interference
to
radio
or
television
reception,
which
can
be
determined
by
turning
the
equipment off
and
on,
the
user
is
encouraged
to
try
to
correct
the
interference
by
one
or
more
of
the
following
measures:
■
Reorient
or
relocate the
receiving
antenna.
■
Increase
the
separation
between
the
equipment
and
receiver.
■
Connect
the
equipment into
an
outlet
on
a circuit
different
from
that
to
which
the receiver
is
connected.
■
Consult
the
dealer or
an
experienced
radio/TV
technician
for
help.
If
you
cannot eliminate
the
interference,
the
FCC
requires
that
you
stop
using
your
product.
Changes
or modifi
cations
not
expressly
by
the
party
responsible
for
compliance
could
void
the
user's
authority
to
operate
the
equipment.
This
device
complies
with
Part
15
of
the
FCC
Rules.
Operation
is
subject
to
the
following
two
conditions:
(1)
This
device
may
not
cause
harmful
interference,
and
(2)
this
device
must accept
any
interference
received,
including
interference
that
may
cause
undesired
operation.
Limited
Warranty
Complies with the European Union·s "Restriction
of
Hazardous Substances Directive;· which protects the
environment by restricting specific hazardous materials
and
products. -


