Osram Claypaky CloudIO User manual

INSTRUCTION MANUAL
ENGLISH

2
INDEX
PAGE
1. Safety Information 03
2. How It Works - Topology 04
2.1 Account Setup - First Registration 04
3. Unboxing - Box Setup 06
4. Cloudio Box Application Launcher 08
4.1 Cloudio Gateway 08
4.2 Fixture Firmware Uploader 09
4.3 Settings 10
4.3.1 General Info - Set Access Pin 10
4.3.2 Wi-Fi -Wi-Fi Settings 11
4.3.3 Ethernet - Ethernet Settings 12
4.3.4 Cloud - Box Paring 12
4.3.5 Cloudio Box Firmware Update 13
5. Cloudio Web Interface 14
5.1 Dashboard 15
5.2 Overview 16
5.3 Fixture Detailed Info 17
5.3.1 Log Overview 17
5.3.2 Firmware Details 18
5.3.3 Fixture Properties 18
5.4 Operations 19
5.4.1 Cloudio Box Selection 19
5.4.2 Batch Overview + Functionality Batch Overview 20
Parameter Factory Default 21
Movement Reset 21
Clear Errors 21
Smart Notepad 21
Smart Coding 22
Start Locate 23
5.4.3 Firmware Update 23
5.4.4 Dmx Settings 25
5.4.4.1 Rdm Live Menu 25
5.5 Smart Notepad 27
5.6 Users 29
5.7 Settings 30
5.7.1 Change Password 30
5.7.2 General Setup 31
5.7.3 Line Setup 31
5.7.4 Smart Coding 32
6. F.A.Q. 34
7. Trouble Shooting 36

EN
IT
DE
ES
FR
RU
3
1. SAFETY INFORMATION
Congratulations on choosing a Claypaky product! We thank you for your choice.
Please note that this product, as all the others in the rich Claypaky range, has been designed and
made with the highest quality to ensure excellent performance and to meet your expectations and
requirements.
In this instruction manual you will nd a careful explanation of all the components that make up CloudIO.
You will be guided step by step from hardware installation to software use.
The rst part will show you an overview of CloudIo, in the second part you will nd quick tutorials that will
show you how to carry out the different features that CloudIO offers.
SAFETY INFORMATION
IMPORTANT: Claypaky recommends you carefully read and keep t he s afety information on this p roduct, also
available in digital format at the following link:
www.claypaky.com
FIS01X - Safety Information CloudIO
INFORMAZIONI DI SICUREZZA
IMPORTANTE: Claypaky raccomanda di leggere accuratamente e conservare le informazioni di sicurezza relative
a questo prodotto, sempre reperibili in versione digitale al seguente link:
www.claypaky.com
FIS01X - Safety Information CloudIO
INFORMATIONEN ZUR SICHERHEIT
WICHTIG: Claypaky empfiehlt, die Sicherheitsinformationen bezüglich dieses Produkts genau zu l esen und
aufzubewahren. Sie sind in Digitalversion immer unter folgendem Link auffindbar:
www.claypaky.com
FIS01X - Safety Information CloudIO
INFORMACIONES DE SEGURIDAD
IMPORTANTE: Claypaky recomienda leer detenidamente y conservar la información de seguridad relativa a este
producto. Además, está disponible una versión digital de la misma en el siguiente enlace:
www.claypaky.com
FIS01X - Safety Information CloudIO
CONSIGNES DE SÉCURITÉ
IMPORTANT: Claypaky recommande de lire attentivement et de conserver les informations de sécurité relatives à
ce produit, disponibles en version digitale au lien suivant:
www.claypaky.com
FIS01X - Safety Information CloudIO
: Claypaky
, :
www.claypaky.com
FIS01X - Safety Information CloudIO

SLAVEMASTER
CLOUD
2. HOW IT WORKS - TOPOLOGY
2.1 ACCOUNT SETUP - FIRST REGISTRATION
4
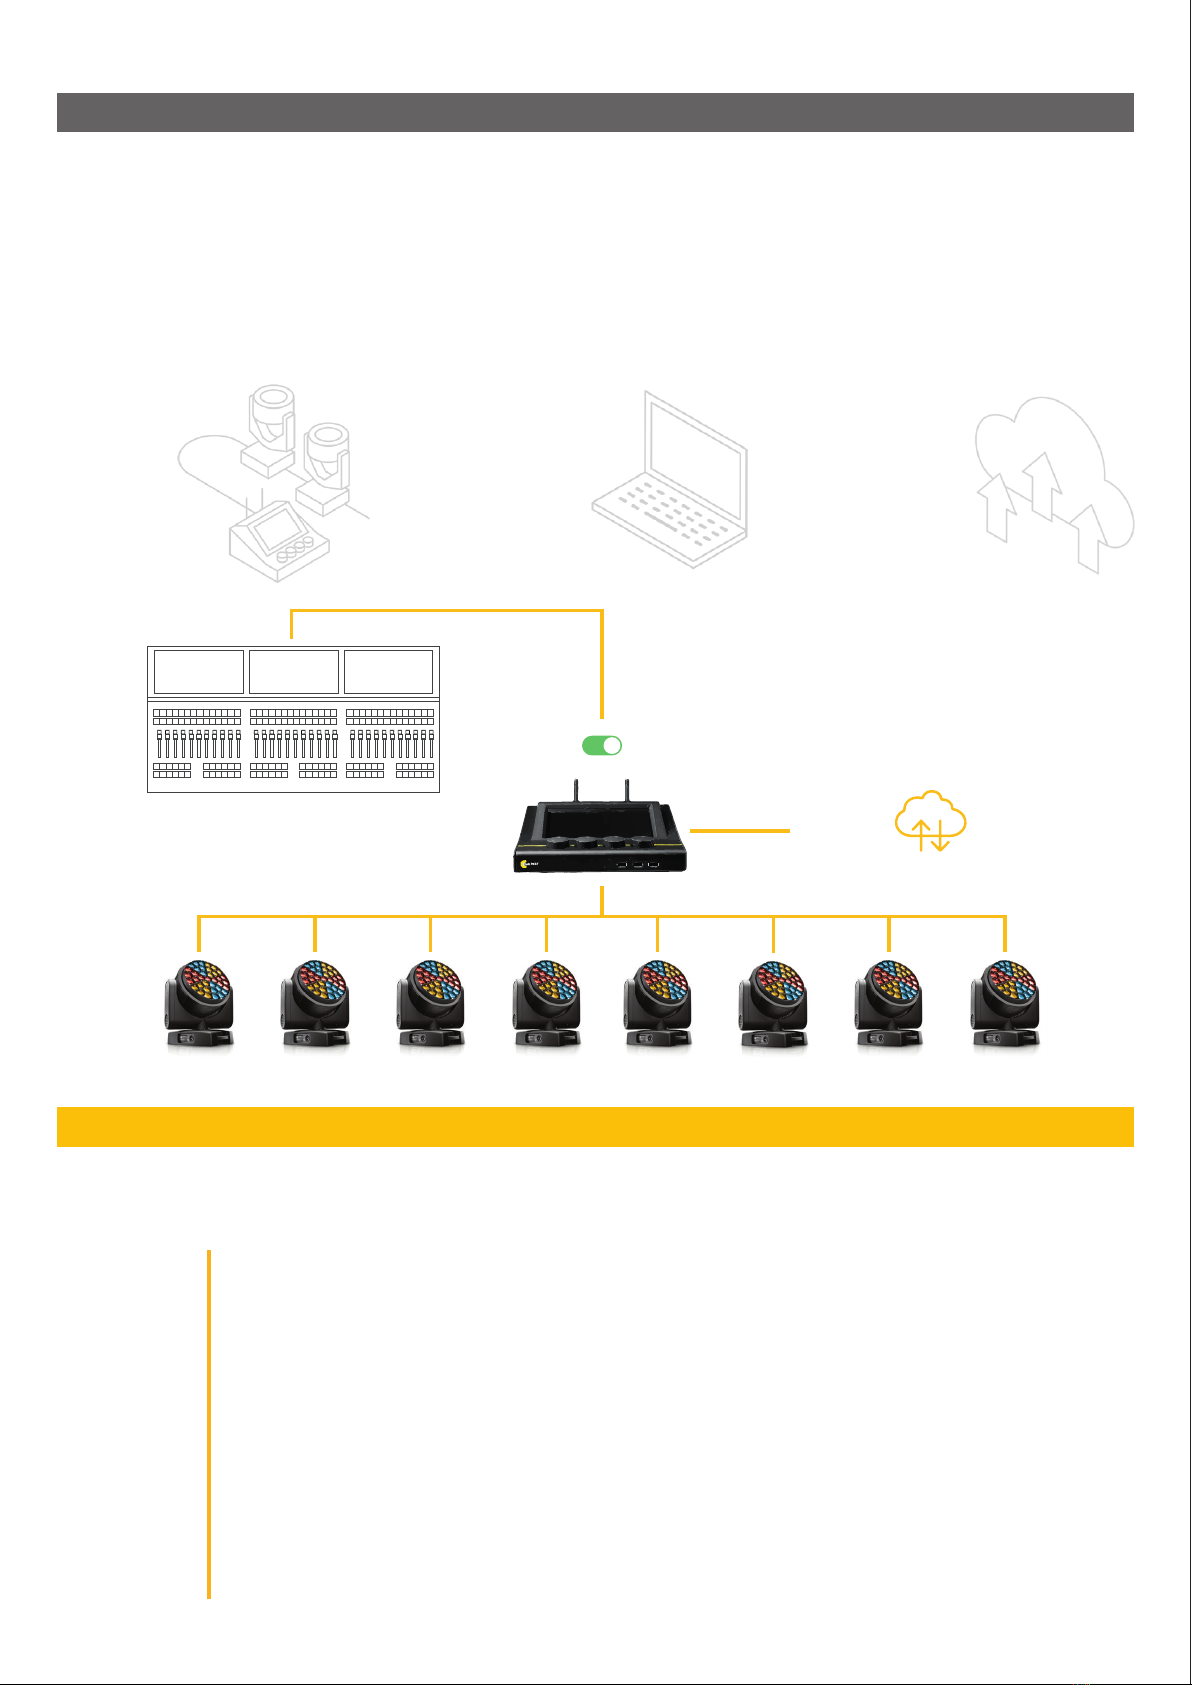
CloudIO is a compact IoT device capable of offering a whole world of xture information, diagnostics and remote assistance.
topology of CloudIO
CLOUD DATA
COLLECTION
COMPACT HARDWARE
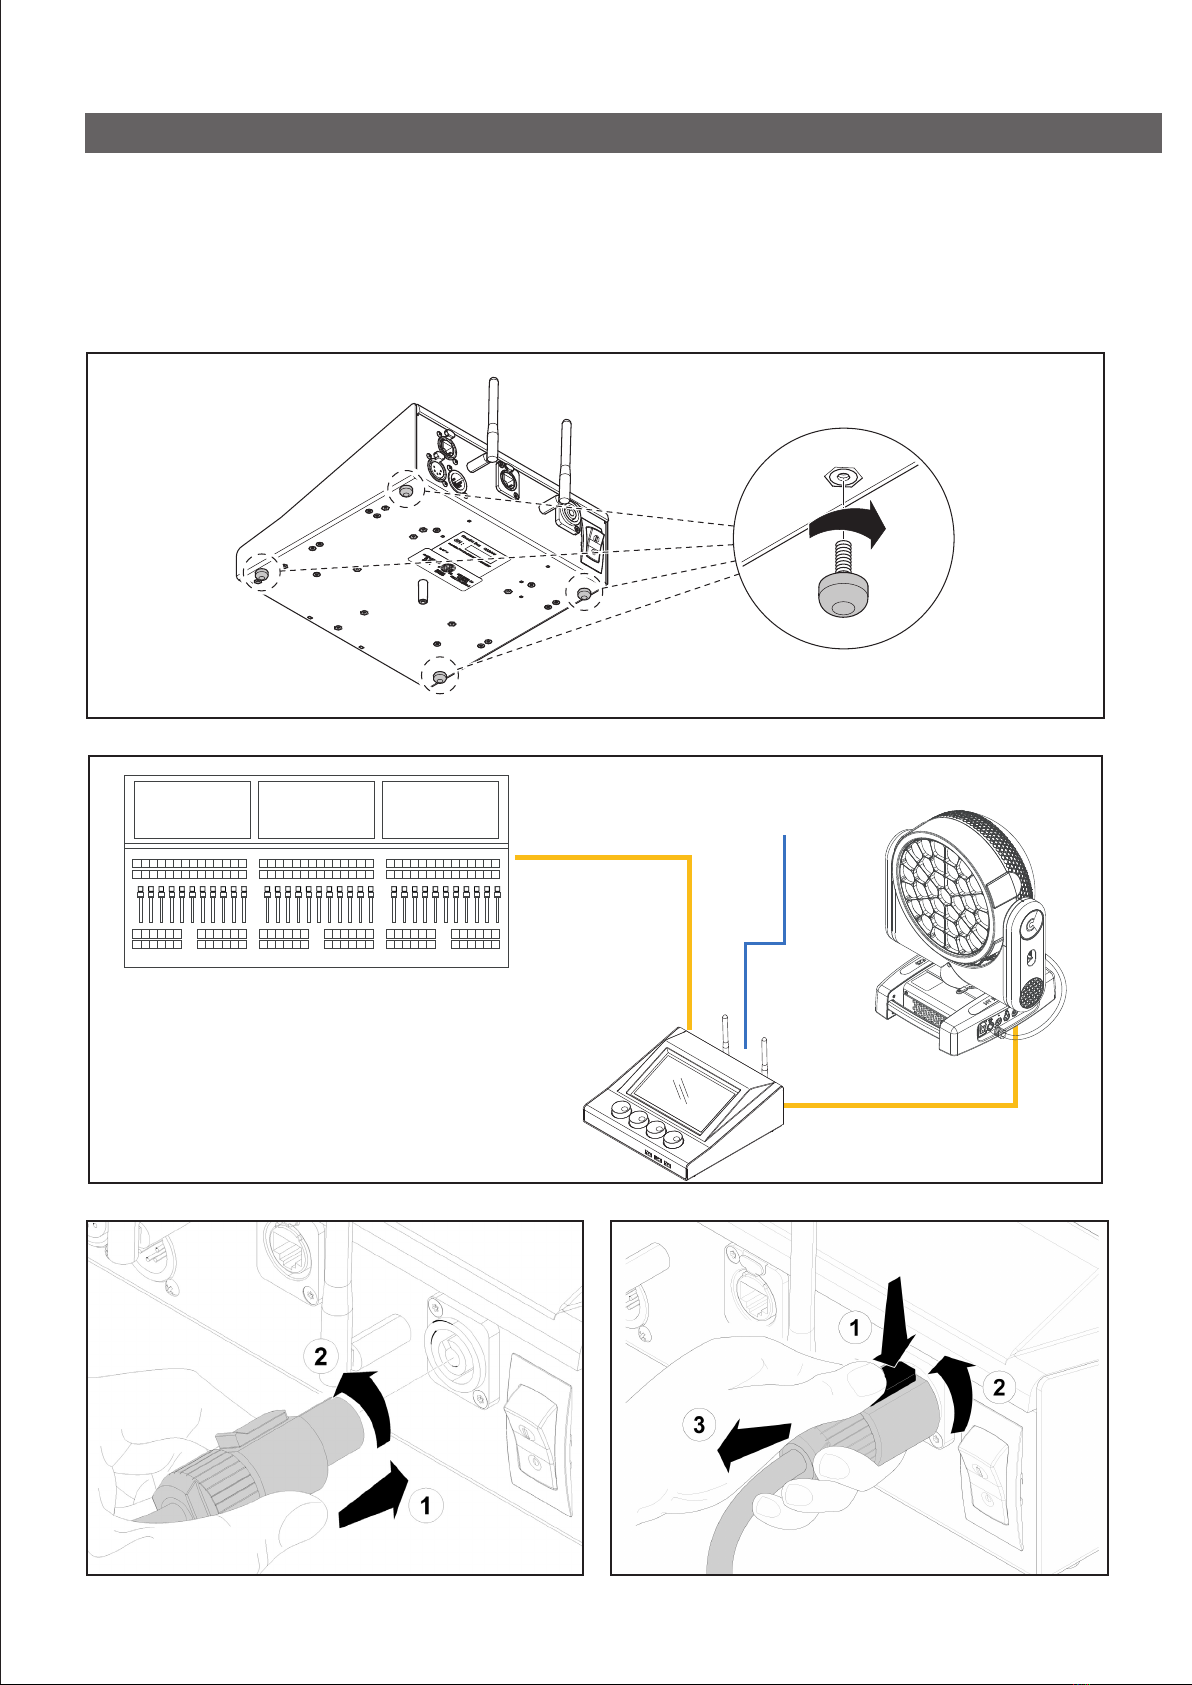
CloudIO box is a very
compact device, that allows
the connection between the
moving heads and the cloud,
through a smart user interface
based on a web interface.
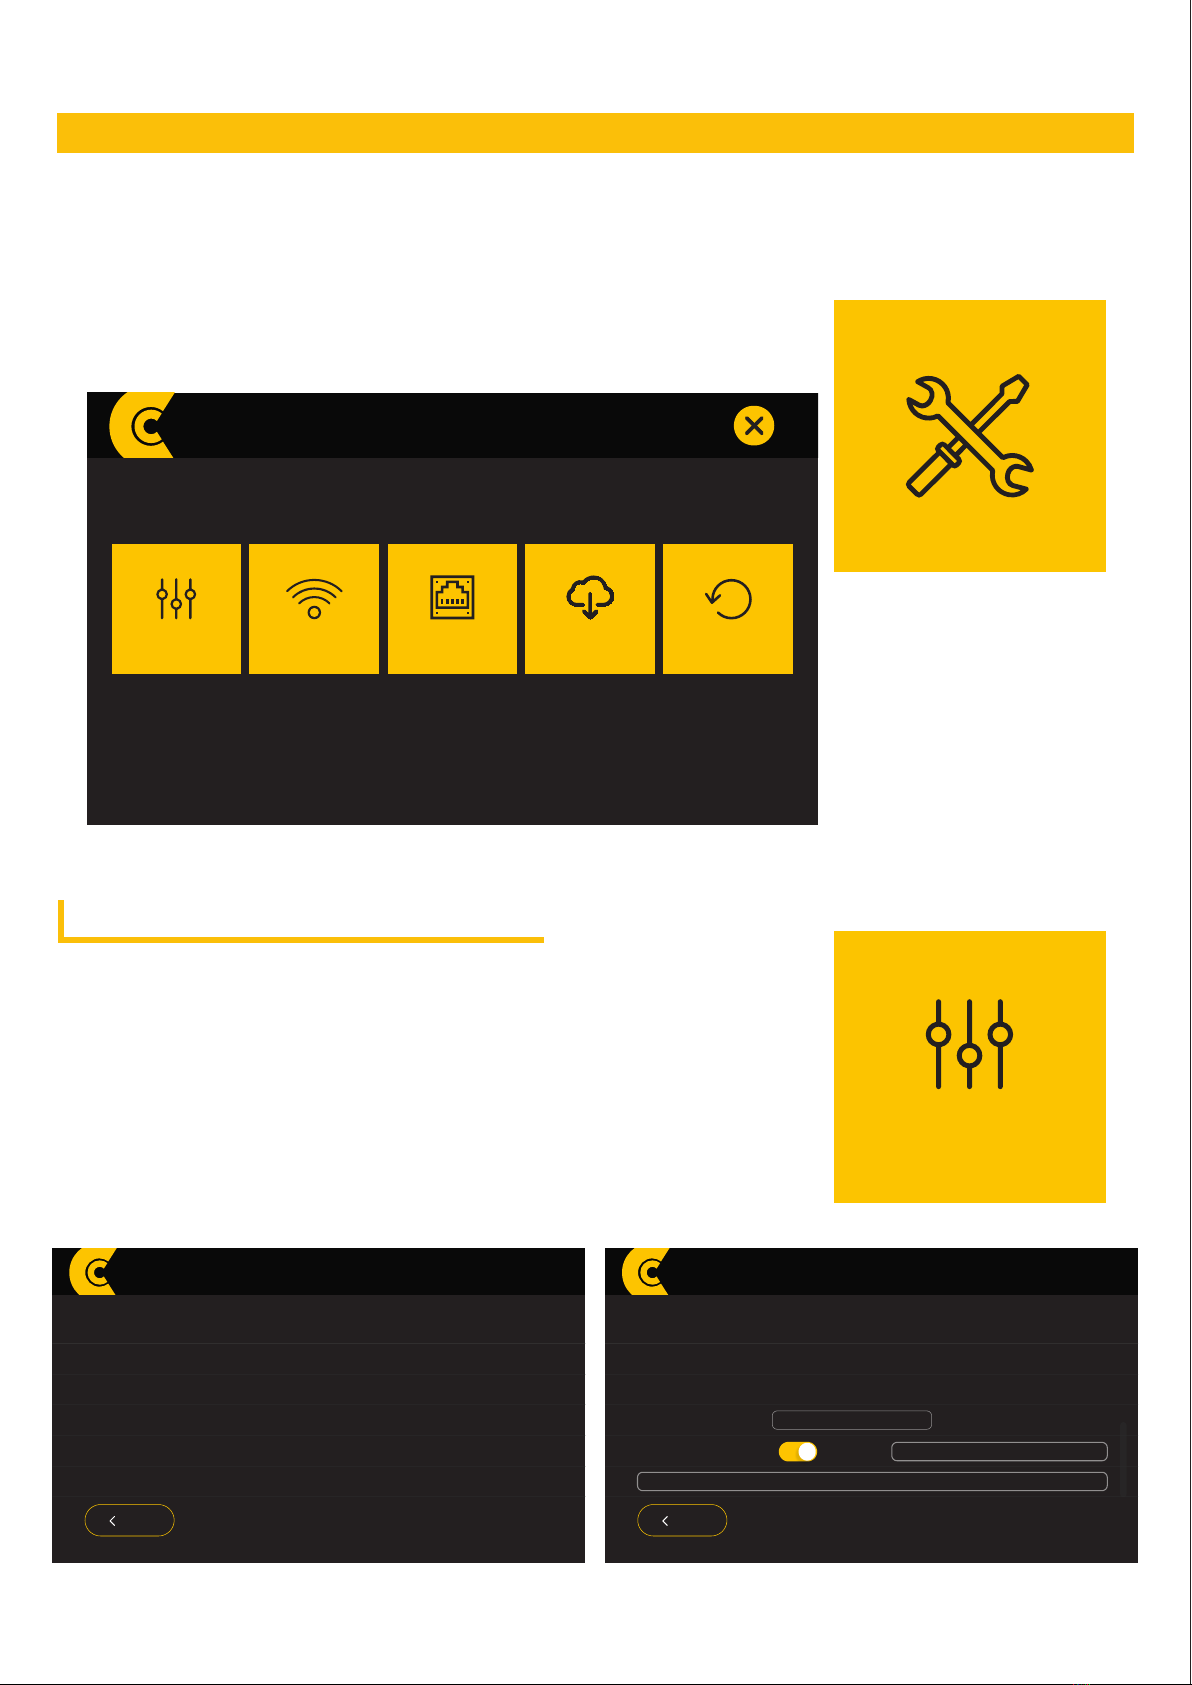
SMART WEB APP
INTERFACE
The web interface works with
any browser. A user-friendly
interface gives an overview of all
xtures and allows you to select
information, statistics, rmwares
to update, errors and solutions.
All the information is stored in
the cloud. Statistics and analysis
on the connected xtures will be
available for the user, offering a
complete monitoring of your xture
inventory or on installed xtures.
To start using CloudIO the rst thing to do is register your account. Follow these simple steps:
FIRST REGISTRATION
Visit the webpage https://www.cloudiobox.tech/
Press the button login/register
On the login page, click on “Don’t have an account? Register”
Fill out the registration form and click on submit
You will receive an e-mail after you click submit in which you will be asked to conrm your e-mail
address.
Please click on the link in the e-mail to conrm.
Claypaky will then validate your registration.
Your account is not yet active until you receive another e-mail from Claypaky, within 48 hours from
the registration submission, with the account activation conrmation.

5
login/register CloudIO webpage, screen_1
login/register CloudIO webpage, screen_2
user and company registration Cloudio
Only the Admin, responsible for the company, should do the “First Registration”, the remaining components will not
have to worry about creating any account or waiting for a verication email, it will be the Admin’s task to go to the
dedicated section “USERS” (p. 28) to create a new user inside the company.
The user will receive an email that will notify him that an account has been created for him, the user must go to the
login page and log in by entering the username and password that can be found in the email.
NOTICE

6
3. UNBOXING
DMX OUT: used to connect the controlled lighting xtures
DMX IN : used to connect a Lighting Control Console
WiFi: used to connect the CloudIO Box to a local AP WiFi for Cloud Service Connection
Ethernet 1: Fast Ethernet for Art-Net connection
Ethernet 2: GbE to be used to connected the CloudIo box to a local AP Ethernet for Cloud Service Connection
Main Switch: used to power on/power off the CloudIO box
PowerCon IN: Main power input
USB IN: Used to connect eternal USB keyboard, mouse or USB Mass-storage key
Inside the box there you will nd:
x2 WiFi antennas, x1 power cable, x4 rubber feet for the CloudIO box, the instruction manual and the safety.
information
packing contents
legend parts and components
Ethernet 1
DMX OUT DMX IN
Ethernet 2
Gigabit
PowerCon IN Main Switch
Antenna
Wi-Fi USB IN
Encoder Wheels

DMX cable
DMX cable
Ethernet
cable
LOCAL
NETWORK
7
3. BOX SETUP
To setup the box, attach the 2 WiFi antennas onto the back of the box. Install provided feet onto the bottom of the box
connection diagram
connection instructions step_1
instruction rubber feet assembly
connection instructions step_2

CloudIO Gateway Settings
Fixture Firmware Uploader
ENABLED
Sending firmware...
Internet Cloud
WAREHOUSE 1
CLOUDIO GATEWAY
DISABLED
Swipe right to enable CloudIO
CONNECTIVITYCLOUDIO GATEWAY
Internet Cloud
WAREHOUSE 1
4. CLOUDIO BOX APPLICATION LAUNCHER
4.1 CLOUDIO GATEWAY
8
At power up CloudIO presents the “Applicaton Launcher” page, this is where we can nd the 3 main apps:
- CloudIO Gateway: by launching this app, the user can enable or disable the CloudIO Gateway feature.
- Fixture Firmware Uploader: by launching this app the user can upload, a FW from an external storage device.
- Settings: by launching this app, the user can congure all the parameters such as connection and cloud settings.
home view CloudIO box
The CloudIO Gateway app, allows the management of the xtures connected
to the DMX OUT output through the services provided by the CloudIO platform.
When the Cloudio Box is enabled, the DMX IN /DMX OUT digital short-cut is
opened and the CloudIO Box takes the control of the Fixture as the Master DMX/
RDM device excluding any other control device connected on DMX IN.
CloudIO box must be rst paired to the user account.
To pair your account to the CloudIO box please refer to the instruction (p.12)
screen view CloudIO gateway enabled screen view CloudIO gateway disabled

FIXTURE FIRMWARE UPLOADER
Attention
The user is aware of the damage
that a not compatible firmware
can cause on the fixtures.
All the operations are intended under
user's own responsability
ACCEPT
BACK
Please insert USB Key in the USB slot
and then press "Continue"
OFFLINE FIRMWARE UPDATER
CONTINUE
2.21.004
2.22.000
2.21.011
0.14.210
CONTINUE
FIXTURE FIRMWARE UPLOADER
Firmware successfully sent
REBOOT
Click "Reboot" to reboot the fixtures
FIXTURE FIRMWARE UPLOADER
Click "send firmware" to continue
Attention
The fixtures will be updated following
the current firmware selection
AX_301.kdf
SEND FIRMWARE
BACK
FIXTURE FIRMWARE UPLOADER
Firmware update successfully done
CONTINUE
FIXTURE FIRMWARE UPLOADER
4.2 FIXTURE FIRMWARE UPLOADER
9
xture rmware uploader screen _1
xture rmware uploader screen _3
xture rmware uploader screen _5
xture rmware uploader screen _2
xture rmware uploader screen _4
xture rmware uploader screen _6
The Fixture Firmware Uploader app, allows you to update the rmware of any
Claypaky xture.
User can upload the ‘’.img le’’ of the new rmware in the root folder of a
USB KEY and press CONTINUE in order to activate the update procedure:
all Claypaky lights connected to the DMX OUT output, if compatible with the
rmware version present selected, will be updated to the new rmware version.
To download the rmware versions of the Claypaky products refer to www.
claypaky.it

CloudEthernetWi-FiGeneral Info CloudIO Update
SETTINGS
00-E0-18-98-56-35
Ethernet 1 MAC
50-Q0-48-27-56-15
Ethernet 2 MAC
00-D0-78-75-16-14Wi Fi MAC
AI000001
1.02
RYK-WUBT236ACNBT
CloudIO Serial Number
CloudIO Fw Version
Contains FCC ID
GENERAL INFO
BACK
GENERAL INFO
BACK
AI000001
1.02
7500ms
RYK-WUBT236ACNBT
CloudIO Serial Number
CloudIO Fw Version
FFU Delay
Contains FCC ID
Settings PIN CHANGE PIN
LICENSING
General Info
4.3 SETTINGS
10
In this screen a second application launcher screen is displayed, here the user can congure all the parameters
such as connection and cloud settings. There are 5 apps:
General Info / WiFi / Ethernet / Cloud / CloudIO Update
In this app, the user can view all of the general information relating to the
CloudIO box, such as internet connection info, serial number, rmware version
and a readable version of the licensing. It is also possible to set an FFU Delay
and a PIN for access and protection. The FFU allows you to set a delay between
the start of the rmware update process and the sending of the rmware data le,
necessary to allow the xture to enter the rmware update mode.
screen home CloudIO with applications
general info screen_1 general info screen_2
4.3.1 GENERAL INFO - SET ACCESS PIN

Wi-Fi
Wi-Fi
WI FI SETTINGS
Switch on Wi Fi to connect CloudIO
BACK
41656488xxsde8185a
51edcsvrgs
11drtd006684w
054516516321
Wi-Fi
WI-FI SETTINGS
41656488xxsde8185a
BACK
41656488xxsde8185a
51edcsvrgs
Insert Password
Ap188756
054516516321
Wi-Fi
WI FI SETTINGS
******************* JOIN
Wi-Fi
BACK
WI FI SETTINGS
41656488xxsde8185a
Automatic
Automatic
Off
FORGET THIS NETWORK
IPv4 Address
DNS
Http Proxy
BACK
4.3.2 Wi-Fi -Wi-Fi SETTINGS
11
In this app the user can manage the internet connection via WiFi, the user can
toggle the wi from off to on to allow the search for an available network. Once
your WiFi network has been identied, it will be possible to connect by simply
clicking on it, if the network is protected by a password, you will be asked to
enter it and then hitting to connect. If you need custom settings on the Wi-Fi
connection, press on the “i” icon from the list of networks, you will be able to set
custom parameters on the desired network
Please be aware that in case of a network that uses a rewall or with custom security
restrictions, the network requirements for the CloudIO box are the following:
- HTTPS address reached: live.cloudiobox.tech - port 443
- MQTT address reached: mqtt.cloudiobox.tech - port 443
wi settings screen _1
wi settings screen _3
wi settings screen _2
wi settings screen _4
BE AWARE

Email
Password
Sign In
CLOUD SETTINGS
BACK
LOGIN
Device currently paired with
CLAY PAKY S.p.A
CLOUD SETTINGS
BACK
LOGOUT
Configure IPv4
IPv4 Address
Subnet Mask
Gateway
DNS
Proxy
ETHERNET SETTINGS
Ethernet Port 1
BACK
Use DHCP
10.188.45.58
Automatic
Automatic
255.255.255.0
10.188.45.1
Configure IPv4
IPv4 Address
Subnet Mask
Gateway
DNS
Proxy
ETHERNET SETTINGS
Ethernet Port 1
BACK
Use DHCP
Automatic
Automatic
10.188.45.1
Static IP
Manual
Ethernet
Cloud
4.3.3 ETHERNET - ETHERNET SETTINGS
12
In this app, the user can access the settings of the Ethernet network parameters.
The user can congure different parameters such as IPv4 in Manual or DHCP,
DNS in automatic or manual and can also choose to enable or disable PROXYs.
On the back of the box there are two Ethernet connections, Ethernet 1 is a Art
Net ready port (see legend p.06)
Ethernet 2 is a Gigabit Ethernet port and must be used for the internt connection.
4.3.4 CLOUD - BOX PARING
The “Cloud” app allows the user to connect all his CloudIO boxes to his account.
To perform pairing insert your CloudIO account credentials and click “Login”.
On the screen will appear your company name and the CloudIO Box will then
be paired to your account. If the user has already paired the box, the name with
which he is paired will be shown and it will be possible to disconnect the box from
his account using the LOGOUT button.
The user must insert CloudIO credentials to pair the box to his account.
ethernet settings screen _1 ethernet settings screen _2
cloud settings pairing for log in screen _1 cloud settings unpairing logout screen _2

Please insert USB Key in the USB slot
and then press "Continue"
CLOUDIO UPDATE
CONTINUE
BACK
CLOUDIO UPDATE
AX_301.kdf
Attention
The system will be updated using
the following file
INSTALL UPDATE
Click "Install Update" to continue
BACK
CLOUDIO UPDATE
CONTINUE
2.21.004
2.22.000
2.21.011
0.14.210
BACK
Update successfully installed
CONTINUE
CLOUDIO UPDATE
CloudIO Update
4.3.5 CLOUDIO BOX FIRMWARE UPDATE
13
With this app, the user has the ability to update the rmware related to the
CloudIO box.
It will be necessary to go to the E-ASSIST website https://e-assist.tech/en/login
dedicated to assistance, download the latest rmware version released and save
it to a USB key.
Now the user can go to the dedicated CloudIO Update app, insert the USB key in
one of the slots at the base of the box, select the rmware he wants to install and
start the installation.
CloudIO update screen _1
CloudIO update screen _3
CloudIO update screen _2
CloudIO update screen _4

Forgot your password?
Enter your username or email adress and we will send you instructions on how to create a new password.
Email
Submit
Email used to authenticate to CloudIO
SMART CODING
SETTINGS
CLAYPAKY SpA
Bergamo
Italy
GENERAL SETUP LINE SETUP
CHANGE PASSWORD
DASHBOARD
OVERVIEW
OPERATIONS
SMART NOTEPAD
USERS
SETTINGS
Lorem Ipsum
Lorem Ipsum
Lorem Ipsum
Lorem Ipsum
Lorem Ipsum
Lorem Ipsum
Lorem Ipsum
Lorem Ipsum
ILorem psum
24/04/20
24/04/20
24/04/20
24/04/20
24/04/20
24/04/20
24/04/20
24/04/20
24/04/20
14:00
14:00
14:00
14:00
14:00
14:00
14:00
14:00
14:00
Lorem ipsum dolor sit amet, consectetur adipiscing...
5
NOTIFICATIONS
5. CloudIO WEB INTERFACE
Once the account and the company is activated, the internet connection and the pairing done, the user can start
using CloudIO. Visit the webpage https://www.cloudiobox.tech/, click in the section at the top right dedicated to
Registration / Login, insert your CloudIO account credentials and click “Login”.
In case you have forgotten your password, don’t worry, you will always have the opportunity to recover it using the
section dedicated “Forgot password?”
The web server interface consists of a series of elements that make the user experience easy to use.
On the left side there is a menu with which the user can navigate within the different sections, which are:
DASHBOARD / OVERVIEW / OPERATIONS / SMART NOTEPAD / USERS (admin) / SETTINGS (admin).
At the top right we nd the notication icon, with a number that indicates the number of notications and by clicking
on it we can view them and the account icon that if you hover over it with the mouse shows the prole in use, the
information notes, the rmware version installed and the Log Out button.
screen _password recovery
screen user interface with side menu open and notication window open
14

55
FIRMWARE UPDATE REQUIRED
4
25%
NUMBER OF FIXTURES
16
LAMP LIFETIME LIMIT
0
0%
FIXTURE ERRORS
7
43%
AVG FIXTURES LIFETIME
0.3 khrs
FIXTURES OVERVIEW FIRMWARE UPDATE
N.
FIXTURE
4
1
11
MANUAL CHECK OLD FWUPDATED
FIXTURES LIFETIMELAMP LIFETIME
N.
FIXTURE
WARNING EXCEEDEDGOOD LED ENGINE
10
12
8
6
4
2
0
N. of Fixtures
Khrs
30 30 30 30 30 30
NEW INFO
N.
FIXTURE
3
5
457 7
WARNINGS ERRORSLOGS NO LOGS
16
MAINTENANCE ANALYTICS
AUG.
0
20
40
60
80
100
SEPT. OCT. NOV. DEC. JAN. FEB. MAR. APR. JULYMAY JUNE
FIRMWARE OPERATION ERRORS OPERATION LAMP OPERATION
5.1 DASHBOARD
The DASHBOARD shows an informative report of all xtures that have been connected at least once to CloudIO.
The interface shows a quick and intuitive view of the inventory through 6 information boxes:
- “Fixture Overview” list: List and number of all the xtures owned and discovered by CloudIO
- “Firmware update” graphic: Overall status of the rmware update status of the eet / selected model
- “New Info” graphic: Overall status of the xtures internal errors of the eet / selected model
- “Lamp lifetime” graphic: Overall status of the lamp lifetime of the eet / selected model
- “Fixtures lifetime” graphic: Overall status of the xture lifetime of the eet / selected model
- “Maintenance analytics” graphic: Operations tracking done by the user during the year
Clicking on one of the xtures in the “xtures overview” list, the charts next to it will show the data related to the
individual selected xture model.
By clicking on any of the graphics boxes you will give you access to the OVERVIEW page.
screen home page dashboard
15

ERRORS 6
55
FIXTURES OVERVIEW
MODEL ALL FW UPDATE 11 ERRORS 6LAMP LIFETIME 2
DELETE FIXTURES EXPORT CSV
MODEL NAME UID FIXTURE NAME FW VERSION ERRORS LAMP LIFETIME (HRS) LED ENGINE (W/HRS) FIXTURE LIFETIME (HRS)
DETAILS
Aleda B-Eye K10 Easy 435022256B6F 2.22.002 0 / 2 -060
DETAILS
Aleda B-Eye K20 43502425AC40 2.22.002 0 / 12 -062
DETAILS
Aleda B-Eye K20 4350242548A9 2.21.003 32 / 32 -535
DETAILS
Aleda WashK10 43501E259378 2.21.003 1 / 1 -15 52
DETAILS
Aleda WashK10 43501E258989 2.21.003 5 / 5 -132
DETAILS
Aleda WashK10 43501E258A2F 2.23.500 1 / 1 -0743
DETAILS
Aleda WashK20 CC 435008300CFF 1.14.012 0 / 0 -40 0
DETAILS
Alpha Beam 700 435010027941 2.22.001 0 / 6 0-49
DETAILS
Aleda Profile 800 43501C02876B 2.22.001 0 / 0 0-62
DETAILS
HEPIKOS 43502A057C25 2.22.001 0 / 4 1008 -2019
DETAILS
HEPIKOS 43502A0568FF 2.22.001 0 / 56 1008 -2235
DETAILS
HY B-Eye K15 43502E25964E 2.24.000 6 / 154 -100 223
DETAILS
HY B-Eye K25 43502C25A53A 2.23.600 16 / 958 -13025 1593
16
5.2 OVERVIEW
The overview page shows, in list format, the details of each xture in the system, which are ltered according
to the operator’s choice. The system provides for a cataloging based on: model name, xture uid, custom label,
warehouse code, serial number, rmware version, errors, lamp lifetime, led engine, or xture lifetime.
Above the table list, through a drop-down menu it is also possible to choose whether to display all the xtures “ALL”
or only those belonging to a specic family. Please note, when no lter is activated, the default order is set by UID.
From this screen it is possible to perform some functions using the buttons located in the lower right part of the
screen. The functions are:
- creation of a new SmartNote with Smart Notepad or the option to add a note to an existing one (p.27)
- export all the details of the xtures present in a .csv format
- the option to select and delete xtures
The xtures can be ltered and viewed based on the items listed above, depending on the operator’s preferences.
By selecting the toggle buttons above the table: “FW UPDATE”, “ERRORS”, “LAMP LIFETIME”, the table will show
only the xtures marked with notications relating to the selected item.
screen overview section

DETAILS
ERROR 0
WARNING 0
INFO 0
DETAILS
Aleda B-Eye K20 4350242548A9 2.21.003 32 / 32 -535
DETAILS
Aleda Wash K10 43501E259378 2.21.003 1 / 1 -15 52
DETAILS
Aleda Wash K10 43501E258989 2.21.003 5 / 5 -132
55
FIXTURE DETAILED INFO
CLAY PAKY - A.LEDA WASH K10 UID: 43501E258989
BACK
FIXTURE PROPERTIESFIRMWARE DETAILSLOG OVERVIEW
INFO 11 WARNING 42 ERROR 24
NEW LOGS (0) MARK ALL AS READ EXPORT CSV i
FIXTURE HOURS ... EVENT VALUE
DOWNLOAD TIME
17
5.3 FIXTURE DETAILED INFO
From the “DETAILS” button on the right side of the list table, the user can access the detailed view of each single
device. On this page you can see 3 different sections: Log Overview, Firmware Details, Fixture Properties.
5.3.1 LOG OVERVIEW
From this page the user can monitor all the internal events recorded in the xtures. Events are divided in 3 toggle.
that allow a quick view based on the selected category:
- INFO: Normal operating information
- WARNING: Errors happened but that are not preventing the correct operation of the xture
- ERROR: Important failure on the xture
On the right side the user can nd an interactive manual with description of the events and a “rst aid” for trouble xing.
The intuitive interface and graphics allow the user to solve the problem quickly and safely.
screen xture detailed info + section log overview open

55
FIXTURE DETAILED INFO
CLAY PAKY - A.LEDA WASH K10 UID: 43501E258989
BACK
FIXTURE PROPERTIESFIRMWARE DETAILSLOG OVERVIEW
BOARD
CPU
Pan/Tilt Type 1
Led Driver ALEDA K10
CPU Standard
2.25.002
000.010
000.011
000.014
2.25.002
000.010
000.011
000.014
FW VERSION LATEST FW VERSION
55
FIXTURE DETAILED INFO
CLAY PAKY - A.LEDA WASH K10 UID: 43501E258989
BACK
FIXTURE PROPERTIESFIRMWARE DETAILSLOG OVERVIEW
General properties
Lamp Thresholds
Fixture name / description
Enable custom threshold
Warehouse Code Serial Number
5.3.2 FIRMWARE DETAILS
18
On this page, the user can view the rmware version installed on each board and the latest rmware version
released, following the sections in the list table; “BOARD” / “FW VERSION” / “LATEST FW
From this page, the user can insert a custom name on the xture and insert the Warehouse code to align the WMS,
where present, with CloudIO web interface.
From this tab the user can also insert a custom threshold for the lamp usage.
screen xture detailed info + section rmware details open
screen xture detailed info + sectionxture properties open
5.3.3 FIXTURE properties

55
CLOUDIO BOX SELECTION
OLYMPUS CRUISE
SEA HALL
AI007619
Mark Johnson
v1.3.3
ONLINE
BLUE SHELL RIG
AI007623
Jo Bennington
v1.3.3
OFFLINE
SAND THEATER
AI007688
Carl Roose
v1.3.3
OFFLINE
APOLLO ABYSS CRUISE
CASSIOPEA FLOOR
AI007633
Nick Herton
v1.3.3
ONLINE
CALYPSO THEATER
AI007677
Ralph Rudess
v1.3.3
ONLINE
C2 LAB
AI007657
Amy Delore
v1.3.3
OFFLINE
5
CHANGE CLOUDIOBOXLINE 2 - INCOMING TEST ONLINE
BATCH OVERVIEW FIRMWARE UPDATE DMX SETTINGS
START DISCOVERY
AI007619
John Smith
v1.3.3
ONLINE
FLOOR THEATER
5
10
Fixtures found
19
5.4.1 CLOUDIO BOX SELECTION
From this page, the user can choose on which CloudIO box operate. In the “Default Line” there are all the CloudIO
boxes paired (p. 00), the information box shows the name of the box, the serial number, the administrator, the
rmware version installed and the status of the box, which can be OFFLINE, ONLINE, ACTIVE, IN USE.
Once the box is selected, the xtures connected to the box can be discovered using the button “start discovery”.
The number of lines, the number of CloudIO per lines and CloudIO Box names are parameters easily customizable
only by the administrator, entering the LINE SETUP section, present in the SETTINGS section (p. 31).
screen operation + box selection open
screen operation + box selection start discovery screen operation + box selection nd xtures
BOX NAME
SERIAL NUMBER
USER NAME / EMAIL
FIRMWARE VERSION
STATUS BOX
5.4 OPERATIONS

FW UPDATE 11
ERRORS 6
LAMP LIFETIME 2
5
CHANGE CLOUDIOBOXLINE 2 - INCOMING TEST ONLINE
BATCH OVERVIEW FIRMWARE UPDATE DMX SETTINGS
Claypaky
HEPIKOS
DMX Address
Firmware on board
Lamp hours
001
2.24.00
3
Claypaky
HEPIKOS
DMX Address
Firmware on board
Lamp hours
001
2.24.00
3
Claypaky
HEPIKOS
DMX Address
Firmware on board
Lamp hours
001
2.24.00
3
Claypaky
HEPIKOS
DMX Address
Firmware on board
Lamp hours
001
2.24.00
3
Claypaky
HEPIKOS
DMX Address
Firmware on board
Lamp hours
001
2.24.00
3
Claypaky
HEPIKOS
DMX Address
Firmware on board
Lamp hours
001
2.24.00
3
Claypaky
HEPIKOS
DMX Address
Firmware on board
Lamp hours
001
2.24.00
3
Claypaky
HEPIKOS
DMX Address
Firmware on board
Lamp hours
001
2.24.00
3
Claypaky
HEPIKOS
DMX Address
Firmware on board
Lamp hours
001
2.24.00
3
Claypaky
HEPIKOS
DMX Address
Firmware on board
Lamp hours
001
2.24.00
3
Claypaky
HEPIKOS
DMX Address
Firmware on board
Lamp hours
001
2.24.00
3
Claypaky
HEPIKOS
DMX Address
Firmware on board
Lamp hours
001
2.24.00
3
Claypaky
HEPIKOS
DMX Address
Firmware on board
Lamp hours
001
2.23.00
3
Claypaky
HEPIKOS
DMX Address
Firmware on board
Lamp hours
001
2.23.00
3
FW UPDATE 11 ERRORS 6LAMP LIFETIME 2
START DISCOVERY SELECT ALL DESELECT ALL
CLEAR ERRORS
MOVEMENT RESET SMART CODING START LOCATESMART NOTEPAD
PARAMETER RESET
FACTORY DEFAULT
USER DEFAULT RESET
SOFTWARE REBOOT
5
CHANGE CLOUDIOBOXLINE 2 - INCOMING TEST ONLINE
BATCH OVERVIEW FIRMWARE UPDATE DMX SETTINGS
FW UPDATE 11 ERRORS 6LAMP LIFETIME 2
START DISCOVERY SELECT ALL DESELECT ALL
CLEAR ERRORS
PARAMETER RESET MOVEMENT RESET SMART CODING START LOCATESMART NOTEPAD
Claypaky
HEPIKOS
DMX Address
Firmware on board
Lamp hours
001
2.24.00
3
Claypaky
HEPIKOS
DMX Address
Firmware on board
Lamp hours
001
2.24.00
3
Claypaky
HEPIKOS
DMX Address
Firmware on board
Lamp hours
001
2.24.00
3
Claypaky
HEPIKOS
DMX Address
Firmware on board
Lamp hours
001
2.24.00
3
Claypaky
HEPIKOS
DMX Address
Firmware on board
Lamp hours
001
2.24.00
3
Claypaky
HEPIKOS
DMX Address
Firmware on board
Lamp hours
001
2.24.00
3
Claypaky
HEPIKOS
DMX Address
Firmware on board
Lamp hours
001
2.24.00
3
Claypaky
HEPIKOS
DMX Address
Firmware on board
Lamp hours
001
2.24.00
3
Claypaky
HEPIKOS
DMX Address
Firmware on board
Lamp hours
001
2.24.00
3
Claypaky
HEPIKOS
DMX Address
Firmware on board
Lamp hours
001
2.24.00
3
Claypaky
HEPIKOS
DMX Address
Firmware on board
Lamp hours
001
2.24.00
3
Claypaky
HEPIKOS
DMX Address
Firmware on board
Lamp hours
001
2.24.00
3
Claypaky
HEPIKOS
DMX Address
Firmware on board
Lamp hours
001
2.23.00
3
Claypaky
HEPIKOS
DMX Address
Firmware on board
Lamp hours
001
2.23.00
3
5
CHANGE CLOUDIOBOXLINE 2 - INCOMING TEST ONLINE
BATCH OVERVIEW FIRMWARE UPDATE DMX SETTINGS
FW UPDATE 11 ERRORS 6LAMP LIFETIME 2
START DISCOVERY SELECT ALL DESELECT ALL
CLEAR ERRORS
PARAMETER RESET MOVEMENT RESET SMART CODING START LOCATESMART NOTEPAD
Claypaky
HEPIKOS
14
1
4 5 6 732
5.4.2 BATCH OVERVIEW
Once the discovery is completed, CloudIO web interface will show to the user an overview on the connected
xtures. From this page the user can locate the xtures or perform a parameter or movement reset.
The color coding is related to FW UPDATE / INTERNAL ERRORS / LAMP LIFETIME ISSUE.
Using the icons in the upper right part of the screen, the user can choose whether to view the xtures in table list
format, in blocks or divided by models
screen operation + batch overview and legend number
20
screen batch overview page organization screen batch overview page organization
Other manuals for Claypaky CloudIO
2
Table of contents
Other Osram Diagnostic Equipment manuals