Ossenberg Flexyfoot User manual
Seite 1
Stand 14.02.2019
Gebrauchsanweisung für Flexyfoot
Artikel 971P / 977P
Verwendungszweck
Flexyfoot ist ein neues Konzept für Gehstöcke. Der patentierte Federbalg gestattet dem Fuß, sich automatisch auf den Winkel des Bodens
einzustellen, wodurch der Kontaktbereich der Lauffläche maximiert wird. Der Halt wird dadurch stark verbessert und der Verschleiß
entschieden reduziert. Der Federbalg wirkt dämpfend und reduziert die Belastung von Händen und Schulter.
1. Anwendung
So montieren Sie Flexyfoot:
Flexyfoot besteht aus zwei separaten Teilen, die es Ihnen ermöglicht eine verbrauchte oder kaputte Lauffläche auszutauschen, ohne den
kompletten Fuß auszuwechseln.
•Falls Sie keine höhenverstellbare Gehhilfe haben, müssen Sie die Gehhilfe vor dem Anbringen von Flexyfoot gegebenenfalls kürzen. Bitte
prüfen Sie sorgfältig vor der Montage, um wieviel Sie ihre Gehhilfe kürzen müssen oder lassen die Montage vom Fachhändler durchführen.
•Markieren Sie sich 22 mm an Ihrem Gehstock: soweit sollte sich der Stock in die Manschette drücken lassen. Bringen Sie Flexyfoot an, indem
Sie die Manschette auf das Ende Ihrer Gehhilfe drücken. Stellen Sie sicher, dass der Stock bis zu Ihrer Markierung und fest in der Manschette
sitzt.
•Drehen Sie dann den Fuß in die Manschette bis er einrastet und man ihn drehen, aber nicht schrauben kann.
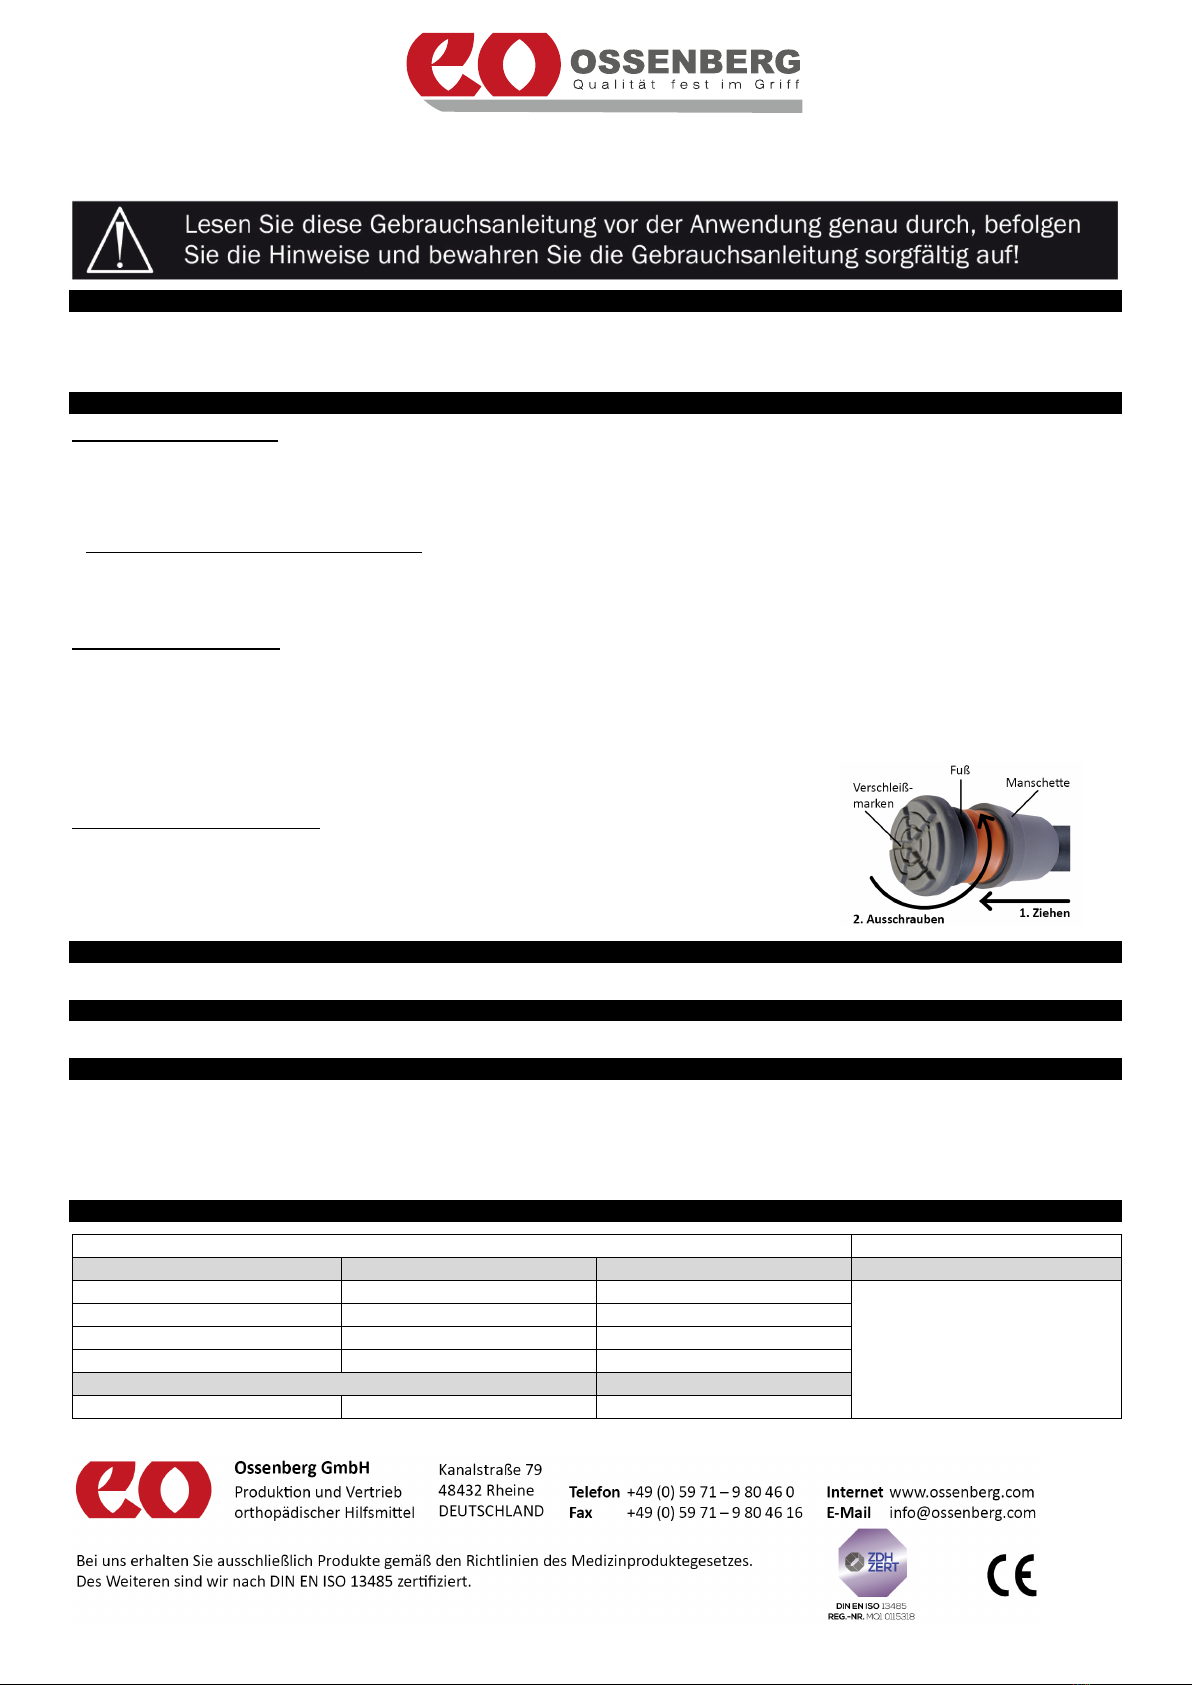
Auswechselbare Lauffläche:
•Ihr Flexyfoot lässt sich leicht auswechseln, wenn er abgenutzt ist, ohne dass die Manschette ausgebaut werden muss.
•Der Federbalg wird mit der Zeit um ca. 6 mm eingedrückt, doch dass beeinträchtigt seine Leistung nicht.
•Wechseln Sie den Fuß aus, wenn die Lauffläche bis zu den Verschleißmarken abgenutzt ist (dies sind die Querstriche auf den Laufblöcken),
bzw. wenn der Federbalg oder die Lauffläche beschädigt sind oder wenn der Federbalg sich in der Manschette gelockert hat.
•Wechseln Sie die Manschette, wenn sie beschädigt oder abgenutzt ist, oder wenn ein neuer Federbalg nicht länger in der Manschette
einrastet oder locker ist.
Montage einer neuen Lauffläche:
Ziehen Sie den alten Fuß von der Manschette ab, bis er sich löst und Herausgeschraubt werden kann.
Schrauben Sie den neuen Fuß in die Manschette und drücken sie ihn, bis er einrastet und man ihn
drehen kann, ohne ihn dabei herauszuschrauben.
2. Reinigung
Mit feuchtem Tuch und ggf. mit mildem Reiniger abwischen und trocknen lassen.
3. Entsorgung
Bitte erkundigen Sie sich bei Ihrem Fachhändler nach den regionalen Entsorgungsvorschriften.
4. Gewährleistung und Haftung
Sie haben ein hochwertiges Produkt erworben. Sollte trotz höchster Qualitätsstandards ein berechtigter Sachmangel auftreten, steht
Ossenberg das Recht zu, im Rahmen einer 12-monatigen Gewährleistung, nach eigener Wahl die mangelhafte Sache nachzubessern oder durch
eine mangelfreie Nachlieferung zu ersetzen. Für Schäden, die durch die Veränderungen am Produkt entstanden sind, können wir keine
Haftung übernehmen. Nicht von der Gewährleistung erfasst sind Mängel, die auf Verschleiß oder unsachgemäße Behandlung zurückzuführen
sind. Verschleißteile sind von der Gewährleistung ausgeschlossen.
5. Technische Daten
Flexyfoot, in grau oder schwarz
Farbe grau
Farbe schwarz
Innen-Ø
Max. Belastbarkeit
97116P-1 (Inhalt 1 St.)
97716P-1 (Inhalt 1 St.)
16 mm
125 kg
97119P-1 (Inhalt 1 St.)
97719P-1 (Inhalt 1 St.)
19 mm
97122P-1 (Inhalt 1 St.)
97722P-1 (Inhalt 1 St.)
22 mm
97125P-1 (Inhalt 1 St.)
97725P-1 (Inhalt 1 St.)
25 mm
Ersatzlauffläche
Auftrittsfläche
972P (Inhalt 1 St.)
977P (Inhalt 1 St.)
Ø 40 mm
Seite 2
Stand 14.02.2019
Instruction for use Flexyfoot
Article 971P / 977P
Usage
Shock-absorbing, anti-slip Flexyfoot is designed to replace the old fashioned ferrule and revolutionise walking aids. Flexyfoot gives improved
grip on all types of terrain and eases the aches and pains associated with constant stress and impact on joints. They are suitable for people of
all ages and levels of fitness.
1. Application
Fitting your first Flexyfoot:
Flexyfoot is consists of two separate parts to allow you to renew the foot section when worn or damaged without replacing the whole
Flexyfoot.
•If your walking aid is not adjustable, you might have to shorten it to correct the new length by taking into consideration the change of
the total length after you have fixed your Flexyfoot. Please check and consider carefully.
•Mark 22mm from the end of your stick, push the stick into the base until it reaches the mark and ensure it is a tight fit.
•Fit Flexyfoot by pushing the collar into the base, screw it until it clicks and is able to freely rotate in either direction without unscrewing.
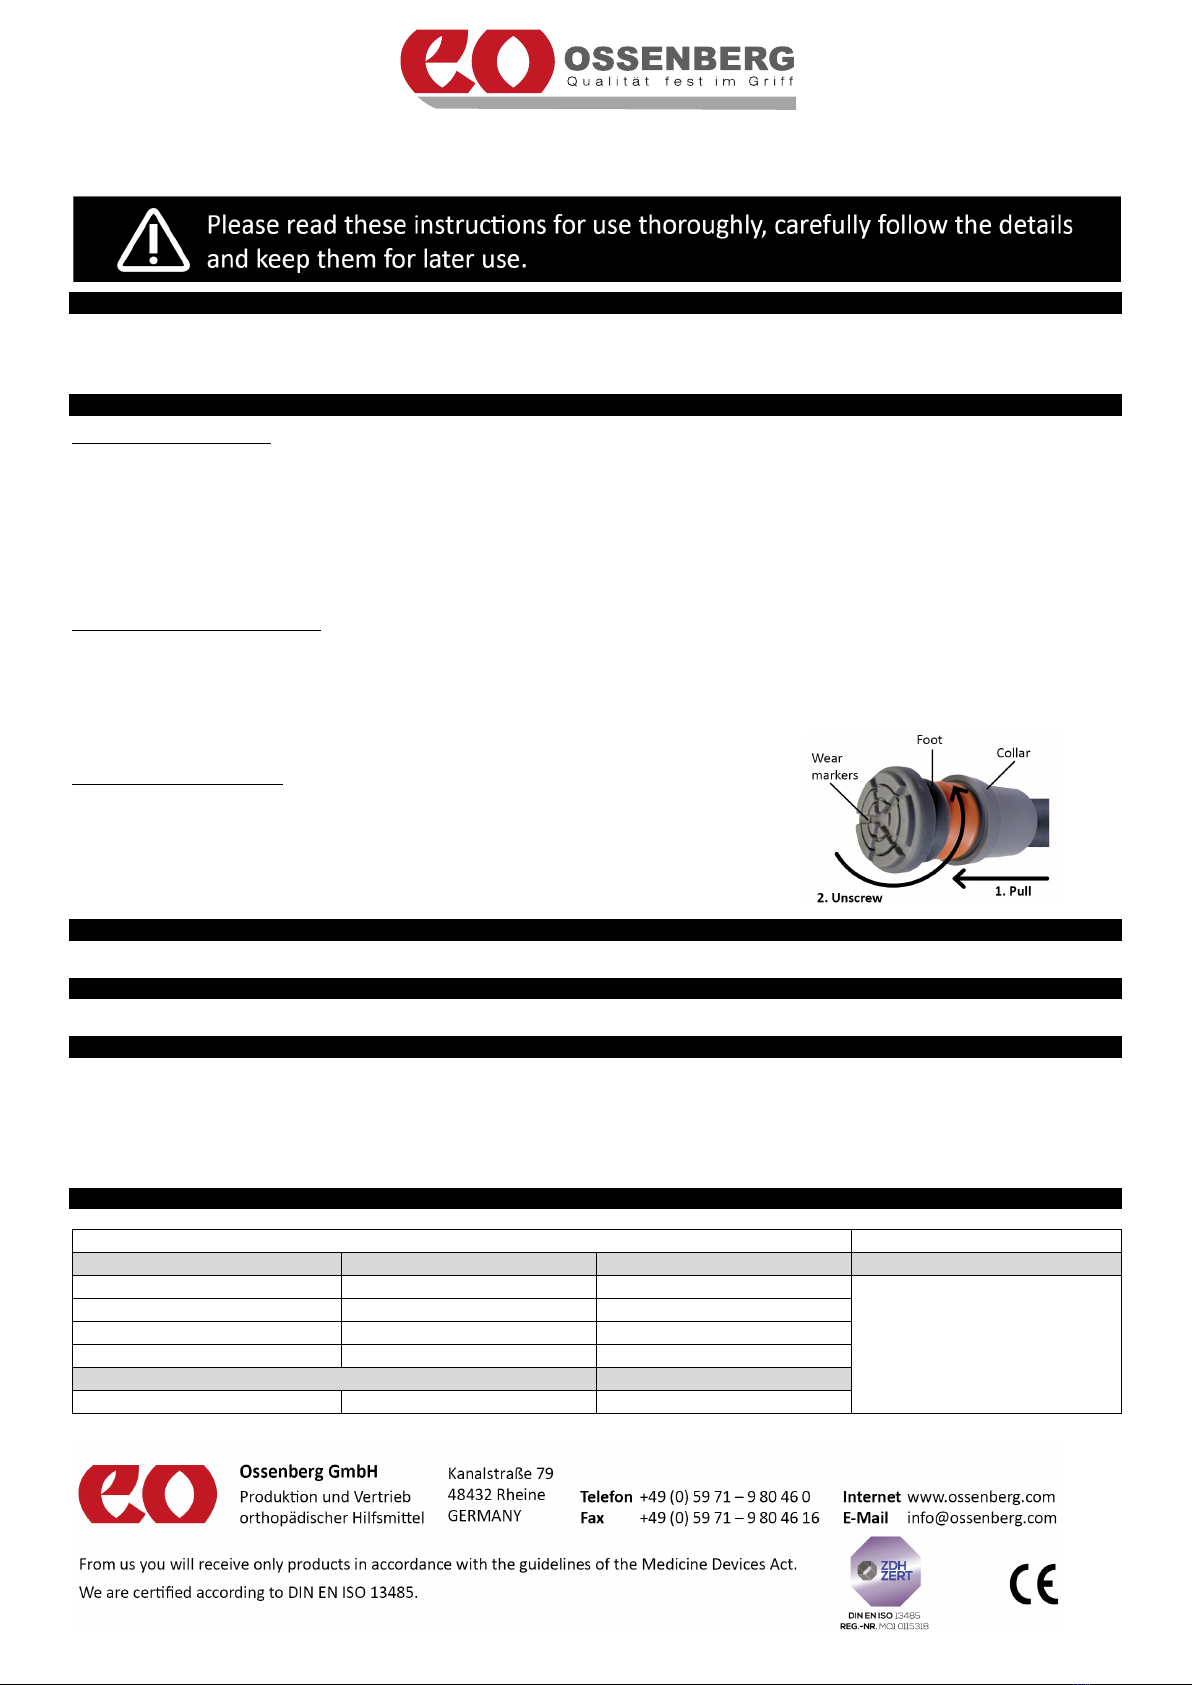
When to fit a new Flexyfoot foot:
The Flexyfoot foot can be easily renewed without replacing the whole Flexyfoot. If the tread is worn down to the wear markers, the bellows or
foot become damaged or if the bellows loses too much spring, stop using immediately and replace the foot. In normal use, the bellows will
soften slightly after a short period of use and will compress over time by about 6 mm.
Full weight-bearing crutch users such as amputees or very active users, may find that Flexyfoot Extra provides greater long-term resistance. It
fits the standard collar and is available from your retailer or Flexyfoot.
Fitting a new Flexyfoot foot:
Remove the old foot by pulling the foot away from the collar and then unscrewing.
To fit the new foot screw into collar until it can freely rotate and then push the foot in
until it clicks home. Replace the collar if it becomes damaged, the fit to the aid becomes
loose or the foot cannot be properly fitted. The collar should be replaced with every third
replacement foot.
2. Cleaning
Wipe with a damp cloth and possibly with a mild household cleaner and let dry.
3. Disposal
Please inquire with your specialized dealer about the regional waste disposal.
4. Warranty and Liability
You have purchased a high-quality product. If you have a justified complaint, despite highest quality standards, we are entitled, at our
discretion – within a 12 month warranty period - to repair the defective product or to replace it with an immaculate one.
We cannot assume liability for damages resulting from modifications made to our products.
Not covered by the warranty are damages resulting from ordinary wear and tear or inappropriate use. Wearing parts are excluded from
warranty.
5. Technical Data
Flexyfoot, in grey or black
Color grey
Color black
Inner-Ø
Max. weight
97116P-1 (Contents 1 pc.)
97716P-1 (Contents 1 pc.)
16 mm
125 kg
97119P-1 (Contents 1 pc.)
97719P-1 (Contents 1 pc.)
19 mm
97122P-1 (Contents 1 pc.)
97722P-1 (Contents 1 pc.)
22 mm
97125P-1 (Contents 1 pc.)
97725P-1 (Contents 1 pc.)
25 mm
Replacement tread, grey or black
Auftrittsfläche
972P (Contents 1 pc.)
977P (Contents 1 pc.)
Ø 40 mm
This manual suits for next models
10
Table of contents
Languages:
Other Ossenberg Personal Care Product manuals


