OtterBox ALPHA GLASS User manual

ALPHA GLASS
Install Guide for Galaxy S9 & Galaxy S9+
1. Remove case (if applicable)
2. Remove any screen films, clean screen
with alcohol wipe, dry with microfiber cloth
3. Slide each installation tool all the
way onto top and bottom of phone
5. Align glass to top installation tool
with speaker cutout as guide
6. Lay glass down until aligned with bottom installation
tool, then press around all edges. Remove tools.
7. Install case per manufacturer instructions
(if applicable). Note: for best results, place
bottom end of phone into case first.
4. Peel off adhesive backing

Alpha Glass Installation Instructions /French Canadian - FrCa
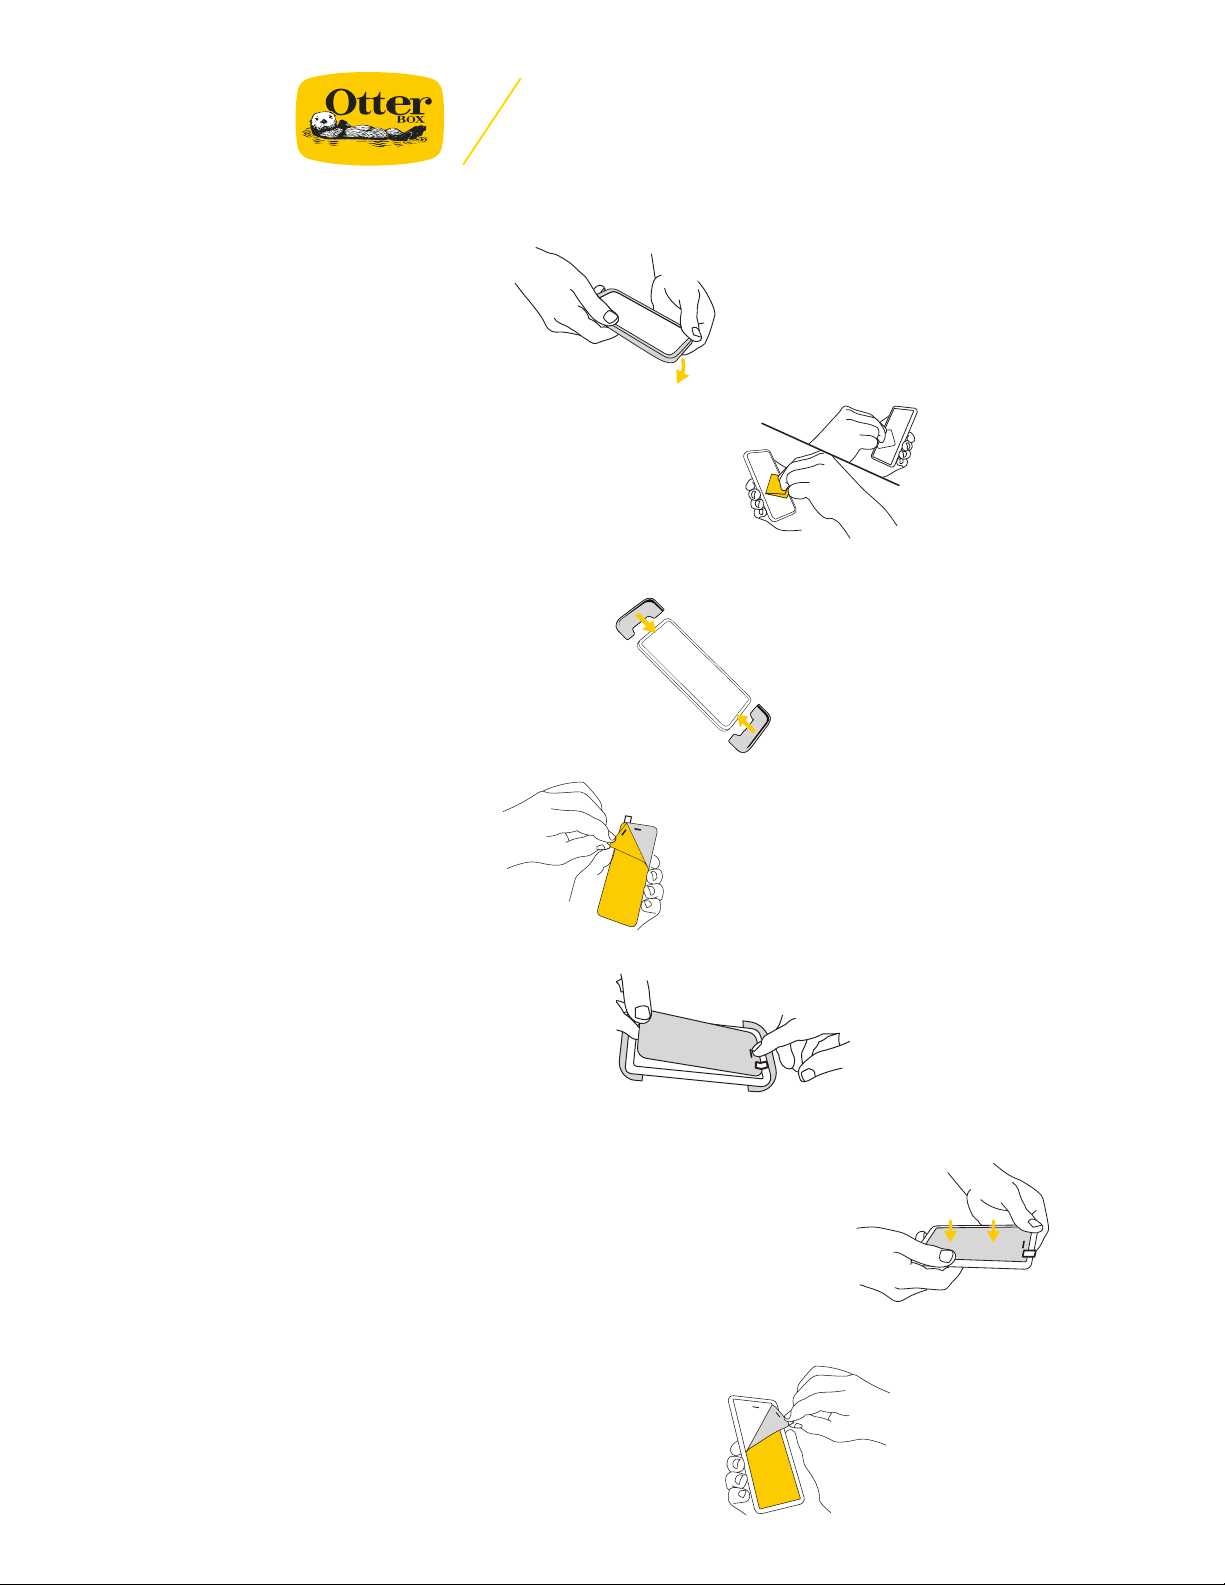
1. Retirez la coque (le cas échéant).
2. Retirez tout protecteur d’écran, nettoyez l’écran à l’aide de la lingette imbibée d’alcool,
puis séchez-le avec le chiffon en microfibre.
3. Faites glisser chaque guide d’application le long du téléphone, jusqu’aux deux extrémités.
4. Enlevez la partie arrière autocollante.
5. Alignez le verre sur le guide d’application de la partie supérieure, en utilisant l’encoche du
haut-parleur comme point de repère.
6. Mettez le verre en place en l’alignant sur le guide d’application inférieur, puis appuyez sur
tous les bords. Retirez les guides.
7. Installez la coque selon les instructions du fabricant (le cas échéant). Remarque:
pour de meilleurs résultats, placez d’abord la partie inférieure du téléphone dans la coque.
Alpha Glass Installation Instructions /German - DE
1. Schutzhülle entfernen (falls zutreffend)
2. Jede Montagehilfe vollständig oben und unten in das Telefon einschieben
3. Kleberückseite abziehen
4. Glas am oberen Montagewerkzeug ausrichten, zur Orientierung die
Lautsprecheröffnung verwenden
5. Alignez le verre sur le guide d’application de la partie supérieure, en utilisant
l’encoche du haut-parleur comme point de repère.
6. Glas nach unten absenken, bis es am unteren Montagewerkzeug ausgerichtet ist,
alle Ecken festdrücken. Werkzeuge entfernen.
7. Schutzhülle gemäß Herstelleranweisungen anbringen (falls zutreffend). Hinweis:
Für beste Ergebnisse das untere Ende des Telefons zuerst in die Schutzhülle schieben.
Alpha Glass Installation Instructions /Spanish - ES (Latin America)
1. Retire el protector (si se aplica).
2. Retire la película de la pantalla, limpie la pantalla con la toallita con alcohol y luego con el
paño de microfibra
3. Deslice cada herramienta de instalación hasta la parte superior e inferior del teléfono
4. Despegue adhesivo del reverso
5. Alinee el cristal con la herramienta de instalación superior teniendo el recorte del altavoz
como guía
6. Coloque el cristal hacia abajo hasta alinearlo con la herramienta de instalación inferior, luego
presione alrededor de todos los bordes. Quite las herramientas.
7. Instale el protector siguiendo las instrucciones del fabricante (si se aplica) Nota: para obtener
mejores resultados, coloque el extremo inferior del teléfono en el protector en primer lugar.
Alpha Glass Installation Instructions /French - FR
1. Retirez l’étui (le cas échéant)
2. Retirez les éventuels protecteurs d’écran et nettoyez l’écran à l’aide de la lingette imbibée
d’alcool, puis séchez-le avec la pochette en microfibre
3. Glissez entièrement les deux outils d’installation, jusqu’en haut et en bas du téléphone
4. Décollez le film adhésif de protection
5. Alignez le verre sur l’outil d’installation supérieur en utilisant la découpe pour le haut-parleur
comme repère
6. Déposez le verre jusqu’à ce qu’il soit aligné avec l’outil d’installation inférieur, puis appuyez
sur les bords. Retirez les outils.
7. Réinstallez l’étui selon les instructions du fabricant (le cas échéant). Remarque: pour obtenir
les meilleurs résultats, positionnez le bas du téléphone dans l’étui en premier.

Alpha Glass Installation Instructions / Italian - IT
1. Rimuovi la custodia (se installata)
2. Rimuovi eventuali pellicole protettive e pulisci lo schermo con la salviettina imbevuta di
alcol e asciugalo con il panno in microfibra
3. Fai scorrere ciascuna guida di installazione interamente sulla parte superiore e inferiore
del telefono
4. Stacca il supporto adesivo
5. Allinea il vetro alla guida d’installazione superiore facendo riferimento all’intaglio
per l’altoparlante
6. Appoggia il vetro allineandolo alla guida d’installazione inferiore, poi premi lungo i bordi.
Rimuovi le guide.
7. Installa la custodia secondo le istruzioni del produttore (se applicabile). Nota: per risultati
ottimali, inserisci il telefono nella custodia iniziando dal bordo inferiore.
Alpha Glass Installation Instructions /Spanish - ES
1. Retire el protector (si se aplica)
2. Retire cualquier película de la pantalla, limpie la pantalla con un paño humedecido con alcohol y
seque con un paño de microfibra.
3. Deslice las herramientas de instalación hasta la parte superior e inferior del teléfono
4. Retire el protector del adhesivo.
5. Alinee el cristal con la herramienta de instalación superior usando el recorte del altavoz como guía.
6. Coloque el cristal hacia abajo hasta alinearlo con la herramienta de instalación inferior, luego
presione alrededor de todos los bordes. Quite las herramientas.
7. Instale el protector de acuerdo con las instrucciones del fabricante (si se aplica). Nota: para obtener
mejores resultados, coloque en primer lugar el extremo inferior del teléfono en el protector.
Alpha Glass Installation Instructions /Dutch - NL
1. Verwijder het hoesje (indien van toepassing)
2. Verwijder eventuele folie van het scherm, reinig het scherm met het alcoholdoekje en droog het af
met het microvezeldoekje
3. Schuif de installatie-tools op de boven- en onderkant van de telefoon
4. Verwijder de schutlaag
5. Lijn het glas uit ten opzichte van de installatie-tool aan de bovenkant en houd de uitsparing voor
de luidspreker daarbij als referentie aan
6. Leg het glas zo neer dat het is uitgelijnd ten opzichte van de installatie-tool aan de onderkant en
druk vervolgens alle randen vast. Neem de tools weg.
7. Installeer het hoesje volgens de aanwijzingen van de fabrikant (indien van toepassing). Let op: het
onderste uiteinde van de telefoon als eerste in het hoesje doen levert de beste resultaten op.
Alpha Glass Installation Instructions /Portuguese - PT
1. Retire a capa (se aplicável)
2. Retire quaisquer películas, limpe o ecrã com um pano embebido em álcool e seque-o com um
pano de microfibras
3. Faça deslizar completamente cada ferramenta de instalação para a parte superior e inferior
do telefone
4. Retire o suporte adesivo
5. Alinhe o vidro com o topo da ferramenta de instalação utilizando a abertura do altifalante
como guia
6. Baixe o vidro até que este esteja alinhado com a parte inferior da ferramenta de instalação
e, em seguida, pressione ao longo das bordas. Remova as ferramentas.
7. Instale a capa de acordo com a instruções do fabricante (se aplicável) Nota: para melhores
resultados, coloque a parte inferior do telefone na capa primeiro.

Alpha Glass Installation Instructions / Russian -RU
1. Снимите чехол (если применимо).
2. Снимите все экранные пленки, протрите экран спиртовой салфеткой, а затем вытрите насухо салфеткой
из микрофибры.
3. Сместите каждое приспособление для установки на самый верх и низ телефона.
4. Снимите клейкую подложку.
5. Выровняйте стекло, ориентируясь на приспособление для установки сверху и на отверстие для
динамика.
6. Положите стекло и выровняйте его, ориентируясь на приспособление для установки, а затем надавите
на все края. Снимите приспособления.
7. Наденьте чехол в соответствии с инструкциями производителя (если применимо). Примечание: для
достижения наилучших результатов в чехол лучше в первую очередь вставлять нижнюю часть телефона.
Alpha Glass Installation Instructions / Polish - PL
1. Zdjąć obudowę (jeżeli dotyczy).
2. Zdjąć wszystkie folie z ekranu, oczyścić go za pomocą szmatki nasączonej alkoholem,
następnie wytrzeć ściereczką z mikrobry.
3. Nasunąć oba szablony całkowicie na górną i dolną część telefonu..
4. Zdjąć warstwę zabezpieczającą klej.
5. Ustawić osłonę równo z górnym szablonem, korzystając z wycięcia na głośnik jako
punktu odniesienia.
6. Przyłożyć osłonę równo z szablonem dolnym, następnie docisnąć ją wokół wszystkich
krawędzi. Zdjąć szablony.
7. Założyć obudowę zgodnie z instrukcją producenta (jeżeli dotyczy). Uwaga: aby uzyskać
najlepszy efekt, należy do obudowy włożyć najpierw dolną część telefonu.
Alpha Glass Installation Instructions / Finish - FI
1. Poista kotelo (jos sovellettavissa)
2. Poista mahdolliset suojakalvot, puhdista näyttö alkoholiliinalla ja kuivaa mikrokuituliinalla.
3. Vedä jokainen asennustyökalu koko matkalta puhelimen ylä- ja alareunaan
4. Vedä tarratausta irti
5. Aseta lasi kohdakkain yläreunan asennustyökalun kanssa käyttämällä kaiuttimen
reikää oppaana
6. Laske lasia alas, kunnes se on kohdakkain alareunan asennustyökalun kanssa, ja paina
sitten kaikkien reunojen ympäri. Irrota työkalut.
7. Asenna kotelo valmistajan ohjeiden mukaan (jos sovellettavissa). Huomaa: saat parhaat
tulokset asettamalla puhelimen alaosan ensin koteloon.
Alpha Glass Installation Instructions / Turkish - TR
1. Kapağı çıkarın (uygunsa)
2. Ekran lmlerini çıkarın, alkollü ıslak mendille ekranı temizleyin, mikrober
bezle kurulayın
3. Tüm kurulum araçlarını telefonun üst ve altına doğru kaydırın
4. Yapışkan arka yüzü soyarak çıkarın
5. Kılavuz olarak hoparlör deliğini kullanarak camı üst kurulum aracıyla hizalayın
6. Camı yerleştirerek alt kurulum aracıyla hizalayın ve tüm kenarlardan bastırın.
Araçları çıkarın.
7. Üretici talimatlarına göre kapağı takın (uygunsa). Not: en iyi sonuçlar için önce
telefonun alt tarafını kapağa yerleştirin.

©2018 Otter Products, LLC. All rights reserved. The OtterBox name and OtterBox trademarks are the property of Otter Products, LLC, registered in the U.S. and other countries. Other trademarks are the property of their respective owners.
Limited Product Warranty: otterbox.com/warranty
Customer Service
1-855-688-7269 /USA + Canada - Toll Free
support@otterbox.com /otterbox.com/support
Otter Products Alpha Glass Warranty
Otter Products, LLC (dba OtterBox) and its affiliated companies worldwide (collectively “Otter”)
warrants its Alpha Glass line of products against defects in material or workmanship for the life
of the product. Otter does not warrant, and is not responsible for, any smartphone or other device
made by anyone other than Otter. If a material or workmanship defect arises with regard to an
Alpha Glass product, and a valid claim is received, Otter will (1) repair the product using new or
refurbished parts or (2) replace the product with a new or refurbished Alpha Glass product. Otter
also provides a one-time replacement of Alpha Glass product for defective installation of the product
by the end user (including air bubbles that do not go away within 24 hours after installation). For
purposes of this limited warranty, “refurbished” means a product or part that has been substantially
returned to its original specifications. In the event of a defect, these are your exclusive remedies.
Otter reserves the right to charge a small shipping and handling fee in connection with the
fulfillment of any valid claim. More info can be found at www.otterbox.com/warranty.
ES ATENCIÓN AL CLIENTE /EE. UU. + Canadá - Línea gratuita PE Atendimento Ao Cliente /EUA + Canadá - Gratuito DE Kundendienst
/USA + Kanada - gebührenfrei IT Servizio Clienti /USA + Canada - Numero verde NL Klantenservice /USA + Canada - gratis SV
Kundservice /USA + Kanada – avgiftsfritt RU Птехподдержка /США + Канада – бесплатно PL OBSŁUGA KLIENTA /USA + Kanada –
numer bezpłatny FI Asiakaspalvelu /Yhdysvallat + Kanada – maksuton TR Müşteri Hizmetle /ABD + Kanada - Ücretsiz AR خدمة العملاء /
كندا والولايات المتحدة الأمريكية - الرقم المجاني ADEAI שירות לקוחות /ארה”ב וקנדה - שיחת חינם JA カスタマーサービス /米国およびカナダ通話料無料 KO
/ZHT/ ZHS 客户服务 /美国和加拿大 - 免费
Table of contents
Other OtterBox Cell Phone Accessories manuals