OtterBox PURSUIT Series User manual

Customer Service
1-855-688-7269 /USA + Canada - Toll Free
support@otterbox.com /otterbox.com/support
STEP 1.
Locate notch along front side.
Open seal along edge with finger.
Use two fingers to grab lid at notch
and pull it away from base.
STEP 2.
Slide phone into base, volume-button
side first.
STEP 3.
Insert each lid corner under rubber seal of
base, then press in.
If necessary, gently pull back rubber seal
to slip lid underneath.
STEP 4.
Press around lid corners and edges to
secure onto base.
PURSUIT SERIES
Install Guide
©2018 Otter Products, LLC. All rights reserved. The OtterBox name and OtterBox trademarks are the property of Otter Products, LLC, registered in the U.S. and other countries.
Other trademarks are the property of their respective owners.
Limited Product Warranty: otterbox.com/warranty

©2018 Otter Products, LLC. All rights reserved. The OtterBox name and OtterBox trademarks are the property of Otter Products, LLC, registered in the U.S. and other countries.
Other trademarks are the property of their respective owners.
Limited Product Warranty: otterbox.com/warranty
ÉTAPE1.
Localisez l’encoche sur l’avant du téléphone.
Ouvrez le joint le long du bord avec le doigt.
Utilisez deux doigts pour saisir le couvercle à
l’encoche et retirez-le de la base.
ÉTAPE2.
Faites glisser le téléphone dans la base, le
côté du bouton de volume en premier.
ÉTAPE3.
Insérez chaque coin du couvercle sous le joint en
caoutchouc de la base, puis appuyez à l’intérieur.
Si nécessaire, retirez doucement le joint en
caoutchouc pour glisser le couvercle en dessous.
ÉTAPE4.
Appuyez autour des coins et des rebords
du couvercle pour fixer la base.
GUIDE D’INSTALLATION

©2018 Otter Products, LLC. All rights reserved. The OtterBox name and OtterBox trademarks are the property of Otter Products, LLC, registered in the U.S. and other countries.
Other trademarks are the property of their respective owners.
Limited Product Warranty: otterbox.com/warranty
INSTRUCCIONES DE INSTALACIÓN
PASO 1.
Ubique la muesca a lo largo del lado delantero.
Abra el sello a lo largo del borde con el dedo.
Use dos dedos para sujetar la tapa por la
muesca y sepárela de la base.
PASO 2.
Deslice el teléfono en la base, empezando
por el botón de volumen.
PASO 3.
Inserte cada esquina de la tapa bajo el sello de
goma de la base, luego presione.
Si es necesario, retire suavemente el sello de goma
para deslizar la tapa por debajo.
PASO 4.
Presione las esquinas y los bordes de la
tapa para asegurarla a la base.

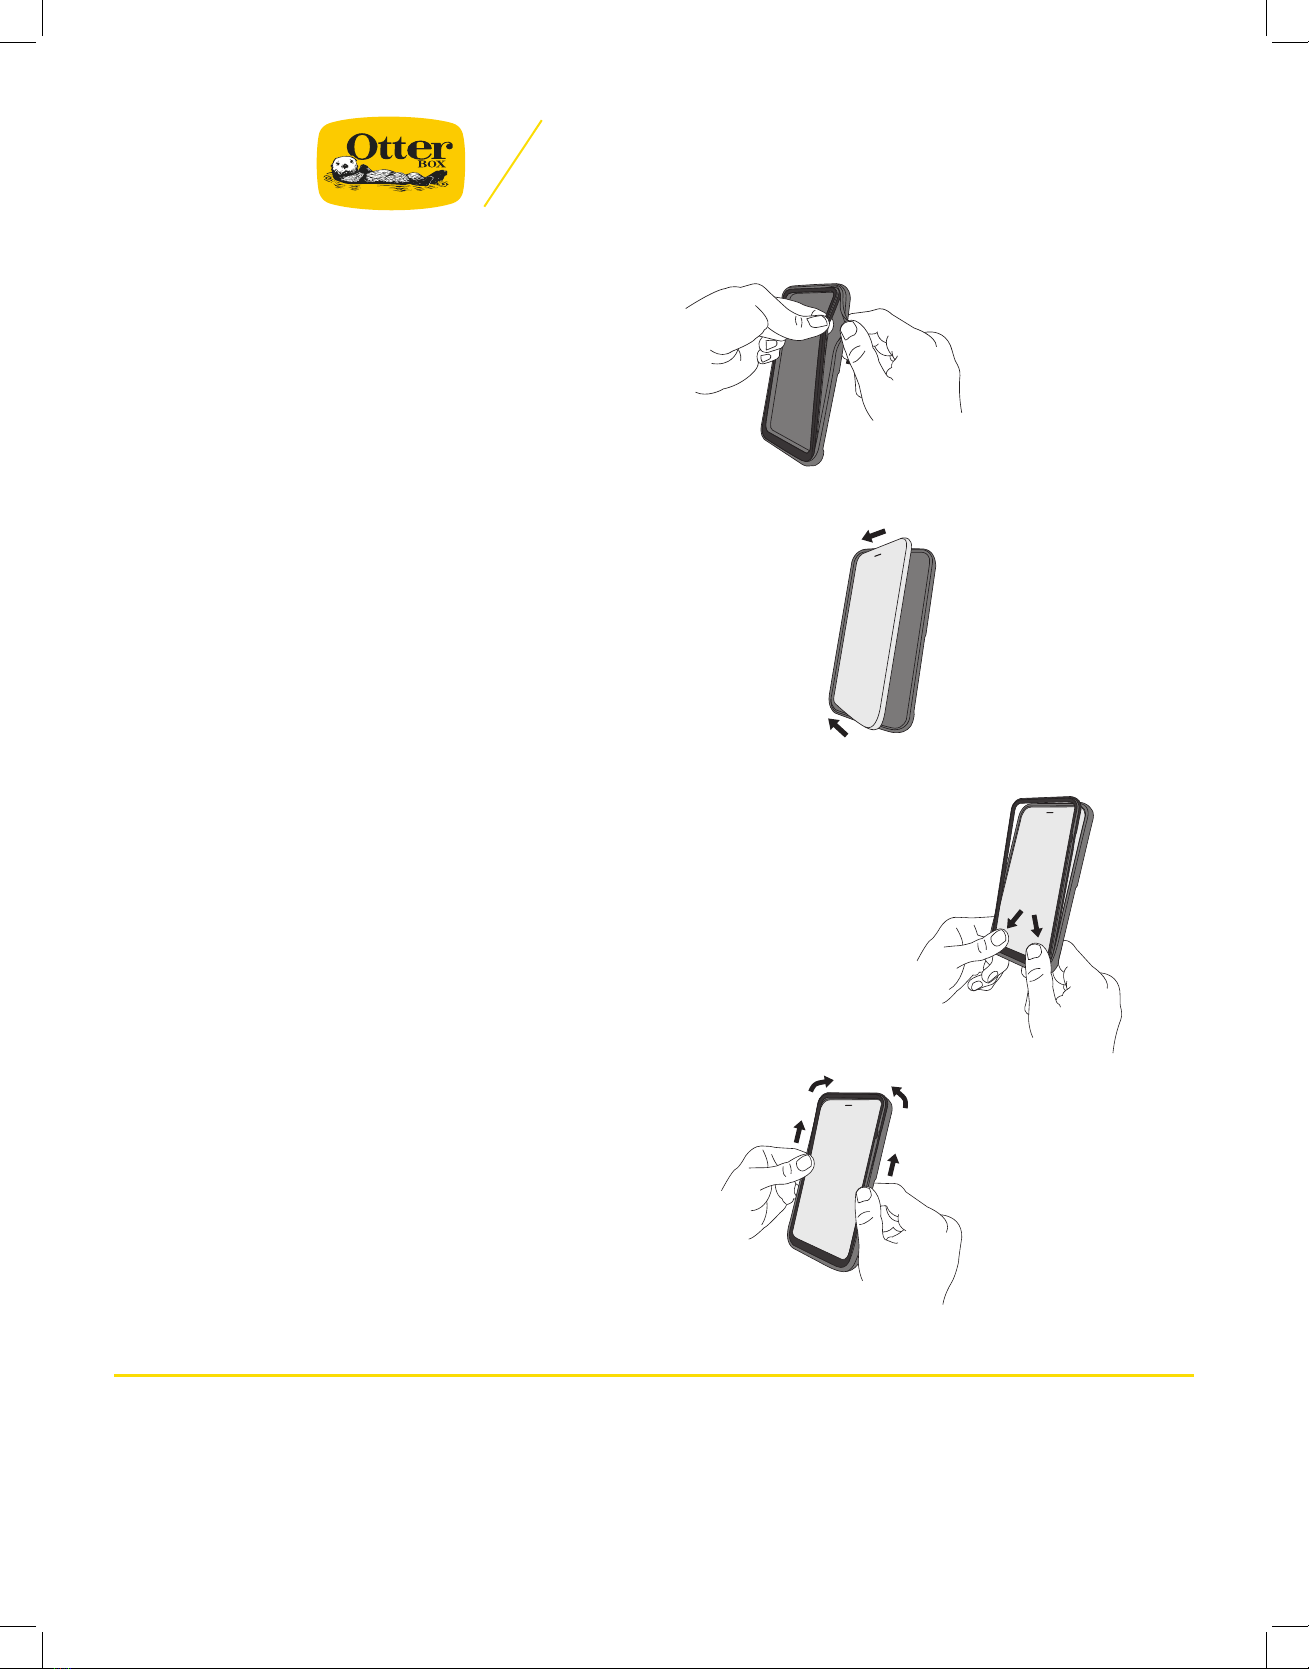
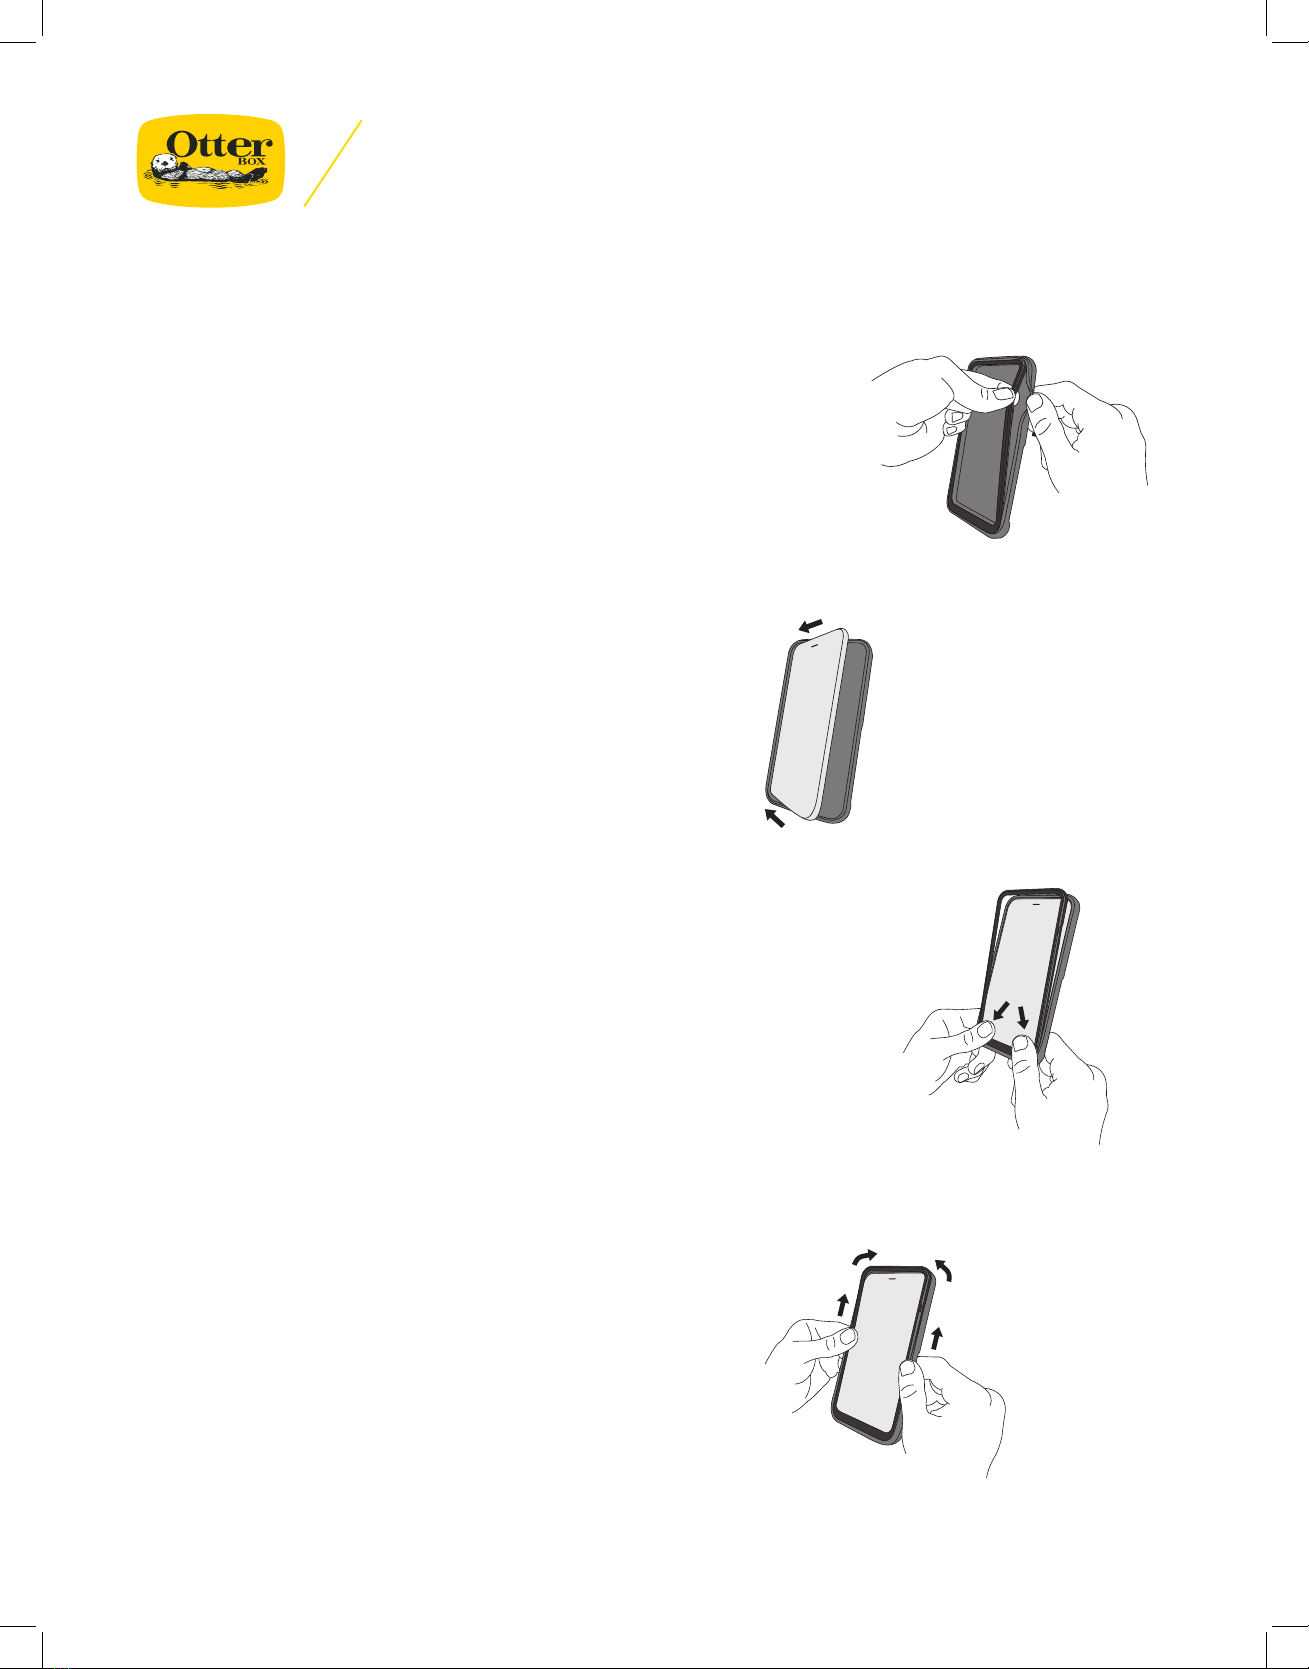
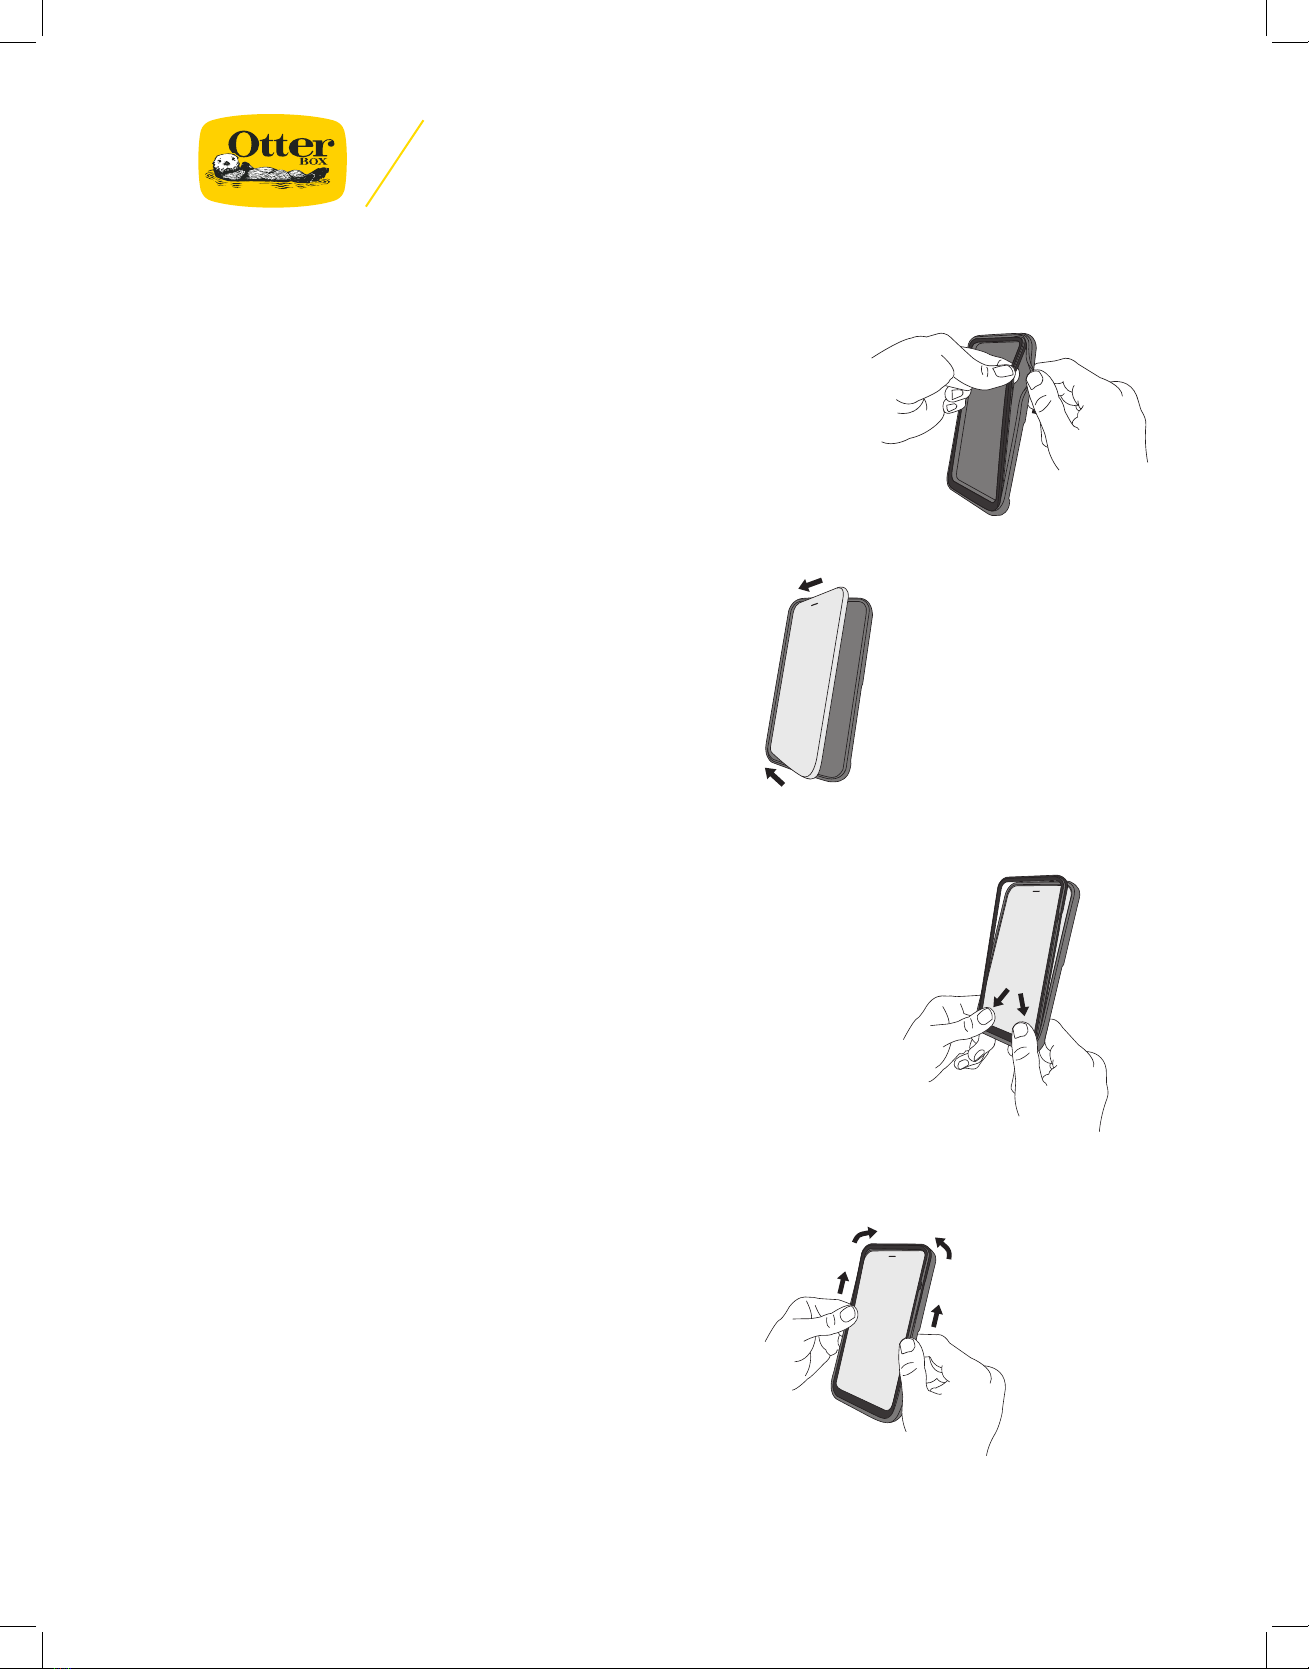
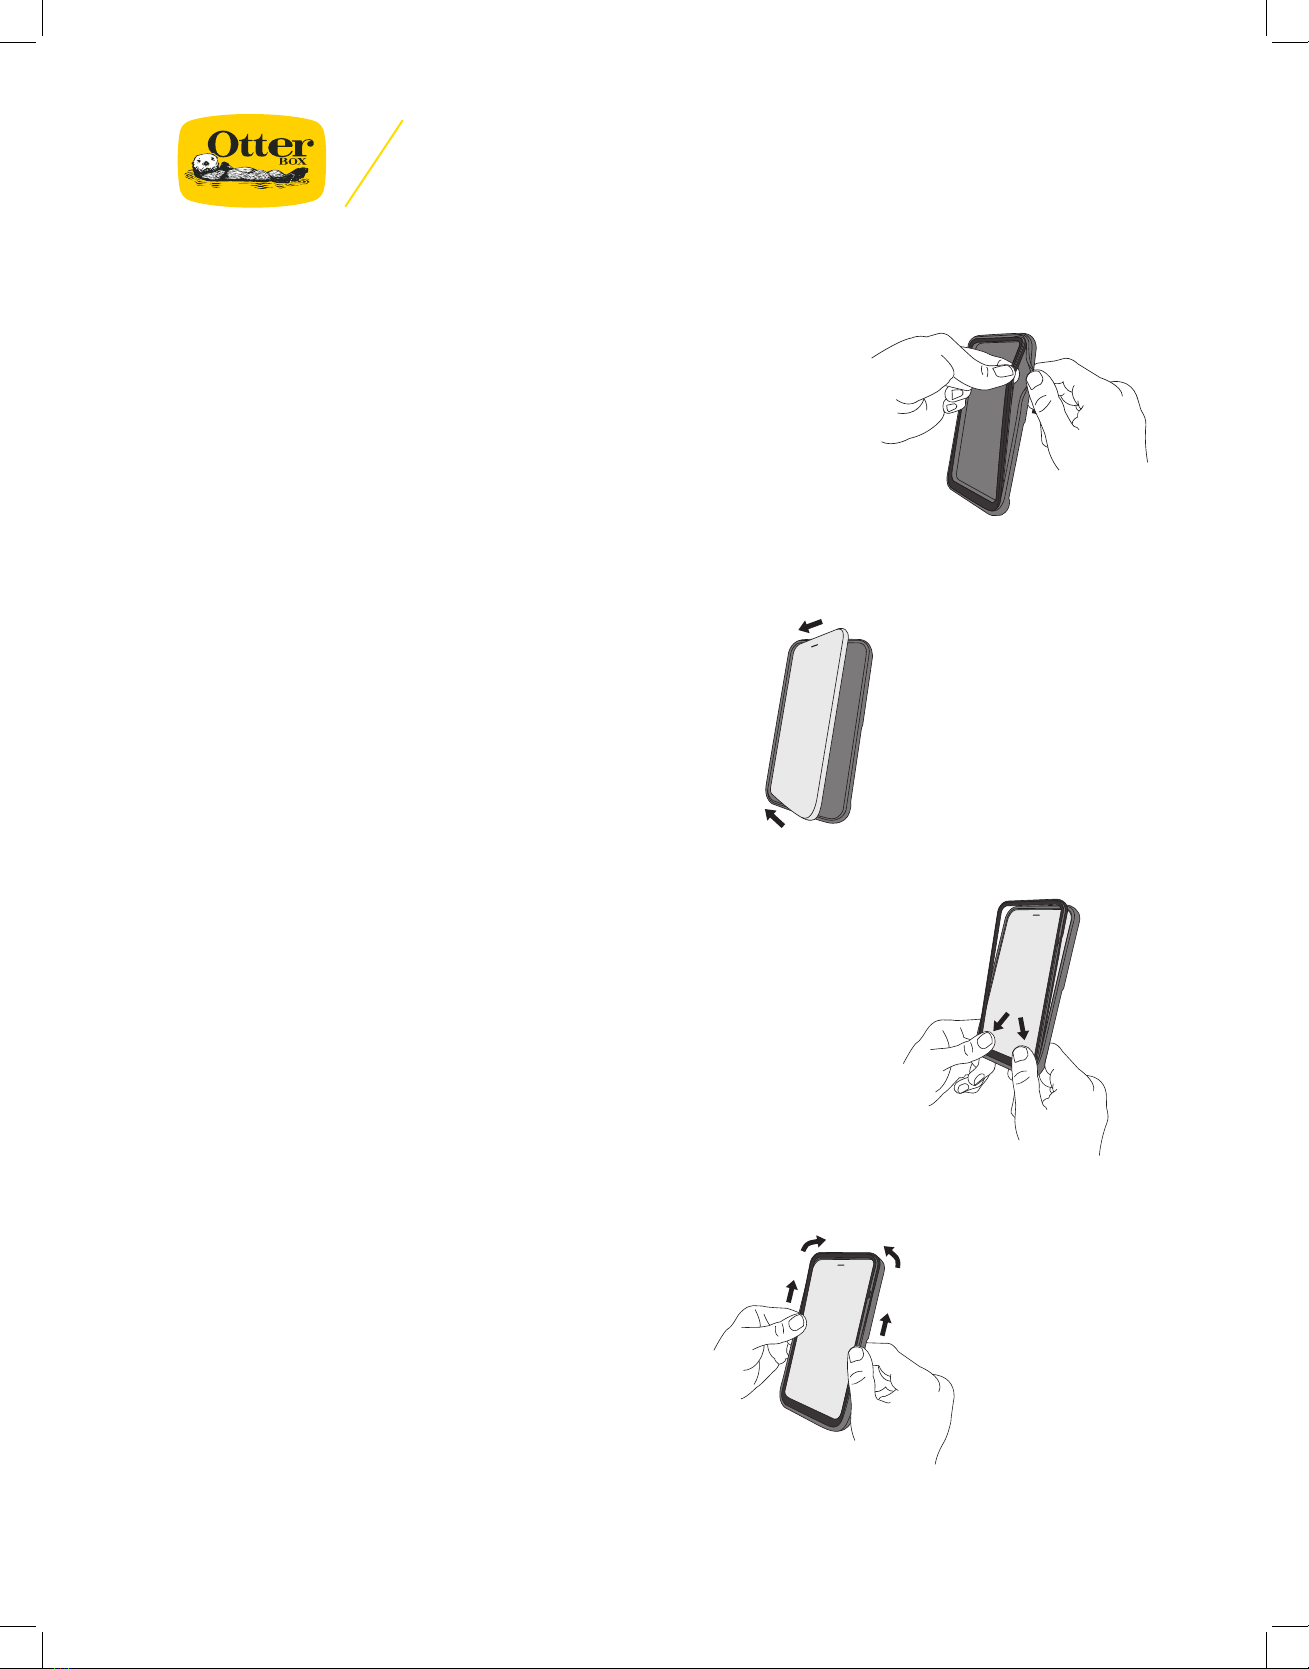
ANWEISUNGEN ZUR ANBRINGUNG
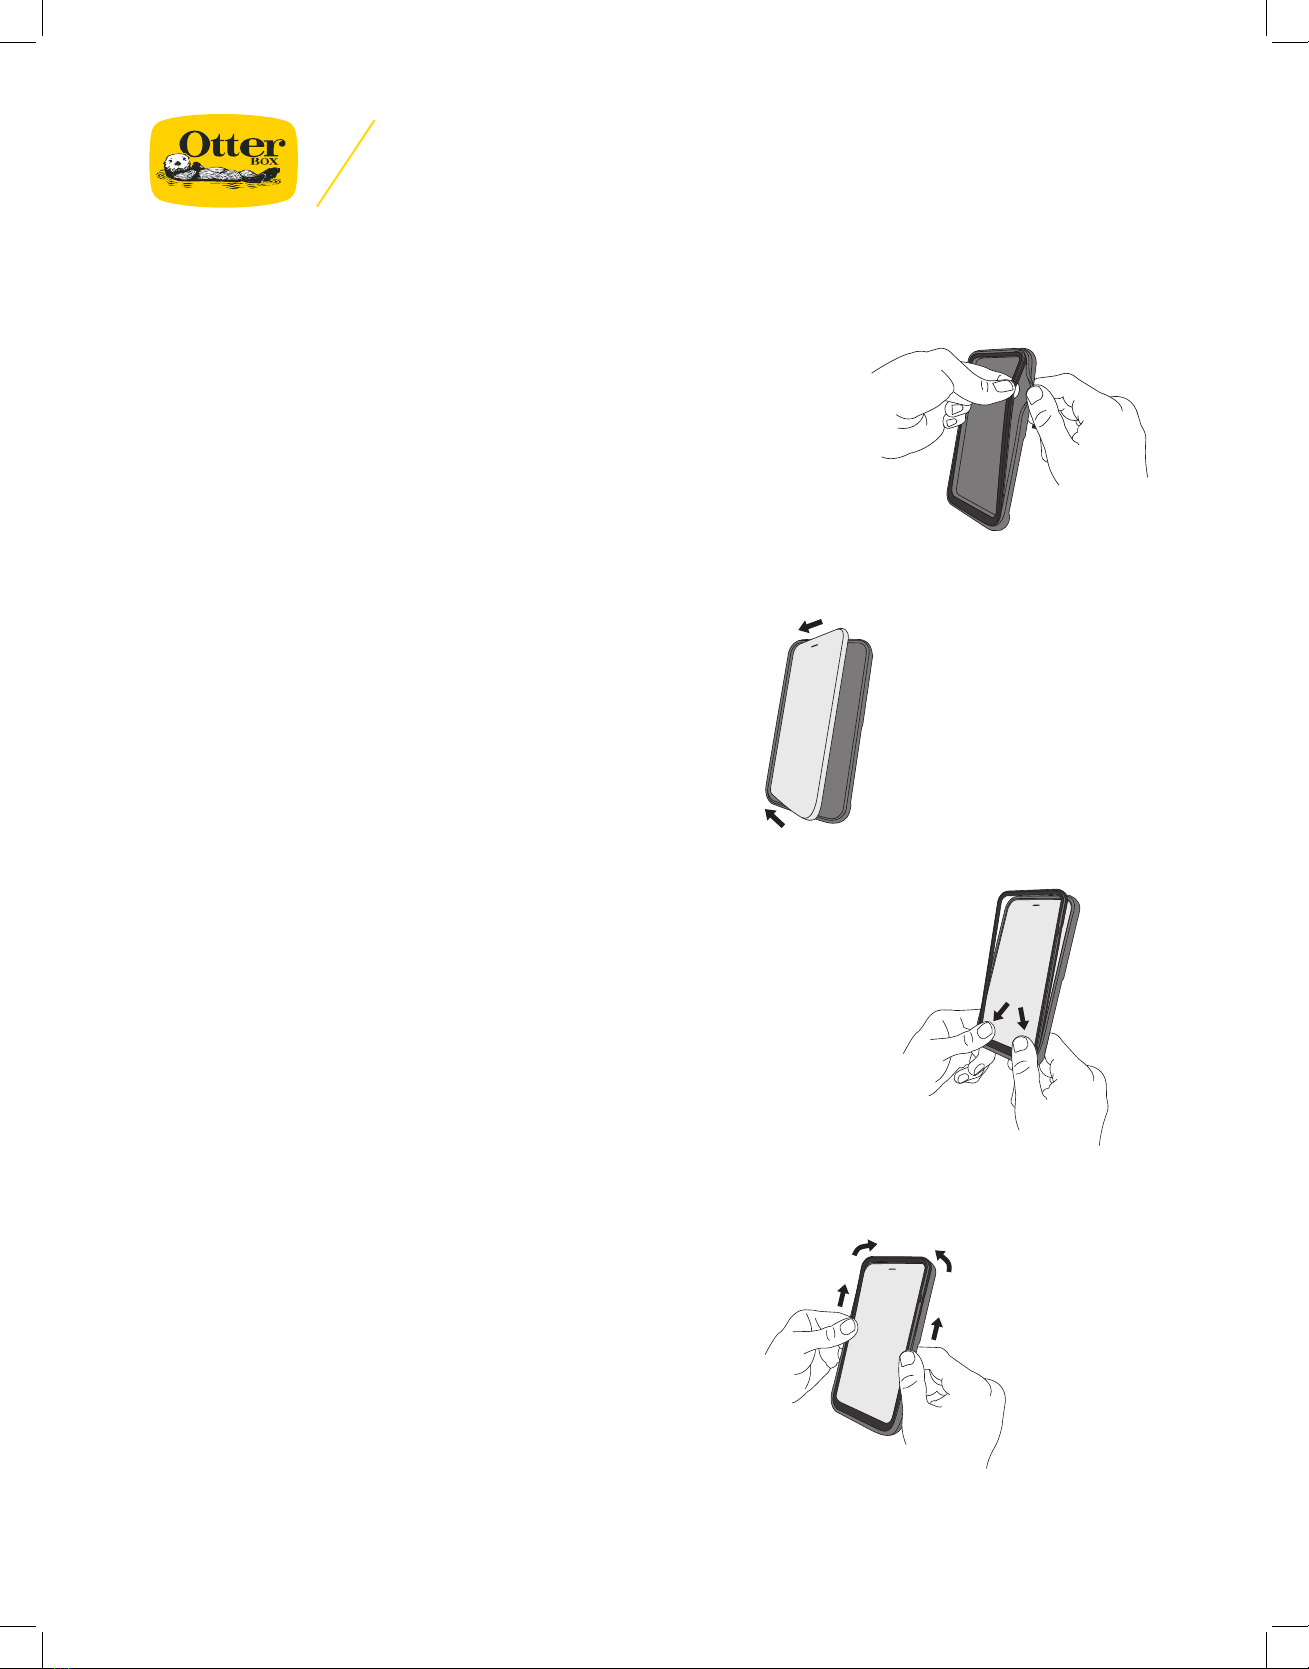
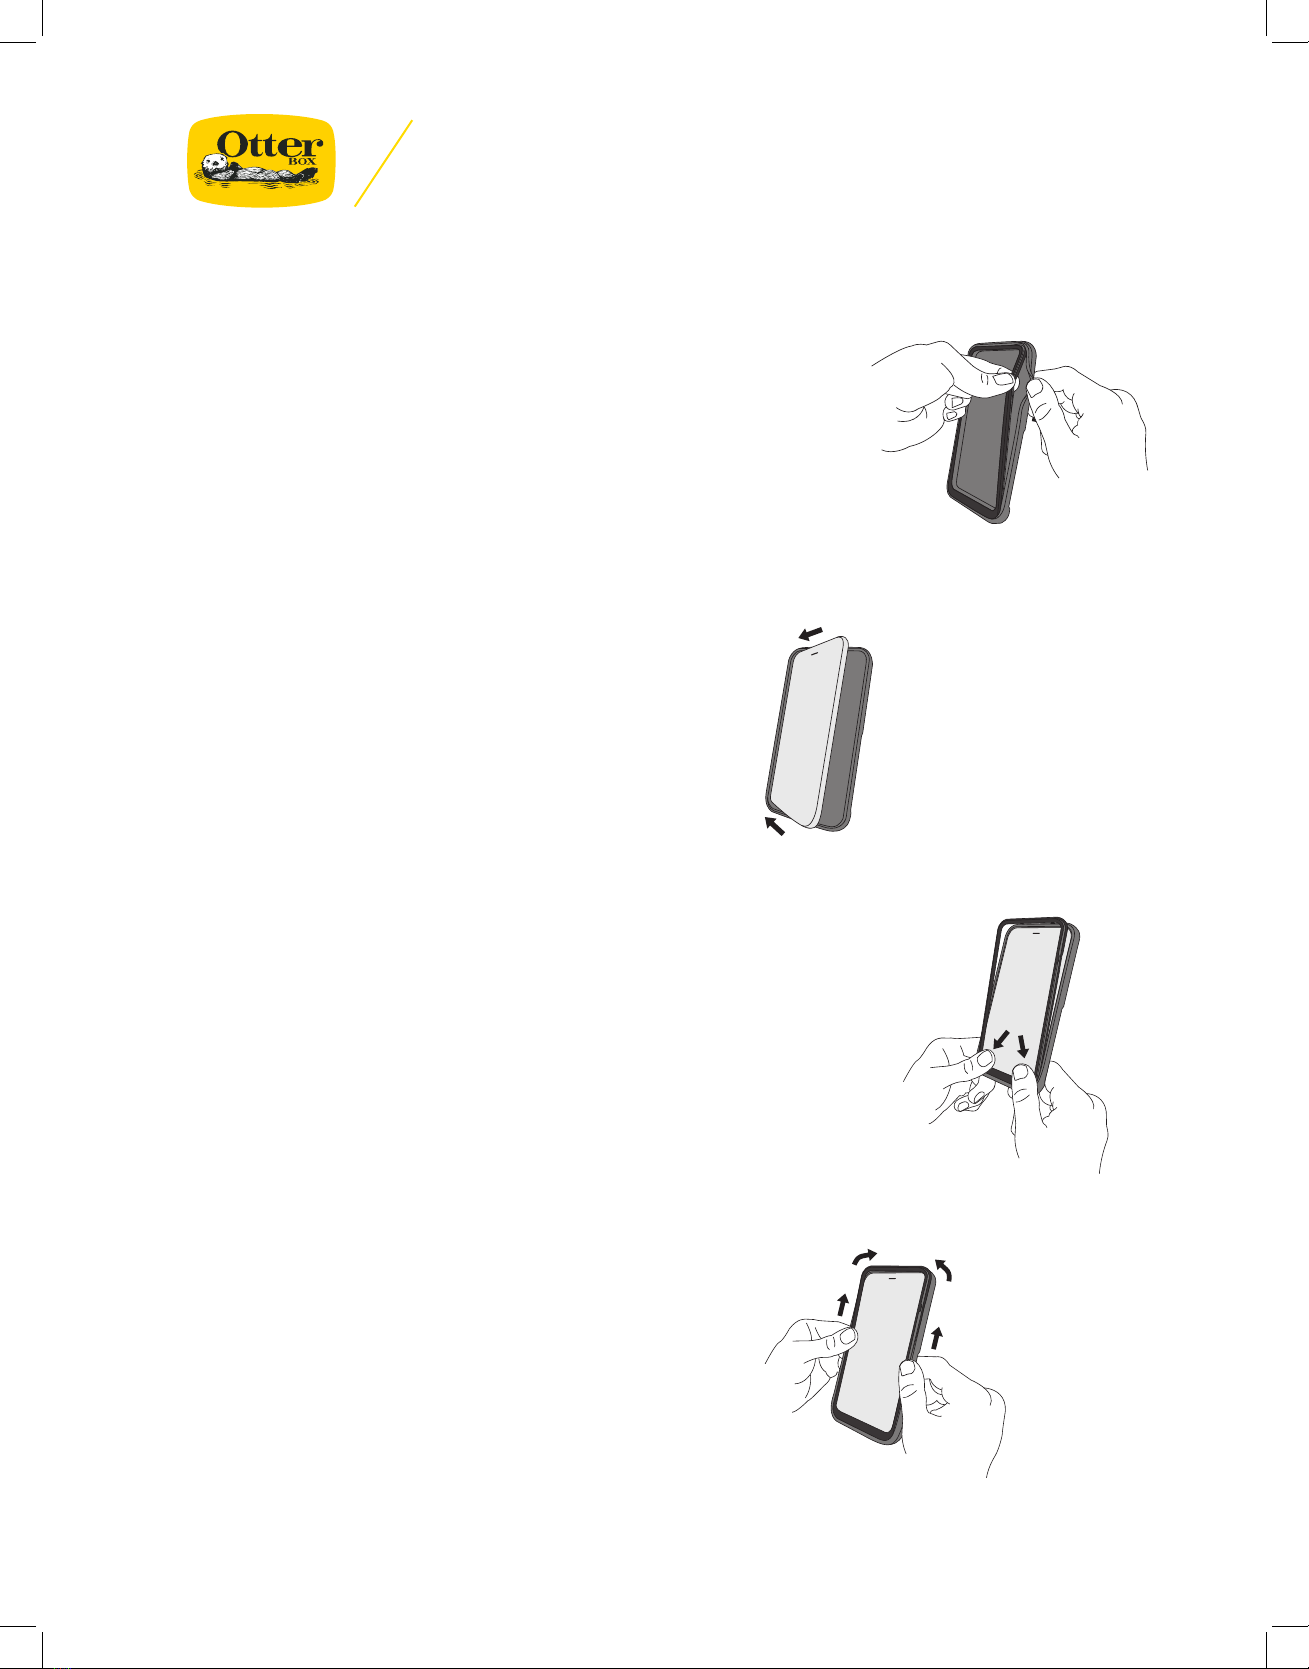
SCHRITT1.
Finden Sie die Kerbe auf der Vorderseite.
Öffnen Sie den Verschluss am Rand mit dem Finger.
Fassen Sie den Deckel an der Kerbe mit zwei Fingern
an und ziehen Sie ihn von der Basis ab.
SCHRITT3.
Stecken Sie jede Deckelecke unter den
Gummiverschluss der Basis und drücken Sie sie ein.
Ziehen Sie den Gummiverschluss bei Bedarf vorsichtig
zurück, um den Deckel darunter zu schieben.
SCHRITT2.
Schieben Sie das Handy in die Basis,
mit der Seite der Lautstärketaste voran.
SCHRITT4.
Drücken Sie die Deckelecken und -kanten
zusammen, um den Deckel auf der Basis zu
befestigen.
©2018 Otter Products, LLC. All rights reserved. The OtterBox name and OtterBox trademarks are the property of Otter Products, LLC, registered in the U.S. and other countries.
Other trademarks are the property of their respective owners.
Limited Product Warranty: otterbox.com/warranty

INSTRUCTIONS DE MONTAGE
ÉTAPE1.
Repérez l’encoche le long de la face avant.
Ouvrez le joint du bord avec vos doigts.
Utilisez deux doigts pour bien agripper le couvercle
à l’encoche et tirez-le loin de la base.
ÉTAPE3.
Insérez chaque coin du couvercle sous le joint en
caoutchouc de la base, puis pressez.
Au besoin, tirez délicatement sur le joint en caoutchouc
pour glisser le couvercle en dessous.
ÉTAPE2.
Faites coulisser le téléphone dans la
base, bouton de volume en premier.
ÉTAPE4.
Appuyez sur les coins et les bords du
couvercle pour les fixer à la base.
©2018 Otter Products, LLC. All rights reserved. The OtterBox name and OtterBox trademarks are the property of Otter Products, LLC, registered in the U.S. and other countries.
Other trademarks are the property of their respective owners.
Limited Product Warranty: otterbox.com/warranty

ISTRUZIONI DI INSTALLAZIONE
PASSAGGIO 1.
Individuare la tacca sul lato anteriore.
Aprire la chiusura lungo il bordo con il dito.
Con due dita, afferrare il coperchio alla tacca
e staccarlo dalla base.
PASSAGGIO 3.
Inserire ogni angolo del coperchio sotto la chiusura in
gomma della base, quindi premere.
Se necessario, tirare delicatamente la chiusura in
gomma per far scivolare il coperchio al di sotto.
PASSAGGIO 2.
Far scorrere il telefono nella base, partendo
dal lato del pulsante per il volume.
PASSAGGIO 4.
Premere attorno agli angoli e ai bordi
per assicurare alla base.
©2018 Otter Products, LLC. All rights reserved. The OtterBox name and OtterBox trademarks are the property of Otter Products, LLC, registered in the U.S. and other countries.
Other trademarks are the property of their respective owners.
Limited Product Warranty: otterbox.com/warranty

INSTRUCTIES VOOR INSTALLATIE
STAP 1.
Zoek de inkeping aan de zijkant van het
voorste gedeelte.
Open de verzegeling langs de rand met je vinger.
Gebruik twee vingers om de omlijsting bij de
inkeping eruit te halen en deze uit de basis te halen.
STAP 3.
Plaats iedere hoek van de omlijsting onder de rubberen
afdichting van de basis en druk hem er dan in.
Indien nodig trek je de rubberen afdichting zachtjes
terug om de omlijsting eronder te krijgen.
STAP 2.
Klik je telefoon in de basis, waarbij je begint
aan de kant waar de volumeknop zit.
STAP 4.
Druk de omlijsting aan rond de hoeken en
randen om ervoor te zorgen dat deze goed
vastzit op de basis.
©2018 Otter Products, LLC. All rights reserved. The OtterBox name and OtterBox trademarks are the property of Otter Products, LLC, registered in the U.S. and other countries.
Other trademarks are the property of their respective owners.
Limited Product Warranty: otterbox.com/warranty

INSTRUCCIONES DE INSTALACIÓN
PASO 1.
Localice lamuesca en la parte delantera.
Abra el cierre por el borde con el dedo.
Utilice dos dedos para sujetar la tapa en la muesca
y separarla de la base.
PASO 3.
Inserte cada esquina de la tapa por debajo del
cierre de goma de la base y presione.
Si es necesario, tire ligeramente del cierre de
goma para introducir la tapa por debajo.
PASO 2.
Deslice el teléfono dentro de la base,
primero por el lado delbotón de volumen.
PASO 4.
Presione alrededor de las esquinas de la tapa
y los bordes para asegurarla en la base.
©2018 Otter Products, LLC. All rights reserved. The OtterBox name and OtterBox trademarks are the property of Otter Products, LLC, registered in the U.S. and other countries.
Other trademarks are the property of their respective owners.
Limited Product Warranty: otterbox.com/warranty

INSTRUÇÕES DE INSTALAÇÃO
ETAPA1.
Localize a ranhura ao longo do lado da frente.
Abra o vedante ao longo da extremidade com o dedo.
Utilize dois dedos para agarrar a tampa na ranhura
e soltá-la da base.
ETAPA3.
Introduza cada canto da tampa sob o vedante
de borracha da base e, depois, pressione.
Se necessário, afaste ligeiramente o vedante de
borracha para fazer encaixar a tampa por baixo.
ETAPA2.
Encaixe o telefone na base, com o lado do
botão de volume primeiro.
ETAPA4.
Pressione os cantos e as extremidades
da tampa para a fixar à base.
©2018 Otter Products, LLC. All rights reserved. The OtterBox name and OtterBox trademarks are the property of Otter Products, LLC, registered in the U.S. and other countries.
Other trademarks are the property of their respective owners.
Limited Product Warranty: otterbox.com/warranty

INSTRUKTIONER
STEG 1.
Hitta jacket på skalets framsida.
Använd ett finger för att öppna förseglingen längs
med kanten.
Använd två fingrar för att ta tag i förslutningen vid
skåran och ta bort det från skalets baksida.
STEG 3.
För in förslutningens hörn under baksidans
gummiförsegling och tryck sedan till.
Dra försiktigt bak gummiförseglingen om det
behövs för att kunna föra in förslutningen.
STEG 2.
För in telefonen i skalets baksida med den
sida som volymknappen sitter på först.
STEG 4.
Tryck längs med förslutningens hörn och kanter
för att säkra att den sitter fast ordentligt i
skalets baksida.
©2018 Otter Products, LLC. All rights reserved. The OtterBox name and OtterBox trademarks are the property of Otter Products, LLC, registered in the U.S. and other countries.
Other trademarks are the property of their respective owners.
Limited Product Warranty: otterbox.com/warranty

©2018 Otter Products, LLC. All rights reserved. The OtterBox name and OtterBox trademarks are the property of Otter Products, LLC, registered in the U.S. and other countries.
Other trademarks are the property of their respective owners.
Limited Product Warranty: otterbox.com/warranty

INSTRUKCJA INSTALACJI
KROK 1.
Znajdź wcięcie znajdujące się na przedniej stronie.
Otwórz uszczelnienie wzdłuż krawędzi za
pomocą palca.
Dwoma palcami złap pokrywę przy nacięciu i
odciągnij ją od podstawy.
KROK 3.
Wsuń każdy z rogów pokrywy pod gumowe
uszczelnienie podstawy, a następnie wciśnij je.
Jeśli to konieczne, delikatnie odciągnij gumowe
uszczelnienie, aby wsunąć pod nie pokrywę.
KROK 2.
Wsuń telefon na bazę, zaczynając od
strony z przyciskiem głośności.
KROK 4.
Dociśnij obszar rogów i krawędzi pokrywy,
aby zamocować ją na podstawie.
©2018 Otter Products, LLC. All rights reserved. The OtterBox name and OtterBox trademarks are the property of Otter Products, LLC, registered in the U.S. and other countries.
Other trademarks are the property of their respective owners.
Limited Product Warranty: otterbox.com/warranty

ASENNUSOHJEET
VAIHE 1.
Paikanna lovi etuosan sivulla.
Avaa sinetti reunaa myöten sormella.
Käytä kahta sormea tarttuaksesi kanteen loven
kohdalla ja vedä poispäin pohjaosasta.
VAIHE 3.
Aseta kannen jokainen kulma pohjaosan
kumisinetin alle ja paina paikoilleen.
Vedä tarvittaessa kumisinettiä hellävaroen
asettaaksesi kannen sen alle.
VAIHE 2.
Liu’uta puhelin pohjaosaan
äänenvoimakkuuspainikkeen puoli ensin.
VAIHE 4.
Paina kannen kulmista ja reunoista
varmistaaksesi napakan kiinnityksen.
©2018 Otter Products, LLC. All rights reserved. The OtterBox name and OtterBox trademarks are the property of Otter Products, LLC, registered in the U.S. and other countries.
Other trademarks are the property of their respective owners.
Limited Product Warranty: otterbox.com/warranty

MONTAJ TALİMATLARI
1. ADIM
Ön taraftaki çentiği bulun.
Parmağınızla kenar boyunca kapamayı açın.
Çentikte kapağı tutmak için iki parmağınızı
kullanın ve tabandan yukarı doğru çekin.
3. ADIM
Her bir köşeyi tabanın kauçuk yalıtımı altına
yerleştirin, ardından içeri doğru bastırın.
Gerekirse kapağın altına kaydırmak için, kauçuk
yalıtımı nazikçe geri çekin.
2. ADIM
Telefonu, ilk önce ses-düğmesi tarafı
olmak üzere tabana geçirin.
4. ADIM
Tabana oturtmak için çepeçevre kapak
köşelerine ve kenarlarına bastırın.
©2018 Otter Products, LLC. All rights reserved. The OtterBox name and OtterBox trademarks are the property of Otter Products, LLC, registered in the U.S. and other countries.
Other trademarks are the property of their respective owners.
Limited Product Warranty: otterbox.com/warranty

©2018 Otter Products, LLC. All rights reserved. The OtterBox name and OtterBox trademarks are the property of Otter Products, LLC, registered in the U.S. and other countries.
Other trademarks are the property of their respective owners.
Limited Product Warranty: otterbox.com/warranty

©2018 Otter Products, LLC. All rights reserved. The OtterBox name and OtterBox trademarks are the property of Otter Products, LLC, registered in the U.S. and other countries.
Other trademarks are the property of their respective owners.
Limited Product Warranty: otterbox.com/warranty

©2018 Otter Products, LLC. All rights reserved. The OtterBox name and OtterBox trademarks are the property of Otter Products, LLC, registered in the U.S. and other countries.
Other trademarks are the property of their respective owners.
Limited Product Warranty: otterbox.com/warranty
装着方法
ステップ 1
前面にあるくぼみを見つけます
端に沿って指で開封していきます
2本の指でくぼみの部分からふたをつま
み、ベースからはずします
ステップ 3
ふたの角をベースのゴムパッキンの下まで
はめ込み、押し込みます
必要に応じて、ふたがしっかりはまるように
ゴム パッキンを軽く引き出します
ステップ 2
ベースに、音量ボタンがある側から電話を
はめ込みます
ステップ 4
ベースに確実にはまるように、ふたの角と
端を押し込みます

©2018 Otter Products, LLC. All rights reserved. The OtterBox name and OtterBox trademarks are the property of Otter Products, LLC, registered in the U.S. and other countries.
Other trademarks are the property of their respective owners.
Limited Product Warranty: otterbox.com/warranty
설치 지침
1단계
전면을 따라 눈금을 찾습니다.
손가락으로 가장자리를 따라 개봉합니다.
두 손가락으로 눈금의 뚜껑을 잡고 베이스에서
바깥쪽으로 잡아 당깁니다.
2단계
먼저 전화기의 볼륨 버튼이 측면으로
오게 하고 베이스에 밀어 넣습니다.
3단계
각 뚜껑의 모서리를 베이스의 고무 밀봉 아래로
끼운 다음 누릅니다.
필요할 경우 고무 밀봉을 가볍게 뒤로 당겨 뚜껑
아래로 살짝 넣습니다.
4단계
뚜껑 모서리와 가장자리를 눌러
베이스에 고정합니다.

©2018 Otter Products, LLC. All rights reserved. The OtterBox name and OtterBox trademarks are the property of Otter Products, LLC, registered in the U.S. and other countries.
Other trademarks are the property of their respective owners.
Limited Product Warranty: otterbox.com/warranty
安裝說明
第 1 步
沿著正面找出凹槽
用手指沿著邊緣打開密封
用兩個手指抓住凹槽蓋,從底座拉起
第 2 步
先由音量鍵一側將手機滑入底座
第 3 步
將蓋子每個角插入底座橡膠密封處,然後輕壓
使其入位
必要時,輕輕拉開橡膠密封,使蓋子滑入至內
第 4 步
壓緊蓋子角和周圍邊緣,確保與底座密合

©2018 Otter Products, LLC. All rights reserved. The OtterBox name and OtterBox trademarks are the property of Otter Products, LLC, registered in the U.S. and other countries.
Other trademarks are the property of their respective owners.
Limited Product Warranty: otterbox.com/warranty
安装说明
第 1 步
沿着正面找出凹槽
用手指沿着边缘打开密封
用两个手指抓住凹槽盖,从底座拉起
第 2 步
先由音量键一侧将手机滑入底座
第 3 步
将盖子每个角插入底座橡胶密封处,然后轻压
使其入位
必要时,轻轻拉开橡胶密封,使盖子滑入至内
第 4 步
压紧盖子角和周围边缘,确保与底座密合
Table of contents
Languages:
Other OtterBox Cell Phone Accessories manuals