manuals.online logo
Brands
  1. Home
  2. •
  3. Brands
  4. •
  5. OttLite
  6. •
  7. Home Lighting
  8. •
  9. OttLite 964008 User manual

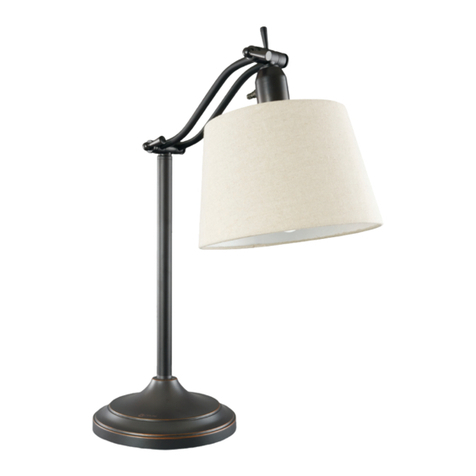
OttLite 964008 User manual

A B
E
C
F
F
D
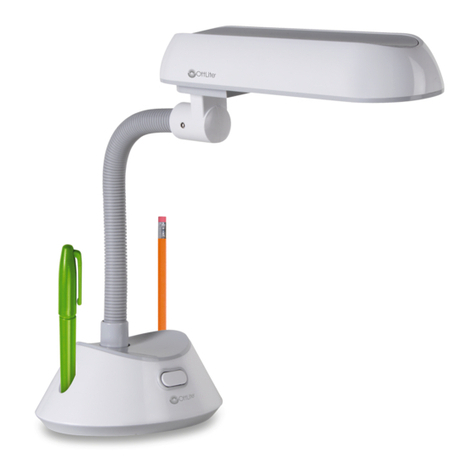
15w Telescoping Lamp CDO-003
964008 964PN8 964218 964508 964088
915808 915218
Telescoping Lamp
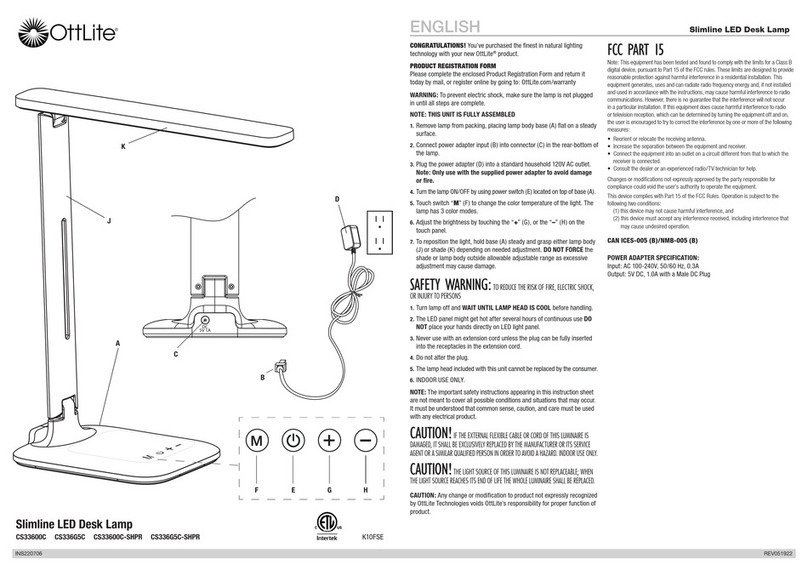
ENGLISH
CAUTION! If the external flexible cable or cord of this luminaire is damaged, it shall be exclusively replaced by the manufacturer
or its service agent or a similar qualified person in order to avoid a hazard. Indoor use only.
CONGRATULATIONS!
You’ve purchased the finest in natural
lighting technology with your new
OttLite® product.
PRODUCT REGISTRATION FORM
Please complete the enclosed Product
Registration Form and return it today
by mail, or register online by going to:
http://warranty.OttLite.com.
1. Remove lamp from packing and
place the base (E) flat on a steady
surface.
2. Refer to BULB INSTALLATION AND
REMOVAL to install bulb (A) to lamp.
3. Plug the cord into a standard
120Vac outlet.
4. To turn the lamp on or off rotate
the wheel of the power cord mounted
switch.
5. To adjust postion of shade (B) simply
grasp the shade with one hand while
holding the base steady with the other.
The shade can move up and down at
pivot (C). Shade (B) can also be
adjusted by swiveling the pole in a
circular direction at the base (E).
6. To adjust the height of the shade (B),
grasp the telecoping pole (D) and pull
or push while holding the base steady
with the other hand.
If the ball joints connecting the shade
to the pole are too loose, tighten
screws (F).
NOTE: DO NOT try and move shade
(B) beyond the limits of pivot (C)
as lamp damage may occur. To
prevent damaging the lamp, DO
NOT turn or rotate the telescoping
pole (D).
TUBE INSERTION/REPLACEMENT
1. Make sure that the lamp is not
plugged into an electrical socket.
2. If the lamp has been in use, allow
it to cool approximately 5 minutes
before proceeding.
3. To install a bulb (A) in the socket
inside the shade (B), hold bulb (A)
firmly by the glass end and carefully
thread it into the socket turning
clockwise until snug (DO NOT
overtighten as removal may be dif-
ficult).
4. To remove a bulb (A) already
installed in the lamp, grasp it firmly
at the glass end and gently but firmly
rotate it counterclockwise. DO NOT
allow bulb to strike any hard surface.
Please note that in operation, OttLite®
tubes are not dimmable.
Enjoy your OttLite® Telescoping Lamp!
This lighting system is designed
for use with OttLite® type (style
number ED15-S). Use of other prod-
ucts voids the warranty and may
result in damage to the lighting sys-
tem.
CAUTION! IMPORTANT SAFETY INSTRUCTIONS:
THIS PORTABLE LAMP HAS A POLARIZED PLUG (ONE BLADE IS WIDER THAN THE OTHER) AS A FEATURE TO
REDUCE THE RISK OF ELECTRIC SHOCK. THIS PLUG WILL FIT IN A POLARIZED OUTLET ONLY ONE WAY. IF
THE PLUG DOES NOT FIT FULLY IN THE OUTLET, REVERSE THE PLUG. IF IT STILL DOES NOT FIT, CONTACT A
QUALIFIED ELECTRICIAN. NEVER USE WITH AN EXTENSION CORD UNLESS PLUG CAN BE FULLY INSERTED. DO
NOT ALTER THE PLUG.
CAUTION: TO PREVENT ELECTRIC SHOCK, MATCH WIDE BLADE OF PLUG TO WIDE SLOT, FULLY INSERT.
AVERTISSEMENT ! IMPORTANTES CONSIGNES DE
SÉCURITÉ : CETTE LAMPE PORTATIVE EST MUNIE D’UNE FICHE POLARISÉE (UNE LAME PLUS LARGE
QUE L’AUTRE). CE DISPOSITIF DE SÉCURITÉ DIMINUE LE RISQUE DE DÉCHARGES ÉLECTRIQUES PUISQUE LA
FICHE NE S’INSÈRE DANS LA PRISE QUE D’UN SEUL CÔTÉ. SI ELLE N’ENTRE PAS DANS LA PRISE, INVERSEZ-
LA. SI ELLE N’ENTRE TOUJOURS PAS, CONTACTEZ UN ÉLECTRICIEN QUALIFIÉ. N’UTILISEZ JAMAIS AVEC UNE
RALLONGE SAUF SI LA FICHE S’INSÈRE ENTIÈREMENT. NE MODIFIEZ PAS CE DISPOSITIF DE SÉCURITÉ.
AVERTISSEMENT : POUR ÉVITER LES DÉCHARGES ÉLECTRIQUES, INSÉREZ LE BOUT LARGE DE
LA FICHE DANS LA GRANDE FENTE ET POUSSEZ JUSQU’AU BOUT.
¡PRECAUCIÓN! INSTRUCCIONES DE SEGURIDAD
IMPORTANTES: ESTA LÁMPARA PORTÁTIL TIENE UN ENCHUFE POLARIZADO (UNA DE SUS
PATAS ES MÁS ANCHA QUE LA OTRA) PARA REDUCIR EL RIESGO DE UNA DESCARGA ELÉCTRICA. ESTE ENCHUFE
ENCAJARÁ EN CUALQUIER TOMACORRIENTE POLARIZADO SÓLO DE UNA MANERA. SI EL ENCHUFE NO CALZA
COMPLETAMENTE EN EL TOMACORRIENTE DÉLE LA VUELTA. SI AÚN NO ENCAJA, COMUNÍQUESE CON UN
ELECTRICISTA CALIFICADO. NO UTILICE UNA EXTENSIÓN SI NO PUEDE INSERTAR EL ENCHUFE COMPLETAMENTE.
NO ALTERE EL ENCHUFE.
PRECAUCIÓN: PARA PREVENIR UNA DESCARGA ELÉCTRICA, HAGA COINCIDIR LA PATA ANCHA DEL
ENCHUFE CON LA RANURA ANCHA, INSERTE TOTALMENTE.
INS110013 REV051611
A B
E
C
F
F
D
¡FELICITACIONES!
Este nuevo producto OttLite® que
usted acaba de adquirir representa
lo mejor en tecnología de iluminación
natural.
FORMULARIO DE INSCRIPCIÓN DEL
PRODUCTO
Sírvase completar el Formulario de
Inscripción del Producto adjunto y
envíelo hoy por correo, o inscríbase en
línea en: http://warranty.OttLite.com
1. Remueva la lámpara de su embalaje
y coloque la base (E) sobre una
superficie firme.
2. Consulte INSTALACIÓN Y
REMOCIÓN DEL BOMBILLO para
instalar el bombillo (A) en la lámpara.
3. Enchufe el cable en un tomacorri-
ente estándar de 120 voltios.
4. Para encender o apagar la lámpara,
haga girar la ruedita del interruptor
ubicado en el cable.
5. Ajuste la posición de la pantalla (B),
sujetándola con una mano mientras
sujeta la base con la otra. La pantalla
puede moverse hacia arriba o hacia
abajo en el pivote (C). La pantalla (B)
puede también ajustarse haciendo girar
el poste en la base (E) en dirección
circular.
6. Para ajustar la altura de la pantalla
(B), sujete el brazo telescópico (D) y
hálelo o empújelo mientras sujeta la
base firmemente con la otra mano.
Si las articulaciones esféricas que
conectan la pantalla al brazo están
flojas, apriete las tuercas (F).
ADVERTENCIA: NO mueva la
pantalla (B) más allá de los límites
del pivote (C) pues podría dañar la
lámpara. Para evitar daños a la
lámpara, NO haga girar o rotar el
brazo telescópico (D).
INSTALACIÓN Y RETIRO DEL
BOMBILLO
1. Cerciórese de que la lámpara no
esté enchufada en un tomacorriente.
2. Si la lámpara estuvo recientemente
encendida, permita que se enfríe por
aproximadamente 5 minutos antes de
continuar.
3. Para instalar el bombillo (A) en el
portalámpara dentro de la pantalla (B),
sujete el bombillo (A) firmemente por el
vidrio y enrósquelo cuidadosamente en
el portalámpara en la dirección de las
manecillas del reloj hasta que quede
ajustado (NO lo apriete demasiado
porque podría ser difícil retirarlo más
tarde).
4. Para retirar el bombillo (A) de la
lámpara, sujételo firmemente por el
vidrio y desenrósquelo delicada pero
firmemente en la dirección contraria a
las manecillas del reloj. EVITE que el
bombillo golpee superficies duras.
Los bombillos OttLite® no pueden
atenuarse mientras están encendi-
dos.
¡Disfrute su Lámpara Telescópica
OttLite®!
Este sistema de iluminación está
diseñado para uso exclusivo con
tubos OttLite® typo (
número de estilo
ED15-S). El uso de otros productos
invalida la garantía del producto y
podría dañar el sistema de iluminación.
ATTENTION ! Si le câble ou le cordon souple externe de cette lampe est endommagé, celui-ci doit être remplacé exclusive-
ment par le fabricant, son agent de service ou toute personne compétente afin d’éviter tout danger. Pour usage à l’intérieur seulement.
FÉLICITATIONS !
En achetant un produit OttLite®, vous avez
acheté ce qui se fait de mieux en matière de
technologie d’éclairage de lumière naturelle.
FORMULAIRE D’ENREGISTREMENT DE
PRODUIT
Remplissez le formulaire d’enregistrement
inclus pour votre produit et retournez-le dès
aujourd’hui par la poste. Enregistrez-vous
en ligne en visitant le http://warranty.OttLite.
com.
1. Retirer la lampe de son empaquetage et
placer la base (E) sur une surface plane ou
toute autre surface dure.
2. Se référer au INSERTION/
REMPLACEMENT DE L’AMPOULE pour
installer l’ampoule (A) dans la lampe.
3. Brancher le cordon d’alimentation dans
une prise murale standard de 120 V.
4. Pour allumer ou éteindre la lampe, tourner
la roulette de l’interrupteur placé sur le cor-
don d’alimentation.
5. Pour ajuster la position de l’abat-jour (B),
tenir fermement l’abat-jour d’une main tout
en maintenant la base en place de l’autre
main. L’abat-jour peut bouger de haut en
bas à partir du pivot (C). La position de
l’abat-jour (B) peut aussi être modifiée en
faisant pivoter la tige dans un mouvement
circulaire à partir de la base (E).
6. Pour ajuster la hauteur de l’abat-jour (B),
tenir fermement la tige télescopique (D) et
pousser ou tirer tout en maintenant la base
de l’autre main.
Si les joints à rotule qui relient l’abat-jour à
la lampe ne sont pas assez serrés, resserrer
les vis (F).
REMARQUE : NE PAS essayer de bouger
l’abat-jour (B) plus loin que le pivot (C),
car vous pourriez briser la lampe. Pour
ne pas l’endommager, NE PAS non plus
tourner ou faire pivoter la tige téle-
scopique (D).
INSERTION/REMPLACEMENT DE
L’AMPOULE
1. Assurez-vous que la lampe n’est
pas branchée dans une prise de courant
électrique.
2. Si la lampe a été utilisée, laissez-la refroi-
dir pendant environ cinq minutes avant de
continuer.
3. Pour installer une ampoule (A) dans la
douille à l’intérieur de l’abat-jour (B), tenir
l’ampoule (A) par la base et visser
la base de l’ampoule dans le culot de
la douille en tournant délicatement dans
le sens des aiguilles d’une montre jusqu’à
ce qu’elle soit bien en place. (NE PAS trop
serrer l’ampoule. Une ampoule trop serrée
vous empêcherait de l’enlever facilement).
4. Pour retirer une ampoule (A) déjà instal-
lée dans la lampe, tenir fermement sa partie
exposée et la faire tourner délicatement,
mais fermement dans le sens contraire des
aiguilles d’une montre. PRENDRE GARDE à
ce que l’ampoule frappe toute surface dure.
Veuillez noter que l’intensité des ampoules
OttLite® n’est pas réglable.
Profitez de votre Lampe télescopique
OttLite® !
Ce système d’éclairage est conçu pour
être utilisé avec les ampoules OttLite®
type (numéro de style ED15-S).
L’utilisation d’autres produits annule la
garantie et risque d’endommager le sys-
tème d’éclairage.
ESPAÑOL Lámpara Telescópica
¡PRECAUCIÓN! Si el cable de esta lámpara está dañado, debe reemplazarse exclusivamente por el fabricante o su representante
o técnico calificado a fin de evitar cualquier riesgo. Utilícese únicamente en interiores.
FRANÇAIS Lampe télescopique
INS110013 REV051611
15w Telescoping Lamp CDO-003
964008 964PN8 964218 964508 964088
915808 915218
This manual suits for next models

6

Other OttLite Home Lighting manuals

OttLite Strive User manual

OttLite

OttLite Strive User manual

OttLite J8600C User manual

OttLite

OttLite J8600C User manual

OttLite CSMQC00Z-CA User manual

OttLite

OttLite CSMQC00Z-CA User manual

OttLite L15BN7 User manual

OttLite

OttLite L15BN7 User manual

OttLite J8600C User manual

OttLite

OttLite J8600C User manual

OttLite SanitizingPRO SC1AP00S User manual

OttLite

OttLite SanitizingPRO SC1AP00S User manual

OttLite T96G5R User manual

OttLite

OttLite T96G5R User manual

OttLite Creative Curves LED Desk Lamp User manual

OttLite

OttLite Creative Curves LED Desk Lamp User manual

OttLite FlexNeck A5900B User manual

OttLite

OttLite FlexNeck A5900B User manual

OttLite 15991CH8 User manual
OttLite

OttLite 15991CH8 User manual

OttLite A34G5B User manual

OttLite

OttLite A34G5B User manual

OttLite CS59029 User manual

OttLite

OttLite CS59029 User manual

OttLite 286SV9 User manual

OttLite

OttLite 286SV9 User manual

OttLite PL-0360Q User manual

OttLite

OttLite PL-0360Q User manual

OttLite Dawson User manual

OttLite

OttLite Dawson User manual

OttLite L1W92ZC9-SHPR User manual

OttLite

OttLite L1W92ZC9-SHPR User manual

OttLite T81G5T User manual

OttLite

OttLite T81G5T User manual

OttLite Eastman L1E83009-SHPR User manual

OttLite

OttLite Eastman L1E83009-SHPR User manual

OttLite CS2QC00Z User manual

OttLite

OttLite CS2QC00Z User manual

OttLite CSA77WGC User manual

OttLite

OttLite CSA77WGC User manual

OttLite 929WG3 User manual

OttLite

OttLite 929WG3 User manual

OttLite T57WGC User manual

OttLite

OttLite T57WGC User manual

OttLite CY4G59-FFP User manual

OttLite

OttLite CY4G59-FFP User manual

OttLite Purify User manual

OttLite

OttLite Purify User manual

Popular Home Lighting manuals by other brands

Renkforce Nerja operating instructions

Renkforce

Renkforce Nerja operating instructions

Schlage 1910S-1 installation instructions

Schlage

Schlage 1910S-1 installation instructions

HUDSON VALLEY LIGHTING TROY LIGHTING JUSTIN PTL8631 Installation

HUDSON VALLEY LIGHTING

HUDSON VALLEY LIGHTING TROY LIGHTING JUSTIN PTL8631 Installation

HOMCOM B31-441V90 manual

HOMCOM

HOMCOM B31-441V90 manual

IKEA Strala manual

IKEA

IKEA Strala manual

JONATHAN Y JYL1058A manual

JONATHAN Y

JONATHAN Y JYL1058A manual

QisDESIGN RF10 F user guide

QisDESIGN

QisDESIGN RF10 F user guide

JONATHAN Y JYL1074A manual

JONATHAN Y

JONATHAN Y JYL1074A manual

Philips 346104816 manual

Philips

Philips 346104816 manual

MELINERA Z30253 manual

MELINERA

MELINERA Z30253 manual

Philips 70998-30-PU - quick start guide

Philips

Philips 70998-30-PU - quick start guide

Steelcase Campfire manual

Steelcase

Steelcase Campfire manual

JONATHAN Y JYL6000A quick start guide

JONATHAN Y

JONATHAN Y JYL6000A quick start guide

Hay APOLLO PORTABLE instruction manual

Hay

Hay APOLLO PORTABLE instruction manual

Safavieh Lighting TBL4307A quick start guide

Safavieh Lighting

Safavieh Lighting TBL4307A quick start guide

Inspire T16069E WH instruction manual

Inspire

Inspire T16069E WH instruction manual

FOSCARINI Terra instructions

FOSCARINI

FOSCARINI Terra instructions

MATTING NEOS Desk Instructions for use

MATTING

MATTING NEOS Desk Instructions for use

manuals.online logo
manuals.online logoBrands
  • About & Mission
  • Contact us
  • Privacy Policy
  • Terms and Conditions

Copyright 2025 Manuals.Online. All Rights Reserved.