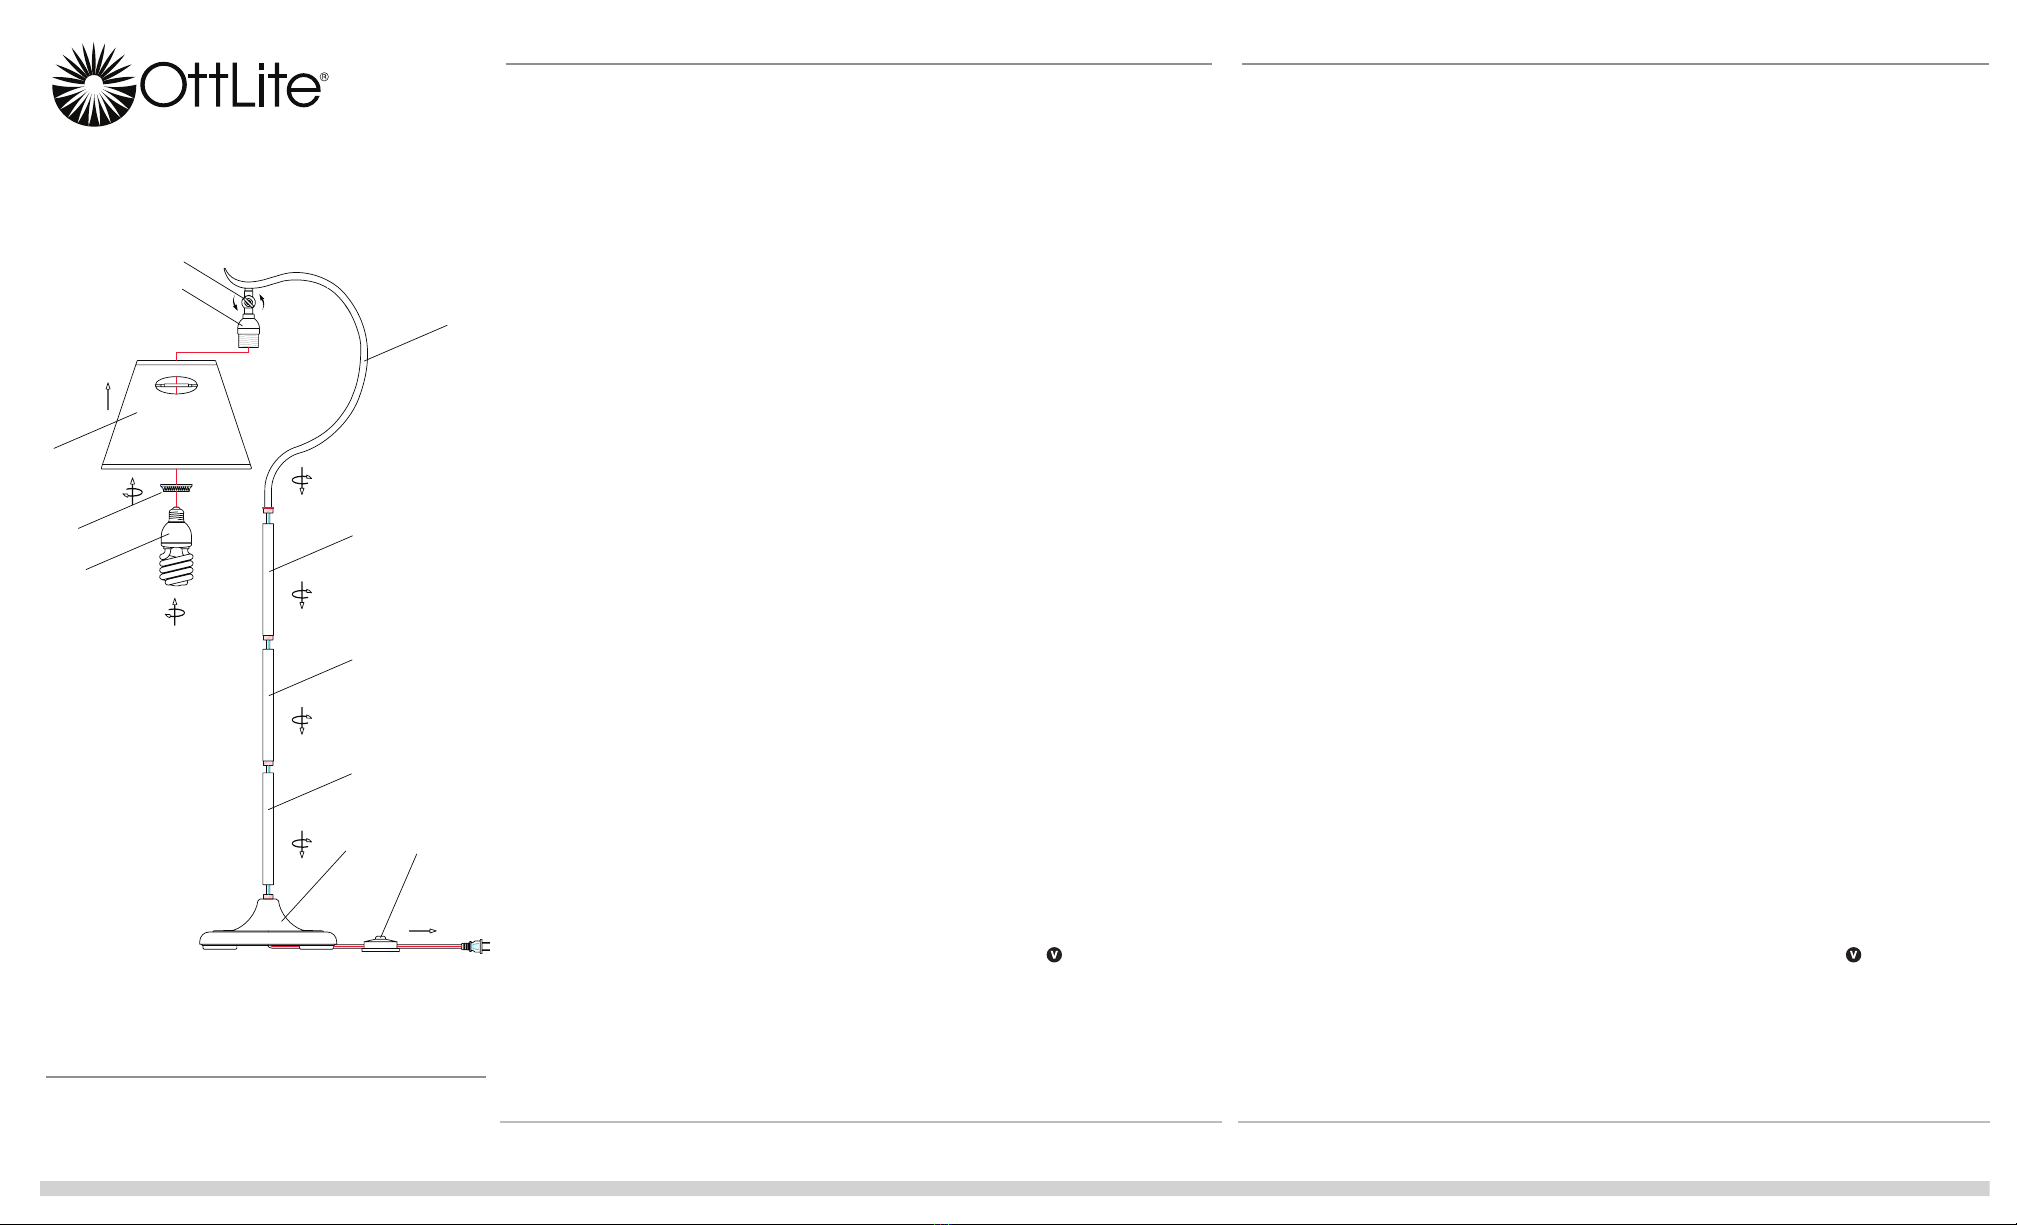
manuals.online logo
Brands
  1. Home
  2. •
  3. Brands
  4. •
  5. OttLite
  6. •
  7. Outdoor Light
  8. •
  9. OttLite 25D54BZX User manual

OttLite 25D54BZX User manual

J
K
G
H
F
E
L
D
C
A
B
CONGRATULATIONS! You’ve
purchased the finest in natural lighting
technology with your new OttLite®
product.
PRODUCT REGISTRATION FORM
Please complete the enclosed Product
Registration Form and return it today
by mail, or register online by going to:
http://OttLite.com/warranty
WARNING: To prevent electric shock,
make sure the lamp is not plugged in
until all assembly steps are complete.
To avoid lamp tip over, position lamp
shade as shown in diagram.
LAMP ASSEMBLY
1. Make sure the lamp is not plugged
into an electrical socket.
2. If the lamp has been in use, allow it to
cool approximately five minutes before
proceeding.
3. Remove lamp from packing placing
the base (B) flat on a steady surface.
4. Thread upper pole (E) to arm (F)
turning clockwise by hand until tight.
5. Thread middle pole (D) to upper pole
(E) turning clockwise by hand until tight.
6. Thread bottom pole (C) to middle pole
(D) turning clockwise by hand until tight.
7. Thread base (B) to bottom pole (C)
by hand carefully turning clockwise until
tight. Keep poles inline with base (B) to
prevent crossthreading. Excess cord may
be pulled through the base (B).
8. Fit shade (J) over socket (H) then
thread socket ring (K) onto socket. Turn
socket ring (K) clockwise to tighten until
finger tight and the shade (J) is held
securely.
9. Refer to BULB INSTALLATION AND
REMOVAL to install bulb (L) in lamp.
10. Plug the cord into a standard 120Vac
outlet.
11. To turn the lamp on or off depress
cord mounted footswitch (A).
12. To postion the shade (J), loosen
thumbscrew (G), move shade (J) into
position, then tighten thumbscrew (G) by
hand until snug.
DO NOT force thumbscrew as damage to
the lamp may occur.
BULB INSERTION/REMOVAL
1. Make sure the lamp is not plugged into
an electrical socket.
2. If the lamp has been in use, allow it to
cool approximately 5 minutes before
proceeding.
3. To install the bulb (L) in the socket
(H), thread the base of the bulb into the
socket turning clockwise until snug.
CAUTION: DO NOT overtighten the
bulb. Overtightening the bulb may
make removal difficult or damage the
lamp or bulb.
4. To remove a bulb (L) already installed
in the lamp, unthread the bulb from the
socket (H) turning counterclockwise to
loosen.
Please note that in operation, OttLite®
bulbs are not dimmable.
Enjoy your OttLite® Coupelle Floor Lamp!
This lighting system is designed
for use with OttLite® type bulbs
(Style Number ED25-V). Use of other
products voids the warranty and
may result in damage to the lighting
system.
Coupelle Floor Lamp
CAUTION! If the external flexible cable or cord of this luminaire is damaged, it shall be exclusively replaced by the manufacturer
or its service agent or a similar qualified person in order to avoid a hazard. Indoor use only.
REV081511
25w Coupelle Floor Lamp
25D54BZX 9602
2 shades – Mica and Linen –
Both Included
Incluye 2 pantallas (mica y lino)
2 abat-jours – 1 couleur lin et 1
couleur mica – sont inclus
CAUTION! IMPORTANT SAFETY INSTRUCTIONS:
THIS PORTABLE LAMP HAS A POLARIZED PLUG (ONE BLADE IS WIDER THAN THE OTHER) AS A FEATURE TO
REDUCE THE RISK OF ELECTRIC SHOCK. THIS PLUG WILL FIT IN A POLARIZED OUTLET ONLY ONE WAY. IF
THE PLUG DOES NOT FIT FULLY IN THE OUTLET, REVERSE THE PLUG. IF IT STILL DOES NOT FIT, CONTACT A
QUALIFIED ELECTRICIAN. NEVER USE WITH AN EXTENSION CORD UNLESS PLUG CAN BE FULLY INSERTED.
DO NOT ALTER THE PLUG.
CAUTION: TO PREVENT ELECTRIC SHOCK, MATCH WIDE BLADE OF PLUG TO WIDE SLOT,
FULLY INSERT.
AVERTISSEMENT! IMPORTANTES DIRECTIVES
DE SÉCURITÉ:
CETTE LAMPE PORTATIVE EST MUNIE D’UNE FICHE POLARISÉE (UNE LAME PLUS LARGE QUE L’AUTRE). CE
DISPOSITIF DE SÉCURITÉ DIMINUE LE RISQUE DE CHOCS ÉLECTRIQUES PUISQUE LA FICHE NE S’INSÈRE
DANS LA PRISE QUE D’UN SEUL CÔTÉ. SI ELLE N’ENTRE PAS DANS LA PRISE, INVERSEZ-LA. SI ELLE
N’ENTRE TOUJOURS PAS, CONTACTEZ UN ÉLECTRICIEN QUALIFIÉ. N’UTILISEZ JAMAIS AVEC UNE RALLONGE
SAUF SI LA FICHE S’INSÈRE ENTIÈREMENT. NE MODIFIEZ PAS CE DISPOSITIF DE SÉCURITÉ.
AVERTISSEMENT: POUR ÉVITER LES CHOCS ÉLECTRIQUE, INSÉREZ LE BOUT LARGE DE LA
FICHE DANS LA GRANDE FENTE ET POUSSEZ JUSQU’AU BOUT.
¡PRECAUCIÓN! INSTRUCCIONES DE SEGURIDAD
IMPORTANTES:
ESTA LÁMPARA PORTÁTIL TIENE UN ENCHUFE POLARIZADO (UNA DE SUS PATAS ES MÁS ANCHA QUE LA
OTRA) COMO CARACTERISTICA PARA REDUCIR EL RIESGO DE UNA DESCARGA ELÉCTRICA. ESTE ENCHUFE
ENCAJARÁ EN CUALQUIER TOMACORRIENTE POLARIZADO SOLO DE UNA MANERA. SI EL ENCHUFE NO CALZA
COMPLETAMENTE EN EL TOMACORRIENTE DÉLE LA VUELTA. SI AÚN NO ENCAJA, PÓNGASE EN CONTACTO
CON UN ELECTRICISTA CALIFICADO. NUNCA UTILICE UNA EXTENSIÓN A NO SER QUE EL ENCHUFE PUEDA
SER TOTALMENTE INSERTADO. NO ALTERE EL ENCHUFE.
PRECAUCIÓN: PARA PREVENIR UNA DESCARGA ELÉCTRICA, HAGA COINCIDIR LA PATA
ANCHA DEL ENCHUFE CON LA RANURA ANCHA, INSERTE TOTALMENTE.
ENGLISH
J
K
G
H
F
E
L
D
C
A
B
REV081511
25w Coupelle Floor Lamp
25D54BZX 9602
FRANÇAIS
ESPAÑOL Lampadaire à coupelle
ATTENTION! Si le câble ou le cordon souple externe de ce lampadaire est endommagé, celui-ci doit être remplacé exclusive-ment par le fabricant, son
agent de service ou toute personne compétente afin d’éviter tout danger. Pour usage à l’intérieur seulement.
¡PRECAUCIÓN! Si el cable o cordón flexible externo de esta luminaria está dañado, debe ser exclusivamente reemplazado por el fabricante o
su agente de servicio o una persona calificada similar a fin de evitar un riesgo. Sólo para uso en interiores.
Lámpara de piso Coupelle
¡FELICITACIONES! Usted acaba de adquirir
la mejor tecnología de iluminación natural con
su nuevo producto OttLite®.
FORMULARIO DE REGISTRO
Por favor, llene el Formulario de Registro
de Producto anexo y envíelo por correo
hoy mismo, o regístrese en línea visitando:
http://OttLite.com/warranty
ADVERTENCIA: Para prevenir un choque
eléctrico, cerciórese de que la lámpara
no se conecte hasta que se complete el
ensamblaje y todos los pasos. Para evitar
que la lámpara se vuelque, coloque la
pantalla como se muestra en el diagrama.
ENSAMBLAJE DE LÁMPARA
1. Asegúrese de que la lámpara no esté
conectada a un tomacorriente.
2. Si la lámpara ha estado en uso, permita que
se enfríe durante aproximadamente 5 minutos
antes de proceder.
3. Remueva la lámpara de su embalaje y
coloque la base (B) sobre una superficie firme.
4. Enrosque a mano el poste superior (E) en
el brazo (F) girando en el sentido de las
manecillas del reloj hasta que quede ajustado.
5. Enrosque a mano el poste del medio (D)
en el poste superior (E) girando en el sentido
de las manecillas del reloj hasta que quede
ajustado.
6. Enrosque a mano el poste inferior (C) en
el poste del medio (D) girando en el sentido
de las manecillas del reloj hasta que quede
ajustado.
7. Enrosque a mano la base (B) en el poste
inferior (C) girando cuidadosamente a mano en
el sentido de las manecillas del reloj hasta que
quede ajustado. Asegúrese de que todos los
postes estén alineados con la base (B) para no
dañar la cuerda de las roscas. Hale el exceso
del cable eléctrico por la base (B).
8. Coloque la pantalla (J) sobre el portalámpara
(H) y luego atornille el anillo (K) en el portalám-
para. Gire el anillo (K) a mano en la dirección
de las manecillas del reloj hasta que la pantalla
(J) quede ajustada en su lugar.
9. Consulte INSTALACIÓN Y REMOCIÓN DEL
BOMBILLO para instalar el bombillo (L) en la
lámpara.
10. Enchufe la lámpara en un tomacorriente
estándar de 120 voltios.
11. Para encender o apagar la lámpara,
presione el interruptor de pie (A).
12. Para ajustar la posición de la pantalla (J),
afloje la tuerca (G), y ajuste la pantalla (J) en la
posición deseada; después ajuste la tuerca (G)
a mano hasta que quede ajustada.
NO FUERCE las tuercas porque podría dañar
la lámpara.
INSTALACIÓN Y RETIRO DEL BOMBILLO
1. Asegúrese de que la lámpara no esté
conectada a un tomacorriente.
2. Si la lámpara ha estado en uso, permita que
se enfríe durante aproximadamente 5 minutos
antes de proceder.
3. Para instalar el bombillo (L) en el portalám-
para (H), enrosque la base del bombillo dentro
del portalámpara en la dirección de las
manecillas del reloj hasta que quede ajustado.
ADVERTENCIA: NO ajuste demasiado el
bombillo, porque puede ser difícil retirarlo
después o podría dañar la lámpara o el
bombillo.
4. Para retirar el bombillo (L) de la lámpara,
desenrósquelo del portalámpara (H) girando en
la dirección contraria a las manecillas del reloj.
Por favor tenga en cuenta que durante la
operación, los bombillos OttLite® no son
graduables.
¡Disfrute su Lámpara de piso Coupelle OttLite®!
Este sistema de iluminación está diseñado
para ser utilizado únicamente con
bombillos OttLite® tipo (número de estilo
ED25-V). El uso de otros productos anula
la garantía y pudiera resultar en daños al
sistema de iluminación.
FÉLICITATIONS! Vous avez fait l’achat de la plus
innovatrice technologie naturelle et de renom en
éclairage avec votre produit OttLite®.
FORMULAIRE D’ENREGISTREMENT DE
PRODUIT
Compléter le formulaire d’enregistrement qui
est inclus pour votre produit et nous le
retourner dès aujourd’hui par le retour du
courrier, ou enregistrez-vous en ligne en allant à :
http://OttLite.com/warranty
AVERTISSEMENT : Pour éviter les chocs
électriques, assurez-vous que la lampe ne soit
pas branchée avant d’avoir effectué toutes
les étapes de montage. Pour éviter que la
lampe ne bascule, veuillez placer l’abat-jour tel
qu’illustré sur le diagramme.
ASSEMBLAGE DE LA LAMPE
1. Assurez-vous que la lampe n’est pas branchée
dans une prise de courant électrique.
2. Si la lampe a été utilisée, laissez-la refroidir
pendant environ cinq minutes avant de continuer.
3. Retirer la lampe de son empaquetage et placer
la base (B) sur une surface plane.
4. Visser la tige du haut (E) au bras (F) en
tournant à la main dans le sens des aiguilles
d’une montre jusqu’au serrage complet.
5. Visser la tige du milieu (D) à la tige du haut (E)
en tournant à la main dans le sens des aiguilles
d’une montre jusqu’au serrage complet.
6. Visser la tige du bas (C) à la tige du milieu (D)
en tournant à la main dans le sens des aiguilles
d’une montre jusqu’au serrage complet.
7. Visser la base (B) à la tige du bas (C) à la
main en tournant délicatement dans le sens des
aiguilles d’une montre jusqu’à serrage complet.
Garder les tiges enlignées avec la base (B)
pour prévenir l’arrachement des filets. Le
cordon d’alimentation qui dépasse peut être tiré
à l’intérieur de la base (B).
8. Placer l’abat-jour (J) sur la douille (H) et visser
ensuite les anneaux de la douille (K) sur la douille.
Tourner les anneaux de la douille (K) dans le sens
des aiguilles d’une montre jusqu’à ce que vous
ne puissiez plus les tourner davantage à la main
et que l’abat-jour (J) soit solidement maintenu
en place.
9. Se référer à INSERTION/DÉMONTAGE DE
L’AMPOULE pour installer l’ampoule (L) dans
la lampe.
10. Branchez le cordon d’alimentation dans une
prise murale standard de 120 V.
11. Pour allumer ou éteindre la lampe, presser
simplement le bouton de l’interrupteur au pied (A).
12. Pour bouger l’abat-jour(J), desserrer la vis
à oreilles (G), placer l’abat-jour (J) à la position
voulue, puis resserrer la vis (G) à la main jusqu’à
qu’elle soit bien serrée.
NE PAS forcer la vis à oreilles, car vous pourriez
endommager la lampe.
INSERTION/DÉMONTAGE DE L’AMPOULE
1. Assurez-vous que la lampe n’est pas branchée
dans une prise de courant électrique.
2. Si la lampe a été utilisée, laissez-la refroidir
pendant environ cinq minutes avant de continuer.
3. Pour installer une ampoule (L) dans la douille
(H), visser la base de l’ampoule dans le culot de
la douille en tournant dans le sens des aiguilles
d’une montre jusqu’à ce qu’elle soit bien en
place.
ATTENTION : NE PAS trop serrer l’ampoule.
Une ampoule trop serrée vous empêcherait
de l’enlever facilement ou risquerait
d’endommager la lampe ou l’ampoule.
4. Pour retirer une ampoule (L) déjà installée dans
la lampe, dévisser l’ampoule de la douille (H) en
tournant dans le sens contraire des aiguilles d’une
montre jusqu’à ce qu’elle soit dégagée.
Veuillez noter qu’une fois en marche, l’intensité
des tubes OttLite® ne peut pas être réglée.
Profitez bien de votre Lampadaire à coupelle
OttLite® !
In diesem Beleuchtungsgerät dürfen
ausschließlich OttLite®- typ
Leuchtstoffröhren benutzt werden (Stil Zahl
ED25-V). Bei Verwendung anderer Produkte
entfällt die Garantie, und die Lampe kann bes-
chädigt werden.

This manual suits for next models

1

Other OttLite Outdoor Light manuals

OttLite T96G5R User manual

OttLite

OttLite T96G5R User manual

OttLite OTL13DWS User manual

OttLite

OttLite OTL13DWS User manual

OttLite 25783ABR User manual

OttLite

OttLite 25783ABR User manual

OttLite Flex & Store User manual

OttLite

OttLite Flex & Store User manual

OttLite SCEQB00Z-CA User manual

OttLite

OttLite SCEQB00Z-CA User manual

OttLite CS59029 User manual

OttLite

OttLite CS59029 User manual

OttLite EasyView CSP57WGC User manual

OttLite

OttLite EasyView CSP57WGC User manual

OttLite C75002 User manual

OttLite

OttLite C75002 User manual

OttLite F26WGC User manual

OttLite

OttLite F26WGC User manual

OttLite 20C83462 User manual

OttLite

OttLite 20C83462 User manual

OttLite VisionSaver Plus Marietta User manual

OttLite

OttLite VisionSaver Plus Marietta User manual

OttLite Alexander Floor Lamp User manual

OttLite

OttLite Alexander Floor Lamp User manual

OttLite X12478 User manual

OttLite

OttLite X12478 User manual

OttLite F26WGC User manual

OttLite

OttLite F26WGC User manual

OttLite DS2G5Z User manual

OttLite

OttLite DS2G5Z User manual

OttLite L1T83G59-SHPR User manual

OttLite

OttLite L1T83G59-SHPR User manual

OttLite SCD0500S User manual

OttLite

OttLite SCD0500S User manual

OttLite 25892A32 User manual

OttLite

OttLite 25892A32 User manual

OttLite 25992PB2 User manual

OttLite

OttLite 25992PB2 User manual

OttLite CDO009 User manual

OttLite

OttLite CDO009 User manual

OttLite K94CP3 User manual

OttLite

OttLite K94CP3 User manual

OttLite 25883A32 User manual

OttLite

OttLite 25883A32 User manual

OttLite Cambridge Floor Lamp User manual

OttLite

OttLite Cambridge Floor Lamp User manual

OttLite 25C92462 User manual

OttLite

OttLite 25C92462 User manual

Popular Outdoor Light manuals by other brands

Timberlab Punto manual

Timberlab

Timberlab Punto manual

Gainsborough Pk6 Tulip H261 Instructions for use

Gainsborough

Gainsborough Pk6 Tulip H261 Instructions for use

Artemide TOLOMEO XXL manual

Artemide

Artemide TOLOMEO XXL manual

Sunforce 80040 Assembly & installation

Sunforce

Sunforce 80040 Assembly & installation

LIGMAN GI-31581 installation manual

LIGMAN

LIGMAN GI-31581 installation manual

SG Fevik 1500 manual

SG

SG Fevik 1500 manual

LIGMAN KI-60485 Installation and service manual

LIGMAN

LIGMAN KI-60485 Installation and service manual

MaxLite ARE Series operating instructions

MaxLite

MaxLite ARE Series operating instructions

Malibu Boats CS14SM Install manual

Malibu Boats

Malibu Boats CS14SM Install manual

Somogyi home MX 715D instruction manual

Somogyi

Somogyi home MX 715D instruction manual

Trilux 8841 Series Mounting instructions

Trilux

Trilux 8841 Series Mounting instructions

brennenstuhl OLI 310 AB operating instructions

brennenstuhl

brennenstuhl OLI 310 AB operating instructions

MOOD AYANA Installation Notice

MOOD

MOOD AYANA Installation Notice

LIGMAN LD-20061 installation manual

LIGMAN

LIGMAN LD-20061 installation manual

Quoizel BURD8413AC installation guide

Quoizel

Quoizel BURD8413AC installation guide

marset ZOC IP65 Assembly instructions

marset

marset ZOC IP65 Assembly instructions

Philips 169389316 user manual

Philips

Philips 169389316 user manual

Philips 168108716 Specifications

Philips

Philips 168108716 Specifications

manuals.online logo
manuals.online logoBrands
  • About & Mission
  • Contact us
  • Privacy Policy
  • Terms and Conditions

Copyright 2025 Manuals.Online. All Rights Reserved.