manuals.online logo
Brands
  1. Home
  2. •
  3. Brands
  4. •
  5. OttLite
  6. •
  7. Outdoor Light
  8. •
  9. OttLite 25992PB2 User manual

OttLite 25992PB2 User manual

ENGLISH
ins 5 0003 rev 1026
CAUTION! If the external flexible cable or cord of this luminaire is damaged, it shall be exclusively replaced by the manufacturer
or its service agent or a similar qualified person in order to avoid a hazard. Indoor use only.
LAMP ASSEMBLY
1. Unpack all lamp parts and lay out
on the floor with the base (A) lying
flat.
2. Thread upper pole (C) to socket
assembly (D) by hand, turning
clockwise until tight.
3. Thread lower pole (B) to upper
pole (C) by hand, turning clockwise
until tight.
4. Thread lower pole (B) to base (A)
by hand, turning clockwise until
tight.
5. Attach harp (E) to socket brackets
(I) by squeezing open ends of harp,
placing flattened section inside of
brackets (I) and releasing. End by
sliding caps (J) over brackets (I).
6. Place shade (F) on harp (E).
7. Place reflector (G) on top of
shade (F), making sure the white side
faces down.
8. Attach finial (H) to top of harp
(E), turning clockwise until tight.
9. Install bulb following BULB
INSERTION/ REPLACEMENT
instructions.
10. Plug the lamp into a standard
120V outlet.
11 . Turn lamp on or off by rotating
switch (K) clockwise.
BULB INSERTION/REPLACEMENT
1. Make sure the lamp is not
plugged into an electrical socket.
2. If the lamp has been in use, allow
it to cool for approximately five
minutes before proceeding.
3. To install a bulb in the socket,
hold the bulb (N) firmly near the
base, align bulb pins with matching
pin-holes then push it straight into
the socket until it "snaps" into place.
4. To remove a bulb (N) already
installed in the lamp, grasp it firmly
at the base and, using a slight
rocking motion, pull it straight out of
the socket. Do not twist or turn
the bulb.
Please note that in operation,
OTT-LITE®bulbs are not dimmable.
Enjoy your OTT-LITE®Athens Floor
Lamp!
This lighting system is designed for
use with OTT-LITE VisionSaver Plus®
bulbs only (model number
H3400K). Use of other products
voids the warranty and may result
in damage to the lighting system.
CAUTION! IMPORTANT SAFETY INSTRUCTIONS:
THIS PORTABLE LAMP HAS A POLARIZED PLUG (ONE BLADE IS WIDER THAN THE OTHER) AS A FEATURE TO
REDUCE THE RISK OF ELECTRIC SHOCK. THIS PLUG WILL FIT IN A POLARIZED OUTLET ONLY ONE WAY. IF THE
PLUG DOES NOT FIT FULLY IN THE OUTLET, REVERSE THE PLUG. IF IT STILL DOES NOT FIT, CONTACT A QUALIFIED
ELECTRICIAN. NEVER USE WITH AN EXTENSION CORD UNLESS PLUG CAN BE FULLY INSERTED. DO NOT ALTER
THE PLUG.
CAUTION: TO PREVENT ELECTRIC SHOCK, MATCH WIDE BLADE OF PLUG TO WIDE SLOT, FULLY INSERT.
CAUTION: BALLAST REQUIRES PROPER VENTILATION FOR PROPER OPERATION. A MINIMUM OF 6
INCHES OF AIR SPACE MUST BE PROVIDED ON ALL SIDES EXCEPT WHERE PLUGGED INTO AN ELECTRICAL OUTLET.
AVERTISSEMENT! IMPORTANTES DIRECTIVES DE
SÉCURITÉ: CETTE LAMPE PORTATIVE EST MUNIE D'UNE FICHE POLARISÉE (UNE LAME PLUS LARGE QUE
L'AUTRE). CE DISPOSITIF DE SÉCURITÉ DIMINUE LE RISQUE DE CHOCS ÉLECTRIQUES PUISQUE LA FICHE NE
S'INSÈRE DANS LA PRISE QUE D'UN SEUL CÔTÉ. SI ELLE N'ENTRE PAS DANS LA PRISE, INVERSEZ-LA. SI ELLE
N'ENTRE TOUJOURS PAS, CONTACTEZ UN ÉLECTRICIEN QUALIFIÉ. N'UTILISEZ JAMAIS AVEC UNE RALLONGE SAUF
SI LA FICHE S'INSÈRE ENTIÈREMENT. NE MODIFIEZ PAS CE DISPOSITIF DE SÉCURITÉ.
AVERTISSEMENT: POUR ÉVITER LES CHOCS ÉLECTRIQUE, INSÉREZ LE BOUT LARGE DE LA FICHE
DANS LA GRANDE FENTE ET POUSSEZ JUSQU'AU BOUT.
ATTENTION: LES BALLASTS NÉCESSITENT UNE VENTILATION ADÉQUATE POUR UN FONCTIONNEMENT
CORRECT. UN MINIMUM DE 15 CM D'ESPACE DOIT ÊTRE LAISSÉ DE CHAQUE COTÉ À L'EXCEPTION DE CELUI OÙ
SE TROUVE LE BRANCHEMENT À LA PRISE D'ALIMENTATION ÉLECTRIQUE.
¡PRECAUCIÓN! INSTRUCCIONES DE SEGURIDAD
IMPORTANTES: ESTA LÁMPARA PORTÁTIL TIENE UN ENCHUFE POLARIZADO (UNA DE SUS PATAS ES
MÁS ANCHA QUE LA OTRA) COMO CARACTERISTICA PARA REDUCIR EL RIESGO DE UNA DESCARGA ELÉCTRICA.
ESTE ENCHUFE ENCAJARÁ EN CUALQUIER TOMACORRIENTE POLARIZADO SOLO DE UNA MANERA. SI EL ENCHUFE
NO CALZA COMPLETAMENTE EN EL TOMACORRIENTE DÉLE LA VUELTA. SI AÚN NO ENCAJA, PÓNGASE EN
CONTACTO CON UN ELECTRICISTA CALIFICADO. NUNCA UTILICE UNA EXTENSIÓN A NO SER QUE EL ENCHUFE
PUEDA SER TOTALMENTE INSERTADO. NO ALTERE EL ENCHUFE.
PRECAUCIÓN: PARA PREVENIR UNA DESCARGA ELÉCTRICA, HAGA COINCIDIR LA PATA ANCHA DEL
ENCHUFE CON LA RANURA ANCHA, INSERTE TOTALMENTE.
PRECAUCIÓN: LA RESISTENCIA NECESITA UNA ADECUADA VENTILACIÓN PARA FUNCIONAR
CORRECTAMENTE. DEBE PROVEERSE UN ESPACIO DE AIRE DE UN MÍNIMO DE 6" EN TODOS LOS LADOS,
EXCEPTO DONDE ESTÁ CONECTADA A UN TOMACORRIENTE.
25W Athens Floor Lamp
25W
Athens Floor Lamp
25992PB2
ESPAÑOL
ATTENTION! Si le câble ou le cordon souple externe de ce lampadaire est endommagé, celui-ci doit être remplacé exclusive-
ment par le fabricant, son agent de service ou toute personne compétente afin d'éviter tout danger. Pour usage à l’intérieur seulement.
ASSEMBLAGE DE LA LAMPE
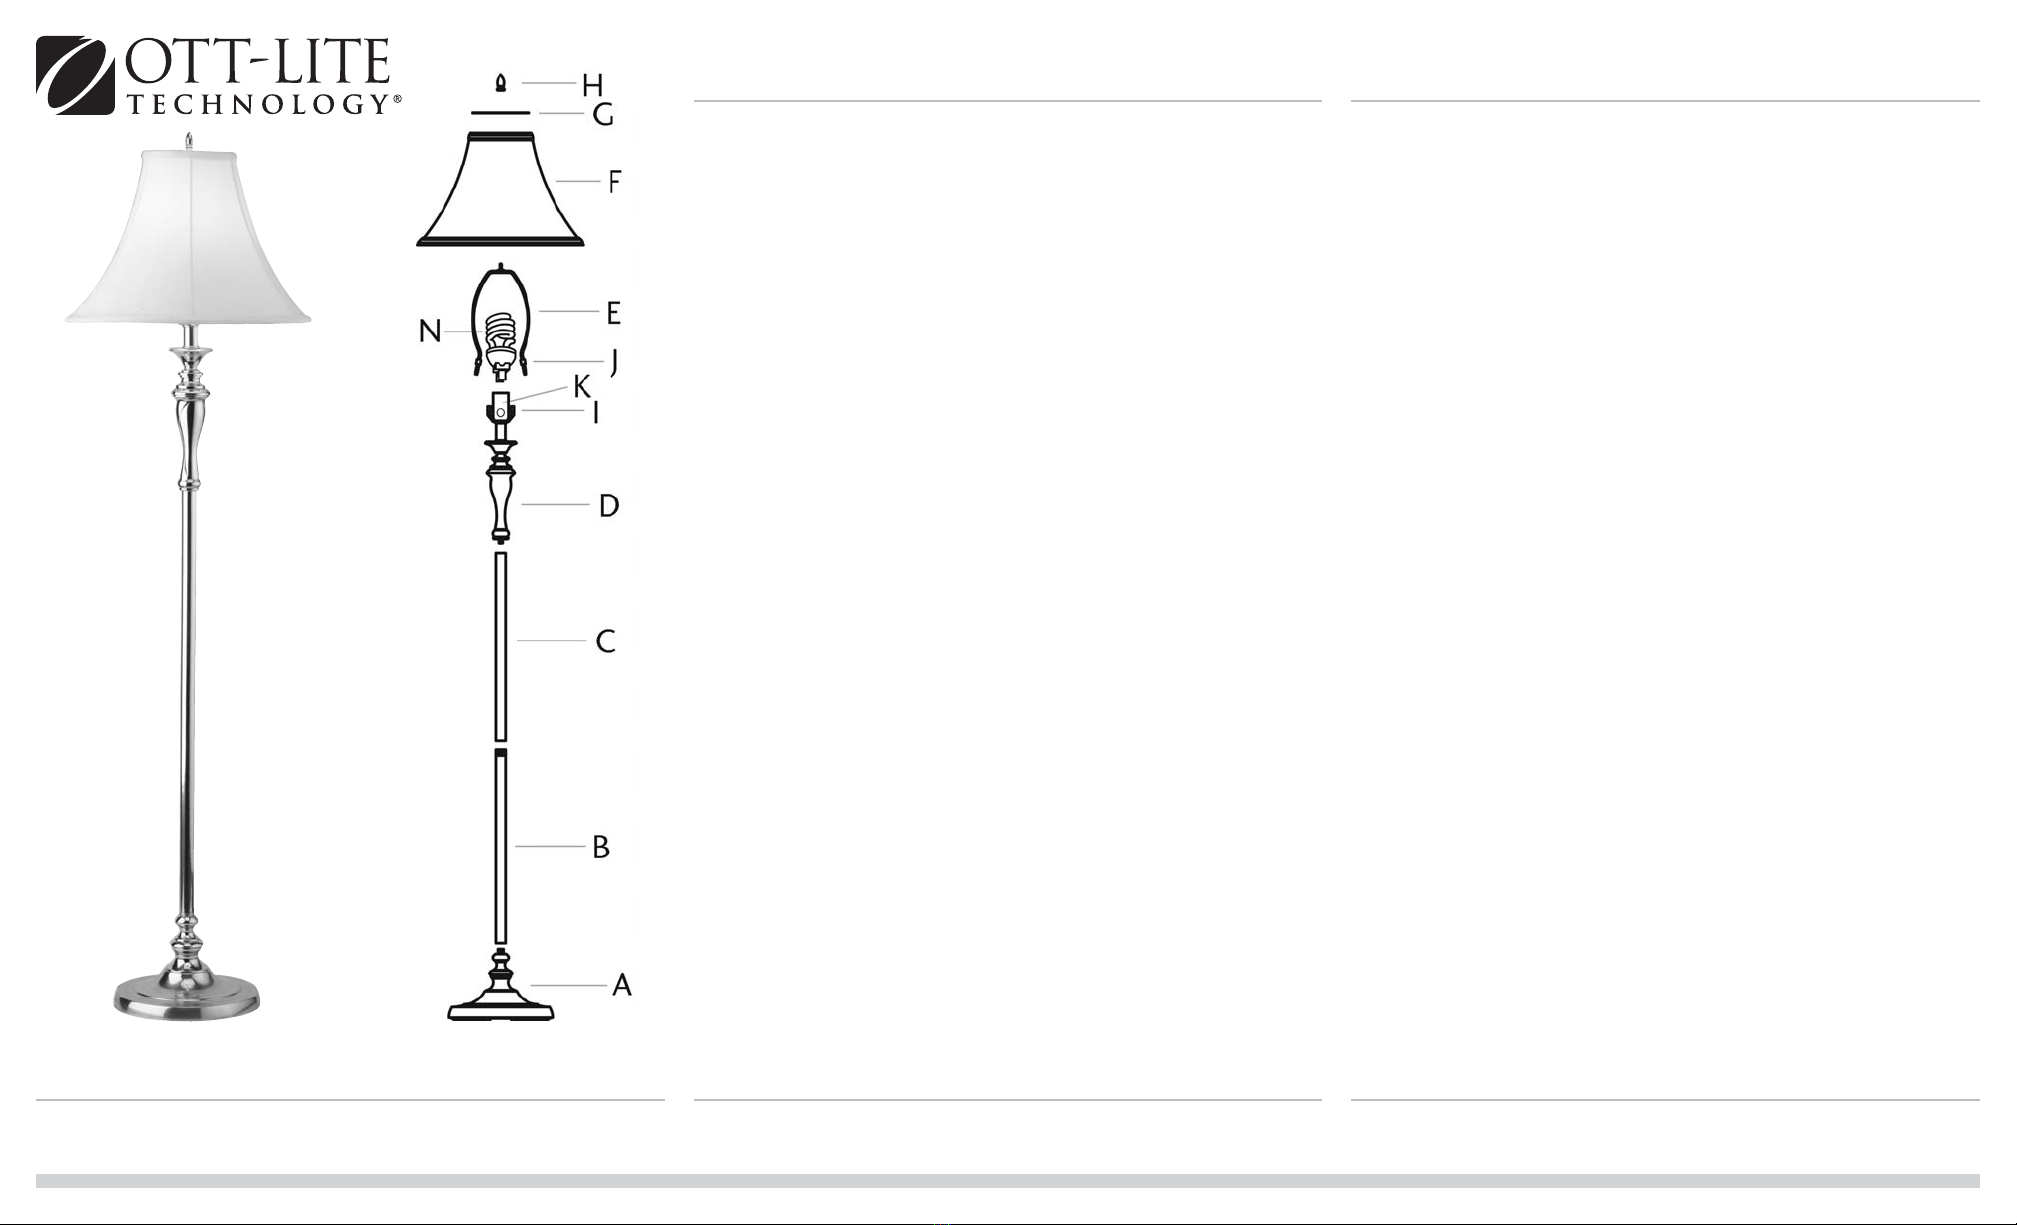
1. Déballez toutes les pièces de la lampe et
disposez-les par terre avec le socle (A)
posé à plat.
2. Fileter la tige supérieure (C) à
l'assemblage douille (D) à la main, en
tournant dans le sens des aiguilles d'une
montre jusqu'à être fermement serrée.
3. Fileter la tige inférieur (B) à la tige
supérieure (C) à la main, en tournant dans
le sens des aiguilles d'une montre jusqu'à
être fermement serré.
4. Fileter la tige inférieur (B) à la base (A)
à la main, en tournant dans le sens des
aiguilles d'une montre jusqu'à être
fermement serré.
5. Attacher la lyre (E) aux bras de douille
(I) en appuyant sur les extrémités ouverte
de la lyre, en plaçant la section aplatie à
l'intérieur des bras (I) et en relâchant.
Terminer en glissant les pinces (J) sur les
bras (I).
6. Placez l'abat-jour (F) sur la harpe (E).
7. Placez le réflecteur (G) au-dessus de
l'abat-jour (F), en vous assurant que le côté
blanc soit tourné vers le bas.
8. Enfilez l'épi de faîte (H) dans l'abat-jour
et le réflecteur en tournant dans le sens
des aiguilles d'une montre jusqu'à ce qu'il
soit bien ajusté.
9. Montez l'ampoule en suivant les
instructions INSERTION/REMPLACEMENT
DE L'AMPOULE.
10. Branchez la lampe dans une prise
standard de 120V.
11 . Allumez ou éteignez la lampe en faisant
pivoter l'interrupteur (K) dans le sens des
aiguilles d'une montre.
INSERTION/REMPLACEMENT DE
L'AMPOULE
1. Assurez-vous que la lampe n'est pas
branchée dans une prise de courant
électrique.
2. Si la lampe a été utilisée, laissez-la
refroidir pendant environ cinq minutes
avant de continuer.
3. Pour installer une ampoule (N) dans la
douille, attrapez-la fermement et poussez-la
directement dans la douille en appliquant
une pression sur la base de l'ampoule
jusqu'à ce qu'elle « s'enclenche » en
position.
4. Pour retirer une ampoule (N) déjà
installée dans la lampe, attrapez-la
fermement et retirez-la vers l'extérieur de la
douille. Ne faites pas pivoter ou ne
tournez pas l'ampoule en la retirant de
la douille.
Veuillez noter qu'une fois en marche,
l'intensité des ampoules OTT-LITE®ne peut
pas être réglée.
Appréciez votre Lampadaire Athens
OTT-LITE®!
Ce système d'éclairage est conçu pour
être utilisé avec les ampoules OTT-LITE
VisionSaver Plus®uniquement (numéro de
modèle H3400K). L'utilisation d'autres
produits annule la garantie et pourrait
endommager le système d'éclairage.
¡PRECAUCIÓN! Si el cable o cordón flexible externo de esta luminaria está dañado, debe ser exclusivamente reemplazado por
el fabricante o su agente de servicio o una persona calificada similar a fin de evitar un riesgo. Sólo para uso en interiores.
ENSAMBLAJE DE LÁMPARA
1. Desempaque todas las piezas de la
lámpara y póngalas sobre el piso poniendo
plana la base (A).
2. Enrosque manualmente el poste superior
(C) en el conjunto de piezas del soquete
(D), girándolo en la dirección de las
manecillas del reloj, hasta que quede
apretado.
3. Enrosque manualmente el poste inferior
(B) en el poste superior (C), girándolo en
la dirección de las manecillas del reloj,
hasta que quede apretado.
4. Enrosque manualmente el poste inferior
(B) en la base (A), girándolo en la dirección
de las manecillas del reloj, hasta que quede
apretado.
5. Instale el arpa (E) en los brazos del
soquete (I), apretando los extremos
abiertos del arpa, colocando la sección
aplanada adentro del arpa, girándolo en la
dirección de las manecillas del reloj, hasta
que quede apretado. Deslice los aros (J)
por los brazos (I).
6. Coloque la pantalla (F) sobre el
arpa (E).
7. Coloque el reflector (G) sobre la parte
superior de la pantalla (F), cerciorándose
de que el lado blanco quede mirando hacia
abajo.
8. Enrosque manualmente el cierre (H)
sobre la pantalla y el reflector, girando en
dirección de las manecillas del reloj hasta
que quede ajustado.
9. Instale el bombillo siguiendo las
instrucciones de INSERTAR/REEMPLAZAR
EL BOMBILLO.
10. Conecte la lámpara en un
tomacorriente estándar de 120V.
11 . Encienda y apague la lámpara girando
el interruptor del soquete (K) en dirección
de las manecillas del reloj.
INSTALACIÓN/REEMPLAZO DE
BOMBILLO
1. Cerciórese de que la lámpara no esté
conectada en algún tomacorriente.
2. Si la lámpara ha estado en uso, permita
que se enfríe por aproximadamente cinco
minutos antes de proseguir.
3. Para instalar un bombillo (N) en el
soquete, sujételo firmemente en su mano y
empújelo bien derecho hacia adentro del
soquete aplicando presión a la base del
bombillo, hasta que "encaje" en su lugar.
4. Para retirar un bombillo (N) ya instalado
en la lámpara, sujételo firmemente en su
mano y hálelo bien derecho hacia afuera
del soquete. No gire o dé vueltas al
bombillo mientras lo retira del soquete.
Por favor tenga en cuenta que durante la
operación, los bombillos OTT-LITE®no son
graduables.
¡Disfrute su Lámpara de Piso Athens
OTT-LITE®!
Este sistema de iluminación está diseñado
para ser utilizado únicamente con
bombillos OTT-LITE VisionSaver Plus®
(modelo número H3400K). El uso de
otros productos anula la garantía y
pudiera resultar en daños al sistema de
iluminación.
FRANÇAIS
ins 5 0003 rev 1026
OTT-LITE TECHNOLOGY®
Lámpara de Piso Athens de 25WLampadaire Athens 25 W
25W
Athens Floor Lamp
25992PB2

Other OttLite Outdoor Light manuals

OttLite T57G5Z User manual

OttLite

OttLite T57G5Z User manual

OttLite 15486RBS User manual

OttLite

OttLite 15486RBS User manual

OttLite 25D54BZX User manual

OttLite

OttLite 25D54BZX User manual

OttLite F26WGC User manual

OttLite

OttLite F26WGC User manual

OttLite EasyView CSP57WGC User manual

OttLite

OttLite EasyView CSP57WGC User manual

OttLite Avery User manual

OttLite

OttLite Avery User manual

OttLite 8FTPN4 User manual

OttLite

OttLite 8FTPN4 User manual

OttLite 20C83462 User manual

OttLite

OttLite 20C83462 User manual

OttLite K94CP3 User manual

OttLite

OttLite K94CP3 User manual

OttLite 2598311P User manual

OttLite

OttLite 2598311P User manual

OttLite C75002 User manual

OttLite

OttLite C75002 User manual

OttLite 25892A32 User manual

OttLite

OttLite 25892A32 User manual

OttLite LED Light Box and Task Lamp Station User manual

OttLite

OttLite LED Light Box and Task Lamp Station User manual

OttLite 25783ABR User manual

OttLite

OttLite 25783ABR User manual

OttLite 20M83AB2 User manual

OttLite

OttLite 20M83AB2 User manual

OttLite SCD0500S User manual

OttLite

OttLite SCD0500S User manual

OttLite Cambridge Floor Lamp User manual

OttLite

OttLite Cambridge Floor Lamp User manual

OttLite 571PN3 User manual

OttLite

OttLite 571PN3 User manual

OttLite SCEQB00Z-CA User manual

OttLite

OttLite SCEQB00Z-CA User manual

OttLite OTL13DWS User manual

OttLite

OttLite OTL13DWS User manual

OttLite Alexander Floor Lamp User manual

OttLite

OttLite Alexander Floor Lamp User manual

OttLite 25883A32 User manual

OttLite

OttLite 25883A32 User manual

OttLite 25983PB2 User manual

OttLite

OttLite 25983PB2 User manual

OttLite DS2G5Z User manual

OttLite

OttLite DS2G5Z User manual

Popular Outdoor Light manuals by other brands

Philips CityTouch OLC COM SRLLC7270 installation instructions

Philips

Philips CityTouch OLC COM SRLLC7270 installation instructions

Utilitech FSI 80-8312-2PK quick start guide

Utilitech

Utilitech FSI 80-8312-2PK quick start guide

Inspire Cardea OS1959-3 instruction manual

Inspire

Inspire Cardea OS1959-3 instruction manual

Ledsavers 64641 manual

Ledsavers

Ledsavers 64641 manual

Malatech Onyx Twin Cold White user manual

Malatech

Malatech Onyx Twin Cold White user manual

BEGA 88 863 Instructions for use

BEGA

BEGA 88 863 Instructions for use

planeo Nodin Manual and safety instructions

planeo

planeo Nodin Manual and safety instructions

Gama Sonic 117i90480 instruction manual

Gama Sonic

Gama Sonic 117i90480 instruction manual

Hubbell Kim Lighting Wall Forms WF30H Series installation instructions

Hubbell

Hubbell Kim Lighting Wall Forms WF30H Series installation instructions

Qazqa Zaandam FL instruction manual

Qazqa

Qazqa Zaandam FL instruction manual

LIGMAN SMITH 3 installation manual

LIGMAN

LIGMAN SMITH 3 installation manual

ADEO Services OS2602 WHITE instruction manual

ADEO Services

ADEO Services OS2602 WHITE instruction manual

SIMES REEF Series General Mounting Instructions

SIMES

SIMES REEF Series General Mounting Instructions

Punt Chicago instructions

Punt

Punt Chicago instructions

Knightsbridge GDL2 Installation & maintenance manual

Knightsbridge

Knightsbridge GDL2 Installation & maintenance manual

Portfolio 00768 manual

Portfolio

Portfolio 00768 manual

SLV Elektronik T5 GRILL instruction manual

SLV Elektronik

SLV Elektronik T5 GRILL instruction manual

Novus NV-IR60/150LED user manual

Novus

Novus NV-IR60/150LED user manual

manuals.online logo
manuals.online logoBrands
  • About & Mission
  • Contact us
  • Privacy Policy
  • Terms and Conditions

Copyright 2025 Manuals.Online. All Rights Reserved.