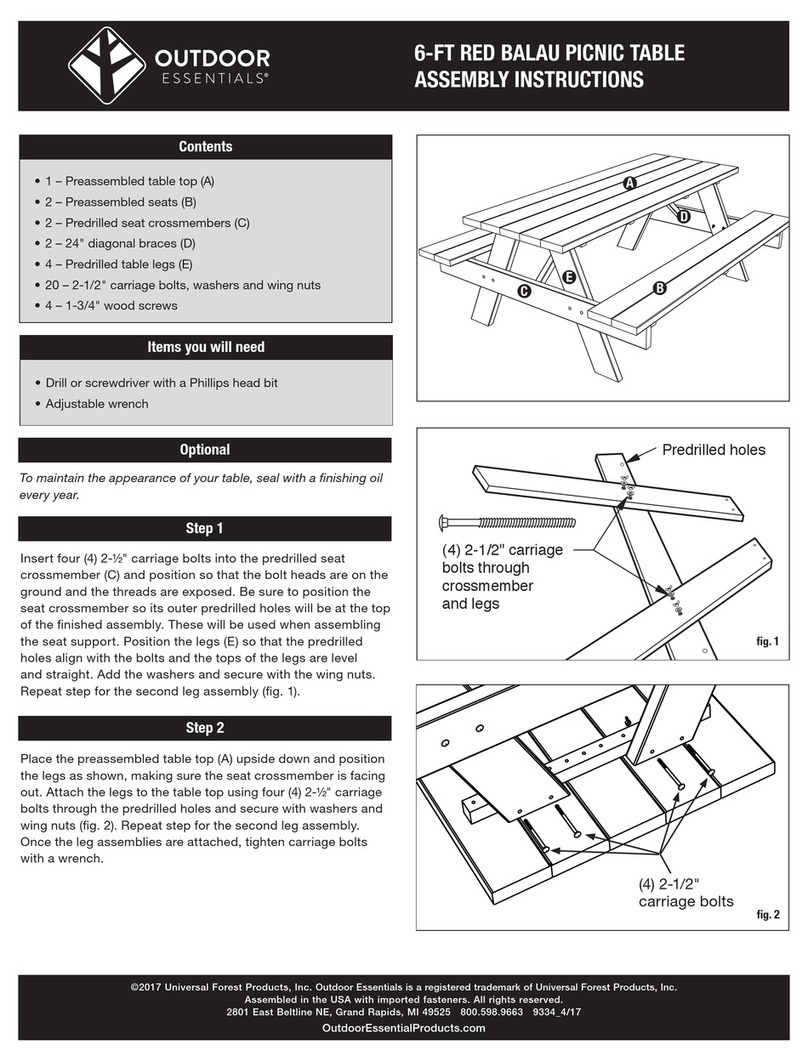
Outdoor Essentials Full Size Wood Picnic Table User manual

Recommended:
Hammer, Carpenter’s square, Clamp, Tape measure
1/2" Wrench Power drill with #2 Phillips bit
6'PICNIC TABLE KIT ASSEMBLY INSTRUCTIONS
©2018 Universal Forest Products, Inc. Assembled in the USA with imported fasteners. All rights reserved. 2801 East Beltline NE, Grand Rapids, MI 49525 800.598.9663 10211_9/18
Outdoor Essentials is a registered trademark of Universal Forest Products, Inc. OutdoorEssentialProducts.com
PARTS LIST BEFORE YOU BEGIN
TOOLS YOU WILL NEED
A
DE
C
4 – Table Legs1 – Tabletop*
2 – Bench Seats* 2 – Diagonal Braces
2 – Bench Supports*
8 – Hex Nuts
8 – Carriage
Bolts
8 – Washers
32 – 2-1/2"
Screws
ASSEMBLY
B
F
H
G
I
6'PICNIC TABLE KIT ASSEMBLY INSTRUCTIONS
©2019 Universal Forest Products, Inc. All rights reserved. 2801 East Beltline NE, Grand Rapids, MI 49525 10211_3/19
Outdoor Essentials is a registered trademark of Universal Forest Products, Inc. OutdoorEssentialProducts.com
PARTS LIST
ASSEMBLY
H I
THE DIAGRAMS AND INSTRUCTIONS IN THIS BROCHURE ARE FOR ILLUSTRATION PURPOSES ONLY AND ARE NOT MEANT TO RE-
PLACE A LICENSED PROFESSIONAL. ANY CONSTRUCTION OR USE OF THE PRODUCT MUST BE IN ACCORDANCE WITH ALL LOCAL
ZONING AND/OR BUILDING CODES. THE CONSUMER ASSUMES ALL RISKS AND LIABILITY ASSOCIATED WITH THE CONSTRUCTION
OR USE OF THIS PRODUCT. THE CONSUMER OR CONTRACTOR SHOULD TAKE ALL NECESSARY STEPS TO ENSURE THE SAFETY
OF EVERYONE INVOLVED IN THE PROJECT, INCLUDING, BUT NOT LIMITED TO, WEARING THE APPROPRIATE SAFETY EQUIPMENT.
EXCEPT AS CONTAINED IN THE WRITTEN LIMITED WARRANTY, THE WARRANTOR DOES NOT PROVIDE ANY OTHER WARRANTY,
EITHER EXPRESS OR IMPLIED, AND SHALL NOT BE LIABLE FOR ANY DAMAGES, INCLUDING CONSEQUENTIAL DAMAGES. FOR
DETAILS ON SAFE HANDLING AND WARRANTY INFORMATION, GO TO UFPI.COM / PTINFO.
cleat
* If your bench supports have beveled
corners, be sure they face downward.
PRO TIPS
Use a hammer to fully seat bolts
into holes
PRO TIP
Flush
Flush
Continuous water absorption and water loss in the wood can cause its natural defects to
surface. To reduce the appearance of these natural defects and extend the life of your picnic
table, apply a protective finish such as a semitransparent stain or waterproofing sealer.
The table has approximately 86 square feet of surface area. Apply the finish following the
stain or sealer manufacturer’s instructions and reapply every two years as needed.
PRO TIPS
Check out our blog to learn more about
finishing your picnic table, along with
other projects!
OE.media/blog
Connect with us:
@OutdoorEssentialProducts
@outdoor_essentials
Mold occurs naturally on wood. If you receive a picnic table with mold on it,
you can safely clean it with water and detergent or vinegar.
2 PEOPLE
1 HOUR
MINUTES
45
View our installation video at OE.media/table
This table is made from construction grade lumber and
may contain rough edges. Wear protective gear.
2 PEOPLE 1 HOUR
MINUTES
45
It will take you about 45 minutes to complete.
You’ll need two adults to safely assemble this picnic table.
C
C
CC
B B
BB
C
- Center legs on tabletop
- Hold legs tight to the cleat
and tabletop
- Drive in screws
- Clamp legs to cleat
before drilling
- Predrill holes before
drilling in screws
1
3
5
4
2
Insert bolts into bench supports
Attach legs to tabletop with screws
Attach bench seats with screws
Attach diagonal braces with screws
Attach legs to bench supports*
CARE AND MAINTENANCE
Do not fully
tighten Hex nuts
*Your kit may include parts with beveled corners.
E
B
H
H
H
B
C
A
D
I
I
C
C
A
B
B
I
I
I
C
F
F
G
G
H
H
PRO TIP
Use a carpenter’s
square to confirm
legs are square
before drilling the
diagonal brace in
place.
Fully tighten
Hex nuts before
drilling the diagonal
brace in place.
Center the brace
Flip table up
2 PEOPLE
1 HOUR
MINUTES
45
PRO TIP
Use a tape
measure to
confirm bench
is centered.

Recomendadas:
Martillo, escuadra de carpintero, abrazadera, cinta métrica
Llave inglesa
de 1/2 pulg.
Taladro eléctrico con
punta Philips #2
*Su kit puede incluir piezas con esquinas biseladas.
* Si los soportes de su banca tienen
esquinas biseladas, asegúrese de que
estén volteando hacia abajo.
6'PICNIC TABLE KIT ASSEMBLY INSTRUCTIONS
©2018 Universal Forest Products, Inc. Assembled in the USA with imported fasteners. All rights reserved. 2801 East Beltline NE, Grand Rapids, MI 49525 800.598.9663 10211_9/18
Outdoor Essentials is a registered trademark of Universal Forest Products, Inc. OutdoorEssentialProducts.com
PARTS LIST ANTES DE COMENZAR
HERRAMIENTAS QUE NECESITARÁ
A
DE
C
4 – Patas de mesa1 – Cubierta de mesa*
2 – Asientos de banco* 2 – Soportes diagonales
2 – Soportes de banco*
8 – Tuercas
hexagonales
8 – Pernos de
carrocería
8 – Arandelas
32 – Tornillos
6.4 cm. (2-1/2
pulg.)
ASSEMBLY
B
F
H
G
I
JUEGO DE MESA DE PICNIC DE 183 CM (6 PIES)
INSTRUCCIONES DE ARMADO
©2019 Universal Forest Products, Inc. Todos los derechos reservados. 2801 East Beltline NE, Grand Rapids, MI 49525 10211_3/19
Outdoor Essentials es una marca comercial registrada de Universal Forest Products, Inc. OutdoorEssentialProducts.com
LISTA DE PARTES
ARMADO
H I
LOS DIAGRAMAS E INSTRUCCIONES DE ESTE FOLLETO SON PARA FINES ILUSTRATIVOS SOLAMENTE Y NO ESTÁN DESTINADOS A REEMPLAZAR A UN PROFESIONAL
MATRICULADO. CUALQUIER CONSTRUCCIÓN O USO DEL PRODUCTO DEBE ESTAR DE ACUERDO CON TODOS LOS CÓDIGOS LOCALES DE CONSTRUCCIÓN O DE ZON-
IFICACIÓN. EL USUARIO ASUME TODOS LOS RIESGOS Y RESPONSABILIDADES ASOCIADOS CON LA CONSTRUCCIÓN O EL USO DE ESTE PRODUCTO. EL USUARIO O
CONTRATISTA DEBE TOMAR TODAS LAS MEDIDAS NECESARIAS PARA GARANTIZAR LA SEGURIDAD DE TODAS LAS PERSONAS INVOLUCRADAS EN EL PROYECTO, QUE
INCLUYEN PERO NO SE LIMITAN A, EL USO DEL EQUIPO DE SEGURIDAD APROPIADO. A EXCEPCIÓN DE LO CONTENIDO EN LA GARANTÍA LIMITADA POR ESCRITO, EL
GARANTE NO PROPORCIONA NINGUNA OTRA GARANTÍA, YA SEA EXPRESA O TÁCITA, Y NO SERÁ RESPONSABLE DE NINGÚN DAÑO, INCLUIDOS DAÑOS CONSECUENTES.
PARA OBTENER DETALLES SOBRE UN MANEJO SEGURO E INFORMACIÓN DE LA GARANTÍA, VISITE UFPI.COM / PTINFO.
listón
Use un martillo para meter los pernos
completamente en los orificios
CONSEJO ÚTIL
A nivel
A nivel
La constante absorción y pérdida de agua en la madera puede hacer que surjan sus defectos
naturales. Para reducir la aparición de estos defectos naturales y prolongar la vida útil de su
mesa de picnic, aplique un acabado protector, como una mancha semitransparente o un
sellador a prueba de agua.
La mesa tiene un área superficial aproximada de 8 metros cuadrados (86 pies cuadrados).
Aplique el acabado siguiendo las instrucciones del fabricante de la mancha o el sellador y
vuelva a aplicar cada dos años, cuando sea necesario.
CONSEJOS ÚTILES
¡Visite nuestro blog para ver más
información sobre el acabado de su
mesa de picnic y otros proyectos!
OE.media/blog
Conéctese con nosotros:
@OutdoorEssentialProducts
@outdoor_essentials
El moho aparece de manera natural en la madera. Si recibe una mesa de picnic con moho, puede
limpiarlo con seguridad usando agua y detergente o vinagre.
2 ADULTOS
1 HOUR
MINUTOS
45
Vea nuestro video de instalación en OE.media/table
Esta mesa está fabricada con madera de construcción y
puede tener bordes ásperos. Use equipo de protección.
2 ADULTOS 1 HOUR
MINUTOS
45
Tardará unos 45 minutos para armarla.
Se necesitan dos adultos para armar esta mesa de picnic de
manera segura.
C
C
CC
B B
BB
C
Use una escuadra
de carpintero para
confirmar que las patas
estén rectas antes de
atornillar el soporte
diagonal en su sitio.
- Centre las patas en la cubierta
de la mesa
- Coloque las patas cerca del
listón y la cubierta de la mesa
- Coloque los tornillos
- Fije las patas al listón
con una abrazadera
antes de taladrar
- Taladre orificios antes
de insertar los tornillos
1
3
5
4
2
Inserte los pernos en los soportes de las bancas
Fije las patas a la cubierta de la mesa con tornillos
Fije los asientos de las bancas con tornillos
Fije los soportes diagonales con tornillos
CUIDADO Y MANTENIMIENTO
No apriete las tuercas
hexagonales por
completo
Fije las patas a los soportes de las bancas*
CONSEJO ÚTIL
CONSEJOS ÚTILES
E
B
H
H
H
B
C
A
D
I
I
C
C
A
B
B
I
I
I
C
F
F
G
G
H
H
Apriete por completo
las tuercas hexago-
nales antes de atornillar
el soporte diagonal en
su sitio.
Centre el soporte
Voltee la mesa
a su posición
correcta
2 ADULTOS
1 HOUR
MINUTOS
45
Use una cinta
métrica para
asegurarse de
que la banca
está centrada
CONSEJO ÚTIL
Table of contents
Languages:
Other Outdoor Essentials Outdoor Furnishing manuals
Popular Outdoor Furnishing manuals by other brands

HAPPATIO
HAPPATIO HPO-ZPTY-H owner's manual

Garden Treasures
Garden Treasures FRS10005 manual

Yardistry
Yardistry CS016 Series quick start guide

Safavieh Outdoor
Safavieh Outdoor Prester PAT7073 Assembly instructions

Eden
Eden The Stockport Arbor Assembly instructions

Euromate
Euromate 662202 Assembly instructions

Sunjoy
Sunjoy L-GG004PST-D Assembly instructions

Superior
Superior County Accents Arbor Seat Assembly

Rutland County Garden Furniture
Rutland County Garden Furniture The Counter unit Assembly instructions

Belson
Belson PB6HEX-ADA instruction sheet

Oxford Garden
Oxford Garden SIG60 Assembly instructions

Courtyard Creations
Courtyard Creations KUS899E-WM Assembly instructions