Outland Technology ROV 3000 User manual

17-Mar-23 Outland Technology Inc. Page 2 of 20 Document Number: 46-0031.docx Rev B2
Contents
Contents............................................................................................................................................................2
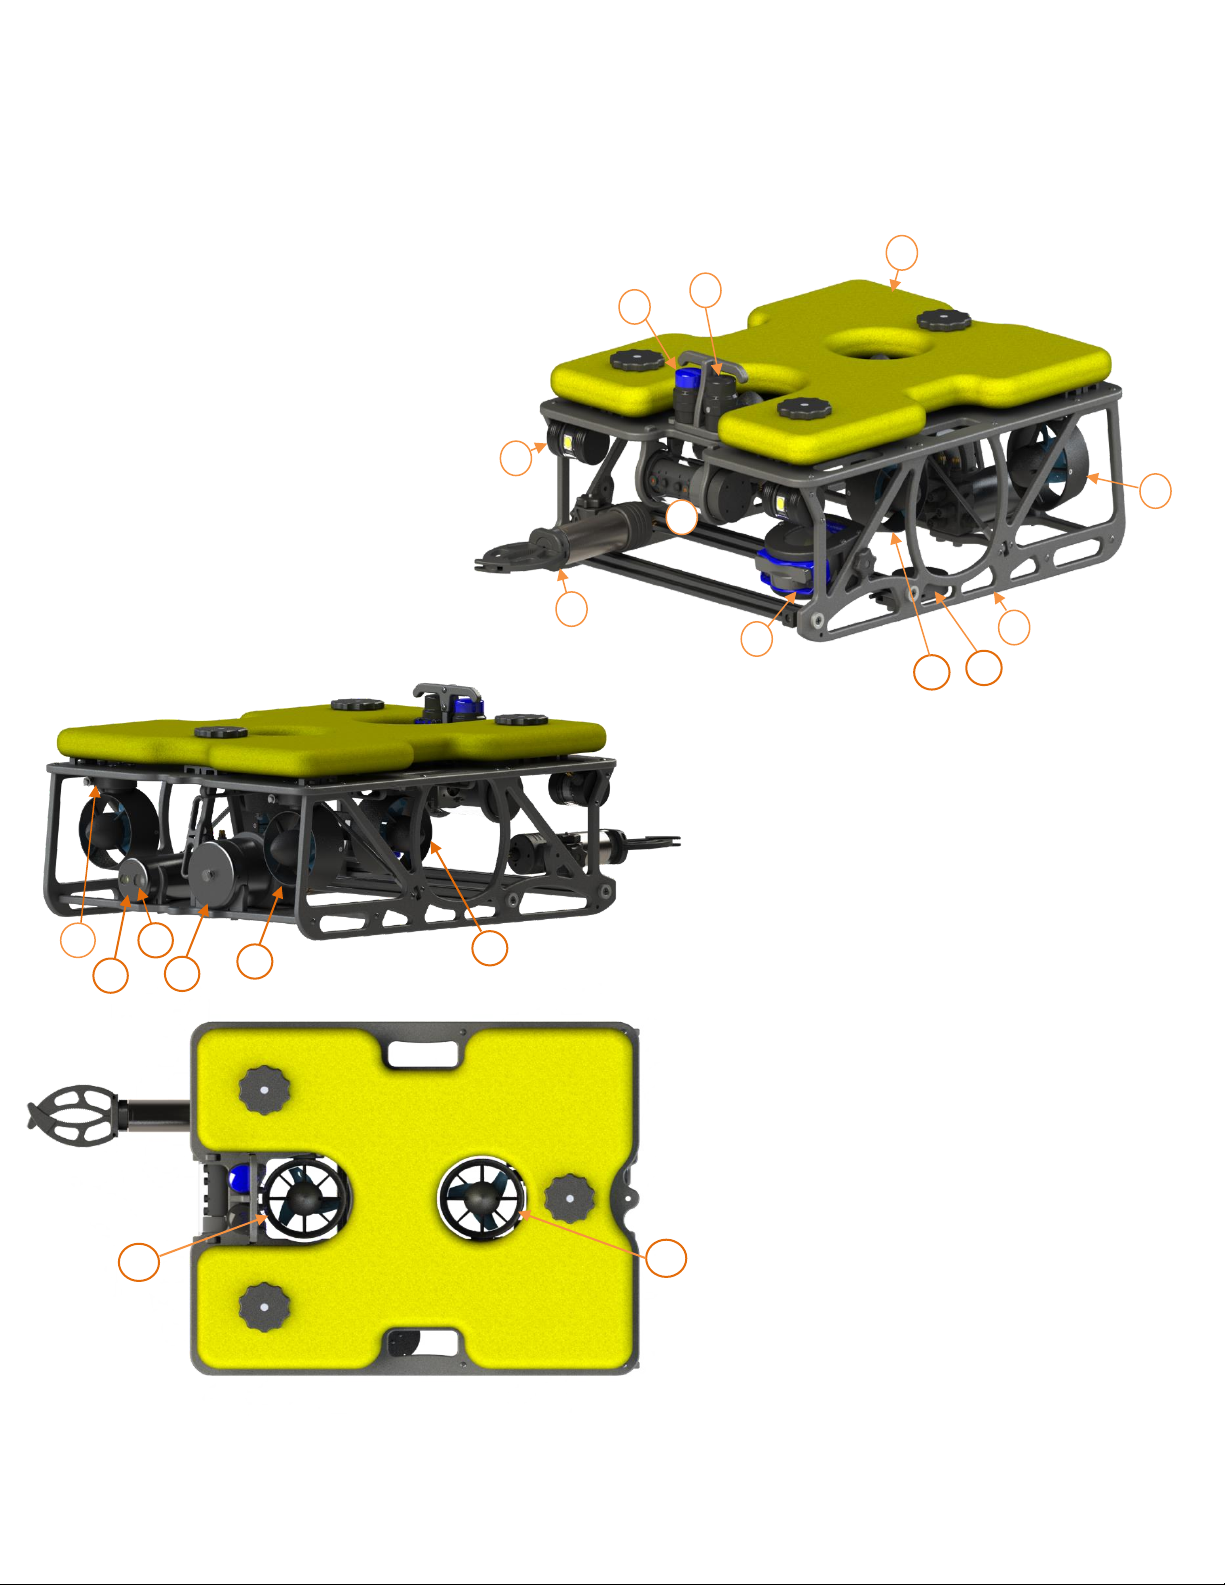
Outland ROV 3000............................................................................................................................................3
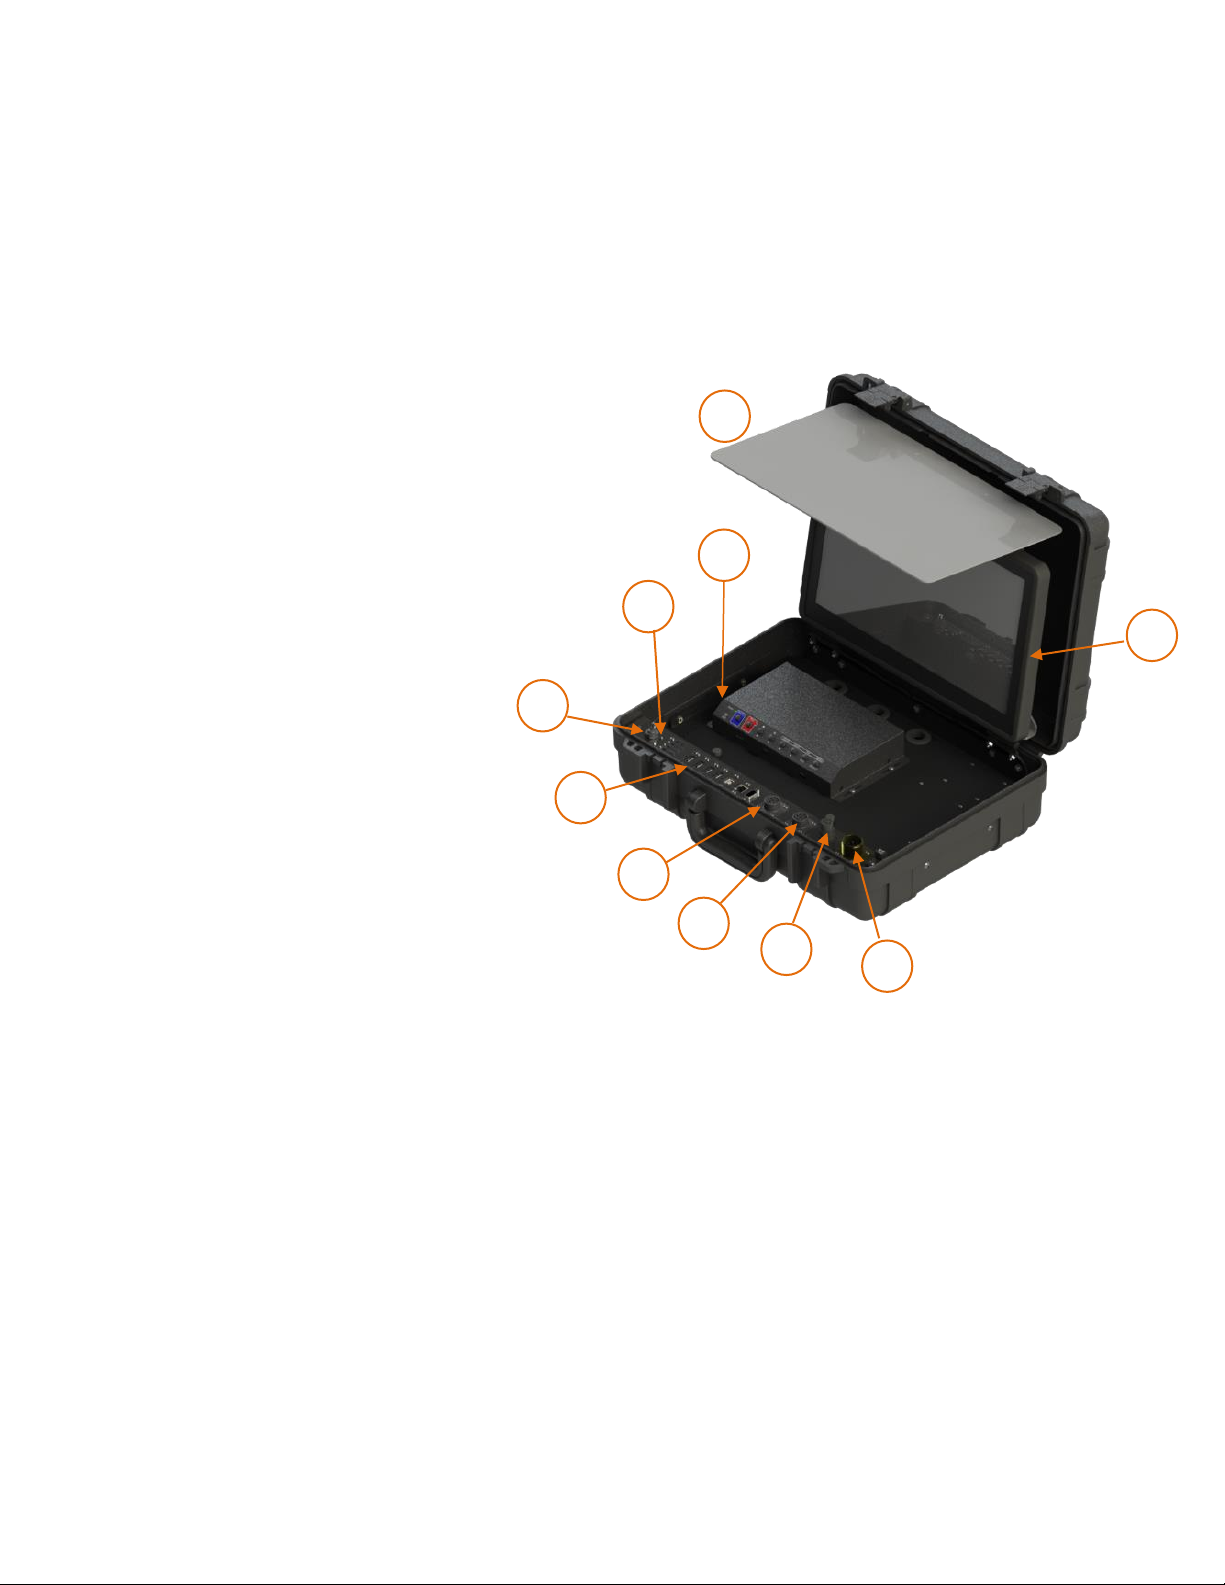
Control Console.................................................................................................................................................4
Control Bottle.....................................................................................................................................................5
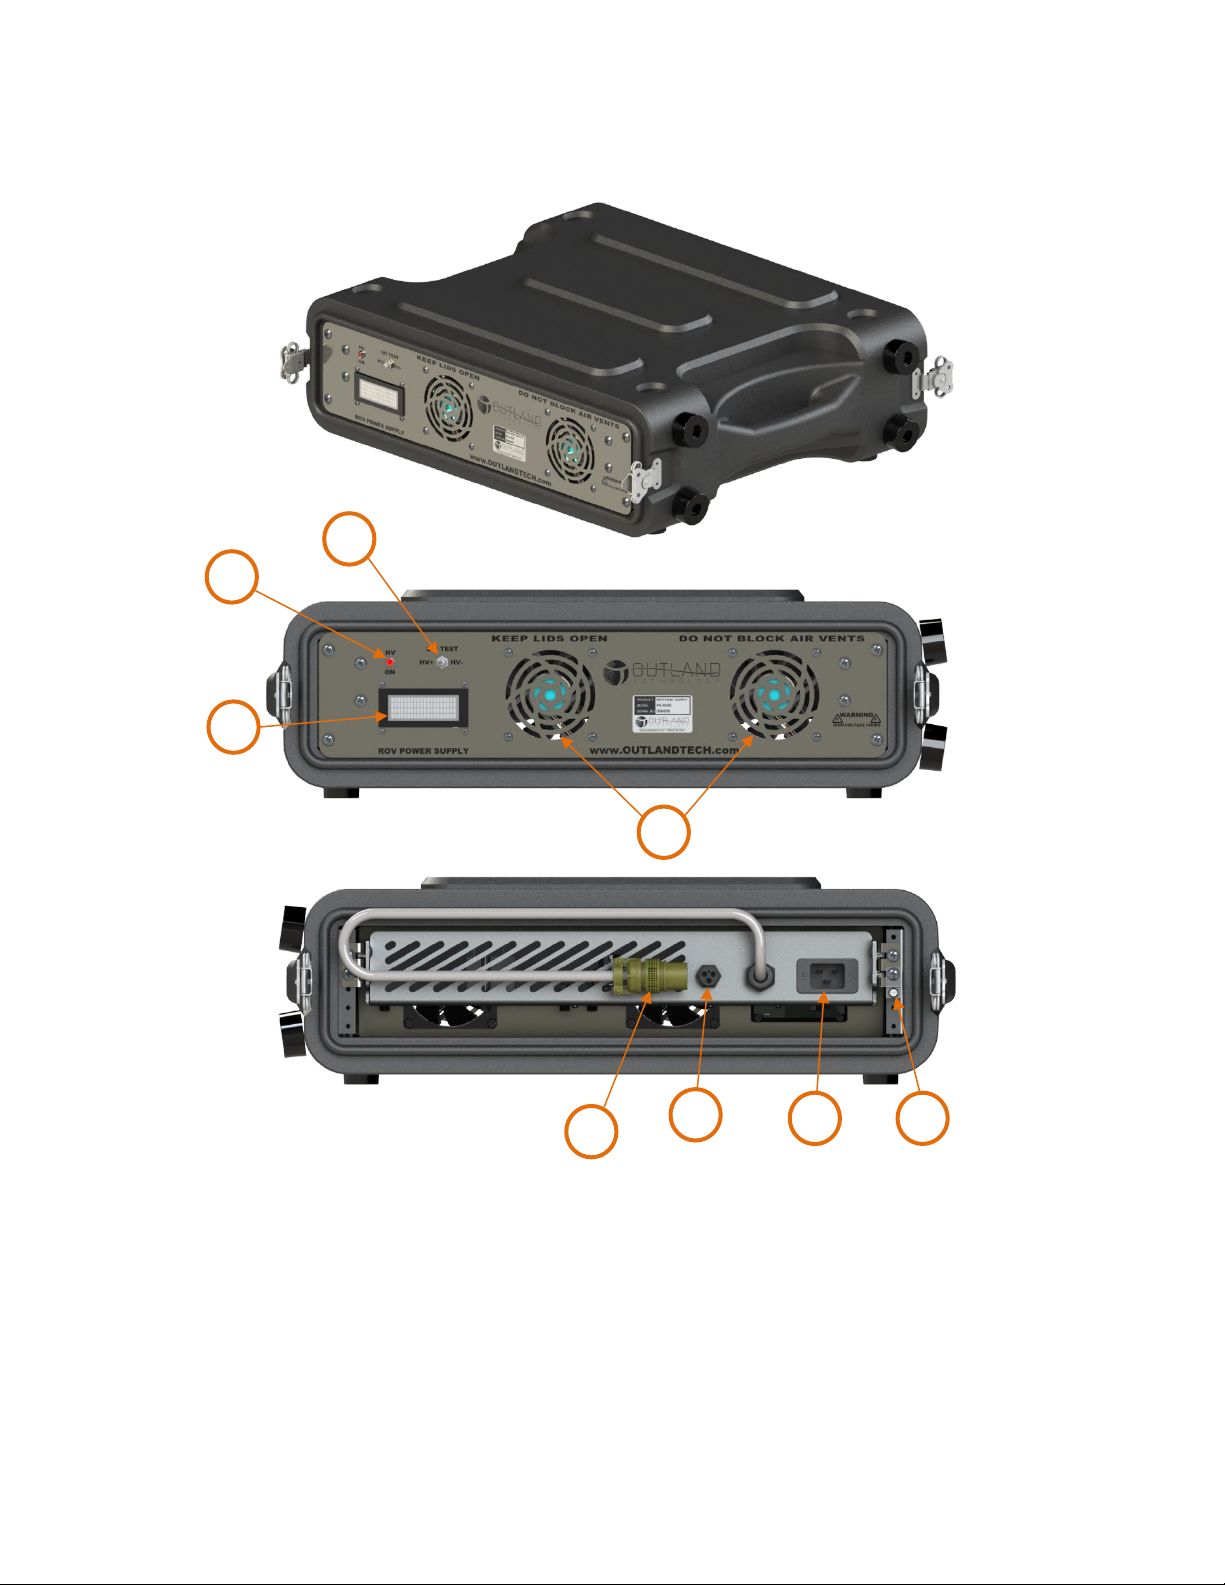
Power Supply....................................................................................................................................................6
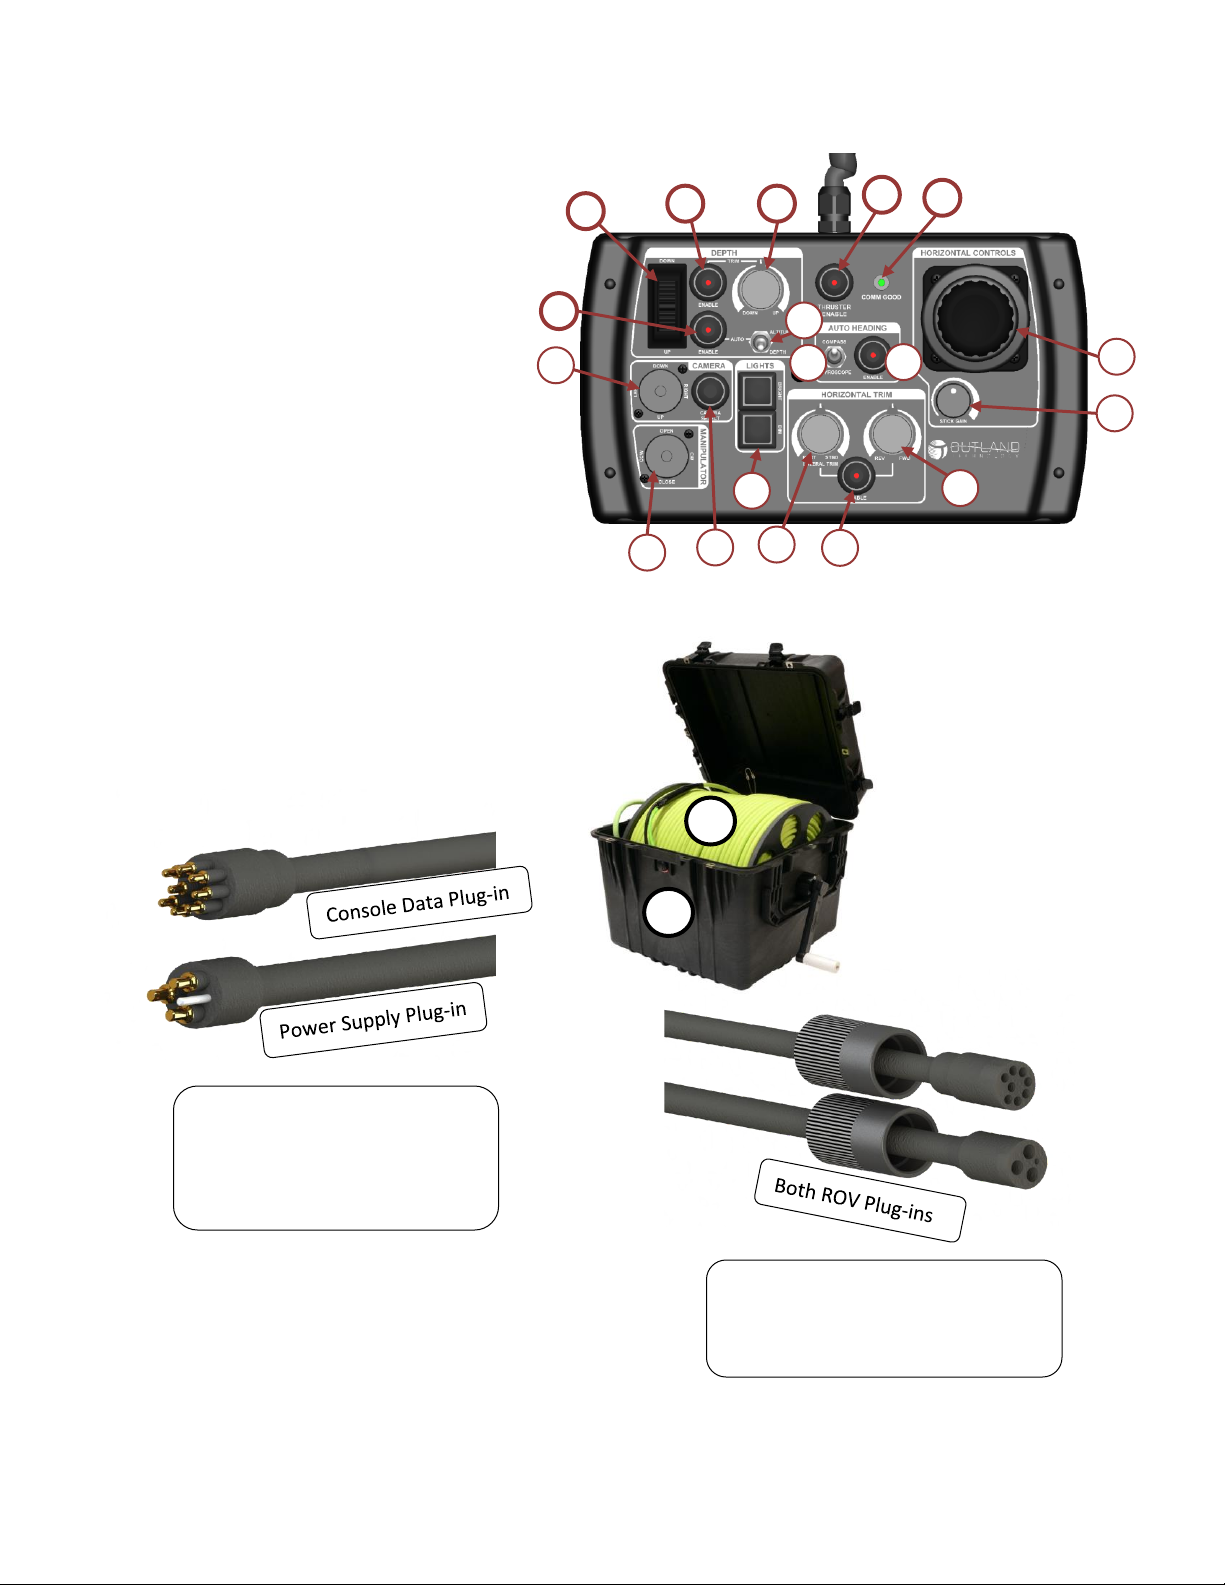
Hand Controller.................................................................................................................................................7
ROV Cable and Reel.........................................................................................................................................7
Using the Outland ROV.....................................................................................................................................8
1. Setup ROV System.................................................................................................................................8
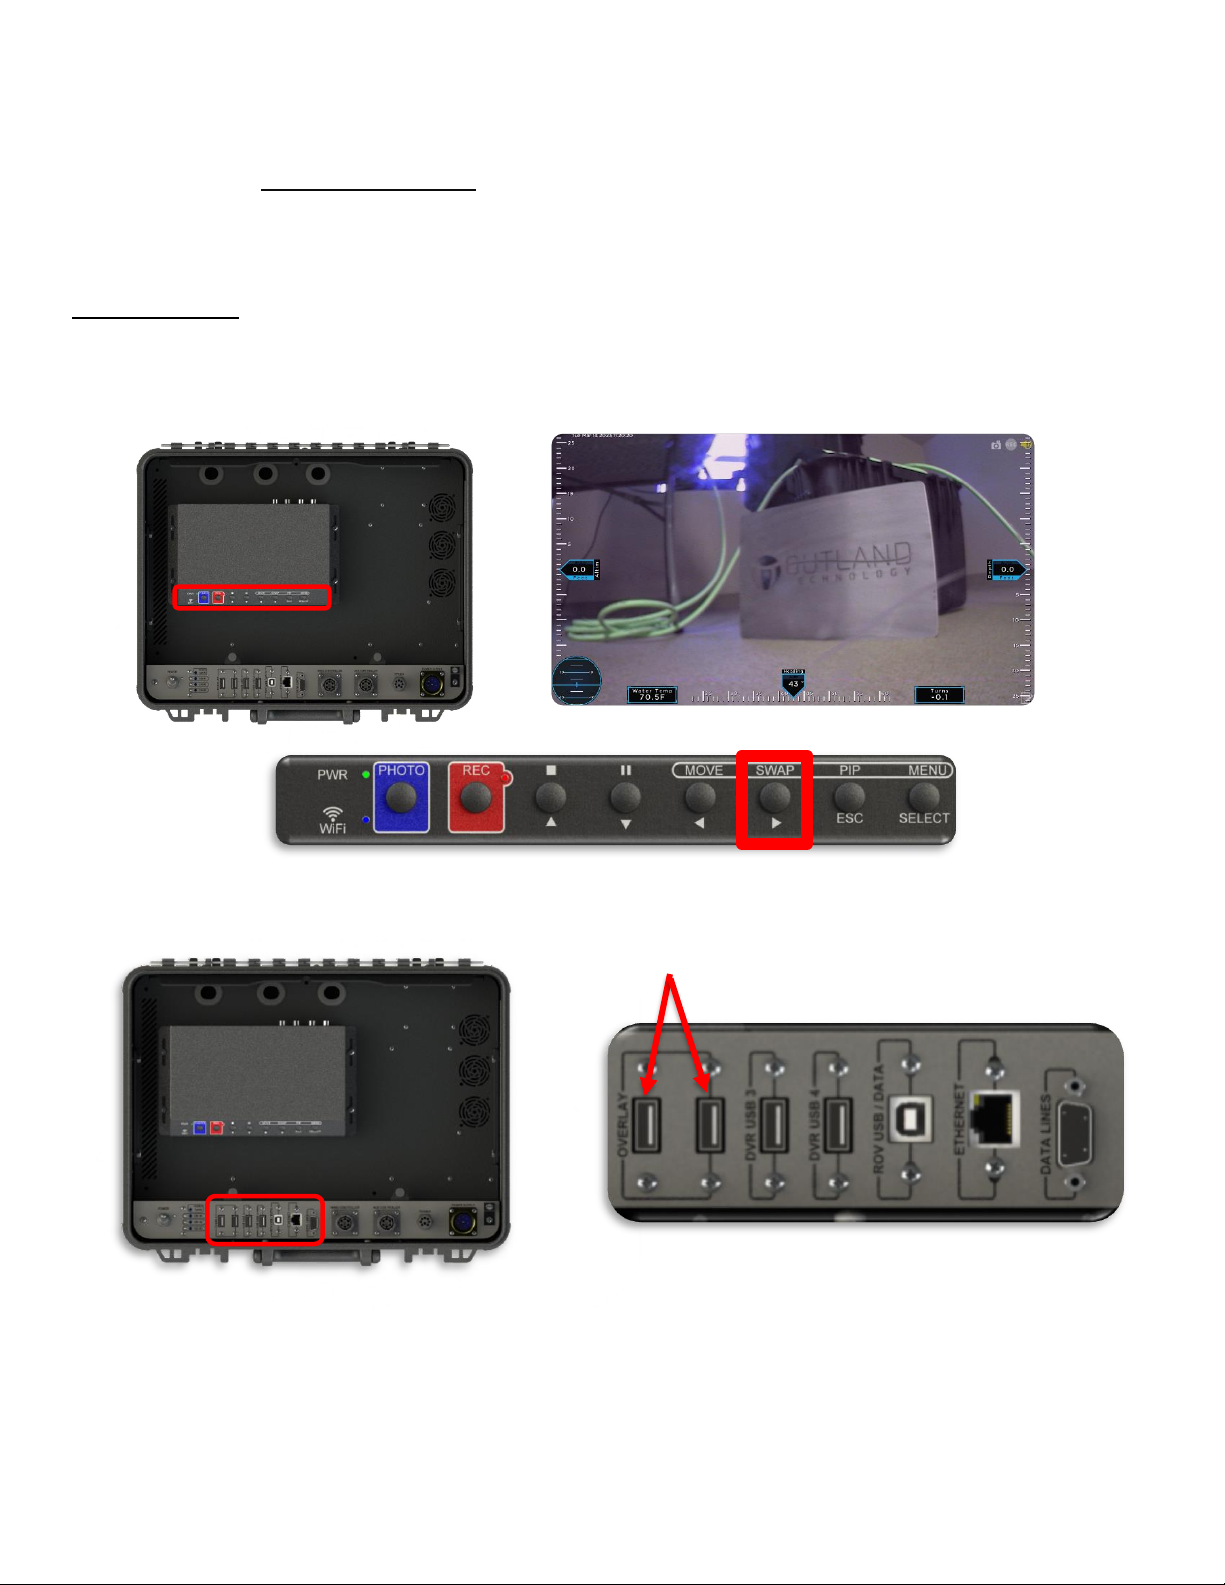
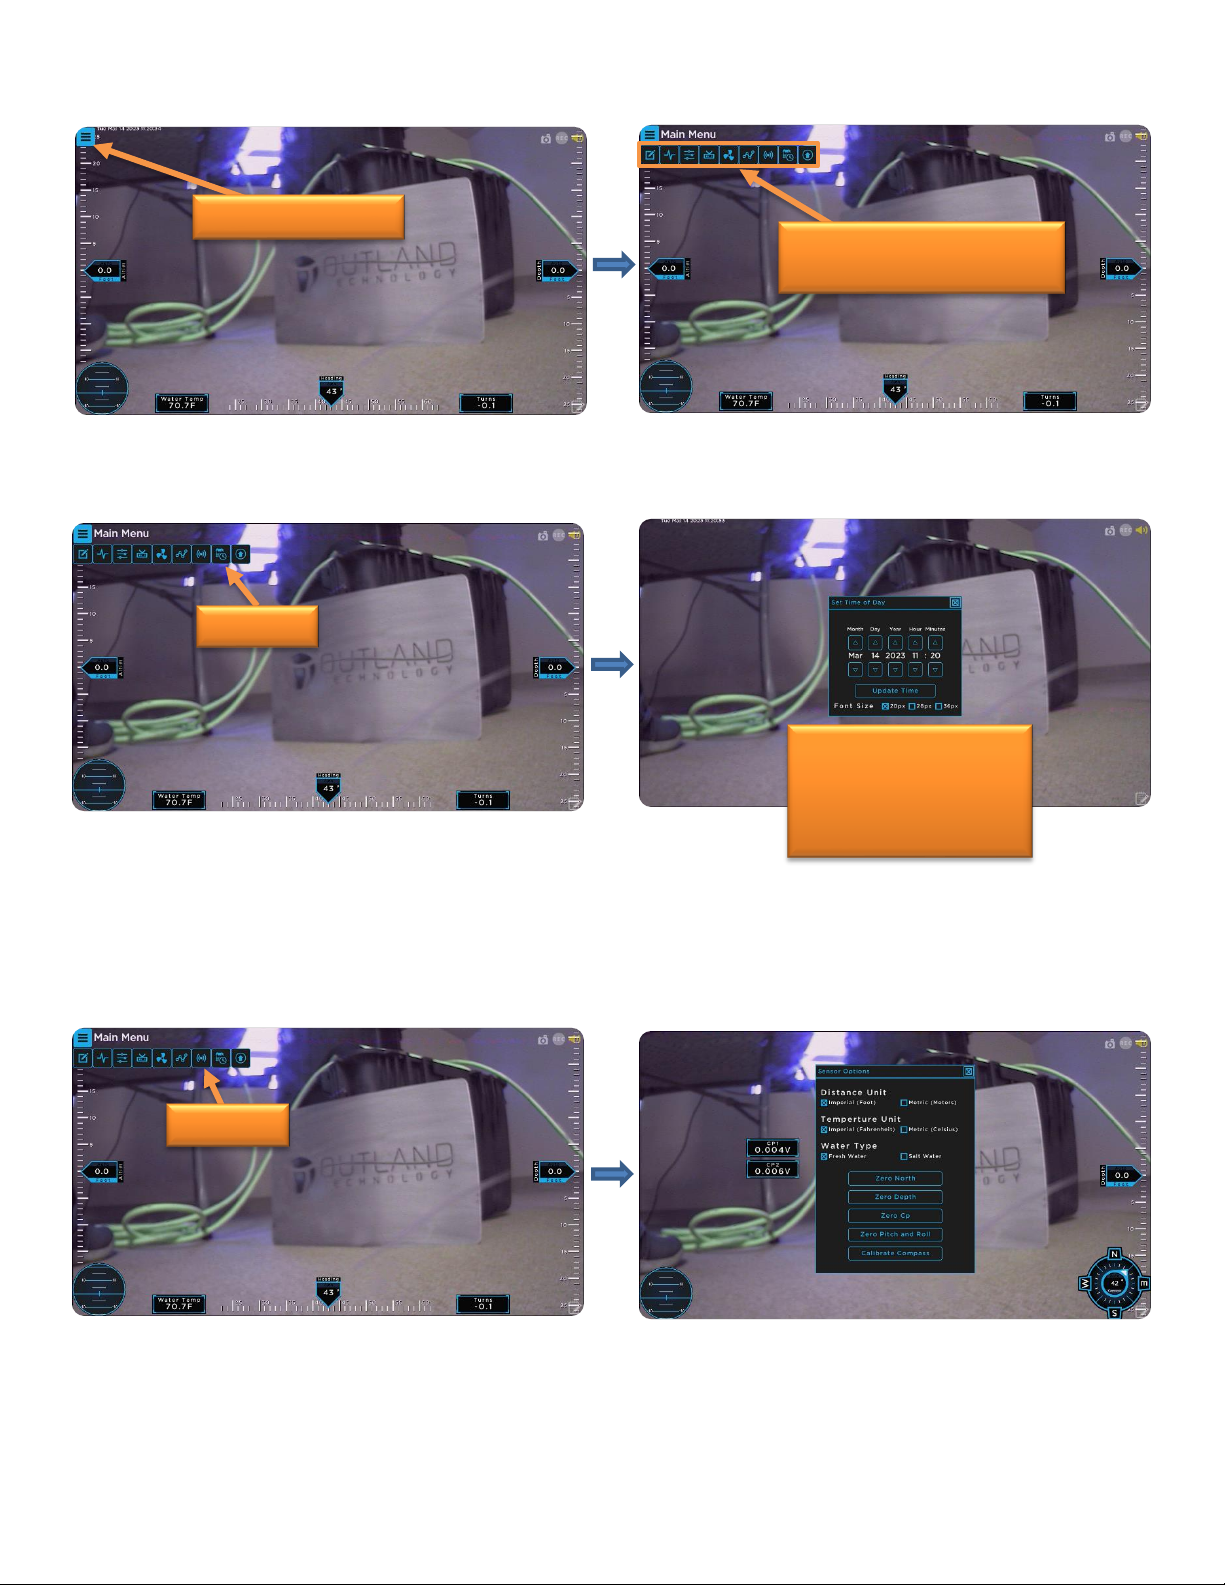
2. Screen Overlay and Recorder.................................................................................................................9
Overlay Setup..................................................................................................................................................................9
DVR Setup .....................................................................................................................................................................12
3. Controls and Flight Options...................................................................................................................14
Summary .......................................................................................................................................................................14
Joystick Controls............................................................................................................................................................14
Depth and Auto Pitch Control.......................................................................................................................................15
Auto Heading Controls..................................................................................................................................................17
Camera Control.............................................................................................................................................................17
Light Control..................................................................................................................................................................18
Manipulator Control .....................................................................................................................................................18
Perform Preflight Check...............................................................................................................................19
Closing Statement...........................................................................................................................................20

17-Mar-23 Outland Technology Inc. Page 3 of 20 Document Number: 46-0031.docx Rev B2
Outland ROV 3000
The Outland ROV systems are robust, powerful Class II vehicles capable of handling harsh conditions. System
components have been designed for maximum reliability while incorporating the latest technology. The robust frame
allows for additional sensors and equipment to be mounted and integrated into the vehicle. The tether allows for
simultaneous streaming of up to 3 cameras with lengths of 1000+ feet. Options such as Sonar, VDSL, CP probe, etc.
1. Flotation Cell
2. Front Lights (x2)
3. Manipulator (Optional)
4. Front Camera (360° Rotating
with scaling lasers)
5. ROV Frame
6. Thruster (Port Fwd/Rev CCW)
7. Multibeam Sonar (Optional)
8. USBL (Optional)
9. Scanning Sonar (Optional)
10. Thruster (Port Lateral CCW)
11. DVL (Optional)
12. Control Bottle
13. Rear Camera
14. Power Bottle
15. Thruster (Starboard Fwd/Rev CW)
16. Thruster (Starboard Lateral CW)
17. Thruster Quick Release (x6)
18. Thruster (Front Vertical CW)
19. Thruster (Rear Vertical CCW)
18
19
12
14
15
16
17
13
0
4
1
2
3
6
5
7
8
9
10
11

17-Mar-23 Outland Technology Inc. Page 4 of 20 Document Number: 46-0031.docx Rev B2
Control Console
The ROV Control console (CON-1500) connects the operator to the vehicle and displays ROV video and data.
1. Sun Shield
2. Monitor
3. DVR
4. Power Switch
5. USB keyboard connections
6. Hand Controller Connection
7. Auxiliary Controller Connection
8. Tether Connection
9. Power Supply Connection
10.GFI Trip Indication Light
1
3
2
4
5
6
7
8
9
10

17-Mar-23 Outland Technology Inc. Page 5 of 20 Document Number: 46-0031.docx Rev B2
Control Bottle
This section will explain, in short, what each plug on the control bottle does to make it simple for the user to
understand where to plug in the equipment they are using. All the letters that are called out on the picture in this
section are engraved onto the control bottle.
Plug identification list:
A. Sonar/IP (8 Pin)
B. Manipulator and Lights (4 Pin)
C. Camera (8 Pin)
D. CP Probe (8 Pin)
E. Pressure and Temp Sensor (No Pins)
F. Spare #1 (Varies)
G. Link between power bottle and control bottle (4 Pin)
H. ROV cable (8 Pin)
I. Spare #2 (Varies)
J. DVL (8 Pin)
Note: Since the manipulator and the lights plug into the same port on the control bottle there will be a whip that plugs
into the manipulator and splits off to the lights.
Note: See manual for connector grease instructions.
Important Note: Any time you unplug a port and do not plug anything back into it you must put a dummy plug into that
port there are some of these in the spares box.
Important Note: Be sure to power down with console switch before connecting or disconnecting plugs.
E
F
G
H
I
J

17-Mar-23 Outland Technology Inc. Page 6 of 20 Document Number: 46-0031.docx Rev B2
Power Supply
The ROV Power Supply (PS-3500) supplies the necessary power to the ROV and the Console.
1
2
3
4
1. High Voltage
Indication Light
2. GFI Test Switch
3. LCD Screen
4. Cooling Fans
5. Console Power Supply Plug
6. Tether Power Supply Plug
7. 120V/220V AC Power Input
8. Ground Lug
5
6
7
8
Important Note: Both lids must be removed, as seen in images during operation.

17-Mar-23 Outland Technology Inc. Page 7 of 20 Document Number: 46-0031.docx Rev B2
Hand Controller
1. COMM Good LED
2. Thruster Enable Button
3. Depth Thumbwheel
4. Depth Trim Enable
5. Depth Trim Knob
6. Auto Depth/Altitude Enable Button
7. Auto Depth Mode Switch
8. Auto Heading Enable Button
9. Auto Heading mode Switch
10. Horizontal Trim Enable Button
11. Lateral Trim Knob
12. Forward/Reverse Trim Knob
13. Stick Gain Knob
14. Horizontal Control Joystick
15. Camera Control
16. Camera Select Switch
17. Light intensity control
18. Manipulator Control
ROV Cable and Reel
1. Cable Case (shown with optional reel)
2. C-3407 Cable
2
1
There will not be a locking
sleeve on this end. Also, If reel
is included this side on the
tether will be fixed.
This side plugs into the ROV, will
be the non-fixed side of the reel,
and will have locking sleeves.
3
4
5
6
7
8
9
10
11
12
2
13
14
1
15
17
16
18

17-Mar-23 Outland Technology Inc. Page 8 of 20 Document Number: 46-0031.docx Rev B2
Using the Outland ROV
1. Setup ROV System
❖Connect Hand Controller. (1)
❖Connect ground lug to earth
ground. (2)
❖Connect tether data cable to
console. (3)
❖Connect tether power cable to
power supply. (4)
❖Connect power supply cable to
console. (5)
❖Connect tether cables to ROV.
(6)
❖Connect power supply power
cable to >4000W power source
(i.e. generator). (7)
Ensure power switch is off prior to
connecting to power source.
Warning: Once power supply is connected to
input power source AC voltage is present on
the console connection cable
>4000W Generator
(Or plug in).
1
2
3
4
5
6
7

17-Mar-23 Outland Technology Inc. Page 9 of 20 Document Number: 46-0031.docx Rev B2
2. Screen Overlay and Recorder
Before starting this section make sure you have everything plugged in and ready to go
from section Setup ROV System. Next power on the entire system from the power switch
on the console. When you power on the console you should here the ROV sing a tune.
Wait for the overlay to completely load.
Overlay Setup
This section will explain step by step how to get the overlay setup and configure the ROV to fly properly.
Step 1: Hit swap on the DVR control panel until the camera with the overlay present shows on the monitor (See image
directly below).
Step 2: Plug a mouse into the USB port labeled overlay on the console (see pictures below).
Overlay Control

17-Mar-23 Outland Technology Inc. Page 10 of 20 Document Number: 46-0031.docx Rev B2
Step 3: Move the mouse to the TOP LEFT of the screen and a 3 line icon will appear. Click on it.
Step 4: Set Date and Time
Step 5: Set Sensor Options
There are a few calibration setups in here that are explained in the manual. Most are fairly self-explanatory.
Change between units here.
Move Mouse HERE.
This appears when icon is
clicked.
Click Here
Set date and time and
setting for date and
time here. Click Update
Time Once done.
Click Here

17-Mar-23 Outland Technology Inc. Page 11 of 20 Document Number: 46-0031.docx Rev B2
Step 6: Thruster Settings
These are preconfigured before sending to the customer; however, occasionally these can get flipped. For
example, up is down and down is up. If you have such issues on start up go into this menu.
Step 7: HUD Settings
There are tons of ways to set the overlay or head up display (HUD) on the monitor. Please feel free to play with
different display options to pick your favorite. Click a check box and then that sensor will show up on screen. To move
things around on the HUD hit Edit Layout and you can then click and drag.
Click Here
Do not
need to
change.
Change these
to reverse or
normal to
switch the
direction of
the thrusters.
Click Here
Allows you to
move things
around on the
HUD.

17-Mar-23 Outland Technology Inc. Page 12 of 20 Document Number: 46-0031.docx Rev B2
DVR Setup
This section will explain how to get into the DVR information and how to setup a few key things.
Step 1: Accessing the DVR menu.
DVR Control
Step 2: Right click on the screen and the DVR Menu will appear. If you right click again it will disappear.

17-Mar-23 Outland Technology Inc. Page 13 of 20 Document Number: 46-0031.docx Rev B2
Step 3: Set date and time on DVR
You want to set the date and time on the DVR as well as the overlay so the time stamps
match.
Step 4: Taking a picture or starting a recording
These DVR on screen controls only work when the mouse is plugged into the DVR port.
Click Here
Set Date
and time
here.
Click Here
Use these buttons to
take a picture, record or
mute.
You have DVR
Controls here as
well.

17-Mar-23 Outland Technology Inc. Page 14 of 20 Document Number: 46-0031.docx Rev B2
Keep hands, feet and objects clear of propellers when power is applied to vehicle.
3. Controls and Flight Options
Summary
This section will explain how the hand controller controls the ROV and how different flight modes can be set on
the ROV from the controller. The ROV will not move at all until the thruster enable button is clicked. The Hand Controller
always defaults to manual operation. The joystick controls the ROV’s forward movement, backward movement, lateral
movements, and rotational movements. The depth thumbwheel controls the up and down movements (For more on
depth check the depth control sections). Rotate the camera up and down by moving the camera thumb switch up or down.
If you hold pan right camera lasers will come on and if you hold pan left camera lasers will go off. Control your manipulator
by using the manipulator thumb switch. Control your lights by hitting brighter or dimmer on the hand controller. For more
information on controls please see the ROV-3000 manual.
Joystick Controls
Rotational
Movements
Lateral
Movements
Forward/Backward
Movements

17-Mar-23 Outland Technology Inc. Page 15 of 20 Document Number: 46-0031.docx Rev B2
Depth and Auto Pitch Control
Auto Pitch Control:
This ROV is equipped with auto pitch control (see image below for graphic). When ROV is in default manual flying
mode, pitch control is not enabled. It is highly recommended that pitch control is enabled when flying. When enabling
auto depth, auto pitch control becomes active. If you want to enable auto pitch without enabling auto depth then enable
depth trim (see button 4 under hand controller) and put depth trim knob (see knob 5 under hand controller) at zero.
When depth trim is enabled it is a good way to move up and down at high speeds. In the image below auto pitch would
enable the thruster to self-level the vehicle.
Manual Depth:
In this mode no auto pitch control is enabled and there is no way to manually control pitch. See auto pitch control
above to know how to be in manual depth and enable auto pitch control.
Depth or up and
down movements

17-Mar-23 Outland Technology Inc. Page 16 of 20 Document Number: 46-0031.docx Rev B2
Auto Altitude (If equipped with DVL):
Enable auto altitude from the bottom surface by having the toggle switch (7) on altitude and then click the enable
button (6). You can still use thumb wheel to move upward or downward and the altitude control will hold your position
once thumb wheel is released.
Enable auto depth from the top surface by having the toggle switch (7) on depth and then click the enable
button (6). The depth that the system sets for the ROV to move to is called the setpoint and is automatically set at
0.1ft increments of movement when in Auto Depth. You can still use thumb wheel to move set point upward or
downward and the ROV will move to the set point and stay there. This mode allows fine control movement up and
down but is not ideal for high-speed. If you want to move at higher speeds reference Auto Pitch Control Section.
Auto Depth:
6
7
6
7

17-Mar-23 Outland Technology Inc. Page 17 of 20 Document Number: 46-0031.docx Rev B2
Auto Heading Controls
In this mode the ROV tries to hold itself pointing in one direction and in one position. In this section, the toggle
switch from compass and gyroscope will be explained.
Compass Auto Heading:
Enable this mode by having the toggle switch (9) on compass and hitting the enable button (8). In this mode the
ROV is using a compass to keep itself pointing in the direction you last let go of the rotation of the joy stick. If you are
less than 164 Feet (50 Meters) off the bottom the DVL will keep you in location. Similarly to the compass, it will keep the
last location you let the joystick go at.
Gyroscope Auto Heading:
Enable this mode by having the toggle switch (9) on Gyroscope and hitting the enable button (8). The ROV has a sensor
that senses rotation inside the control bottle. You would only want to use this setting if you are near a large magnetic
object that is preventing your compass from operating properly. An example of this would be a large metal boat hull.
Same as when in compass mode, If you are less than 164 Feet (50 Meters) off the bottom the DVL will keep you in
location and hold you in position wherever you let the joystick go at.
Camera Control
There are two cameras that come standard on the ROV-3000. The main camera is the front 360 camera. This camera
can spin 360 degrees continuously and is equipped with a scaling laser. The secondary rear camera is on the inside of the
control bottle. This camera is fixed inside the bottle and is usually used to keep track of the tether during operation.
To rotate the main front camera use button 15 seen in the hand controller section.
To switch between cameras click button 16 seen in the hand controller section.
To turn on scaling laser hold pan right and to turn off scaling laser hold pan left on button 15 seen in hand controller.
8
9

17-Mar-23 Outland Technology Inc. Page 18 of 20 Document Number: 46-0031.docx Rev B2
Light Control
To control the lights see the light intensity control button in the hand controller section. Press and hold brighter
to turn the lights all the way to 100%. If you press and hold dimmer it will turn off the lights. A single press of the light
buttons will make the lights brighter or dimmer. The active light level is shown on the overlay.
Manipulator Control
To control the manipulator, use the manipulation control knob. This is knob 18 in the hand controller section.
When going clockwise the manipulator spins in the direction seen in the left image and when going counterclockwise
the manipulator spins in the direction seen in the right image.
Clockwise rotation
Counterclockwise rotation
NOTE: The manipulator mount is highly adjustable. Loosen up the knobs and move it around. You can mount
it in any way you choose.

17-Mar-23 Outland Technology Inc. Page 19 of 20 Document Number: 46-0031.docx Rev B2
Perform Preflight Check
Press Thruster Enable Button
The indicator will blink then remain illuminated indicating thrusters are powered.
If indicator blinks and goes out, this indicates an issue. Refer to manual and troubleshooting guide
for details.
Keep hand and objects clear of propellers when power is applied to vehicle.
Do not run thruster in air at high speed or for extended periods of time. The bearings require water for proper
operation.
Press Light Bright Button
to turn on ROV lights.
Press the Light Dim Button
to turn off ROV lights.
Test Manipulator Open, Close and
rotate functions.
Press camera select to cycle through available
cameras. Verify video is displayed on monitor.
Then rotate main camera to make sure
camera is moving properly.

17-Mar-23 Outland Technology Inc. Page 20 of 20 Document Number: 46-0031.docx Rev B2
If all checks out, you are ready for the water. Launch the ROV and enjoy the fly.
Closing Statement
Congratulations on your new ROV-3000! Everyone at Outland hopes you enjoy this equipment. If there are ever
any issues, questions, concerns, or feedback please reach out to us and let us know. We are always willing to help and
improve. For more in depth information please reference the full manual.
Move control joystick in
each direction and verify
associated thruster
activates.
DOWN
UP
Move Depth Thumbwheel
up and down to verify
thruster activates.
Other manuals for ROV 3000
1
Table of contents
Other Outland Technology Diving Instrument manuals

Outland Technology
Outland Technology 6200 User manual

Outland Technology
Outland Technology ROV 3000 User manual

Outland Technology
Outland Technology ROV 500 User manual

Outland Technology
Outland Technology ROV 500 User manual

Outland Technology
Outland Technology ROV 1000 User manual

Outland Technology
Outland Technology ROV 1000 User manual

Outland Technology
Outland Technology ROV 1000 User manual

Outland Technology
Outland Technology ROV 1000 User manual