manuals.online logo
Brands
  1. Home
  2. •
  3. Brands
  4. •
  5. Outlaw
  6. •
  7. Receiver
  8. •
  9. Outlaw RR 2160 User manual

Outlaw RR 2160 User manual

Other manuals for RR 2160

1

Other Outlaw Receiver manuals

Outlaw BTR-100 User manual

Outlaw

Outlaw BTR-100 User manual

Outlaw 1050 User manual

Outlaw

Outlaw 1050 User manual

Outlaw RR 2160 User manual

Outlaw

Outlaw RR 2160 User manual

Outlaw 1050 User manual

Outlaw

Outlaw 1050 User manual

Outlaw RR2180 User manual

Outlaw

Outlaw RR2180 User manual

Popular Receiver manuals by other brands

Televes ZAS HD SAT user manual

Televes

Televes ZAS HD SAT user manual

Realistic DX-75 Operating and service instructions

Realistic

Realistic DX-75 Operating and service instructions

Saris 4620 Assembly instructions

Saris

Saris 4620 Assembly instructions

Mini DTR 206C PVR user manual

Mini

Mini DTR 206C PVR user manual

RF Elements TwistPort manual

RF Elements

RF Elements TwistPort manual

Denon DN-200WS user guide

Denon

Denon DN-200WS user guide

Yamaha RX-V467 owner's manual

Yamaha

Yamaha RX-V467 owner's manual

Russound SaphIR 858 instruction manual

Russound

Russound SaphIR 858 instruction manual

Quasonix RDMS Firmware update procedure

Quasonix

Quasonix RDMS Firmware update procedure

Pioneer XV-HTD1 Service manual

Pioneer

Pioneer XV-HTD1 Service manual

ATZ HDMI-V2-44HE150 manual

ATZ

ATZ HDMI-V2-44HE150 manual

Sony XNV-770BT MyTomTom Specifications

Sony

Sony XNV-770BT MyTomTom Specifications

Grundig STR 7122 TWIN Service manual

Grundig

Grundig STR 7122 TWIN Service manual

Creative Blaster Modem user guide

Creative

Creative Blaster Modem user guide

Panduit ATLONA AT-OME-RX11 installation guide

Panduit

Panduit ATLONA AT-OME-RX11 installation guide

VOLTCRAFT UTPS-40 operating instructions

VOLTCRAFT

VOLTCRAFT UTPS-40 operating instructions

JVC KW-ADV794 instructions

JVC

JVC KW-ADV794 instructions

Litelink VT-1001 operating instructions

Litelink

Litelink VT-1001 operating instructions

manuals.online logo
manuals.online logoBrands
  • About & Mission
  • Contact us
  • Privacy Policy
  • Terms and Conditions

Copyright 2025 Manuals.Online. All Rights Reserved.

RR 2160MkII
Stereo RetroReceiver
®
Owner’s Manual
STANDBY PHONES LEVEL AUX SPEAKER SPEAKER EQ EXTERNAL
LOOP
USB
TONE OFF BASS BALANCE TREBLE
SOURCE
RECORD
VOLUME
MENU
ENTER
RR2160
MUTE
Mk II
RR2160 MkII Owner’s Manual
Outlaw Audio RR2160MkII Stereo RetroReceiver 2
Please Read First
Caution: To reduce the risk of electric shock, do not remove the
cover. No user serviceable parts inside. Refer to qualified
personnel.
Warning: To reduce the risk of fire or electric shock, do not
expose this appliance to rain or moisture.
The lightning flash with arrowhead, within an equilateral triangle, is
intended to alert the user to the presence of uninsulated
“dangerous voltage” within the product’s enclosure that may be of
sufficient magnitude to constitute a risk of electrical shock to
persons.
The exclamation point within an equilateral triangle is intended to
alert the user to the presence of important operating maintenance
(servicing) instructions in the literature accompanying the
appliance.
Warning: Important Safeguards
•Read instructions: All safety and operating instructions
should be read before the unit is operated.
•Retain instructions: The safety and operating instructions
should be retained for future reference.
•Heed warnings: All warnings on the unit and in the operating
instructions should be adhered to.
•Follow instructions: All operating and use instructions
should be followed.
•Water and Moisture: Do not use the unit near water – for
example, near a bath tub, wash bowl, kitchen sink, laundry
tub; in a wet basement; or near a swimming pool.
•Accessories: Do not place the unit on an unstable cart,
stand, tripod, bracket, or table. The unit may fall, causing
serious injury to a child or adult, and serious damage to the
unit. Any mounting of the unit should follow the
manufacturer’s instructions, and should use a mounting
accessory recommended by the manufacturer.
•Wall or Ceiling Mounting: The unit should be mounted to a
wall or ceiling only as recommended by the manufacturer.
•Ventilation: Slots and openings in the cabinet are provided
for ventilation and to ensure reliable operation of the unit and
to protect it from overheating, and these openings must not
be blocked or covered. The openings should never be
blocked by placing the unit on a bed, sofa, rug, or other
similar surface. The unit should not be placed in a built-in
installation such as a bookcase or rack unless proper
ventilation is provided. There should be free space of at least
3 - 6 in. (7.6 - 15.25 cm) and an opening behind the unit.
•Heat: The unit should be situated away from heat sources
such as radiators, heat registers, stoves, or other units
(including amplifiers) that produce heat.
•Power Sources: The unit should be operated only from the
type of power source indicated on the marking label. If you
are not sure of the type of power supplied to your home,
consult your unit dealer or local power company.
•Grounding or Polarization: The unit may be equipped with a
polarized alternating current line plug (a plug having one
blade wider than the other). This plug will fit into the power
outlet only one way. This is a safety feature. If you are
unable to insert the plug fully into the outlet, try reversing the
plug. If the plug should still fail to fit, contact a licensed
electrician to replace your obsolete outlet. Do not defeat the
safety purpose of the polarized plug.
•Power-Cord Protection: Power-supply cords should be
routed so that they are not likely to be walked on or pinched
by items placed upon or against them, paying particular
attention to cords where they enter a plug, a convenience
receptacle, and the point where they exit from the unit.
•Lightning: For added protection for the unit during a lightning
storm, or when it is left unattended and unused for long
periods of time, unplug it from the wall outlet and disconnect
any antenna or cable system. This will prevent damage to
the unit due to lighting and power-line surges.
•Cleaning: unplug the unit from the wall outlet before
cleaning. The unit should be cleaned only as recommended
by the manufacturer.
•Overloading: Do not overload wall outlets, extension cords,
or integral convenience receptacles as this can result in a risk
of fire or electric shock.
•Object and Liquid Entry: Never push objects of any kind
into the unit through openings as they may touch dangerous
voltage points or short-out parts that could result in a fire or
electric shock. Never spill liquid of any kind on the unit.
•Servicing: Do not attempt to service the unit yourself as
opening or removing covers may expose you to dangerous
voltage or other hazards. Refer all servicing to qualified
service personnel.
•Damage Requiring Service: Unplug the unit from the wall
outlet and refer servicing to qualified service personnel under
the following conditions:
When the power supply cord or plug is damaged,
If liquid has been spilled, or objects have fallen into the unit,
If the unit has been exposed to rain or water,
If the unit does not operate normally by following the
operating instructions. Adjust only those controls that are
covered by the operating instructions as an improper
adjustment of other controls may result in damage and will
often require extensive work by a qualified technician to
restore the unit to its normal operation,
If the unit has been dropped or damaged in any way, and
great care should be exercised in handling, and the unit
should be examined by qualified service personnel,
When the unit exhibits a distinct change in performance (this
indicates a need for service).
•Replacement Parts: When replacement parts are
required, be sure the replacement parts used have the
same characteristics as the original part. Unauthorized
substitutions may result in fire, electric shock, or other
hazards.
IMPORTANT SAFETY NOTE
Before connecting a new component such as the RR2160MkII to your
audio or home theater system it is always good practice to make
certain that all components are turned off, and preferably
unplugged from their AC power source. Many modern electronics
products feature automatic turn-on circuits that may be activated
during an installation, causing the potential for damage to
electronic components and/or speakers. Such damage is not
covered by product warranties and Outlaw Audio specifically
disclaims responsibility for any such damage.
Precautions
Verify the Line Voltage
Your new RR2160MkII has been factory configured for 120V (+/- 3%)
AC lines. Connecting the unit to a line voltage other than that for
which it is intended can create a safety and fire hazard, and may
damage the RR2160MkII. If you have any questions about the voltage
requirements for your specific model, or about the line voltage in
your area, contact Outlaw Audio before plugging the unit into a wall
outlet.
FCC:This device complies with Part 15 of the FCC rules. Operation
is subject to the following two conditions: (1) this device may not
cause harmful interference, and (2) this device must accept any
interference received, including interference that may cause
undesired operation.
ATTENTION: RISQUE DE CHOC ELECTRIQUE
NE PAS OUVRIR
RR2160 MkII Owner’s Manual
Outlaw Audio RR2160MkII Stereo RetroReceiver
3
Veuillez d'abord lire
Mise en Garde:Pour réduire le risque de choc électrique, ne retirez
Avertissement:Pour réduire les risques d'incendie ou de choc
Le flash avec une pointe de flèche, dans un triangle équilatéral, est
destiné à alerter l'utilisateur de la présence d'une "tension dangereuse"
non isolée dans l'enceinte du produit qui peut être d'une amplitude
suffisante pour constituer un risque de choc électrique pour les
personnes.
Le point d'exclamation, dans un triangle équilatéral, est destiné à
alerter l'utilisateur de la présence d'importantes instructions de
maintenance (entretien) de fonctionnement dans la documentation
accompagnant l'appareil.
Avertissement: sauvegardes importantes
•Lisez les instructions: Toutes les instructions de sécurité et de
fonctionnement doivent être lues avant d'utiliser l'appareil.
•Conserver les instructions:Les instructions de sécurité et
d'utilisation doivent être conservées pour une utilisation future.
•Tenez compte des avertissements: Tous les avertissements
sur l'appareil et dans le mode d'emploi doivent être respectés.
•Suivre les instructions: Toutes les instructions de fonctionnement
et d'utilisation doivent être suivies.
•Eau et humidité: N'utilisez pas l'appareil près de l'eau; par
exemple, près d'une baignoire, d'un lavabo, d'un évier de cuisine,
d'une cuve à lessive, dans un sous-sol humide ou près d'une piscine.
•Accessories: Ne placez pas l'appareil sur un chariot, un support,
un trépied, un support ou une table instable. L'appareil peut tomber,
blessant gravement un enfant ou un adulte et endommageant
sérieusement l'appareil. Tout montage de l'unité doit suivre les
instructions du fabricant et doit utiliser un accessoire de montage
recommandé par le fabricant.
•Montage mural ou au plafond: L'unité doit être montée sur un mur
ou un plafond uniquement selon les recommandations du fabricant.
•Ventilation: Les fentes et ouvertures de l'armoire sont prévues
pour la ventilation et pour assurer un fonctionnement fiable de
l'unité et pour la protéger des surchauffes, et ces ouvertures ne
doivent pas être obstruées ou couvertes. Les ouvertures ne doivent
jamais être cadencées en plaçant l'unité sur un lit, un canapé, un
tapis ou toute autre surface similaire. L'unité ne doit pas être
placée dans une installation intégrée telle qu'une bibliothèque
ou un rack à moins qu'une ventilation appropriée soit fournie. Il
doit y avoir un espace libre d'au moins 3 à 6 pouces (7.6 -
15.25 cm) et une ouverture derrière l'unité.
•Chaleur:L'unité doit être située loin des sources de chaleur telles
que les radiateurs, les registres de chaleur, les poêles ou
d'autres unités (et amplificateurs) qui produisent de la chaleur.
•Sources d'énergie:L'appareil ne doit être utilisé qu'avec le type
de source d'alimentation indiqué sur l'étiquette de marquage.
Si vous n'êtes pas sûr du type d'alimentation fourni à votre
domicile, consultez votre revendeur ou la compagnie d'électricité
locale.
•Mise à la terre ou polarisation:L'unité peut être équipée d'une
prise de ligne à courant alternatif polarisée (une prise ayant une
lame plus large que l'autre). Cette fiche ne s'insérera dans la prise
de courant que dans un sens. C'est un dispositif de sécurité. Si
vous ne parvenez pas à insérer complètement la fiche dans la prise,
essayez d'inverser la fiche. Si la fiche ne parvient toujours pas à
s'adapter, contactez un électricien agréé pour remplacer votre prise
obsolète. N'annulez pas l'objectif de sécurité de la fiche polarisée.
•Protection du cordon d'alimentation:Les cordons d'alimentation doivent
être acheminés de manière à ce qu'ils ne soient pas susceptibles d'être
piétinés ou pincés par des objets placés sur ou contre eux, en accordant
une attention particulière aux cordons où ils entrent dans une prise, une
prise de courant et le point où ils sortent du unité.
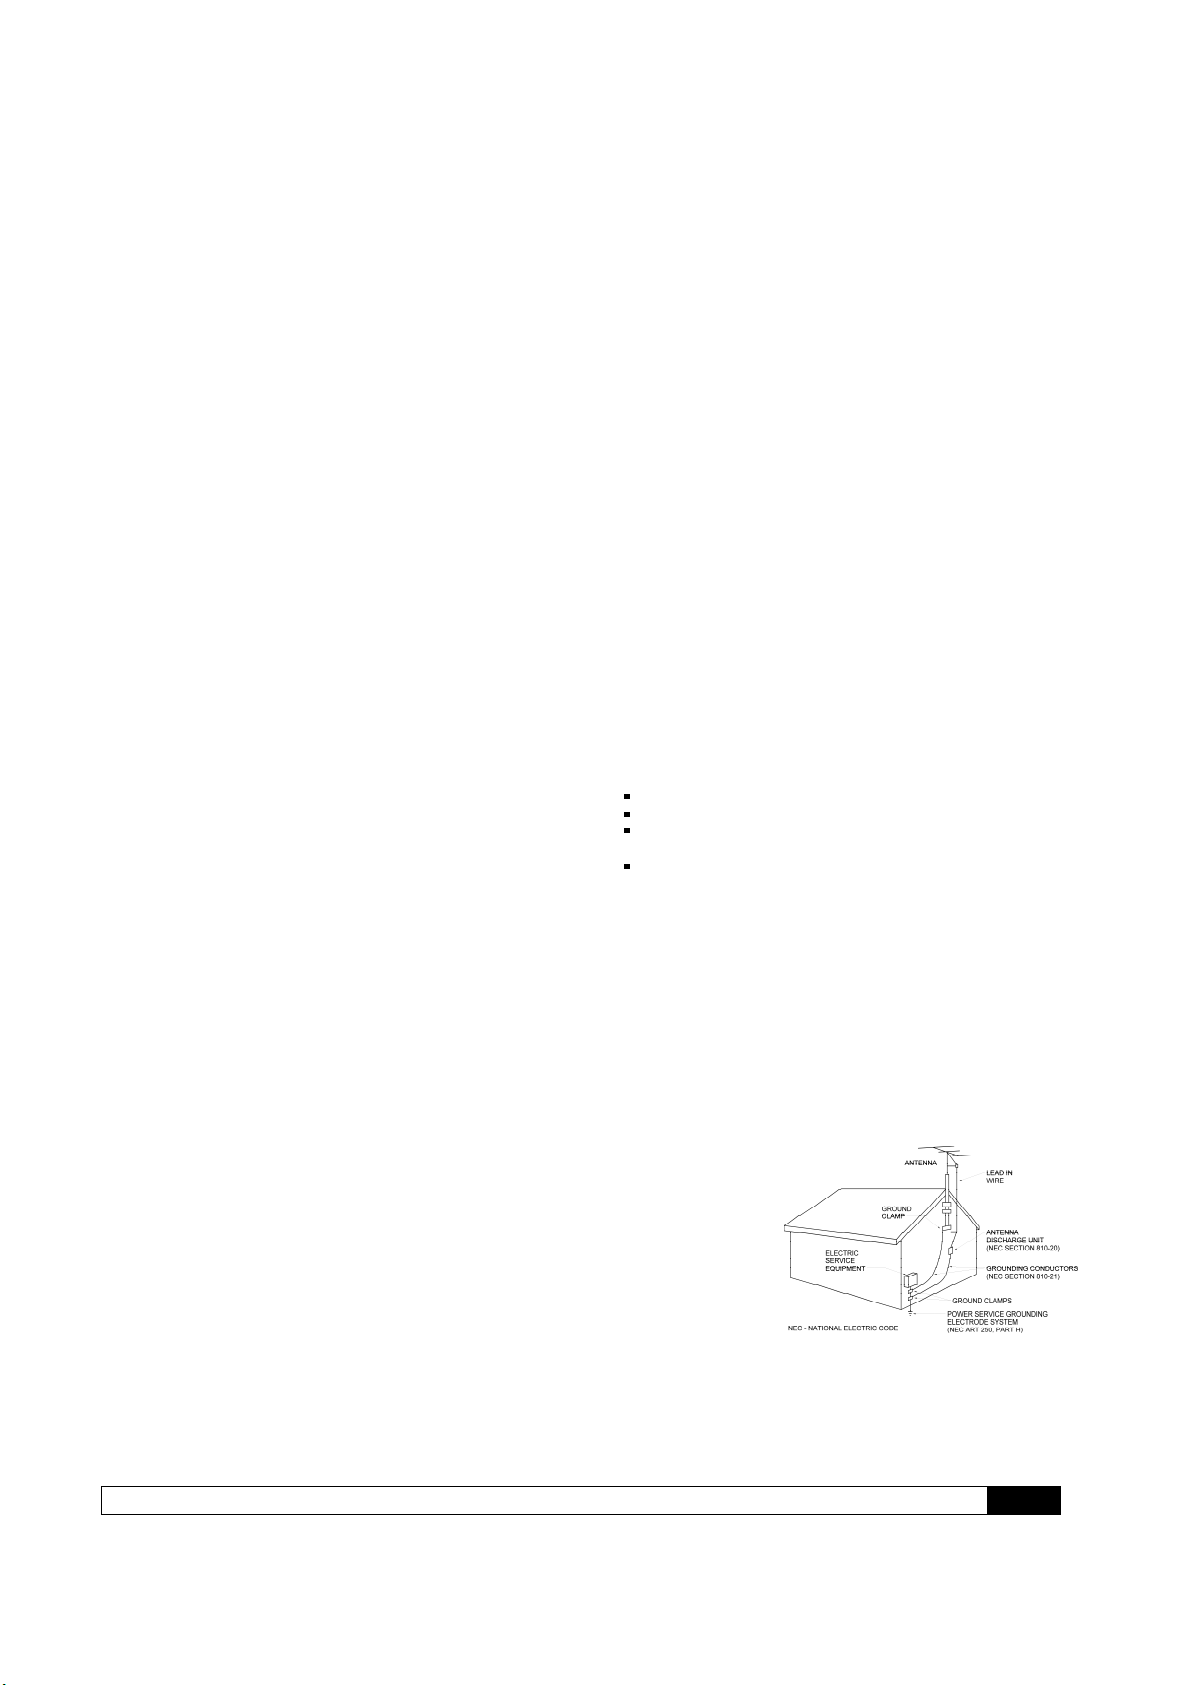
•Foudre:Pour une protection supplémentaire de l'appareil pendant un orage
ou lorsqu'il est laissé sans surveillance et inutilisé pendant de longues
périodes, débranchez-le de la prise murale et débranchez toute antenne
ou système de câbles. Cela évitera d'endommager l'unité en raison de la
foudre et des surtensions de la ligne électrique.
•Nettoyage:Débranchez l'appareil de la prise murale avant de le nettoyer.
L'unité doit être nettoyée uniquement selon les recommandations du
fabricant.
•Surcharge: Ne surchargez pas les prises murales, les rallonges ou les
prises de courant intégrées car cela peut entraîner un risque d'incendie
ou de choc électrique.
•Entrée d'objets et de liquides: N'introduisez jamais d'objets de quelque
nature que ce soit dans l'appareil par les ouvertures car ils pourraient
toucher des points de tension dangereux ou court-circuiter des pièces
susceptibles de provoquer un incendie ou un choc électrique. Ne
renversez jamais de liquide d'aucune sorte sur l'appareil.
•Entretien:N'essayez pas de réparer l'appareil vous-même car l'ouverture
ou le retrait des couvercles peut vous exposer à une tension dangereuse
ou à d'autres dangers. Confiez toutes les réparations à un technicien
qualifié.
•Dommages nécessitant une réparation:Débranchez l'appareil de la
prise murale et confiez la réparation à un technicien qualifié dans
les conditions suivantes:
Lorsque le cordon d'alimentation ou la fiche est endommagé,
Si du liquide a été renversé ou des objets sont tombés dans l'appareil,
Si l'appareil a été exposé à la pluie ou à l'eau,
Si l'appareil ne fonctionne pas normalement en suivant les
instructions d'utilisation.
Ajustez uniquement les commandes qui sont couvertes par les instructions
de fonctionnement, car un réglage incorrect des autres commandes peut
entraîner des dommages et nécessitera souvent un travail approfondi par
un technicien qualifié pour restaurer l'unité à son fonctionnement normal,
Si l'unité est tombée ou a été endommagée de quelque manière que ce
soit, et une grande prudence doit être apportée à la manipulation, et l'unité
doit être examinée par un personnel de service qualifié,
Lorsque l'unité présente un changement de performance distinct
(cela indique un besoin de service).
•Pièces de rechange:Lorsque des pièces de rechange sont
nécessaires, assurez-vous que les pièces de rechange utilisées ont les
mêmes caractéristiques que les pièces d'origine. Les substitutions non
autorisées peuvent provoquer un incendie, une décharge électrique
ou d'autres dangers.
Remarque de sécurité importante
Avant de connecter un nouveau composant tel que le RR2160MkII à votre système
audio ou home cinéma, il est toujours recommandé de vous assurer que tous les
composants sont éteints, et de préférence débranchés de leur source d'alimentation
CA. De nombreux produits électroniques modernes disposent de circuits de mise
sous tension automatiques qui peuvent être activés lors d'une installation, ce qui
peut endommager les composants électroniques et / ou les haut-parleurs. Ces
dommages ne sont pas couverts par les garanties des produits et Outlaw Audio
décline expressément toute responsabilité pour de tels dommages.
Précautions
Vérifier la tension de ligne
Votre nouveau RR2160MkII a été configuré en usine pour des lignes CA
120 V (+/- 3%). La connexion de l'appareil à une tension secteur autre que celle pour
laquelle il est prévu peut créer un risque de sécurité et d'incendie et peut
endommager le RR2160MkII. Si vous avez des questions sur la tension secteur dans
votre région, contactez Outlaw Audio avant de brancher l'appareil dans une prise
murale.
ATTENTION: RISQUE DE CHOC ELECTRIQUE
NE PAS OUVRIR
pas le couvercle. Aucune pièce réparable par l'utilisateur à l'intérieur.
Consulter un personnel qualifié
électrique, n'exposez pas cet appareil à la pluie ou à l'humidité.
FCC
Cet appareil est conforme à la partie 15 des règles de la FCC. Son fonctionnement
est soumis aux deux conditions suivantes: (1) cet appareil ne doit pas provoquer
(2) cet appareil doit accepter toute interférence reçue, y compris les interférences
pouvant entraîner un fonctionnement indésirable.
RR2160 MkII Owner’s Manual
Outlaw Audio RR2160 MkII Stereo RetroReceiver 4
NOTE: It is always a good idea to avoid using any audio or video
equipment on the same AC circuit as equipment with motors, such
as air conditioners or refrigerators. This will lessen the possibility of
power variation and electrical start-up noise affecting your sound
system.
Power Cord
The removable power cord that is shipped with the RR2160 MkII is
specifically designed to be used with this product. DO NOT use
any other power cord, as that may reduce the unit’s performance
and possibly create a safety hazard. In particular, DO NOT use
standard IEC type power cords designed for computers and other
business equipment products, as they have a three prong plug that
is not meant for use with the RR2160 MkII. Should the power cord
require replacement, use an identical type, or contact Outlaw
Audio for service.
Handle the AC Power Cord Gently
When disconnecting the power cord from an AC outlet, always pull
the plug, never pull the cord. If you do not intend to use the
RR2160 MkII for any considerable length of time, disconnect the plug
from the AC outlet. If the power cord is replaced, make certain that
it is of similar gauge. As with all electrical devices, do not run
power cords under rugs or carpets or place heavy objects on them.
Damaged power cords should be replaced immediately with cords
meeting factory specifications.
AC Fuse
The fuse is located inside the chassis and is not user-service-able.
If power does not come on, contact Outlaw Audio.
Wiring
Cables that are run inside of walls should have the appropriate
markings to indicate compliance with, and listing by the UL , CSA
or other standards required by the UL, CSA, NEC or your local
building code. Questions about cables inside of walls should be
referred to a qualified custom installer, or a licensed electrician or
low-voltage contractor.
Installation Location
To assure proper operation and to avoid the potential for safety
hazards, place the unit on a firm and level surface capable of
supporting it’s weight. When placing the unit on a shelf, be certain
that the shelf and any mounting hardware can support the weight
of the unit and any additional items in the equipment rack, or on
the shelf.
When positioning the RR2160 MkII in its final location, make certain
that it has adequate ventilation on all sides, as well as on the top
and bottom. In particular, it is a good idea to provide at least three
to six inches of room above the unit for air circulation. DO NOT
place CDs, DVDs, videotapes, owner’s manuals, or other paper on
top of, or beneath, the unit, or in-between multiple amplifiers in a
stack. This will block airflow, causing heat build-up, degraded
performance, and may create a possible fire hazard.
If the unit is to be enclosed in a cabinet or rack, make certain there
is adequate air circulation. Sufficient ventilation should be provided
so that hot air may exit, and cool air may enter the cabinet. In
some instances, a small cooling fan may be required to insure
adequate airflow through the cabinet. If you are in doubt as to the
ventilation requirements for your specific installation, please
contact us. Also, do not place the RR2160 MkII directly on a carpeted
surface, as this will inhibit airflow underneath as well as create a
potential fire hazard.
Avoid installation in humid locations, in extremely hot or cold
locations, or in areas that are exposed to direct sunlight or space
heating equipment.
Do Not Open the Cabinet
There are no user serviceable components inside this product.
Opening the cabinet may present a shock hazard, and any
modification to the product will void your guarantee. If water or any
metal object, such as a paper clip, coin or a staple, accidentally
falls inside the unit, disconnect it from the AC power source
immediately, and contact Outlaw Audio for further instructions.
Recording Copyright
Recording of copyrighted material for other than personal use is
illegal without permission of the copyright holder.
Note to CATV system installer
This reminder is provided to call the CATV system installer’s
attention to Article 820-40 of the NEC, ANSI/NFPA 70, which
provides guidelines for proper grounding and, in particular,
specifies that the cable ground shall be connected to the grounding
system of the building, as close to the point of cable entry as
practical.
FCC Information for User
CAUTION: ANY changes or modifications not expressly approved
by the party responsible for compliance could void the user’s
authority to operate the equipment.
NOTE: This equipment has been tested and found to comply with
the limits for a Class B digital device, pursuant to Part 15 of the
FCC Rules. These limits are designed to provide reasonable
protection against harmful interference in a residential installation.
This equipment generates, uses and can radiate radio frequency
energy and, if not installed and used in accordance with the
instructions, may cause harmful interference to radio
communications. However, there is no guarantee that interference
will not occur in a particular installation.
If this equipment does cause harmful interference to radio or
television reception, which can be determined by turning the
equipment off and on, the user is encouraged to try to correct the
interference by one or more of the following measures:
Reorient or relocate the receiving antenna.
Increase the separation between the equipment and receiver.
Connect the equipment into an outlet on a circuit different
from that to which the receiver is connected.
Outdoor Antenna Installation
Safe Antenna and cable Connection
If an outside antenna or cable system is connected to the
equipment, be sure the antenna or cable system is grounded so as
to provide some protection against built up static charges and
voltage surges. Section 810 of the National Electrical Code,
ANSI/NFPA 70 (in Canada, part 1 of the Canadian Electrical Code)
provides information with respect to proper grounding of the mast
and supporting structure, grounding of the lead-in wire to an
antenna discharge
unit, size of
grounding
conductors, location
of antenna discharge
unit, connection to
grounding electrodes
and requirements for
the grounding
electrode.
Keep Antenna Clear of High Voltage Power Lines or Circuits
An outside antenna system should be located well away from
power lines, electric light or power circuits and where it will never
come into contact with these power sources if it should happen to
fall. When installing an outside antenna, extreme care should be
taken to avoid touching power lines, circuits or other power
sources as this could be fatal. Because of the hazards involved,
antenna installation should be left to a professional.
Consult the dealer or an experienced radio/TV technician for help.
FCC Radiation Exposure Statement
This equipment complies with FCC radiation exposure limits set forth for
an uncontrolled environment. This equipment should be installed and
operated with a minimum distance of 20cm between the radiator and
your body
RR2160MkII Owner’s Manual
Outlaw Audio RR2160MkII Stereo RetroReceiver 5
Table of Contents
2
5
5
6
6
6
7
9
10
11
12
13
16
17
18
18
18
18
22
22
22
22
23
23
23
24
24
24
25
25
26
27
27
28
28
28
29
30
31
32
Please Read First
A Brief Note on This Manual
For Future Reference
Quick Guide to Features
Unpacking
Accessories
RR2160
MkII Front Panel
RR2160
MkII Rear Panel
Remote Control
Connecting Your RR2160
MkII
Connecting and Using Antennas
Connecting Source Components
Loudspeaker Connections
Subwoofer and Bass Management
External Amplifier Connections
12 Volt Trigger
IR Input and Output
USB Power Ports
AC Power Connection
Operation
Power
Listening to a Source
Using the Volume Control
Muting the Volume
Speaker A/B Selection
Speaker EQ
Adjusting Tone Controls
Balance Adjustment
Using Headphones
Recording
Setting Sleep Timer
Using the Tuner
Playing Audio Files from a USB Source
Using the Internet Radio
Playing Audio Files from your phone
RR2160
MkII Setup Menu
Care and Maintenance
Cleaning
When You’re Away
Troubleshooting
RR2160
MkII Specifications
Notes
Outlaw Audio Limited Warranty
Thank you for purchasing the Outlaw Audio
RR2160
MkII Stereo RetroReceiver. Like its original
predecessor, the RR2150, your new RetroReceiver
is a full-featured stereo receiver with exterior styling
inspired by art deco table radios of the past. This
handsome aluminum face has been paired with
modern circuitry, parts selection, assembly
techniques, and features to provide state-of-the-art
audio performance.
A Brief Note on This Manual
To get the maximum performance and enjoyment
from your RR2160
MkII, please take a few minutes to
read this manual. This advice may seem counter to
the Outlaw approach to audio, but the pages that
follow will help you get full benefit of the RR2160
MkII.
It contains everything you need to know to connect,
configure, and use your new receiver. You’ll learn
how to make your RR2160
MkII work with all of the other
components in your system, and how to adjust its
settings for the best possible performance.
If you have any questions about your RR2160
MkII, its
installation or operation, please contact us at:
support.outlawaudio.com
You may also find fellow Outlaws hanging out at the
Outlaw forum, the Saloon.
Stop in by clicking on “Customer Forum” near the top
of our home page at www.outlawaudio.com.
For Future Reference:
Serial Number:
_____________________________
Date of Purchase:
_____________________________
The contents of this manual are Copyright © 2020 by Outlaw
Audio, LLC, and may not be duplicated or reproduced by any
means, whether physical, electronic or otherwise without prior
written consent from Outlaw Audio.
Outlaw Audio and the Outlaw Audio logo are registered trademarks
of Outlaw Audio, LLC.
Specifications are those in effect at the time of printing. Outlaw
Audio reserves the right to change specifications or designs at any
time without notice without obligation to modify existing units.
RR2160MkII Owner’s Manual
Outlaw Audio RR2160MkII Stereo RetroReceiver 6
Quick Guide to the Features
We’ll explain the RR2160
MkII’s many features later in
this manual, but first we wanted to identify some of
the key features so you can watch for those you’re
most interested in.
•High Power Stereo Amplifier
2 x 110 watts continuous power, 20 Hz to 20 kHz
@ 8 ohms, <0.05% THD, both channels driven
•7 Analog Inputs
Connect all of your analog audio sources with
ease. Included are a rear panel Phono input
(moving coil or moving magnet), four rear analog
inputs, an external processor loop, and a front
panel 3.5mm auxiliary input for an MP3 player.
•1 Front and 2 Rear USB inputs
Connect a USB-enabled device, a USB storage
device, or a computer for playback of audio files or
to use the RR2160
MkII and an external sound card.
•Separate Signal Paths for Listening and
Recording
Listen to one source while recording another.
•Preamp Outputs and Main Amplifier Inputs
These enable easy system configuration with
additional power amplifiers, electronic crossovers,
equalizers, etc.
•A/B Speaker Selector Switch
•Front Panel Adjustable Speaker Equalization
This selector adds a half-octave of bass boost at
selected frequencies for better bass response with
compact bookshelf speakers.
•Front Panel Tone Control Defeat
•High-performance FM/FM Stereo Tuner with
HD Radio and 20 Presets.
•Audiophile-quality Preamplifier and Power
Amplifier Stages
Necessary for critical music listening.
•Headphone jack with level control.
•12 Volt Trigger
Use this output for control of external system
components (amplifier, video projector, etc.) so
they turn on and off in sync with your RR 2160.
•Infrared (IR) Input and Output
Use these to control your RR 2160 even when it is
hidden behind closed doors – not that you’d ever
want to do that!
•Precision Volume Control
•Removable IEC-style Power Cord
Unpacking
Your RR2160
MkII has traveled to you in packaging
designed to protect it from the hardships of shipping
that it inevitably must endure. We recommend you
retain these materials for use if you move or if the
unit ever needs to be shipped back to the Outlaws for
any reason.
You can minimize the size of the carton and
packaging for storage. Flatten the inner and outer
cartons by carefully opening the top and bottom flaps
and folding them flat. Do the same with all cardboard
inserts. For foam and other packaging that can’t be
folded, save it in the unit’s protective plastic bag.
The RR2160
MkII is not light, and the heavier internal
components are not evenly distributed. Lift with your
legs, not your back! Also be careful about knobs on
the front panel and connectors on the rear panel.
Accessories
Accompanying your RR2160
MkII are several
accessories. Please check to make sure the following
are included in the box:
•Remote control
•2 AAA batteries for the remote control
•AC power cord
•FM antenna
•(2) U-shaped jumpers
•Quick Start Guide
•Owner’s Manual
RR2160MkII Owner’s Manual
Outlaw Audio RR2160MkII Stereo RetroReceiver 7
RR2160
MkII Front Panel
F1 Tone Off (Defeat) Control(Page 23)
Press to take the tone controls out of the signal
path so that they have no effect regardless of
where they’re set. The button’s blue LED will light
when tone controls are inactive.
F2 Bass Control(Page 23)
Turn to change the amount of low frequency
information being sent to your speakers or
headphones. This control is inactive when the
Tone Off button (F1) is active.
NOTE: When using small speakers (those with
limited bass handling capability) be careful when
increasing bass content, particularly if any
Speaker EQ (F15) settings are active.
F3 Balance Control (Page 24)
Turn to adjust for left-right imbalances.
F4 Front Panel Display
This display shows the selected input or radio
station currently tuned, the current volume, and
menu items when operating or setting up your
RR2160
MkII.
F5 Treble Control (Page 23)
Turn to change the amount of high frequency
information being sent to your speakers or
headphones. This control is inactive when the
Tone Off button (F1) is active.
F6 Tuning Up (Menu Select) (Pages 25, 28)
F7 Tuning Down (Menu Select) (Pages 25, 28)
Press to tune to a broadcast frequency higher or
lower than the one currently selected. Also use
this button with the Menu and Enter buttons (F8
and F9) to navigate menus.
F8 Menu (Pages 27, 28)
Hold down this button (2-3 seconds) to access
and navigate the RR2160
MkII’s setup menu. Briefly
press this button to move back in menus or to
navigate available selections for Internet Radio.
F9 Enter (Pages 27, 28)
When navigating a menu(F8), this button will
access sub-menus or select highlighted options.
F10 On/Standby (Page 22)
When the RR2160
MkII is plugged in and the Master
Power switch (R11) is On, pressing the front
panel On/Standby button will toggle the unit from
standby condition (everything off except for the
IR sensor and associated circuitry) to fully
operational. When the unit is in standby mode,
the button’s blue LED will light.
F11 Headphone Jack (Page 24)
Connect a 1/4 inch phone plug (or an adaptor)
here for headphone listening.
F12 Headphone Level Control(Page 24)
Turn to control headphone volume.
F13 Aux Input Jack (Pages 12, 22)
Use this stereo 3.5mm jack to plug in any
portable audio device with a headphone or line-
level output.
F14 Speaker Selector (Page 23)
When two pairs of speakers are connected to the
RR2160
MkII, this will let you select which pair is
active.
F15 Speaker EQ (Page 23)
Press to cycle through the available Speaker EQ
settings.
STANDBY PHONES LEVEL AUX SPEAKER SPEAKER EQ EXTERNAL
LOOP
USB
TONE OFF BASS BALANCE TREBLE
SOURCE
RECORD
VOLUME
MENU
ENTER
RR2160
MUTE
Mk II
F1 F2 F3
F5
F4 F6 & F7
F19
F8 F9
F10 F11 F12 F13 F14 F15 F16 F17 F18 F20 F21
RR2160MkII Owner’s Manual
Outlaw Audio RR2160MkII Stereo RetroReceiver 8
F16 External Loop (Page 12)
Press to add a product connected to the rear
panel External Processor Loop connections
(R21) to the signal path. (Remember to turn that
external unit on!) The button’s blue LED will light
when you’ve chosen this optional signal path.
Note: When the signal is routed through the
External Processor Loop and there is no unit
connected to the jacks, no signal will appear at
either the loudspeaker or headphone outputs.
F17 USB Input(Pages 12, 22)
Connect the output of a compatible USB storage
device (32GB maximum) to this jack for playback
of audio files.
F18 Source Selector (Page 22)
Press to select the input source (FM, AM, analog
audio, digital audio, USB, phono) that you want
to listen to.
F19 Record (Pages 12, 24)
Press to cycle through the available inputs that
can be used as a recording source. The REC out
signal source is always active and is set by this
function button.
F20 Mute On/Off (Page 22)
Press to mute the speaker outputs. The button’s
blue LED will be on when Mute is engaged.
F21 Master Volume control(Page 22)
Turn to the right (clockwise) to increase volume
and to the left (counterclockwise) to decrease
levels.
RR2160
MkII Rear Panel
R2 Serial Number
Write this number in the space provided on page
4 for future reference.
R3 USB Input / Upgrade(Pages 12, 22, 28)
Connect the USB output of a compatible MP3
audio player, flash drive, or external hard drive
(32BGB/3.0 speed max) to this jack for playback
of audio files. This port is also used for software
upgrades, when available (see page 28).
R4 Ethernet (Page 12)
Connect the RR2160
MkII to a network for
Internet Radio and remote-app access.
R5 PC USB Input (Pages 12, 22)
Connect the RR2160
MkII to a computer
and select the PC USB input to allow the
RR2160
MkII to act as an external sound card.
R7 Coaxial / Optical Digital Inputs (Pages 12, 22)
Connect coaxial or optical digital output from any
audio source such as a CD player, DVD player,
or Blu-ray Disc player.
R1 WiFi Antenna(Page 12)
When hardwiring an Ethernet cable is not possible
this antenna is used to receive a WiFi signal.
R6 FM/HD Antenna (Page 11)
Connect the supplied FM antenna or an optional
external FM antenna to this connector.
R8 Accessory Power USB(Page 18).
Use these USB ports to provide 5V power to
accessories such as phones or tablets.
Do not connect a data source to these ports.
R9 Trigger Outputs (Page 18)
These 3.5mm mono mini-jacks provide a
continuous 12VDC signal that may be used to
control optional external amplifiers from Outlaw
and other brands, as well as other compatible
accessories.
R10 IR Input/Output (Page 18)
When your RR2160
MkII is hidden behind doors that
prevent the remote control from “seeing” the front
panel IR sensor, you may connect an optional,
external IR sensor to this 3.5mm mini-plug. To
send the IR signal to another product in a “daisy
change” configuration, connect the IR Out jack to
another product with a compatible IR system.
R11 Master Power Switch (Page 22)
When the power cord has been plugged into an
AC output, put this switch in the On position to
connect the receiver to AC. When this switch is
on, the front panel On/Standby pushbutton (F10)
is used to turn the receiver “on” or place it in the
“standby” mode.
R12 Right Speaker Binding Posts (Page 15)
Use these binding posts to connect your primary
(Speakers A) and secondary (Speakers B)
loudspeakers to the RR2160
MkII.
R13 Phono cartridge sensitivity selector switch
(Page 12)
This switch adjusts the phono pre-amp to work
with either moving magnet (MM) or moving coil
(MC) phono cartridges. Set it to correspond with
the type of cartridge you’re using.
R14 Phono inputs (Page 12)
Plug your turntable’s output cables into these
jacks.
Note: Do not connect with a phono pre-amp
output. A turntable with a pre-amp should be
connected to one of the Analog inputs.
R15 Ground connector (Page 12)
Connect the ground wire from your turntable to
this screw connector.
RR2160MkII Owner’s Manual
Outlaw Audio RR2160MkII Stereo RetroReceiver 9
R16 Analog 1 Inputs (Pages 12, 22)
R17 Analog 2 Inputs (Pages 12, 22)
R18 Analog 3 Inputs (Pages 12, 22)
R19 Analog 4 Inputs (Pages 12, 22)
Connect the line-level analog audio outputs of
sources such as a CD player, DVD/Blu-ray
Disc player, network media player, Bluetooth
or streaming adapter or dongle, satellite or
cable box to these jacks.
R20 Record Output jacks (Pages 12, 24)
Connect analog audio inputs from your
recording device or encoder for digital storage
to these jacks.
Note: These are fixed-level outputs and are not
affected by the RR2160
MkII’s volume control. If
you’re using a portable recording device
(MiniDisc recorder, etc.), you may use shielded
stereo “Y” cords (3.5 mm stereo miniplug to
two RCA-type jacks) to go from it to the
RR2160
MkII.
R21 External Processor Loop connections
(Page 12)
Connect an external processor (equalizer,
electronic crossover, surround processor, etc.)
to these jacks. These outputs are also fixed-
level. The Loopinput may also be used as an
additional analog input.
R22 Bass Management selector switch
(Page 16)
This switch lets you adjust the internal
crossover (bass management system) to route
user-selected low frequencies to the
subwoofer output (R25) while the rest of the
audio signal is sent to the amplifier and then to
the main loudspeakers.
R23 Preamplifier outputs (Page 17)
These outputs allow you to connect a high
output power amplifier if needed. Simply
remove the jumpers and connect the preamp
outputs to the inputs of the additional amplifier.
Note: Removing the jumpers means that the
RR2160
MkII’s internal amplifier does not receive a
signal and cannot send any output to the
speakers connected to it. Use shielded “Y”
cords to connect both the internal amplifier and
another amplifier to the receiver’s preamp
section.
R24 Main Amp inputs (Page 17)
These inputs are normally connected to the
preamplifier outputs by jumpers. (See R23
above.)
R25 Subwoofer outputs (Page 17)
Connect a powered subwoofer to either the
SUB1 or SUB2 output. Make sure you’ve set
the Bass Management selector switch (R22)
correctly. The output from this connector is
variable and controlled by the Master Volume
setting (F21).
R26 Left Speaker Binding Posts (Page 15)
Use these binding posts to connect your
primary (Speakers A) and secondary
(Speakers B) speakers to the RR2160
MkII.
R27 AC Socket (Page 18)
Connect the supplied AC power cord to this
socket before turning on the Master Power
Switch (R11).
+
-
+
-
+
-
+
-
ETHERNET
MAIN
IN
SUB1
MASTER POWER
ON OFF
OUTPHONO
PHONO
GROUND
MC MM
IN1 2 3 4
SUB2
PRE
OUT
REC
OUT
AUDIO IN
EXTERNAL
PROCESSOR
L
R
L
R
L
R
BASS
MANAGEMENT
ACCESSORY POWER
5V DC / 1.0A MAXCOAX 1PC-USB COAX 2
OPT 1 OPT 2 TRIGGER
OUT IR-IN
1 2
IR-OUT
USB PLAY/
UPGRADER
SERIAL NUMBER:
60 80 100 BP
RIGHT
SPEAKERS
A
B
A
B
LEFT
SPEAKERS
HD RADIO ANT.
RR2160 MkII
Outlaw Audio, LLC
Easton, MA USA
www.outlawaudio.com
Designed in the USA
Made in China
AC INPUT 120V~60Hz
POWER CONSUMPTION 400W
WiFi ANT.
R1 R2 R3
R4 R5 R6 R7 R8 R9 R10
R11
R12 R13 R14R16 - R19 R20 R21 R22 R23R25R26R27
R15 R24
RR2160 MkII Owner’s Manual
Outlaw Audio RR2160MkII Stereo RetroReceiver 10
Remote Control
C1 Power On (Page 22)
Press this button to turn on the RR2160 MkII.
C2 Power Off (Page 22)
Press this button to place the receiver in standby mode.
C3 Source/Input Selectors (Page 22)
Press the button corresponding to the name of the input
you wish to listen to. For the analog audio inputs (ANA),
coaxial digital audio inputs (COAX), optical digital inputs
(OPT), USB inputs (USB), and Internet Radio inputs (NET),
press the button multiple times to cycle through the input
choices.
C4 Numeric Keypad (0-9) (Page25)
Press these buttons to enter numbers for different
functions such as direct input of station frequencies and
direct access to preset stations for the tuner.
C5 Record (Pages 12, 24)
Press this button to cycle through the available analog
inputs that can be used as the recording source.
C6 Menu (Pages 27, 28)
Hold down this button to access the RR2160
MkII’s setup
menu, or press it briefly to navigate back when utilizing
Internet Radio or the setup menu.
C7 Cursor Control (Pages 25, 26, 28)
The Left and Right buttons provide balance control. The
Up and Down buttons provide the same function as the
Tuning Up/Down buttons (F6/F7 on the front panel)
when using the tuner or navigating USB or Internet
Radio.
C8 Treble control (Page 23)
This button and the Left/Right cursor buttons control the
treble setting, which is displayed on the front panel
display.
C9 Volume Up/Down (Page 22)
Press these buttons to raise or lower the volume.
C10 Speaker EQ (Page 23)
Press this button to cycle through the available Speaker
EQ settings.
C11 Tuner Mode (Page 25)
This button selects either the “FM Stereo” or “FM Mono”
tuner mode.
C12 Display (Page 28)
This button adjusts the brightness of the front panel
display.
C13 Direct (Page 25)
This button starts the process of selecting a broadcast
station directly. Within five seconds of pressing the
button, key in a broadcast frequency using the numeric
pad (C4).
C14 Sleep (Page 25)
Press this button to activate the sleep function, which
turns the RR2160
MkII off after a user-selectable amount
of time.
ON
OPTANA
1 2 3
4 5 6
8
0
REC
Vol +
P
P
T
T.Scan-
SPK
EQ
Disp
Mem
SLEEP
T.Mode
Direct
ENTER
SPK
A/B
9
USB AUX
OFF
PHONO
Mute
Menu
Treble Bass
Exit
_
C1
C2
C3
C4
C5
C6
C7
C8
C9
C11
C13
C14
C10
C12
C15
C16
C17
C18
C19
C20
C21
C22
COAX
NET LOOP TNR
7
Vol
.Scan+
.Scan+
.Scan-