Overmax multipic 3.1 User manual


English
Warning:
Before using this projector, please read the manual carefully. Any wrong
operation may cause electric shock or fire. Please comply with the following
instructions when using and/or repairing the projector.
1. Clean
When clean this projector, please unplug the power cable and use the wet cloth
not the cleanser.
2. Accessories
Please use the recommended accessories or the projector maybe damaged.
3. Using environment
Do not place the projector on any wet environments.
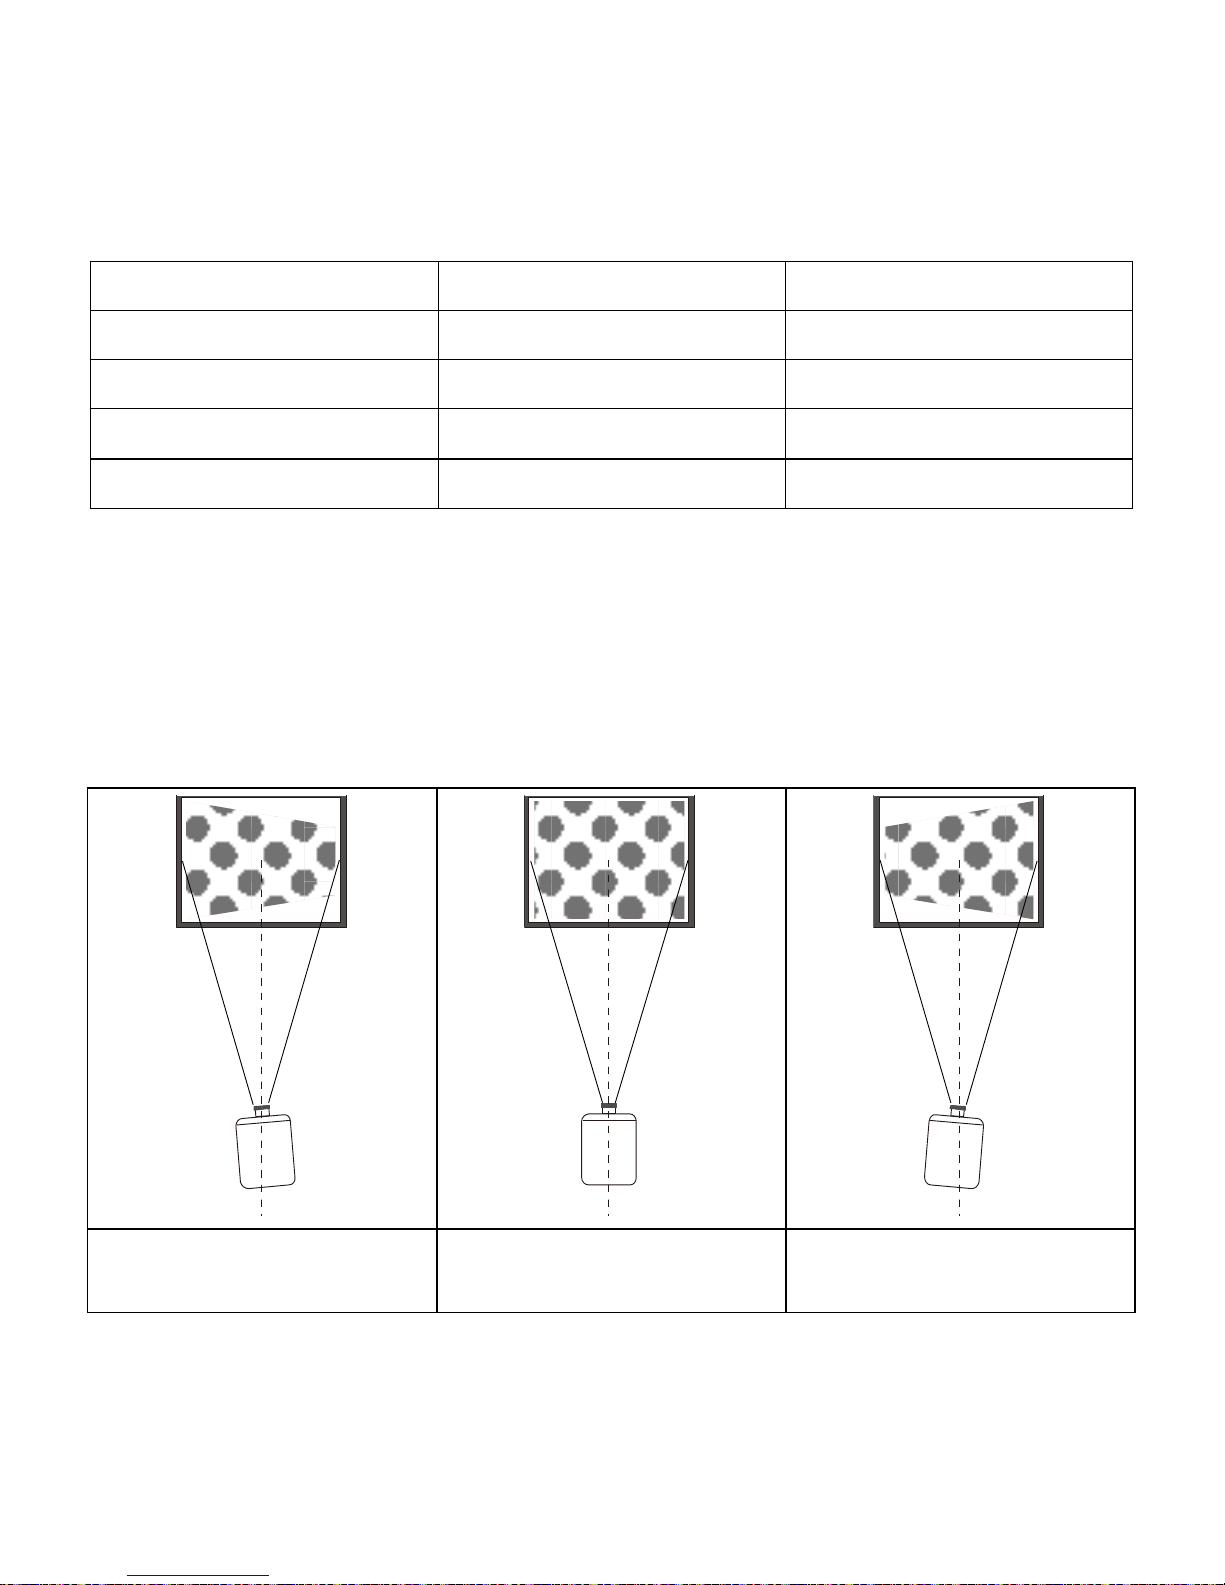
4. Installation
Please place this projector on a stable surface
5. Ventilation
For best performance, please clean the filter once a month.
6. Power
Before plug in the power, please make sure the voltage of your area matches
this projector (220V or 110V).
7. Ground wire
The three pin plug is the ground wire of this projector.
8.Protect the power cable
Make sure the power cable is in perfect working condition before using it.
9.
Thunder
When there is thunder or not using
the projector for a long period of time , unplug the power cable.
10.
Repair
Due to high voltage, do not open or try to repair the projector by yourself.
Refer to a professional technician if repair is needed.
11. Heat
Make sure not to put this projector near any heating devices. That may
shorten the life span of the projector.

English
About the installation
In order to improve this projector's life span, do not place it on a wet surface.
Do not put the projector under the direct sun light.
Projector working temperature: 0°C - +50 °C
Projector store temperature :-20°C - +50 °C
Do not block the ventilation-window of the projector. If the projector
interior temperature is too hot, it will be automatically shut down. This will
protect the projector. To prevent over heating the projector, please clean
the filter once a month.
About turn on/off the projector
To turn on the projector, connect the power cable, then press the "power" key
on the panel. It will take couple of minutes before the lamp works normally.
To turn off the projector, press the "power" key again. The lamp will shut
off while the fan will still working for a little longer. The projector will shut off
automatic--ally when the fan stops. DO NOT unplug the power cable before
turn off the projector.
Warning:
The fan is to keep the projector's temperature low. It will turn on when projector
is turned on. The speed of the fan is according to the heat of the projector. Do
not unplug the power cable when the projector is not turned off and the fan
is still working. If the fan stops working, the projector may be damaged due to
overheat.
Troubleshooting
Problem
The possible causes
When turn on the
power, the indicator light
does not work
•
power cable did not connect well.
•
the power switch fuse is broken
The remote control
cannot turn on the
projector.
•
the power switch is turned off
•
the remote control has no batteries or
the batteries are low
•
the remote control does not aim at the
IR
point
No Image
•the choice of the input source may not be
correct
•no input signal
•the input cable is not connected
•if under PC mode, the PC output frequency is
not 50-60Hz. Make sure that the PC output is
connected with the projector.
Auto-off after use some
times
•
the projector ventilation is blocked
•
the voltage is not stable
•
the projector is overheated, check if the fan
is broken

English
Machine instruction
1.
Focus lens
2.
IR receiver
3.
Level-stand adjustment
4.
Cool winds input ventilation
5.
Input terminals
6.
Power switch
7.
Keystone
8.
Hot winds output ventilation
9.
Speaker
10.
Level-stand adjustment
11.
Projector mount hole
12.
Label
13.
Cool winds input ventilation

English
Interface
Name
Instruction
Y/ Pb / Pr
Component video input
Video
AV input
L-Out , R-Out
Audio output
L-In , R-In
Audio input
VGA IN
VGA input
TV
N/A
HDMI 1/2
HDMI
Signal input
USB
1/2
Connect USB flash drive
Caution
Please connect the input signal cable well , then turn on the projector
Otherwise, it is easy to damage the projector.

English
Installation method
Contact a professional installer to mount this projector to a ceiling. Follow the
instructions below for the correct projector positions:
Warning
1. This projector maybe damaged beyond repair if it is
incorrectly mounted on a ceiling or on a surface.
2. This projector can be only used in an environment with the
temperature that's not exceeding the range of 0-35°C. If the
temperature is outside the normal range, it may cause the
projector malfunction.
3. It may cause malfunction if the projector is placed in a dusty,
wet, moist or smoke environment.
4. Take care of the ventilation. Otherwise, the projector maybe
damaged or cause life threatening situation due to overheat.

English
Standard setting
Please refer to the following table to adjust your picture size and distance (from the
lens to screen )
Distance 4:3 16:9
50" 1.85m 2.00m
70" 2.55m 2.75m
100" 3.50m 3.85m
120" 4.18m 4.58m
Please allow +- 3% to the image sizes of the above table.
If the distance is less than 2 meters and more than 5 meters, the image could
be blurry.
Please check the following picture to show the trapezoid adjustment
Incorrect installation Correct installation Incorrect installation

English
Focus adjustment
1.Turn the lens clockwise to the projector then turn it counter clockwise slowly
. At the same time, check the resolution point carefully. When image is clear
(as the middle area of the image), it will be the best position of the lens.
NOTE:
When you replace the projector from a cold to a warm environment
water vapor might occur. Don't turn the projector on when this occurs but wait
until the vapor has disappeared.
KEYSTONE
If a projected picture has keystone distortion , correct image with keystone
adjustment. The image becomes trapezoid shape when the screen or
projector is not leveled. Please reposition the projector to improve its angle
to the screen . However , the circumference of the image may not be
focused.

English
Panel keyboard sketch map
1. Power key
It turns on or off the projector. The
function is the same as the "power" on
the remote control.
2. Sources
It chooses the input signal (such as:
AV, YPBPR, HDMI 1/2, USB1/2 or
PC)
3. Menu
4. Indicator light
Red color: standby
Green color: working
5. Direction operation Key
It adjusts the menu by Up/Down,
Left/Right.

English
Remote Control
Turn on/off
Up
MUTE
Down
info Display information
Left
Pic. Picture mode
Right
Audio Audio mode Prey
ZOOM Image change larger
or smaller Next track
Rep.
Repeat function
(when using USB
multimedia play) Fast backward
AB AB cycle (when using
USB multimedia play) Fast forward
Aud.T Audio tracks (when
using USB multimedia
play) Play/Pause
Subt. Subtitle (when using
USB multimedia play) Stop
Goto Go to a certain time to
play (when using USB
multimedia play) OK Confirm
USB Enter the USB mode
directly Vol+/- Volume to add and
subtract
S Source CH+/- Channel to add and
subtract
R 16:9/4:3 Aspect
ratio Flip Image 360 degree flip
M Menu FRZ Image freeze
Exit exit 1,2,3...9 Chose TV channel

English
Menu settings
1. Menu settings method
1) During operating the projector, press
"Menu" key, the projector show the
windows as picture(1).
2) Press "4/ W' key, enter the Sub menu
picture > sound > time > option in turn
3) After confirm the submenu, use "A / V"
to select your inquired submenu.
4) Use "OK" and " / " to adjust the
parameters.
5) After finishing all settings, press "menu"
again, exit the settings.
6) Repeat steps 2) - 5), set up all
parameters.
2. Parameters of menu setting.
a) press "menu" key , when it show.
b) press key. The selection will
be highlighted yellow.
c)
press "OK" key, use A/ ► key, to
adjust parameters. D)press "menu"
key again, exit the window.

English
3. Picture menu
User mode of picture
Contrast
0-100
Adjust the dark and brightness area difference
Brightness
0-100
Adjust the full picture brightness
Color
0-100
Adjust the picture color
Sharpness
0-100
Adjust the picture sharpness
4. Sound menu
5. Time menu
Picture menu
Picture mode
Standard / Soft
User / Dynamic
Color temperature
Standard / warm / cool
Aspect ratio
4:3 or 16:9 /zoom1 / zoom2
Noise reduction
Off / low / middle / high
Flip horizon
On / off
Flip vertical
On / off
Sound mode
Sound mode
Music / Movie / Sport /
User / Standard
Balance
-50 to 50
Auto volume
On / Off
Surround
sound
On / Off
EQ
(120/500/1.5K/5K/10K)Hz 50
Time menu
Clock----
Date--/month--/year--/hour--
/min--
Off time
Off/one time/everyday /
Monday – Friday
On time
Off/one time/everyday /
Monday - Friday
Sleep timer
Off/10mins / 20mins /30mins /
60mins / 90mins

English
6. Settings
7. Multimedia menu
CAUTIONS:
1. The USB interface support USB 1.1USB2.0, including hard drive and fresh
drives
2. The max. Storage supported is 400GB
3. The system format supported:FAT16, FAT32. NTFS
4. The USB interface can support most drives but is not universal, any unknown
device problem is caused by the device drive
5. The total voltage of the connected devices shall not be over 1200mAh, the
problems caused by the wrong operation will not be warranted
Menu setting
OSD language
English, Germany...
Restore
factory default
Yes / no
Blending
Off/lower/middle/high
OSD
duration
OFF/5seconds/l0
seconds/15seconds
Software
update(USB)
Software update
Mul
timedia
Menu
Picture
View the photos in gallery
Music
Play an album
Movie
Watch a movie
TXT
Read the book

Polski
Uwaga:
Przed rozpoczęciem korzystania z projektora należy przeczytać, a następnie
postępować zgodnie z zaleceniami zawartymi w niniejszej instrukcji obsługi.
Niepoprawna obsługa urządzenia może doprowadzić do porażenia prądem oraz
zwiększyć ryzyko pożaru. Podczas używania oraz konserwacji projektora należy
stosować się do poniższych instrukcji.
1. Czyszczenie
Przed rozpoczęciem czyszczenia projektora należy odłączyć przewód zasilający.
W celu usunięcia kurzu lub zabrudzeń należy użyć wilgotnej szmatki bez środka
czyszczącego.
2. Akcesoria
Należy używać tylko zalecanych akcesoriów. W przeciwnym razie projektor może
ulec uszkodzeniu.
3. Środowisko pracy
Nie należy umieszczać projektora w miejscach, gdzie byłby on narażony na
działanie wilgoci.
4. Instalacja
Projektor należy umieścić na stabilnej powierzchni.
5. Wentylacja
Aby uzyskać najlepszą wydajność projektora, należy raz w miesiącu wyczyścić filtr.
6. Zasilanie
Przed podłączeniem zasilania należy upewnić się, że napięcie w sieci jest zgodne
z napięciem znamionowym projektora (220V lub 110V).
7. Uziemienie
Przewód zasilania projektora posiada trójwtykową wtyczkę z uziemieniem.
8.
Należy chronić przewód zasilania.
Przed rozpoczęciem korzystania z urządzenia należy upewnić się, że przewód
zasilania jest w idealnym stanie technicznym.
9.
Burza
Podczas burzy oraz gdy wiemy, że projektor nie będzie używany przez dłuższy
okres czasu, należy odłączyć przewód zasilający od źródła zasilania.
10. Naprawa
Ze względu na wysokie napięcia elektryczne w podzespołach urządzenia, nie
należy samodzielnie otwierać obudowy projektora, ani wykonywać jego napraw.
W przypadku konieczności naprawy, należy zlecić jej przeprowadzenie w
wyspecjalizowanym serwisie.
11. Źródła ciepła
Nie należy umieszczać projektora w pobliżu jakichkolwiek urządzeń grzewczych.
W przeciwnym razie może to skrócić jego żywotność.

Polski
Instalacja projektora
Aby móc przez długi czas cieszyć się wysoką jakością funkcji projektora, nie należy
umieszczać go na mokrych powierzchniach, ani w miejscach, gdzie byłby on
narażony na bezpośrednie oddziaływanie promieni słonecznych.
Temperatura środowiska pracy projektora 0°C - +50 °C
Temperatura miejsca przechowywania projektora -20°C - +50 °C
Nie należy zasłaniać otworów wentylacyjnych projektora. Jeśli temperatura we
wnętrzu projektora jest zbyt wysoka, zostanie on automatycznie wyłączony. Ma to
na celu ochronę urządzenia. Aby uniknąć nadmiernego nagrzewania projektora,
należy raz w miesiącu czyścić jego filtr.
Włączanie i wyłączanie projektora
Aby włączyć projektor, podłącz przewód zasilający, a następnie naciśnij przycisk
zasilania ("Power") na panelu sterowania. Po włączeniu, lampa projektora
rozgrzewa się przez kilka minut. Po ich upływie pracuje już z maksymalną
wydajnością.
Aby wyłączyć projektor, ponownie naciśnij przycisk "Power". Lampa zgaśnie,
natomiast wentylator będzie pracował jeszcze przez kilka chwil. Gdy wentylator
zatrzyma się, nastąpi automatyczne wyłączenie projektora. Zanim to nastąpi, nie
należy odłączać przewodu zasilającego od gniazda zasilania.
Uwaga:
Funkcją wentylatora jest utrzymanie niskiej temperatury urządzenia. Pracuje on
wówczas, gdy włączony jest projektor, a jego prędkość jest zależna od temperatury
wewnątrz urządzenia. Dopóki projektor jest włączony i wentylator nadal pracuje,
nie należy odłączać przewodu zasilającego. Jeśli wentylator przestanie działać,
projektor może zostać uszkodzony z powodu przegrzania.

Polski
Rozwiązywanie problemów
Problem
Możliwe przyczyny
Po podłączeniu
urządzenia do
zasilania dioda
zasilania nie świeci
•Przewód nie jest podłączony prawidłowo.
•Bezpiecznik włącznika jest przepalony.
Nie można włączyć
projektora za pomocą
pilota
•Przycisk włącznika jest w trybie OFF
(wyłączony).
•W pilocie nie ma baterii lub są
one wyczerpane.
•Pilot nie jest skierowany w stronę sensora
podczerwieni.
Brak obrazu
•Wybrane źródło sygnału jest
nieprawidłowe.
•Brak sygnału wejściowego
•Kabel wejściowy nie jest podłączony
•W przypadku trybu PC - częstotliwość
wyjściowa jest inna niż 50-60Hz. Upewnij
się, że wyjście komputera jest połączone z
projektorem.
Projektor wyłącza się
automatycznie
•Otwory wentylacyjne projektora są
zasłonięte.
•Napięcie nie jest stabilne.
•Temperatura projektora jest zbyt wysoka.
Upewnij się, że wentylator nie jest
uszkodzony.

Polski
Schemat i opis produktu
1.
Obiektyw z funkcją manualnego
dostosowania ostrości
2.
Sensor podczerwieni
3.
Regulacja poziomu podstawy
4.
Otwory wlotowe wentylacji
5.
Porty wejściowe
6.
Włącznik
7.
Pokrętło korekcji Keystone
8.
Otwory wylotowe wentylacji
9.
Głośnik
10.
Regulacja poziomu podstawy
11.
Otwór do montażu projektora
12.
Informacje o produkcie
13.
Otwory wlotowe wentylacji

Polski
Interfejs
Nazwa
Opis
Y/ Pb / Pr
Port wejściowy wideo
Wideo
Wejście AV
L-Out , R-Out
Wyjścia dźwiękowe
L-In , R-In
Wejścia dźwiękowe
VGA IN
Wejście VGA
TV
Niedostępne
HDMI 1/2
Wejście sygnału HDMI
USB 1/2
Port USB
Uwaga Należy zwrócić uwagę na poprawne podłączenie przewodu sygnału
wejściowego (przed włączeniem projektora) tak, aby nie uszkodzić portów oraz
całego urządzenia.

Polski
Sposoby instalacji
Montaż projektora do sufitu należy zlecić wykwalifikowanemu serwisowi
instalacyjnemu. Aby skorygować ustawienie projektora, postępuj zgodnie z
poniższymi instrukcjami:
Legenda:
Projector – projektor
Screen – powierzchnia projekcyjna
Front projection – projekcja przednia
Rear projection – projekcja tylna
Table mount – montaż na stole
Ceiling mount – mocowanie do sufitu
Uwaga
1. Nieprawidłowy montaż projektora może spowodować jego trwałe uszkodzenie.
2. Projektor może być używany wyłącznie w miejscach o temperaturze
niewykraczającej poza zakres 0-35°C. Korzystanie z projektora w środowisku o
niższych lub wyższych temperaturach może doprowadzić do jego uszkodzenia.
3. Nie należy umieszczać projektora w miejscach, gdzie mógłby być on zalany lub
narażony na działanie kurzu, dymu lub wilgoci.
4. Należy zapewnić odpowiednią wentylację projektora. W przeciwnym razie
może to doprowadzić do jego przegrzania, a w efekcie, do skrócenia okresu jego
użytkowania.

Polski
Standardy montażu
Dane odnośnie relacji odległości (obiektywu od tablicy lub ściany, na której
wyświetlany jest obraz) do rozmiaru obrazu przedstawione są w poniższej tabeli.
Odległość
4:3
16:9
50"
1.85m
2.00m
70"
2.55m
2.75m
100"
3.50m
3.85m
120"
4.18m
4.58m
Podane powyżej parametry mogą różnić się od wartości rzeczywistych o +-3%.
Jeśli odległość jest mniejsza niż 2 metry lub większa niż 5 metrów, wyświetlany
obraz może być rozmazany.
Poniższy obrazek przedstawia porównanie prawidłowej oraz nieprawidłowej pozycji
projektora.
Ustawienie
nieprawidłowe Prawidłowa pozycja
Ustawienie
nieprawidłowe
Table of contents
Languages:
Other Overmax Projector manuals

Overmax
Overmax Multipic 4.2 User manual

Overmax
Overmax Multipic 2.4 User manual

Overmax
Overmax Multipic 2.4 User manual

Overmax
Overmax Multipic 3.6 User manual

Overmax
Overmax Multipic 5.1 User manual

Overmax
Overmax Multipic 4.1 User manual

Overmax
Overmax Multipic 2.5 User manual

Overmax
Overmax MULTIPIC 2.1 User manual

Overmax
Overmax Multipic 3.5 User manual