Ovili O-501 User manual

Manual plastic bending machine
O-501 / O-801 / O-1301 / O-2001 / O-1302 / O-2002 / O-1304 / O-2004
WARNING: do not place on machine unattended objects
WARNING: No contact with flammable products
WARNING make sure you have adequate ventilation when working with gasifying materials.
Use heat resistant gloves Use safety goggles
CAUTION: Do not operate without proper electrical ground
DANGER: To prevent the risk of severe or fatal electrical shock, special precautions must be taken.
Equipment should be plugged into an approved Ground Fault Circuit Interrupt (GFCI) receptacle.
Intended for indoor use only
Do not alter the construction or design. Do not remove safety labels or devices.
For keeping warranty always use machine according to usage and always use original parts for service.
Do not exceed equipment's maximum rated flow capacity and/or operating pressure.
Do not use equipment for other than its intended purpose, as described in the equipment manual.
Equipment should be protected from the elements and from temperatures below freezing.
On equipment with blowers keep inlet and outlet vents, clean and clear of objects.
CAUTION: Machine can be used only in dry places
Do not operate equipment if the power cord and/or plug are damaged, or if any other damage to the unit is visible or suspected.
Machine must not be disposed of in the trash.
Please use instructions for machine´s installation.
If a defect is detected, do not use the machine and contact the producer.
Make sure you have adequate ventilation when working with gasifying materials.
All occupants and personnel should be alerted to the potential hazards indicated by the product safety labelling on this unit.
The following conventions are used to indicate and classify precautions and on product safety labelling. Failure to observe
precautions could result in injury to people or damage to property.
WARNING: Never touch heating lines risk of burns.
WARNING: Always disconnect power, to the equipment and unplug, before performing any service or maintenance,
is detected, do not use the machine and contact the producer.

MACHINE O-501, O-801, O-1301, O-2001
AABBCCDDEE
A - ELEMENT HEIGHT ADJUSTMENT OF HEATING WIRE
B - END STOP
C - HEATING WIRE
D - CONTROL PANEL
E - ELEMENT FOR CHANGING AND ADJUSTMENT HEATING WIRE
CONTROL PANEL OF MACHINE O-501, O-801, O-1301, O-2001
A ON/OFF POWER BUTTONA
B TEMPERATURE SETTINGSB
C WORKING TIME SETTINGSC
D START BUTTOND

MACHINE O-1302, O-2002
BBCC
EE
GGHH
AADDFF
A - ELEMENT HEIGHT ADJUSTMENT OF BOTTOM HEATING WIRE
B - ELEMENT HEIGHT ADJUSTMENT OF TOP HEATING WIRE
C - END STOP
D - BOTTOM WIRE TEMPERATURE SETTING SHEATING WIRE
E - TOP ARM WITH HEATING ELEMENT
F - TOP HEATING WIRE
G - ELEMENT FOR CHANGING AND ADJUSTMENT HEATING WIRE
H - CONTROL PANEL
CONTROL PANEL OF
WIRE TEMPERATURE SETTINGS
D - WORKING TIME SETTINGS
E - START BUTTON
MACHINE O-1302, O-2002
A - ON/OFF POWER BUTTON
B - TOP WIRE TEMPERATURE SETTINGS
C - BOTTOM
AA
BB
CC
EE
DD

MACHINE O-1304. O-2004
CCFF
AA
CC
DDBBEEGG
A - WORKING TABLES
B - POWER SWITCH
C - POWER CORD CONNECTOR
D - WORKING TABLE POSITION REGULATION SCREW
E - FUSE FOR EACH HEATING LINE (4 PCS)
F - ELEMENT HEIGHT ADJUSTMENT OF EACH HEATING WIRE
G - GENERAL FUSE
H - END STOP
CONTROL PANEL OF
WORKING TIME SETTINGS
START BUTTON
MACHINE O-1304, O-2004
A - EACH WIRE TEMPERATURE SETTINGS
B -
C -
HH
BBAA

----- -
--
-
--
-
----
--
-
---
--
PICTURE 1. PICTURE 2.
Bending process
Materials such as PVC, PETG, polystyrene, etc., can be deformed after heating.
You can heat precisely these plastics and make them deformable.
1. Place a flat board of plastic on the heating line area.
2. Switch "on" the machine.
3.
:
4. Set up time of heating (all kind of thermoplastics have a specific heating time)
by the time setting knob.
5. Set up temperature of the wire by temperature knob
(In case of machines O-1302, O-2002 you can set up as well temperature of the top line of heating,
in case of machines O-1304,O-2004 you can set ups individually temperature on all 4 heatings wires).
6. Press button "Start" to indicate the heating process,
7.
-
:
The distance between the heating wire and the work piece to be bent should be at least
equal to the thickness of the work piece. For example material 1 mm, minimum distance: 1 mm
After a few seconds, it will sound a notice indicating the end.
8. bend the material manually, to reach right angle, please use O 1300K angle stop attachment.
The bend radius will be larger if the heating line is farther
from work piece (moving down the heating line). Picture 1.
The bend radius will be smaller if the heating line is closer
to the work piece. Picture 2.
To setu up level of heating wire, use knob A.
Setting the radius of curvature
Bending process
AA

Suggestion
Please register the exposure temperature and the distance of the heating line when
you have an optimum result. In this way, you can repeat the same guidelines for future
work with the same material.
Maintenance
Occasionally remove dirt on the reflector below the heating wire. Heating line should not touch
at any time the walls of the reflector.
If necessary, stretch the heating wire. First, unplug the machine. Subsequently, loosen the hex
screw on one side with an Allen wrench, tighten and retighten.
It could be possible that you have to cut a little heating wire.
Use only original heating wire Ovili., by contacting your provider.
Reparing
Repairs permitted only by a qualified electrician. During guaranty only by Ovili service.
Before opening the control box, please unplug the machine.
Stretching or changing heating lines
Moving heating lines (4 line unit)
In order to move work place and lines on these units, please use an Allen key.
Untight a little bit the screws under the heating lines (from both parts), move whole
line simultaneously, and adjust exact place. When it is on the place, tight the screws up again.
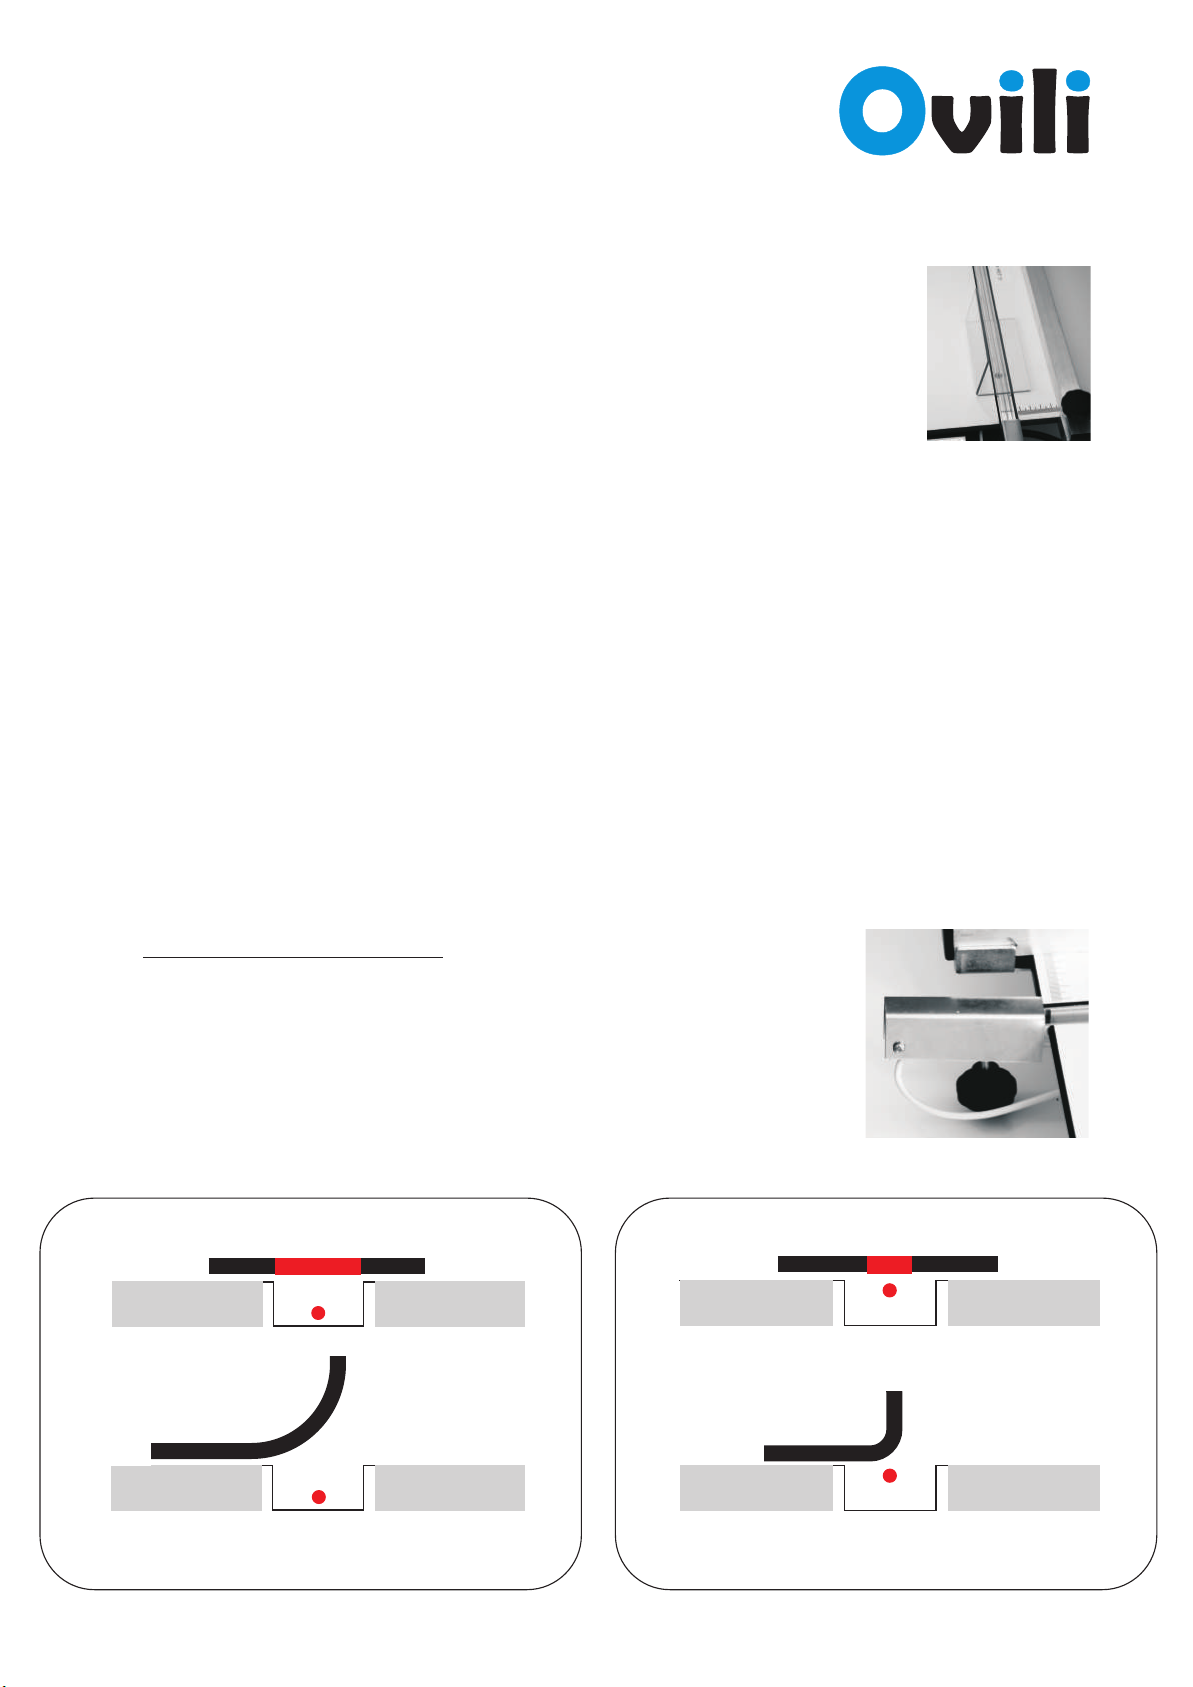
If necessary, stretch the heating wire to achieve
a regular heating points all over the machine.
First, unplug the machine. Subsequently, loosen
the hex screw on one side with an Allen wrench,
tighten and retighten. It could be possible that you
have to cut a little heating wire.
If you need to change heating line, please loosen
the screws and remove heating line from holder.
Introduce a new heating line in one of the holders
and screw it. Then, straight the line and make
same process in the second holder. The line should
be completely straight before to use the unit.

Technical information
O-501 O-801
working area length 19 1/2" | 50cm 31 1/2" | 80 cm
working area width 2 x 9 1/4" | 2 x 23.5 cm 2 x 9 3/4" | 2 x 25 cm
machine size 26 1/4" x 19" x 2 2/5" | 67x48.5x6cm 37 1/2" x 20 1/4" x 2 2/5" | 95x51.5x6cm
weight 12.13 lbs | 5.5kg 18.74 lbs | 8.5kg
power consumption 150W 250W
fuse 3.15A | 1.6A 4A | 2.5A
packaging size 27 1/4" x 20 1/2" x 4 1/4" | 69x52x11cm 38 1/2" x 22" x 4 1/4" | 98x56x11cm
weight with packaging 20.15 lbs | 9.15kg 30.85 lbs | 14kg
O-1301 O-1302
working area length 51 1/4" | 130 cm 51 1/4" | 130 cm
working area width 2 x 11 3/4" | 2 x 30 cm 2 x 11 3/4" | 2 x 30 cm
machine size 56" x 24 1/4" x 2 1/2" | 147x61.5x6.5cm 58" x 28" x 4 1/4" | 147x71x11cm
weight 43 lbs | 19.5kg 60.85 lbs | 27.6kg
power consumption 350W 700W
fuse 6.3A | 3.15A 10A | 6.3A
packaging size 58 1/4" x 55 1/2" x 4 1/4" | 148x65x11cm 59" x 29" x 6 1/4" | 150x74x16cm
weight with packaging 65 lbs | 29.5kg 69.45 lbs | 31.5kg
O-2002 O-1304
working area length 78 3/4" | 200 cm 51 1/4" | 130 cm
working area width 2 x 15 3/4 | 2 x 400 39 1/4" | 100 cm
machine size 84 1/2" x 35 1/2" x 3 3/4" | 215x90x9.5cm 58" x 39 1/2" 37 1/2" | 147x100x95cm
weight 127.85 lbs | 58kg 121.25 lbs | 55kg
power consumption 1000W 1400W
fuse 16A | 8A 4x6.3A + 0.5A | 4x3.15A + 0.5A
packaging size 86 1/2" x 37 1/2" x 8" | 220x95x20cm 59" x 41 1/4" x 13" | 150x105x33cm
weight with packaging 198.42 lbs | 90kg 163.15 lbs | 74kg
O-2004 O-1300K
working area length 78 3/4" | 200 cm 51 1/4" | 130 cm
working area width 39 1/4" | 100 cm 19 1/2" + 11 3/4" | 50cm + 30 cm
machine size 84 1/2" x 39 1/2" x 37 1/2" | 215x100x95cm 54 1/4" x 31 1/2" x 15" | 138x80x38cm
weight 209.45 lbs | 95kg 34.15 lbs | 15.5kg
power consumption 2000W X
fuse 4x8A + 0.5A | 4x4A + 0.5A X
packaging size 88 1/2" x 41 1/4" x 13 3/4" | 225x105x35cm 58 1/4" x 55 1/2" x 4 1/4" | 148x65x11cm
weight with packaging 330.70 lbs | 150kg 41.88 lbs | 19kg
This manual suits for next models
7
Table of contents
Popular Cutter manuals by other brands

AE
AE LC100 operating manual

Mejix
Mejix DC 580 Original manual translation

Ripley
Ripley Cablematic QCST Series manual

Scheppach
Scheppach FS4700BE Translation from the original manual

Current Tools
Current Tools Omni 747 Operating, Maintenance, Safety and Parts Manual

Bush Hog
Bush Hog TOUGH RZ60R Specification sheet