manuals.online logo
Brands
  1. Home
  2. •
  3. Brands
  4. •
  5. Ovislink
  6. •
  7. Switch
  8. •
  9. Ovislink AirLive POE-FSH804AT User manual

Ovislink AirLive POE-FSH804AT User manual

AirLive POE-FSH804AT
8-Port 802.3at/802.3af Fast Ethernet Switch with 4 PoE Ports
Quick Setup Guide
Declaration of Conformity
We, Manufacturer/Importer
Declare that the product
8-Port 802.3at/802.3af Fast Ethernet Switch with 4 PoE Ports
AirLive POE-FSH804AT
is in conformity with
In accordance with 2004/108/EC Directive and 1999/5 EC-R & TTE Directive
Clause
Manufacturer/Importer
Description
OvisLink Corp.
5F, No.6, Lane 130, Min-Chuan Rd., Hsin-Tien Dist.,
New Taipei City 231, Taiwan
■
■
CE marking
Signature:
Name:Albert Yeh
Position/ Title : Vice President
Place : Taiwan Date:2012/10/30
EN 55022:2010 Limits and methods of measurement of radio disturbance characteristics of
information technology equipment
■EN 55024:2010 Information Technology equipment-Immunity characteristics-Limits and
Methods of measurement
■EN 61000-3-2:2006 +A1:2009+A2:2009 Disturbances in supply systems caused by household appliances
and similar electrical equipment "Harmonics"
■
■
EN 61000-3-3:2008 Disturbances in supply systems caused by household appliances
and similar electrical equipment "Voltage fluctuations"
EN 60950-1:2006+A11:
2009+A1:2010+A12:2011
Safety for information technology equipment including electrical business
equipment
Regulatory Approvals
FCC Statement
This equipment has been tested and found to comply with the limits for a Class A
digital device pursuant to Part 15 of the FCC Rules. These limits are designed to
provide reasonable protection against harmful interferences when the equipment is
operating in a commercial area. This equipment generates, uses and may radiate radio
frequency energy, and if not installed in accordance with the user guide, may cause
interference in the transmission of radio communications. If operating in a residential
area, it is probable this equipment will cause harmful interference, in which case the
user will be required to try to correct this interference using his own means.
CE Marking Warning
This is a Class A product. In a domestic environment this product may cause radio
interference in which case the user may be required to take adequate measures.
CE Statement
This product complies with the 99/5/EEC directives, including the following safety and
EMC standards:
EN 55022:2010
■
Limits and methods of measurement of radio disturbance characteristics of information technology
equipment
EN 55024:2010
■
Information Technology equipment-Immunity characteristics-Limits and Methods of measurement
EN 61000-3-2:2006 +A1:2009+A2:2009
■
Disturbances in supply systems caused by household appliances and similar electrical equipment
"Harmonics"
EN 61000-3-3:2008
■
Disturbances in supply systems caused by household appliances and similar electrical equipment
"Voltage fluctuations"
EN 60950-1:2006+A11: 2009+A1:2010+A12:2011
■
Safety for information technology equipment including electrical business equipment
HR
OvisLink Corp. izjavljuje da je ovaj uređaj u
skladu sa neophodnimpreporukama i ostalim
važnim odredbama Directive 1999/5/EC.
RO
OvisLink Corporation declara ca acest
dispozitiv este în conformitate cu cerintele
esentiale si alte prevederi relevante ale
Directivei 1999/5/EC
ID
OvisLink Corporation menyatakan bahwa
perangkat ini telah sesuai dengan persyaratan
utama dan ketentuan terkait lainnya direktif
1999/5/EC.
Directive 1999 / 5 / EC
Tested To Comply
With FCC Standards.
FOR HOME OR OFFICE USE
This equipment may be used in AT, BE, CY, CZ, DK, EE, FI, FR, DE, GR, HR, HU, ID, IE, IT,
LV, LT, LU, MT, NL, PL, PT, SK, SI, ES, SE, GB, IS, LI, NO, CH, BG, RO, TR
OvisLink Corporation declares that this device is in
compliance with the essential requirements and
other relevant provisions of directive 1999/5/EC.
P1
Note:
Installation Step:
1. Remove the switch and accessories from the package.
2. Connect power to the switch. Make sure that “Power” LED is on.
3. Connect your IEEE802.3af/at compliant Power Devices (PD) to Ports 1 to 4 and the Switch will
automatically supply power through these ports (see Figure A).
Note: If you connect a legacy device that is not PoE compatible, the Switch will not deliver power
to the legacy device. This feature allows you to freely and safely mix legacy and PoE
compatible devices on your network
4. Check the “PoE” LED indicator status. When PoE device is connected and the port is supplying
power, it light on.
5. Port 5 to 8 are standard Ethernet. Connect any legacy device to these ports.
6. Check whether the “Link/ACT” light is on. If not, please make sure that power is on for the
other device or PC.
English
EN
Česky
CZ
Instalační kroky :
1. Vybalte switch a příslušenství.
2. Připojte switch k elektrické energii. Ujistěte se, že LEDka “Power” svítí.
3. Připojte Vaše IEEE802.3af/at kompatibilní zařízení k portu 1 až 4 a switch automaticky začne
napájet elektrickou energií (obr. A).
Důležité: Když připojíte zařízení, které nepodporuje PoE, switch nebude posílat elektrickou
energii. Díky tomu, můžete bezpečněpřipojit jakékoliv síťové zařízení.
4. Zkontrolujte “PoE” LED. Když je připojeno PoE zařízení a je doručována elektrická energie,
LEDka svítí.
5. Porty 5 až 8 jsou pro standardní síťová zařízení.
6. Zkontrolujte LED “Link/ACT”. Když nesvítí, zkontrolujte připojené zařízení.
- It is recommended that you install the switch with an UPS (Un-interrupted
Power Supply) to prevent costly equipment damage and to protect power surge.
- The Quick Installation Guide can be downloaded on the website,
www.airlive.com
Deutsch
DE
Installationsschritte:
1. Nehmen Sie den Switch und das Zubehör aus der Verpackung.
2. Verbinden Sie den Switch mit dem Stromnetz. Stellen Sie sicher, dass die “Power” LED
leuchtet.
3. Verbinden Sie Ihr IEEE802.3af/at kompatibles Gerät mit einem Anschluss (Port 1 bis 4) und der
Switch wird automatisch Strom an das Gerät liefern. (vgl. Abb. A).
Hinweis: Falls Sie ein normales Gerät ohne PoE anschließen wird kein Strom geliefert. Diese
Funktion ermöglicht es Ihnen, frei und mühelos alle Gerätetypen zu mischen
4. Prüfung des “PoE” Status. Ist ein PoE Gerät angeschlossen, leuchtet die LED PoE und
signalisiert somit den Strom.
5. Port 5 bis 8 sind normale Ethernet Anschlüsse. Verbinden Sie hier Ihre normalen
Netzwerkgeräte.
6. Verbindungsstatus prüfen. Ist die LED “Link/ACT” an, bedeutet dies eine Verbindung. Sollte
Sie aus sein, prüfen Sie das Kabel oder ob das Gerät eingeschaltet ist.
Español
ES
Pasos de instalación:
1. Sacar de la caja el switch y los accesorios.
2. Conectar la corriente. “Power” LED debe estar encendido.
3. Conectar el IEEE802.3af/at compatible con los dispositivos de corriente (Power Devices, PD) a
los puertos 1 a 4 y el switch automáticamente proveerá energía por medio de estos puertos
(Figura A).
Nota: Si conecta un dispositivo legacy que no es compatible con PoE, el Switch no enviará
corriente. Esta característica le permite libremente y seguramente mezclar los dispositivos
legacy y PoE en su conexión de red.
4. Para verificar el estado del “PoE” LED. Cuando el dispositivo PoE está conectado y el puerto
está proporcionando corriente, se iluminará.
5. Puerto 5 a 8 son conexiones Ethernet estándar, conectar dispositivos legacy a estos puertos.
6. Para verificar el estado del “Link/ACT” debe estar encendida. Si no, favor de asegurarse de
que la corriente esté encendido para otros dispositivos o PC.
Figure A
POE-FSH804AT
Power
Data
PoE-AP
IPCam
LED Indicator
POWER Green ON
OFF
Power is on
Power is off
ON
OFF
Flashing
Port is for connection.
No connection.
Data is transmitting or receiving
Link/ACT
Color Status Meaning
LED indicators
PoE Orange ON
OFF
Port is linked to Power Device
No Power Device is connected
Green
Green
AirLive POE-FSH804AT
8-Port 802.3at/802.3af Fast Ethernet Switch with 4 PoE Ports
Quick Setup Guide
P2
Português
PT
Passos de Instalação:
1. Remova o switch e os acessórios da embalagem.
2. Ligue a energia ao switch. Certifique-se que o “Power” LED está aceso.
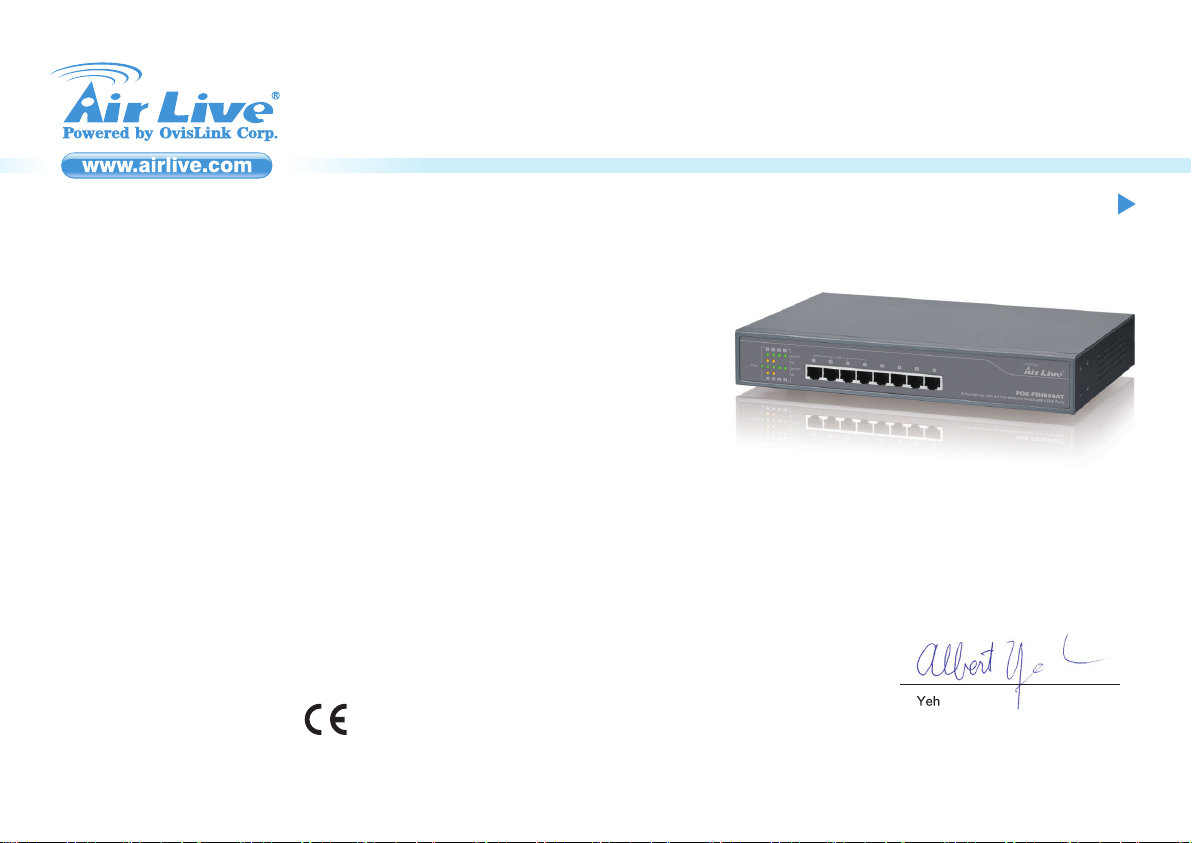
3. Ligue os seus Dispositivos Energia (PD) compatíveis IEEE802.3af/ nas Portas 1 a 4 o Switch
irá automaticamente fornecer energia através dessas portas (ver Figura A).
Nota: Se você conectar um dispositivo antigo não compatível PoE, o Switch não irá fornecer
energia aos dispositivos antigos. Esta característica permite-lhe misturar livremente e em
segurança dispositivos antigos e compatíveis PoE na sua rede
4. Verifique o estado do indicador LED do “PoE”. Quando o dispositivo PoE está conectado e a
porta está fornecendo energia, ele acende.
5. Portas 5 a 8 são standard Ethernet. Conecte qualquer dispositivo antigo nessas portas.
6. Verifique se a luz do “Link/ACT” está acesa. Se não, certifique-se por favor se o power está
aceso para os outros dispositivos ou PC.
Русский
RU
Последовательность установки:
1. Достаньте коммутатор иаксессуары из упаковки.
2. Подключите питание ккоммутатору. Убедитесь, что индикатор “Power” загорелся.
3. Подключите устройство питания совместимое сстандартом IEEE802.3af/at кпортам от 1
до 4 икоммутатор начнет автоматически передавать питание через порты (см. рисунок
A).
Примечание:Если Вы подключаете устаревшие устройства, не поддерживающие PoE,
коммутатор не сможет передавать питание устаревшим устройствам. Эта
фукция позволяем Вам сводобно ибезопасно использовать устаревшие и
поддерживающие PoE устройсва совместно вВашей сети.
4. Проверьте индикатор “PoE”. Когда PoE устройство подключено ипорт передает питание,
индикатор загорится.
5. Порты от 5 до 8 являются обычными Ethernet портами. Подключайте устаревшие
устройства кэтим портам.
6. Убедитесь, что индикатор “Link/ACT” загорелся. Если индикатор не горит, пожалуйста,
убедитесь, что питание ПК идругих устройств включено.
Slovensky
SK
Postup inštalácie:
1. Vyberte zariadenie a príslušenstvo z balenia.
2. Pripojte napájanie k prepínaču a uistite sa, že LED kontrolka „Power“ svieti.
3. Pripojte napájané zariadenia, ktoré spĺňajú štandard IEEE802.3af do portov 1 až 4 a prepínač
ich bude cez tieto porty automaticky napájaťelektrickou energiou (viďobrázok A).
Poznámka: Ak pripojíte zariadenie, ktoré nie je kompatibilné s PoE, tak ho prepínačnebude
napájať. Táto funkcia vám dovoľuje voľne a bezpečne mixovaťv sieti zariadenia,
ktoré sú aj nie sú kompatibilné s PoE.
4. LED kontrolka „PoE“ svieti, keďje do portu zapojené PoE zariadenie a port ho napája
elektrickou energiou.
5. Porty 5 až 8 sú štandardné sieťové porty. Pripojte do nich akékoľvek sieťové zariadenie.
6. Kontrolka „Link/ACT“ by mala svietiť. Ak nie, uistite sa, že pripojené zariadenie je zapnuté.
Magyar
HU
A telepítés lépései:
1. Vegye ki a készüléket és a tartozékokat a csomagolásból.
2. Csatlakoztassa a tápegységet, majd ellenőrizze, hogy a „Power” LED világít-e.
3. Az IEEE802.3af/at kompatibilis (PoE) eszközeit csatlakoztassa az 1-4-es portokra; a switch
ezeknek a készülékeknek automatikusan biztosítani fogja a működéshez szükséges energiát.
Tipp: ha az 1-4-es portokra olyan készüléket csatlakoztat, amelyik nem támogatja a PoE
szabványt, akkor a switch az adott portra nem küld feszültséget. Így nem kell attól tartania,
hogy egy bekötés hibás lesz és/vagy bármelyik eszköz meghibásodik.
4. A „PoE” állapotát LED-ek jelzik; PoE eszköz csatlakozásakor a tápellátást a lámpa folyamatos
fénnye jelzi.
5. Az 5-8-as portok szabványos Ethernet portok, ide bármilyen olyan készüléket csatlakoztathat,
amely nem igényel PoE tápellátást.
6. Az eszközök sikeres csatlakozását a „Link/ACT” lámpa felvillanása jelzi. Amennyiben a lámpa
nem világít, ellenőrizze, hogy a másik eszközt biztosan bekapcsolta-e.
Bahasa
ID
Langkah instalasi :
1. Keluarkan unit Switch dan Aksesoris dari packingannya.
2. Hubungkan listrik ke Switch. Pastikan lampu LED “Power” dalam keadaan nyala.
3. Hubungkan IEEE802.3af/at alat sumber listrik (PD) ke Ports 1 sampai 4 dan secara otomatis
Switch akan memberikan sumber listrik ke port tersebut (lihat gambar A).
Penting: Jika anda menghubungkan ke alat yang tidak mendukung PoE, maka Switch tidak
dapat menyalakan alat tersebut. Fitur ini memberikan pilihan ganda kepada anda untuk
menggabungkan alat-alat yang mendukung PoE dan tidak.
4. Untuk mengecek indikasi lampu LED “PoE”. Jika alat yang mendukung PoE terhubung dan
port-nya tersalur daya listriknya, indikasi lampu pada port tersebut akan menyala.
5. Port 5 sampai 8 adalah port Ethernet biasa. Silakan hubungkan alat-alat lama yang tidak
mendukung PoE diport-port tersebut..
6. Untuk mengecek apakah “Link/ACT” lampu berfungsi atau tidak. Jika tidak, pastikan sumber
listrik telah tersambung ke alat tersebut.
Ελληνικός
GR
Εγκατάσταση:
1. Αφαιρέστε τον μεταγωγέα και τα αξεσουάρ από τη συσκευασία.
2. Συνδέστε την τροφοδοσία στον μεταγωγέα. Βεβαιωθείτε ότι ηλυχνία "Power" είναι αναμμένη
.
3. Συνδέστε τις IEEE802.3af/at συμβατές συσκευές τροφοδοσίας (PD) στις Θύρες 1 έως 4 και ο
μεταγωγέας θα παρέχει αυτόματα ρεύμα τροφοδοσίας μέσω αυτών των θυρών (βλ. Σχήμα Α
).
Σημείωση:Εάν συνδέσετε μια συσκευή παλαιού τύπου που δεν είναι συμβατή με PoE, ο
μεταγωγέας δεν θα δώσει ρεύμα τροφοδοσίας στη συσκευή παλαιού τύπου. Αυτό
το χαρακτηριστικό σας επιτρέπει να συνδέσετε ελεύθερα και με ασφάλεια παλαιού
τύπου και PoE συμβατές συσκευές στο δίκτυό σας
4. Ελέγξτε την ενδεικτική λυχνία "PoE". Όταν μία συσκευή PoE είναι συνδεδεμένη και ηθύρα
τροφοδοτεί με ρεύμα, τότε ηενδεικτική λυχνία “PoE” ανάβει.
5. Οι θύρες 5 έως 8 είναι τυπικές Ethernet. Συνδέστε οποιαδήποτε συσκευή παλαιού τύπου σε
αυτές τις θύρες.
6. Ελέγξτε αν ηενδεικτική λυχνία "Link / ACT" είναι αναμμένη. Αν όχι, βεβαιωθείτε ότι ηάλλη
συσκευή ήουπολογιστής έχουν τροφοδοσία ρεύματος
Hrvatska
HR
Instalacijski koraci:
1. Izvadite switch i pribor iz pakiranja.
2. Priključite switch na mrežni napon. Provjerite da “Power” LED svijetli.
3. Spojite vaše IEEE802.3af/at sukladne napojne uređaje (PD) na Portove 1 do 4 i switch će ih
atomatski napajati kroz te portove( vidi sliku A).
Napomena: Ako spojite stariji uređaj koji nije PoE kompatibilan, switch ga neće napajati. Na taj
način možete slobodno miješati starije uređaje i PoE kompatibilne uređaje na vašoj
mreži
4. Provjerite status “PoE” LED indikatora. Kad je PoE uređaj priključen i port ga napaja, LED
svijetli
5. Portovi 5 do 8 su standardni Ethernet. Priključite bilo koji stariji uređaj na te portove.
6. Provjerite ako “Link/ACT” LED svjetli Ako ne, provjerite da li su drugi uređaji i PC uključeni.

Other Ovislink Switch manuals

Ovislink Air Live POE-FSH8PW User manual

Ovislink

Ovislink Air Live POE-FSH8PW User manual

Ovislink FSH16W User manual

Ovislink

Ovislink FSH16W User manual

Ovislink Air Live POE-GSH1008ATU-110 User manual

Ovislink

Ovislink Air Live POE-GSH1008ATU-110 User manual

Ovislink Live-FSH16T User manual

Ovislink

Ovislink Live-FSH16T User manual

Ovislink AirLive POE-FSH8PW User manual

Ovislink

Ovislink AirLive POE-FSH8PW User manual

Ovislink 16-Port Fast Ethernet 10/100Mbps N-Way... User manual

Ovislink

Ovislink 16-Port Fast Ethernet 10/100Mbps N-Way... User manual

Ovislink N.MINI User manual

Ovislink

Ovislink N.MINI User manual

Ovislink Air Live POE-GSH1008ATU User manual

Ovislink

Ovislink Air Live POE-GSH1008ATU User manual

Ovislink Air Live POE-FSH8PW User manual

Ovislink

Ovislink Air Live POE-FSH8PW User manual

Popular Switch manuals by other brands

Delixi KG316T user manual

Delixi

Delixi KG316T user manual

Dell PowerConnect 6224 Planning and preparation guide

Dell

Dell PowerConnect 6224 Planning and preparation guide

CHINT NP3 Series User instruction

CHINT

CHINT NP3 Series User instruction

TP-Link JetStream TL-SG5412F Cli reference guide

TP-Link

TP-Link JetStream TL-SG5412F Cli reference guide

EUCHNER CTP-AR Unicode operating instructions

EUCHNER

EUCHNER CTP-AR Unicode operating instructions

D-Link KVM-440 Technical specifications

D-Link

D-Link KVM-440 Technical specifications

Intellinet 561143 Quick install guide

Intellinet

Intellinet 561143 Quick install guide

LOVATO ELECTRIC LVFS W Series installation manual

LOVATO ELECTRIC

LOVATO ELECTRIC LVFS W Series installation manual

Pacific Antenna Easy TR Switch manual

Pacific Antenna

Pacific Antenna Easy TR Switch manual

Potter VSR-F instructions

Potter

Potter VSR-F instructions

Dell PowerEdge M1000e Specifications

Dell

Dell PowerEdge M1000e Specifications

HP ProCurve 2510 Management and configuration guide

HP

HP ProCurve 2510 Management and configuration guide

ATEN AS-401PII user manual

ATEN

ATEN AS-401PII user manual

Omron D4NL - datasheet

Omron

Omron D4NL - datasheet

Eaton SVB-PKZ0-CI Instruction leaflet

Eaton

Eaton SVB-PKZ0-CI Instruction leaflet

Avaya 3500 series Installing

Avaya

Avaya 3500 series Installing

Extron electronics DXP DVI Pro user guide

Extron electronics

Extron electronics DXP DVI Pro user guide

Beckhoff CP2 Series Installation and operating manual

Beckhoff

Beckhoff CP2 Series Installation and operating manual

manuals.online logo
manuals.online logoBrands
  • About & Mission
  • Contact us
  • Privacy Policy
  • Terms and Conditions

Copyright 2025 Manuals.Online. All Rights Reserved.