OXO BREW Conical Burr Coffee Grinder with Integrated... User manual

1
Conical Burr
Coffee Grinder with
Integrated Scale
INSTRUCTION MANUAL

2
•Read all instructions. Use this product only as
described in this manual.
•Keep the packaging material (cardboard, plastic,
etc.) out of the reach of children (danger of
asphyxiation or injury).
•Do not touch hot surfaces. Use handles or knobs.
Care must be taken, as burns can occur from
touching hot parts.
•To protect against fire, electric shock, and injury
to persons, do not immerse cord, plugs, or
Grinder in water or other liquid.
•Children should be supervised to ensure that they
do not play with the appliance.
•Unplug Grinder from outlet when not in
use and before cleaning. Allow to cool
before putting on or taking off parts
and before cleaning the appliance.
•Grinder must be operated on a flat surface away from
the edge of counter to prevent accidental tipping.
•Do not operate any appliance with a damaged cord
or plug, or after the appliance malfunctions or is
dropped or damaged in any manner. Contact OXO
Customer Service at (800) 545-4411. Do not
return to store.
•The use of accessory attachments not recommended
by OXO may result in fire, electric shock, or injury
to persons.
•Do not let cord hang over edge of table or counter
or touch hot surfaces.
•Do not place on or near a hot gas or electric
burner, or in a heated oven.
•Check the bean hopper for presence of foreign
objects before using.
IMPORTANT SAFEGUARDS
Read all instructions.
When using electrical appliances, basic safety precautions should always be followed to
reduce the risk of fire, electric shock, and/or injury to persons, including the following:
A Note About Safety

3
•Always attach plug to appliance first, then plug
cord into the wall outlet. To disconnect, turn any
control to the off position, then remove plug from
wall outlet.
• Do not put any substances other than coffee beans
and grinder cleaner into the Grinder.
• Avoid contact with moving parts.
•Do not touch internal parts while Grinder
is in use/plugged in.
•This appliance is intended for household
use only. Do not use appliance for other than
intended use. Do not use outdoors.
To reduce the risk of fire or electric shock, do
not remove the bottom cover. Doing so will void
the warranty. No user-serviceable parts are inside.
Repair should be done by authorized service
personnel only.
Shock Hazard:
This appliance has a polarized plug (one wide
blade) that reduces the risk of electric shock. The
plug fits only one way into a polarized outlet. Do not
defeat the safety purpose of the plug by modifying
the plug in any way or using an adapter. If the plug
does not fit, reverse the plug. If it still does not fit,
have an electrician replace the outlet. Do not plug
this appliance into an outlet with a voltage other
than specified on the bottom of this appliance.
•If the supply cord is damaged, it must be
replaced by the manufacturer, its service agent,
or similarly qualified persons in order to avoid
a hazard.
•To avoid an electrical circuit overload, do not
use any high wattage appliance on the same circuit
as this appliance. This Grinder is not intended for use
by children, persons with reduced physical, sensory,
or mental capabilities, or lack of experience and
knowledge, unless they have received supervision
or instruction concerning use of the appliance by a
person responsible for their safety.

6
Meet Your Grinder
Cups
Mode
Grams
Mode
Manual /
Portafilter
Mode
No Beans
Warning
Warning:
(Led Ring is Red)
Stalled Motor
Warning
Modes/Errors
OXO Button/Dial
Grind Size Selector
Grounds Chute
Strength Adjuster
Built-in Digital Scale
Grounds Container
Removable Steel Plate
Removable Upper Burr
Digital Screen
Bean Hopper
Trap Door
Hopper Release
(on back of Grinder)
Bean Hopper Lid
Warning:
(Led Ring is Red)
Item Missing

7
1Remove all
packaging 2Clean and
wash all parts 3Replace
stainless steel plate
and grounds container 4Plug in
Grinder and
zero the scale
For detailed cleaning
instructions (see pg. 11)
Do not use abrasive pads,
harsh chemicals or spray cleaners.
To learn more about
zeroing/taring (see pg. 10)
Water/Coffee Ratio
Yield 1 Cup 2 Cups 3 Cups 4 Cups 5 Cups 6 Cups 7 Cups 8 Cups 9 Cups 10 Cups 11 Cups 12 Cups
Water 5 oz /
148 mL 10 oz /
296 mL 15 oz /
444 mL 20 oz /
591 mL 25 oz /
739 mL 30 oz /
887 mL 35 oz /
1035 mL 40 oz /
1183 mL 45 oz /
1331 mL 50 oz /
1479 mL 55 oz /
1627 mL 60 oz /
1775 mL
Coffee 8 g 16 g 24 g 32 g 40 g 48 g 56 g 64 g 72 g 80 g 88 g 96 g
OXO recommends using approximately 8 grams of medium-ground coffee per cup (5 fl oz). Coffee dosage recommendations are
based on the Specialty Coffee Association (SCA) Golden Cup Standard designed for optimal extraction and strength.
1 OXO scoop = approximately 8 grams of medium-ground coffee.
Strength Adjuster
The Grinder defaults to grind 8 grams per cup in the center position. To adjust the amount, move the Strength Adjuster to the right
to add more ground coffee, or to the left for less. Each position of the Strength Adjuster represents a change of one gram per
cup. For example, if you want 9 g per cup, you would move the Strength Adjuster one click to the right. For 7 g, you would move
it one click to the left.
Note: The Strength Adjuster only works in Cups Mode.
Before You Begin

8
Using Your Grinder
2
Fill Hopper
with Coffee Beans
Remove hopper lid and fill with
coffee beans. Replace lid.
3
Zero Scale
Ensure stainless steel plate and
grounds container are centered
on the plate and zero the Scale.
(see pg. 10)
Note: You will need to zero the scale
on a regular basis to ensure the Grinder
is working properly.
4Choose Amount
and Press OXO
Button to Start
Choose number of cups or grams
with dial and press OXO button
to start grinding.
Grind Size Recommendations
Brewing Method Espresso Pour Over/Drip Coffee French Press/Cold Brew
Grind Size/Setting Fine / 1-5 Medium / 6-10 Coarse / 11-15
Amount of grounds will vary based on type of bean and grind size setting used. Use a scale or the scoop to weigh or measure grounds. A level
scoop holds approximately 8 grams of medium-ground coffee, perfect for one cup.
1
Select
Grind Size Setting
Rotate hopper to adjust grind
size. (1 = fine, 15 = coarse)
Slide the Strength Adjuster to
your desired position.
(See pg. 7 for more details.)
Note: If beans are in the hopper,
adjust the grind size while motor is
running to prevent jamming.

9
Switching Between Grinding Modes
Grinding in Cups mode:
In this mode, the scale will first measure
and display the number of cups already
in the grounds container. If there are no
grounds already in the container, it will
display zero.
1Twist the dial
Select the total number of cups you
would like in the grounds container.
For example: If there are already 2
cups worth of grounds in the container
and you want a total of 8 cups, turn
the dial to 8.
2Press the OXO button
The scale will count up as it weighs the
grounds. It will continue grinding until
the desired amount is reached.
Grinding in Grams mode:
In this mode, the scale will first measure
and display the number of grams already
in the grounds container. If there are no
grounds already in the container, it will
display zero.
1Twist the dial
Select the total number of grams you
would like in the grounds container.
For example: If there are already 16
grams of grounds in the container and
you want a total of 65 grams, turn the
dial to 65.
2Press the OXO button
The Grinder will grind until the
desired amount is reached, between
1 and 125 grams.
Twist & press
to select preferred
grinding mode
Press & hold
button for 1 second
to enter mode menu
Note: When you plug in
Grinder, it will default to
Cups mode.
Grinding in the
Manual/Portafilter mode:
The Grinder’s built-in scale will
automatically disable in manual
mode. This mode allows you to
manually choose amounts to
grind directly into a portafilter,
or container of your choice. You
cannot select cups or grams in this
grinding mode.
1Place portafilter or
container under chute
2Press OXO button
Grinder will continue to grind
until you press the OXO Button
again to stop.

10
To Zero Scale or Switch Grounds Container
If you prefer to use your own container and/or grinder
without the steel plate, you will need to set the scale
to zero with the container on the scale. Once finished,
the Grinder will now read the new container and will
display a “0 g” or “0 ”. If you change the container
again, repeat the steps above with the new container.
Notes
• Grinder will default to last mode used.
• When in Cups Mode or Grams Mode, make sure to place the
stainless steel plate, container, and lid on the base. Otherwise,
the Grinder will not work properly.
• Do not touch the container or shake the Grinder while grinding,
as it will affect the reading on the scale.
• You cannot adjust the number of cups or grams while grinding,
but you can stop the grinding process at any time by pushing
the OXO button, and then adjust the amount.
• Grinder will go into sleep mode after 20 seconds of no activity.
Let the Grinder Cool
Allow Grinder to cool for at least 2 minutes after
each use. Do not operate this appliance for longer
than 4 minutes at a time to prevent overheating. Allow
the appliance to cool down 10-15 minutes after long
operation. If the motor overheats, the Grinder will
stop working and the display will show a 30 minute
countdown. Wait until the countdown has ended
before using the Grinder again.
Clear Chute Between Uses
If you don’t grind regularly, make sure to clear the
ground coffee from the chute before each use.
Use Fresh Beans
Old/dry beans will create static which can result in
dust sticking to walls of Grinder. Do not store beans in
the bean hopper for an extended period of time. We
recommend grinding only coffee in this Grinder.
Zeroing and More Caring for Your Grinder
Place
container
on the base
Release button
when countdown
reaches 0
Press & hold
button until 3 second
countdown starts
Hand wash
hopper, grounds container
and steel plate. Rinse and
dry thoroughly.

11
Cleaning Your Grinder
Always unplug your Grinder before cleaning it. Any service or maintenance other than
cleaning or descaling should be performed by an authorized service representative.
For more information, call OXO Customer Service at (800) 545-4411.
2
Remove
Hopper
Press down on hopper release lever
and twist hopper counterclockwise.
Lift to remove. The “trap door” feature
will keep beans securely inside while
hopper is removed.
4
Clean burrs
and grounds chute
Use a small bristle brush. Ensure burrs
are clear of beans. Never use water or
other liquids to clean the inside of the
Grinder/burrs.
Do not use abrasive pads, harsh chemicals or
spray cleaner chemicals to clean. These may damage
the surface of the appliance. Do not put any part of
your Grinder in the dishwasher.
5
Replace
Upper Burr
Align indents in burr with tabs inside
lower burr. Push upper burr straight into
grinder and turn handle clockwise, until
you hear a click. To test burr installment,
pull handle straight up. If properly
positioned, burr will stay in place.
Note: If coffee beans have not been emptied
from area around burrs, burr may not lock into
place properly.
6
Wipe Base
and Body
Clean Grinder exterior with
a soft, damp cloth.
7
Replace
Hopper
Twist hopper clockwise onto
Grinder until the line above the
lever aligns with the icon and
release button clicks into place.
1
Unplug
Grinder
Always unplug power cord from outlet
before removing or replacing hopper.
3
Remove
Upper Burr
Lift metal burr handle and twist
counterclockwise, then pull straight up.
Note: Only the upper burr is removable.

12
Troubleshooting
For the most up-to-date troubleshooting information, visit oxo.com
Problem Possible Cause Solution
Grinder does not start
after pressing the
OXO button
Bean hopper is not attached properly Gently remove and reinstall bean hopper ensuring it is seated properly.
Grinder overheated Grinder will pause function for 30 minutes to cool down.
Once the countdown ends, the Grinder will be ready to use.
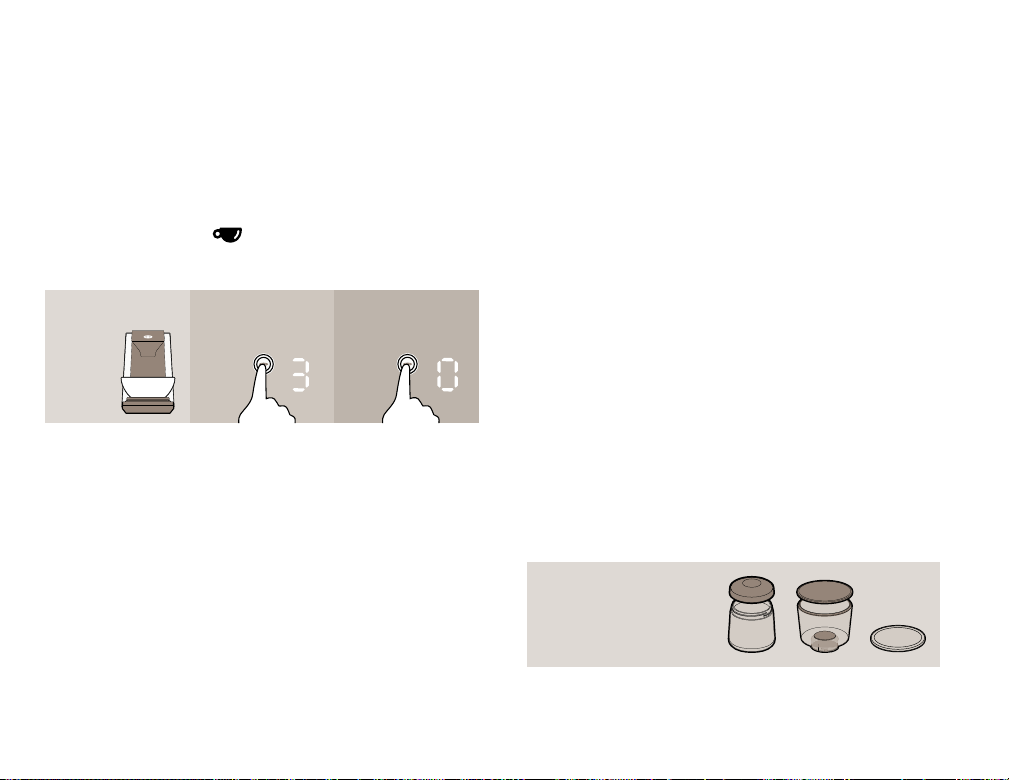
If you see “-- -” and nothing happens,
scale is not zeroed properly
Check stainless steel plate, grounds container and lid are on scale. Zero scale.
Refer to the To Switch Grinding Container section on page 10.
Grinder stops
mid-cycle
No beans in hopper Check stainless steel plate, grounds container and lid are on scale. Zero scale.
Refer to the To Switch Grinding Container section on page 10.
Foreign item trapped in burrs Unplug power cord, remove hopper. Inspect hopper, upper and lower burrs.
Remove any foreign objects. Refer to Cleaning your Grinder section on page 11.
Grinder overheated Grinder will pause function for 30 minutes to cool down.
Once the countdown ends, the Grinder will be ready to use.
Grinder is louder
than normal Grinder blocked with foreign item Unplug power cord, remove hopper. Inspect hopper, upper and lower burrs.
Remove any foreign objects. Refer to Cleaning your Grinder section on page 11.
One type of roast
continuously clogs Grinder
Dark, oily beans can clog
grounds chute
Unplug power cord, remove hopper. Use small flexible brush to clean grounds chute
where grounds dispense. If problem persists,use coffee Grinder cleaning tablets.
Grinder starts
but produces
no coffee grounds
Hopper is blocked up Fill hopper with fresh coffee beans.
Hopper out feed is blocked Unplug power cord and remove hopper. Inspect hopper,
upper/lower burrsand grounds chute for blockage.
Grounds chute is clogged Unplug power cord, remove hopper.
Use small flexible brush to clean grounds chute.
Beans not flowing out of hopper Gently stir beans in hopper with wooden spoon.
Grinder won’t let me
select the number of
cups/grams I want
The integrated scale is detecting
coffee in the grounds container
Select the number of total cups/grams you want in the grounds container.
See page 7 for more details.
Scale is not zeroed properly, it thinks
there is coffee in the grounds container.
Check the stainless steel plate, container and lid are on the scale. Zero scale.
Zeroing instructions on page 10.
Grinder display not
showing “0” with empty
container on base/scale
Zeroing has not been done with the
container you’re trying to use
Zero the scale with the container you are trying to use.
Refer to the Zeroing instructions on page 10.
Table of contents
Other OXO Coffee Grinder manuals