Oxylator EM-100 User manual

CPR MEDICAL DEVICES INC.
OPERATING MANUAL
FOR
®
OXYLATOR EM-100
RESUSCITATION
AND
INHALATION SYSTEM

WARNING !
O2
INH
SN
Oxygen Release Button Serial Number
Inhalator Button Caution! Warning!
Consult accompanying
documentation!
Do not use grease or oil! Do not use near open flames
or while smoking!
Do not use a wrench! Do not autoclave!
®
Symbols used in the Operating Manual for the OXYLATOR EM-100
®
and/or on the OXYLATOR EM-100 unit:
®
The OXYLATOR EM-100 contains patented technology developed by
CPR Medical Devices Inc., 161 Don Park Road,
Markham, Ontario, L3R 1C2, Canada,
U.S. Patent No. 5,230,330
Global patents and further U.S. patents pending
®
The OXYLATOR EM-100 Operating Manual is published by
CPR Medical Devices Inc.,
Applies to Series "A" (fourth character of serial number)
Vol. VI, 4/1999

TABLE OF CONTENTS
Page
Table of Contents ----------------------------------------------------- 3
Section 1 --- Information for the User ---------------------------- 4, 5
Section 2 --- Technical Description and Features --------------- 6, 7
®
OXYLATOR EM-100 Components (Diagram) ---------------- 8, 9
Section 3 --- Modes of Operation ---------------------------------- 10
Section 4 --- Operating Instructions ------------------------------- 11
Section 5 --- Cleaning and Disinfecting -------------------------- 12, 13
Section 6 --- Maintenance ------------------------------------------ 14
Section 7 --- Warranty ---------------------------------------------- 14
Section 8 --- Specifications ----------------------------------------- 15
CAUTION: Federal (USA) law restricts this device
to sale by or on the order of a physician.
3

SECTION 1...
INFORMATION FOR THE USER
-------------------------------------------
Indication for Use:
®
The OXYLATOR EM-100 is an oxygen powered resuscitator intended to provide
emergency ventilatory support for individuals weighing more than 10 kg (22 pounds).
Ventilation may be performed using a mask or an endotracheal tube.
Warnings:
®
- The OXYLATOR EM-100 should be used only by individuals who have
adequate training in CPR techniques and the operation of oxygen powered
resuscitators.
®
- Do not use any type of one-way valve between the OXYLATOR EM-100
and the patient; Its use will cause the system to malfunction.
®
- Do not expose the OXYLATOR EM-100 to MRI (magnetic resonance
imaging) environments.
®
- Do not use grease or oil on the OXYLATOR EM-100 for any reason.
®
- Do not use the OXYLATOR EM-100 in oxygen deficient atmospheres
or near open flames.
®
- Do not autoclave the OXYLATOR EM-100.
®
- Ensure that the OXYLATOR EM-100 is completely dry before
exposing it to freezing conditions. Liquid or water in valves may
cause them to malfunction in freezing conditions. See Section 5:
Cleaning and Disinfecting, pages 12 & 13.
®
- Do not smoke while using the OXYLATOR EM-100 or any other
oxygen equipment.
®
- Do not use wrenches or any other tools on the OXYLATOR EM-100.
Hand-tighten all parts including the hose while connecting or disconnecting
it to the unit.
- Do not dismantle or attempt to remove any components other than those
®
required for routine cleaning. Any tampering with the OXYLATOR
EM-100 may cause the unit to malfunction, and will automatically void the
warranty.
4

Precautions:
®
- The OXYLATOR EM-100 should be connected to a pressurized source
supplying a minimum constant flow of 40 litres per minute and between
45 psig to 80 psig or 3.0 bar to 5.5 bar.
- When an operator observes an abnormally long inspiratory phase (greater
than 2 seconds in adults and greater than 1 second in a child), the
®
OXYLATOR EM-100 should only be used in manual mode and the inspi-
ratory phase restricted to approximately 2 seconds for an adult and 1 second
for a child. See page 10, 1.
- When ventilating an intubated patient, higher pressure release settings may
be required. Select a pressure setting of 35 cm H O to start and adjust if
2
necessary.
- An audible, rapid clicking sound or buzzing sound and rapid movement of
the tip of the main valve indicates airway obstruction. Clear the airway, and
then resume the ventilation procedure.
®
- The OXYLATOR EM-100 should be subjected to high level cold disin-
fection or boiling water after each patient use.
- Replace the filter after each patient use and/or if the valve becomes contami-
nated with vomitus during a CPR attempt.
- Please review and follow the instructions and observe the warnings in this
®
manual before using the OXYLATOR EM-100
®
- If the use or operation of the OXYLATOR EM-100 is unclear, contact
your dealer or agent for clarification.
®
- The OXYLATOR EM-100 is a resuscitation management system and
should not be used as an unattended automatic ventilator.
®
- When several OXYLATOR EM-100 are cleaned simultaneously, assure
that the serial number on the valve (8) and the pressure release selector (10)
match when reassembling the unit. See Section 5, Cleaning and
Disinfecting, pages 12 & 13.
5

SECTION 2...
TECHNICAL DESCRIPTION AND FEATURES
---------------------------------------------------------------
Description:
®
The OXYLATOR EM-100 is an oxygen powered resuscitator/ inhalator which
requires no power source (i.e. battery) other than the supply of compressed oxygen
in an appropriate cylinder or wall outlet.
®
The oxygen supply hose of the OXYLATOR EM-100 should be connected to its
pressurized source supplying a minimum constant flow of 40 litres per minute and
between 45 psig to 80 psig or 3.0 bar to 5.5 bar. During the continuous cycling mode,
the inspiratory flow of oxygen will be initiated upon complete, continuous depression
®
of the OXYGEN RELEASE BUTTON. A sensing chamber in the OXYLATOR
EM-100 allows airway pressure to increase to the maximum limit set, at which point
the system shuts off the inspiratory flow, allowing passive exhalation to take place.
Upon sensing the completion of the exhalation phase, the valve automatically resets
and allows the inspiratory flow to start a new cycle.
®
Cycling continues as long as required, provided the OXYLATOR EM-100 is
connected to pressurized oxygen and its OXYGEN RELEASE BUTTON is conti-
nuously, fully depressed.
The inhalation mode is activated by rotating the INHALATOR KNOB counterclock-
wise allowing the oxygen flow to be mixed with ambient air with a patient's own ins-
piratory effort. The flow in the inhalation mode vents out of the valve and does not
subject the patient's airway to any pressurization, permitting patients to breathe
unassisted.
If a return to automatic cycling mode is needed, full and continuous depression of
the OXYGEN RELEASE BUTTON is required. This automatically overrides the
inhalation mode.
Gauge Port (Optional):
®
A gauge (optional) can be connected to the OXYLATOR EM-100 at the gauge
port connection (19) to verify pressure readings in the airway.
6

Features:
- Meets ASTM F920-85 Minimum Performance and Safety Requirements for
Resuscitators Intended for Use with Humans
- Meets ISO 8382, Resuscitators Intended for Use with Humans
- Meets American Heart Association recommendations for "Adjuncts for
Oxygenation, Ventilation, and Airway Control" (Part III, Adult Advanced
Cardiac Life Support of Guidelines for Cardiopulmonary Resuscitation and
Emergency Cardiac Care, 1992)
- Extremely light-weight, impact resistant and durable
- Simple to learn
- Easy to use
- Single use, quick change filter element
- Few moving parts, minimal maintenance required
- Adjustable airway pressure limiting from 25 cm to 50 cm of H O
2
- Constant maximum flow rate of 40 litres per minute
- Manual and continuous cycling
- Built-in inhalator capability
- Compatible with oxygen supply tanks and regulators supplying between 45
and 80 psig inlet pressure and constant minimum flow rate of 40 litres per
minute
- Hold-down oxygen release mechanism
- PEEP capability
- Eliminates the risk of "air trapping" or "stacked breath"
- FIO of 1.0 during resuscitation
2
- Oxygen powered, no waste of O supply for operation
2
- Audible and visual indication of airway obstruction
7

8
®
OXYLATOR EM-100 COMPONENTS
89
13
Inhalator
Knob
18
Indicator
Eye
19
Gauge Port
Connection
14
Top Cap
2
Oxygen Hose
Connection -
DISS
11
Exhaust
Ports
1
Oxygen
Release
Button
7
Patient
Connector
8

17
15
9
12
Valve Tip
Venting Ports
Valve Stem
Ports
8
4
5
6
3
16
Spring
Main Valve
Primary Sensing
Chamber
Filter
Secondary Chamber
Cartridge
10
Pressure
Release
Selector
18
Indicator
Eye
9
®
OXYLATOR EM-100 COMPONENTS
89

SECTION 3...
®
FOUR MODES OF OPERATION OF THE OXYLATOR EM-100
--------------------------------------------------------------------------------------
1. MANUALLY ACTIVATED CYCLE FOR NON BREATHING PATIENT -
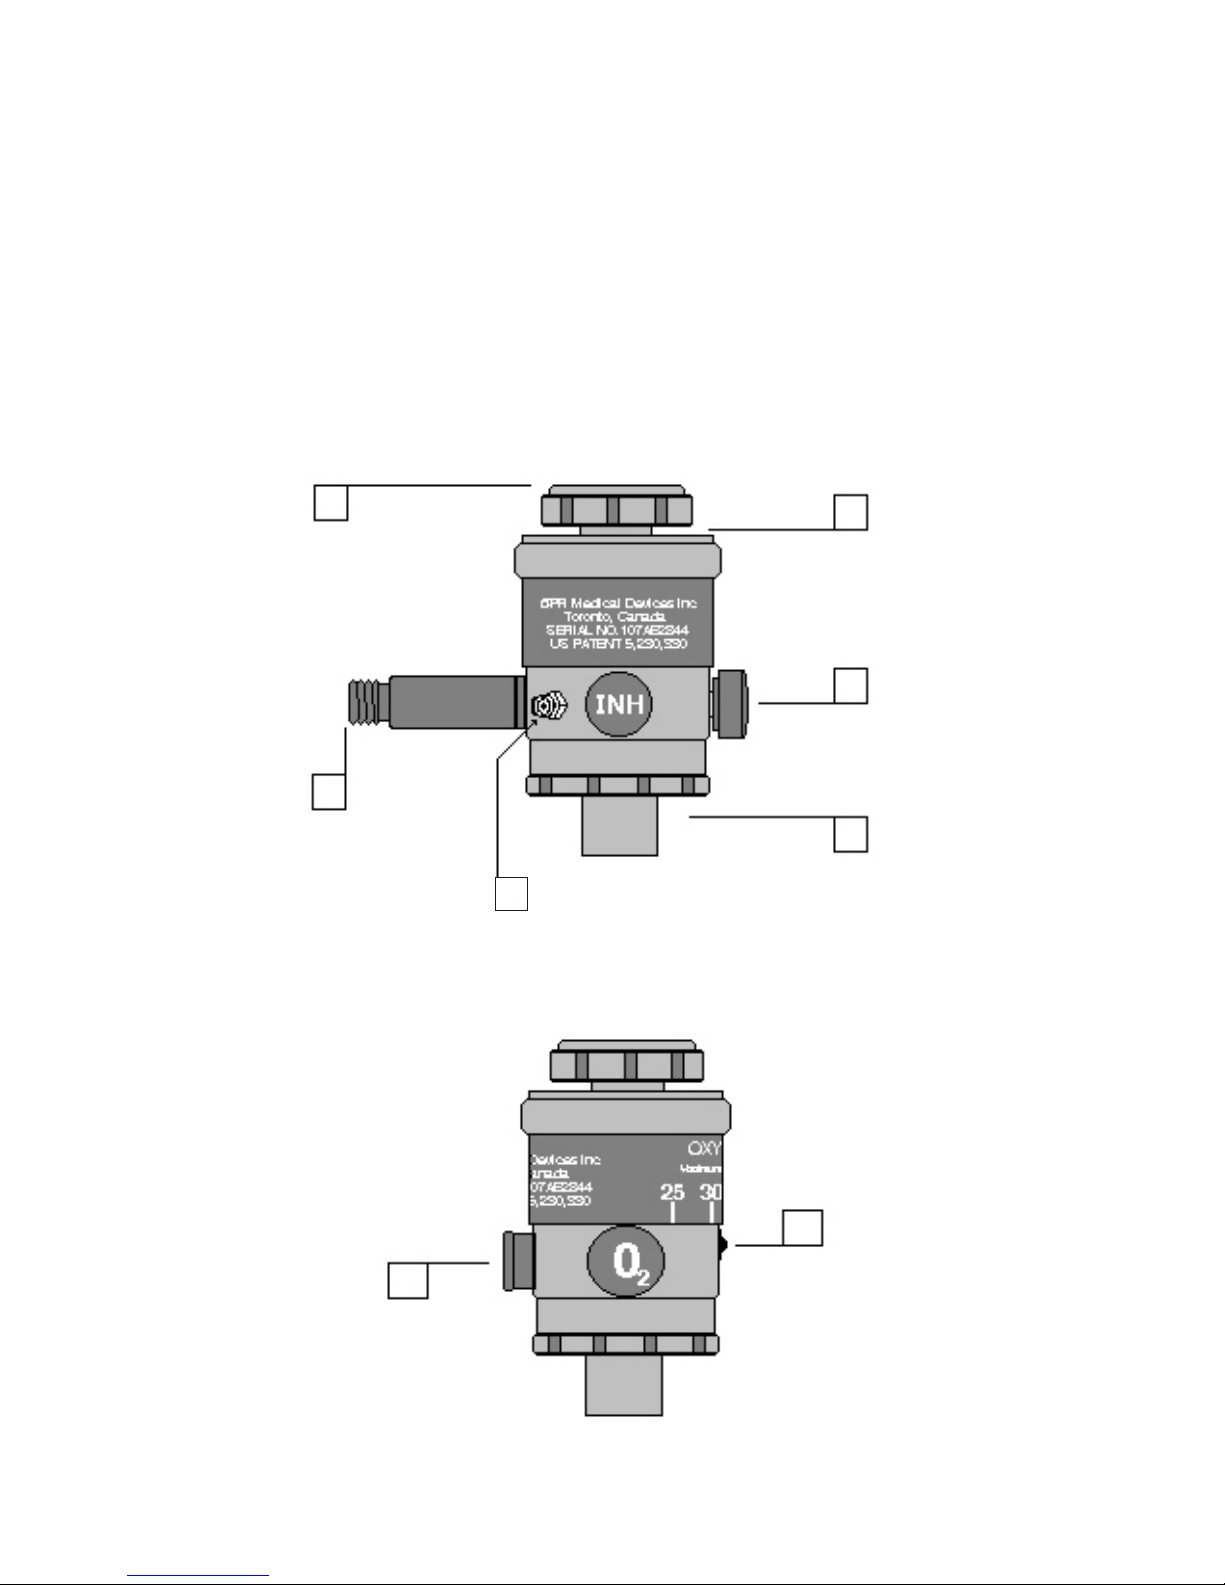
The inhalator knob (13) is closed. Inspiratory flow can be initiated for a single
cycle by depressing the oxygen release button (1) and holding it down until the
®
OXYLATOR EM-100 releases at the end of the inspiratory phase, or until
chest expansion is considered sufficient for adequate ventilatory exchange and
the oxygen release button (1) is let go. Passive exhalation will then take place.
The inspiratory phase should be restricted to 2 seconds in an adult and 1 second
in a child. The level of pressure release is set by rotating the pressure release
selector (10) to the desired value. A new inspiratory cycle can then be initiated
by depressing the oxygen release button (1) once again upon completion of
exhalation. This mode will not maintain a baseline pressure (PEEP) and
upon complete exhalation the airway pressure will be at 0 cm H O. The
2
®
OXYLATOR EM-100 will cycle as in "continuous mode" if the oxygen
release button (1) is held depressed constantly as in mode 2.
2. CONTINUOUS CYCLE WITH BASELINE PRESSURE (PEEP) FOR
NON BREATHING PATIENT - (should only be engaged when the inspi-
ratory time does not exceed 2 seconds in an adult or 1 second in a child)
The inhalator knob (13) is closed. The system will cycle continuously when the
oxygen release button (1) is either continually depressed or held down and then
rotated clockwise to seal and activate oxygen flow. This function overrides the
®
inhalation mode automatically. The OXYLATOR EM-100 will cycle from an
inspiratory to expiratory cycle maintaining positive airway pressure throughout
the cycle with a baseline pressure (PEEP) value of 2 to 4 cm H O. The system
2
will end the inspiratory cycle upon reaching the preset maximum airway pressure
level indicated by the pressure release selector (10). This allows unassisted pas-
sive exhalation to take place until the expiratory flow diminishes to a level of 2
®
to 4 cm H O PEEP. Then, OXYLATOR EM-100 will automatically start a
2
new inspiratory cycle. When an operator observes an abnormally long inspiratory
phase (greater than 2 seconds in an adult or greater than 1 second in a child), the
®
OXYLATOR EM-100 should only be used in manually activated cycles.
See mode 1.
3. MANUALLY ACTIVATED CYCLE WITH BASELINE PRESSURE (PEEP)
FOR NON BREATHING PATIENT - system will maintain a baseline pressure
(PEEP) if the inhalator knob (13) is opened counter-clockwise and the
®
OXYLATOR EM-100 is operated as in mode 1. This will provide a baseline
pressure (PEEP) of 2 to 4 cm H O.
2
4. INHALATION OF OXYGEN ENRICHED AMBIENT AIR FOR BREATH-
ING PATIENT - system can be used in this mode by rotating the inhalator knob
(13) counter-clockwise which will allow the air to be enriched with oxygen as
a patient breathes on his/her own. The oxygen release button (1) cannot be in a
depressed position in the inhalation mode.
10

SECTION 4...
OPERATING INSTRUCTIONS
-----------------------------------------
®
The following instructions are for the proper use of the OXYLATOR
They are to be followed to provide adequate ventilation when attempting Cardio-
pulmonary Resuscitation. The user of this device must have knowledge of cpr
techniques. The instructions deal strictly in the proper use of the device.
®
1. The OXYLATOR hose must be connected to the available oxygen supply,
a wall outlet or a pressurized cylinder.
2. When using a pressurized cylinder, open main valve and ensure regulator indicates a
reading of between 40 psig and 80 psig; adjust if necessary.
3. Attach suitable mask or endotracheal tube to patient connection (7), make sure mask
is rotated into proper position so that an effective seal can be achieved.
4. Ensure inhalator knob (13) is fully closed, and depress oxygen release button (1)
briefly to test for oxygen flow.
5. Rotate maximum airway pressure release selector (10) to desired setting simply by
aligning pressure value with the indicator eye (18). The pressure can be adjusted
from 20 to 45 cm H O. It should be initially set at 20 cm H O and increased if the
22
operator in his or her opinion determines that the patient needs greater airway pressure.
When used with an endotracheal tube, select a maximum airway pressure of 30 cm
H O to start, then adjust as required.
2
6. After positioning person and establishing a proper airway, place mask on person's
face so as to achieve a complete seal with one hand; using the other hand, depress
oxygen release button (1) completely while maintaining mask seal against the
person's face. Hold down oxygen release button (1) FIRMLY, or if appropriate,
depress, then turn oxygen release button (1) clockwise for continuous oxygen flow.
The unit will start cycling continually. OXYGEN RELEASE BUTTON (1) MUST
BE HELD MANUALLYDEPRESSED OR KEPT IN LOCKED-IN POSITION AT
ALL TIMES FOR CONTINUOUS CYCLING.
CAUTION; WITHOUT APROPER MASK SEAL THE DEVICE CANNOT CYCLE.
A NON-CYCLING DEVICE INDICATES THAT IMPROVEMENT IN AIRWAY
MANAGEMENT INCLUDING A PROPER MASK SEAL IS NEEDED.
7. An audible, rapid "clicking" or buzzing sound indicates airway obstruction, STOP!,
take necessary steps to clear airway, then reposition person to continue. REPEAT
step # 6. An obstruction is also confirmed by observing the rapid movement of the
valve tip (17) of the main valve (8). ®
8. A natural breathing pattern will ensue as the OXYLATOR continually
cycles. Ensure that the inspiratory phase does not exceed 2 seconds in an adult or 1
second in a child at any maximum airway pressure setting selected. Switch to manual
mode if necessary. see page 10.
9. To stop flow of oxygen, let go of the oxygen release button (1) or, if oxygen release
button (1) is in locked-in position, rotate it counter-clockwise.
®
10. If the OXYLATOR stops cycling during continuous cycling, release the
OXYGEN RELEASE BUTTON (1) and restart after increasing the pressure by
rotating the PRESSURE RELEASE SELECTOR (10) by 5 cm H O. In some pati-
2
ents, higher cycling pressures are required to overcome increased airway resistance.
EMX
EMX
EMX
EMX
11

SECTION 5...
CLEANING AND DISINFECTING
---------------------------------------------
®
The components of the OXYLATOR EM-100 are made from acetal, aluminum and
stainless steel. This enables the unit to be cleaned and disinfected routinely after each
®
use. The OXYLATOR EM-100 must be cleaned, disinfected and the filter replaced
after each use..
®
CLEANING THE OXYLATOR EM-100.
®
1. Separate the OXYLATOR EM-100 from oxygen hose connection (2).
2. Detach patient connection (7) by rotating its knurled rim in a counter-
clockwise direction.
3. Remove and DISCARD the USED FILTER (6) from its place in the patient
connection (7).
4. Detach top cap (14) by unscrewing in a counter-clockwise direction; pull
out main valve (8) from its chamber.
5. Use a mild soap solution to wash out the four components. Then rinse the
four components thoroughly with distilled water.
6. Wipe off the water from all components. Firmly tap the components of the
unit against the palm of the hand and wipe off the water. Perform for both
ends of the valve body, the main valve (8), top cap (14) and the patient
connection (7). Repeat this step as necessary until no water droplets are
observed.
7. Insert main valve (8) into its chamber and screw on top cap (14) clockwise.
DO NOT OVERTIGHTEN! HAND-TIGHTEN ONLY.Assure that serial
number on main valve (8) is identical to serial number on the pressure release
®
selector (10) when cleaning more than one OXYLATOR EM-100 at a time.
8. Attach hose to oxygen hose connection (2) by hand.Depress oxygen release
button (1) to check for flow.Cover the patient connection end (7) of the valve
body with the palm of the hand and depress oxygen release button (1) for a short
burst to clear away any trapped water residue. Blot any resulting water droplets.
Remove top cap (14) and main valve (8) and blot out any visible liquid in the valve
body, on the main valve (8) and top cap (14). Repeat this step of blowing oxygen/
drying until no moisture is visible in the main body, the main valve (8) and top cap
(14) and that all components are dry. Reassemble main body, main valve (8)
and top cap (14).
9. Insert a new filter (6) into its position in patient connection (7). Screw
patient connection (7) clockwise onto unit. !DO NOT OVERTIGHTEN!
HAND-TIGHTEN ONLY.
10. Remove hose connection from pressure source.
®
DISINFECTING THE OXYLATOR EM-100.
1. Follow steps 1. through 4. above, wash out and rinse the four components,
then disinfect components using a disinfecting solution, or boiling water.
Then rinse the four components thoroughly again with distilled water.
2. Continue with steps 6. to 10. above.
12

7
PATIENT
CONNECTION
6
FILTER
VALVE
BODY
8
MAIN
VALVE 14
TOP
CAP
®
DISASSEMBLY FOR CLEANING THE OXYLATOR EM-100
®
INSTRUCTIONS FOR CLEANING THE OXYLATOR EM-100
AFTER CONTAMINATION BY VOMITUS.
-----------------------------------------------------------------------------------
1. Remove mask from patient connection (7).
2. Detach patient connection (7) by rotating its knurled rim in counter-clockwise
direction.
3. Remove and discard the used filter (6) from its place in the patient connection (7)
4. If necessary, wipe clean inside secondary chamber (3), depress the oxygen release
button (1) to blow out any possible materials that may have penetrated through the
particle filter (6), wipe secondary chamber (3) clean again if necessary.
5. Insert new filter (6) into its position in patient connection (7). Screw patient
connection (7) clockwise onto unit. DO NOT OVERTIGHTEN! Press the oxygen
release button (1) for a quick burst of oxygen to check for flow.
6. Attach mask (new or cleaned) to patient connection (7).
®
7. The OXYLATOR EM-100 is ready for use again.
NOTE: A filter change should normally take approximately 20 seconds.
***WARNING***
®
ENSURE THATTHE OXYLATOR EM-100 IS DRY BEFORE EXPOSING THE
UNIT TO FREEZING CONDITIONS. LIQUID OR WATER IN VALVES MAY
CAUSE THEM TO MALFUNCTION IN FREEZING TEMPERATURES.
DO NOT AT ANY TIME USE GREASE OR OIL FOR ANY PURPOSE ON THE
®
OXYLATOR EM-100. DO NOT USE THE UNIT IN OXYGEN DEFICIENT
ATMOSPHERES OR NEAR OPEN FLAMES. DO NOT SMOKE WHILE USING
®
THE OXYLATOR EM-100 OR ANY OTHER OXYGEN EQUIPMENT.
®
DO NOT AUTOCLAVE THE OXYLATOR EM-100.
13

SECTION 6...
MAINTENANCE
-----------------------
Due to the revolutionary new design and functional characteristics of the
®
OXYLATOR EM-100, minimal maintenance is required!
®
The OXYLATOR EM-100 will function for millions of cycles without requiring
any form of maintenance. However, the unit should be periodically subjected to
short "bursts" of a few seconds (1 - 2 seconds). This can be accomplished simply by
depressing the oxygen release button (1) with the unit connected to its pressure supply.
If for ANY REASON the unit malfunctions, remove the device from service and
contact your sales person, distributor, or agent for help. If the problem cannot be
solved, the device should be returned to CPR MEDICAL DEVICES INC. or its
distributor in your territory for repair or replacement.
DO NOT DISMANTLE OR ATTEMPT TO REMOVE ANY COMPONENTS
OTHER THAN THOSE REQUIRED FOR ROUTINE CLEANING! ANY TAMPE-
®
RING WITH THE OXYLATOR EM-100 WILL VOID THE WARRANTY AND
MAY CAUSE THE UNIT TO MALFUNCTION!
SECTION 7...
WARRANTY
------------------
CPR MEDICAL DEVICES INC. warrants this product to be free from any defects in
material and workmanship for a period of five (5) years from the date of purchase to
the initial purchaser. Warranty card must be completed to validate warranty.
The warranty will be void if any filters are used other than the ones supplied by CPR
MEDICAL DEVICES INC. or its distributors.
All shipping charges for returned goods should be prepaid. Upon inspection and eva-
luation of the returned unit by CPR MEDICAL DEVICES INC. or its distributors,
®
the OXYLATOR EM-100 will be either replaced or repaired to conform to the
required standards.
Any evidence of tampering or disassembly of the valve for any purpose other than
routine cleaning and maintenance shall void this warranty.
CPR MEDICAL DEVICES INC. shall in no event be liable for any consequential
damages, nor for loss, damage or expenses directly or indirectly arising from the
®
use the OXYLATOR EM-100.
14

SECTION 8...
SPECIFICATIONS
-------------------------
®
Model - OXYLATOR EM-100
Weight - 0.25 kg; 0.55 lbs
Dimension dia * length - 2.25 in. * 4.25 in., 57mm * 108mm
Material of housing - Acetal
Required source pressure - between 45 psig to 80 psig, or
between 3.0 bar and 5.5 bar
Required flow (source) - min. 40 litres per minute
Dead Space - 20 millilitres
Inspiratory flow rate - 40 litres per minute (max)
Minute volume delivered - 12 to 16 litres per minute in auto mode
Min. time of oxygen supply - Cylinder vol. divided by 16 l/min
I : E ratio - 1 : 1 to 1 : 2 or manually controlled
PEEP - 2 to 4 cm H O in auto mode
2
Ventilatory frequency - Auto-adjusting to lung capacity in auto mode
Range of pressure relief - 25 to 50 cm H O , 18 to 38 mm Hg
2
Expiratory resistance - approximately 5 cm H O in manual mode
2
Suitable body mass range - 10 kg+, 22 lbs +
Inhalator flow - 0 to 15 litres per minute of 100% O
2
Oxygen concentration - 100% during resuscitation mode
Filter - Single use, disposable
Mask/airway connections - 15mm internal / 22mm external
Usage temperature range - - 30 C - + 60 C, - 22 F - +140 F
Storage temperature range - - 40 C - + 70 C, - 40 F - +158 F
Obstructed airway warning - Rapid cycling, audible and visual
Oxygen inlet connection - DISS, ISO standard or quick connect
NOTE: Data on functional characteristics can fluctuate under varying conditions. Please
OBSERVE INSTRUCTIONS AND WARNINGS in this operating manual.
15
Table of contents
Popular Medical Equipment manuals by other brands

Dr. Mach
Dr. Mach Mach LED 2 MC Mounting instructions, Directions for use

Little Doctor
Little Doctor LD Prof-Plus instruction manual

Genesis
Genesis 2.6 hocl fogger instructions

inhealth
inhealth BE 6048 Instructions for use

Chattanooga
Chattanooga Artromot Elbow Patient instructions

VBM Medizintechnik
VBM Medizintechnik 35-60-000 Instructions for use