1000, 2000 & 3000 SERIES USER ManUal16 17
• Ensure the salt/mineral cell is switched o until the salt/minerals
have been completely dissolved in the pool.
• To achieve the correct salt/mineral levels in new pools you need to
know the pool capacity, you can then work out the amount of salt/
minerals required in kilograms (2 x 20kg bags per 10,000L),
• For example: pool size 60,000L = 240KG of salt/minerals.
3.1 Operating Instructions
Salt/ Mineral Requirements
All combination units require 3500-4500ppm salt/mineral levels
Using only rened swimming pool salt or minerals, add the desired quality to
the swimming pool water. To assist in the rapid dissolving and mixing, sweep
or brush the solids until they are fully dissolved.
Note: Undissolved salt may result in staining of your pool’s interior walls.
Achieving the correct salt/mineral levels
New Pools
Existing Pools
For best results, the salt concentration in the pool water is required to be
within an average range of approximately 3,500 to 4,500 parts per million
(ppm). These gures are temperature dependant. In summer time as
temperature rise salt levels may require slight reduction while in winter time
the reverse may be true to allow optimum performance of the unit.
To establish the salt level in an existing pool, take a water sample to your
local pool shop for testing, they will tell you the current salt/mineral levels
and advise the correct course of action required.
• Set the sanitation switch to the “on” position
• Set the master switch to “manual” position to turn the unit
on
• Once the salt/minerals have been added and dissolved
turn the cell production dial to the required position based
on the season and the size of the pool (set to max output to
start with and adjust down as required)
• Set the timer (see setting the timer) to run for the
recommended times (4-6 hours for winter / 8-10 hours for
summer) switch the system to auto and the unit will now be
controlled by the timer
• To set current time, rotate minute hand clockwise until
arrow head aligns with correct time.
Note: This will need to be reset whenever the power is
disconnected from the unit and for daylight saving time
changes.
Note: Only rotate clockwise to set. Rotating incorrectly will
damage the time clock.
• To set ON/OFF times, move required tappets to
appropriate position. Inner position for OFF and outer
position for ON.
Note: proper operation requires that the appropriate switch
settings below are enabled
• Each of the tappets on outer edge of the timer represents
15-minute intervals.
Note: If you require your Ozone Swim to be connected to an
o-peak tari we recommend the use of an appropriate battery
backup time clock for that purpose.
Master Switch
O The system will not operate
Auto The time clock will automatically switch your pool
equipment on or o at your designated times.
Manual The timer is by-passed, the system will operate all
functions permanently
Ozone Swim 1000, 2000 and 3000 series User Manual –JULY 2017 ENG rev 2.0
Page 11 | 15
•Set the timer (see setting the timer) to run for the recommended times (4-6 hours
for winter and 8-10 hours for summer) switch the system to auto and the unit will
now be controlled by the timer
•To set current time, rotate minute hand clockwise until arrow head aligns with
correct time.
oNote: This will need to be reset whenever the power is disconnected from
the unit and for daylight saving time changes.
oNote: Only rotate clockwise to set. Rotating incorrectly will damage the time
clock.
•To set ON/OFF times, move required tappets to appropriate position. Inner position
for OFF and outer position for ON.
oNote: proper operation requires that the appropriate switch settings below
are enabled
•Each of the tappets on outer edge of the timer represents 15-minute intervals.
(NOTE) If you require your Ozone Swim to be connected to an off-peak tariff we recommend the
use of an appropriate battery backup time clock for that purpose.
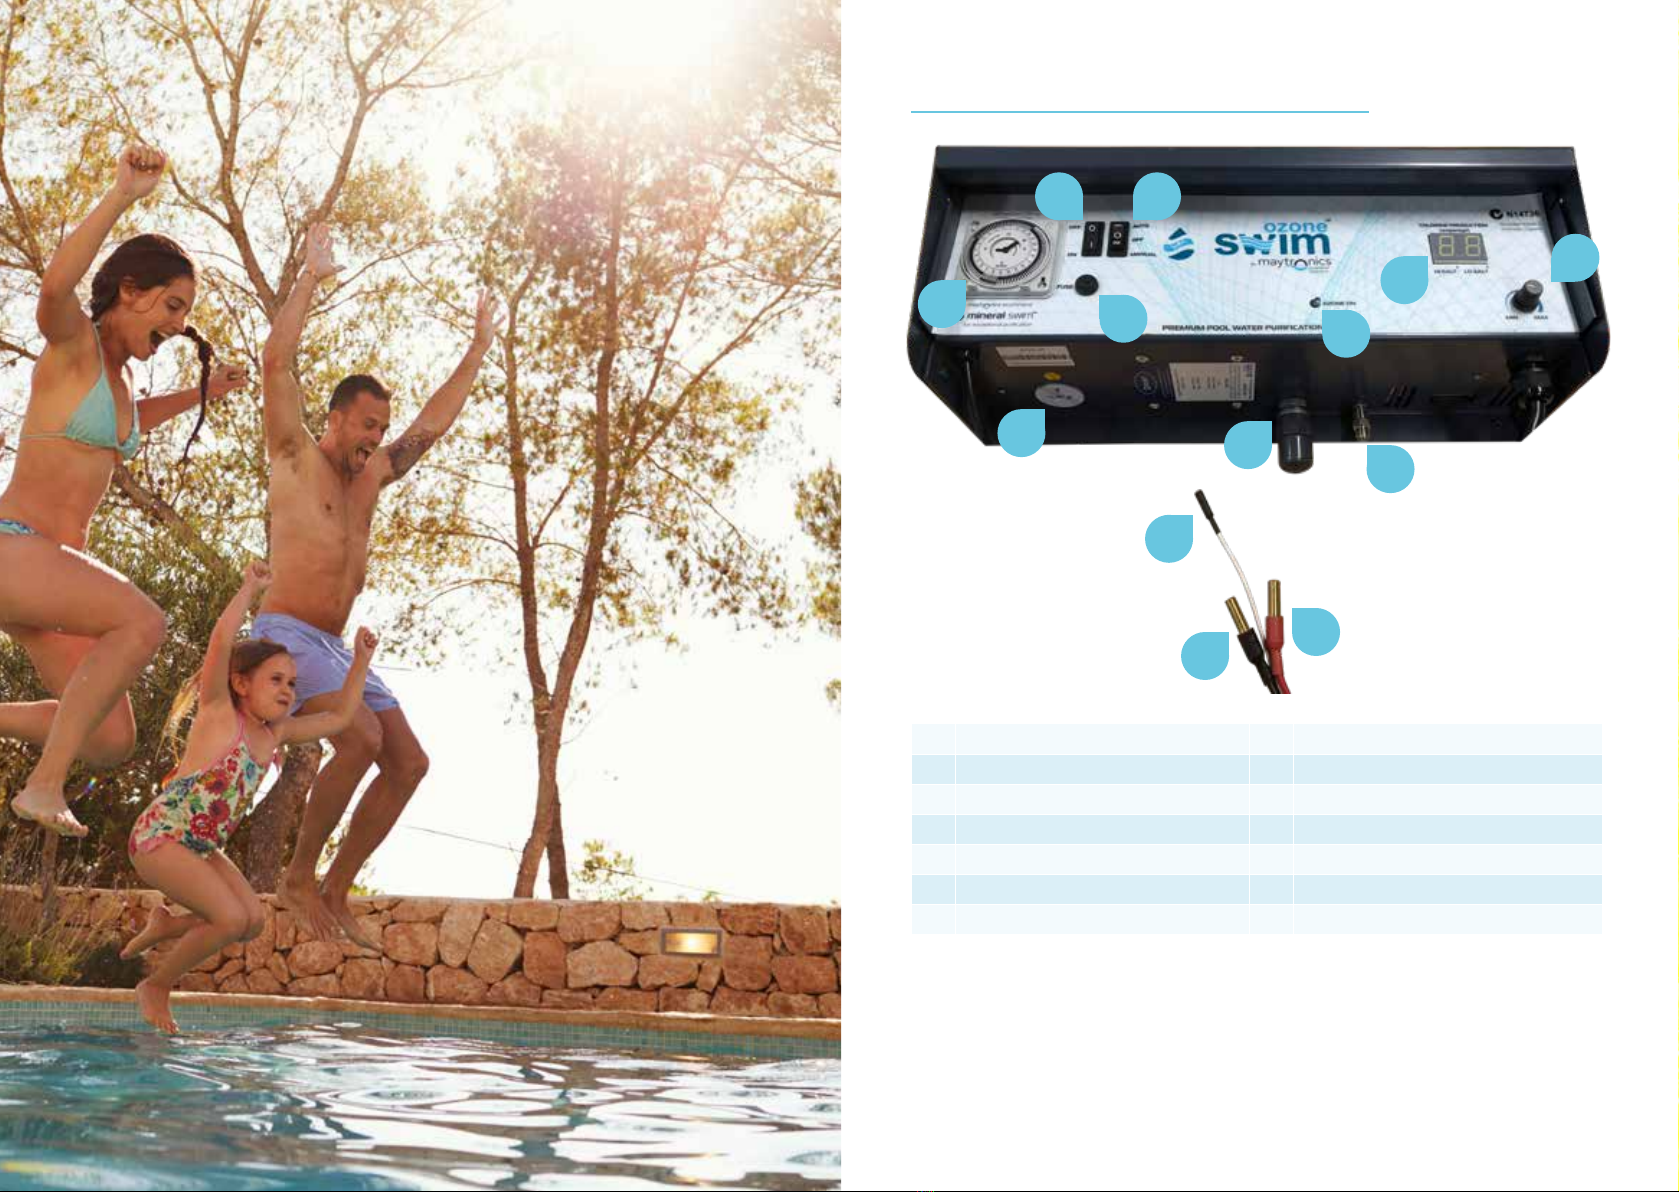
Checking Chlorination output
The chlorine cell output controller regulates the amount of chlorine production relevant to
the position it has been set to. By adjusting the cell output controller clockwise, you
increase chlorine production and by turning anti clockwise you reduce production. Do not
attempt to turn the controller beyond its stops as this could cause damage to your unit that
is not covered by warranty.
To ensure your Chlorinator is working correctly, follow the steps below
•Ensure the cell production is at maximum
•With the unit running take a sample of water from the skimmer box and conduct a
chlorine test, note the result
•Take a sample of water from directly in from of the return to the pool outlet and
conduct a chlorine test, note the result
•If the latter is higher in chlorine than the first test, your ozone Swim is efficiently
producing chlorine (if not please see troubleshooting)
Checking Ozone output
To ensure your Ozone is working follow the steps below
•Check that the green ozone light is on