SUPREME SOFT User manual

SUPREME SOFT
www.supremefilters.com
Installation Manual
Instrukcja montażu
Montageanleitung
Инструкция монтажа


EN
PL
DE
RU
Installation record....................................................................................................................4
Important information.............................................................................................................5
Operating conditions and requirements...................................................................................5
Installation...............................................................................................................................6
Commissioning........................................................................................................................8
Electronic control panel...........................................................................................................9
Maintenance.........................................................................................................................11
Service card............................................................................................................................44
Dane dotyczące instalacji.......................................................................................................14
Ważne informacje..................................................................................................................15
Warunki pracy i wymagania....................................................................................................15
Instalacja................................................................................................................................16
Rozruch..................................................................................................................................18
Elektroniczny panel sterowania..............................................................................................19
Konserwacja..........................................................................................................................21
Karta serwisowa.....................................................................................................................44
Datenblatt..............................................................................................................................24
Sicherheitstipps.....................................................................................................................25
Betriebsbedingungen und anforderungen.............................................................................25
Installation.............................................................................................................................26
Inbetriebnahme.....................................................................................................................28
Elektronische steuerung........................................................................................................29
Wartung.................................................................................................................................31
Kartenservice.........................................................................................................................44
Отчет по установке...............................................................................................................34
Предупреждения и правила техники безопасности..........................................................35
Условия эксплуатации и требования...................................................................................35
Установка............................................................................................................................36
Запуск....................................................................................................................................38
Панель электронного управления.......................................................................................39
Обслуживание......................................................................................................................41
Обслуживание карты...........................................................................................................44

Seriar number:............................................................................
Model:....................................................................................
Water hardness-inlet:.................................................................
Water hardness-outlet:...............................................................
Water pressure-inlet:..................................................................
Date of installation:.....................................................................
Company name:..........................................................................
Installer name:............................................................................
Phone number:...........................................................................
Prosimy o uzupełnienie poniższych danychFor future reference, fill in the following data
INSTALLATION RECORD
EN
4

- Before you begin the installation of the appliance,
we advise you read and carefully follow the instructions
contained in this manual. It contains important
information about safety, installation, use and
maintenance of the product. The actual system that you
have received, may differ from the pictures, illustrations,
descriptions in these Instructions.
- Failure to follow the instructions could cause personal
injury or damage to the appliance or property. Only when
installed, commissioned and serviced correctly,
the appliance will offer you many years of trouble-free
operation.
- The appliance is intended to 'soften' the water, meaning
it will remove hardness minerals; it will not necessarily
remove other contaminants present in the water.
The appliance will not purify polluted water or make it safe
to drink!
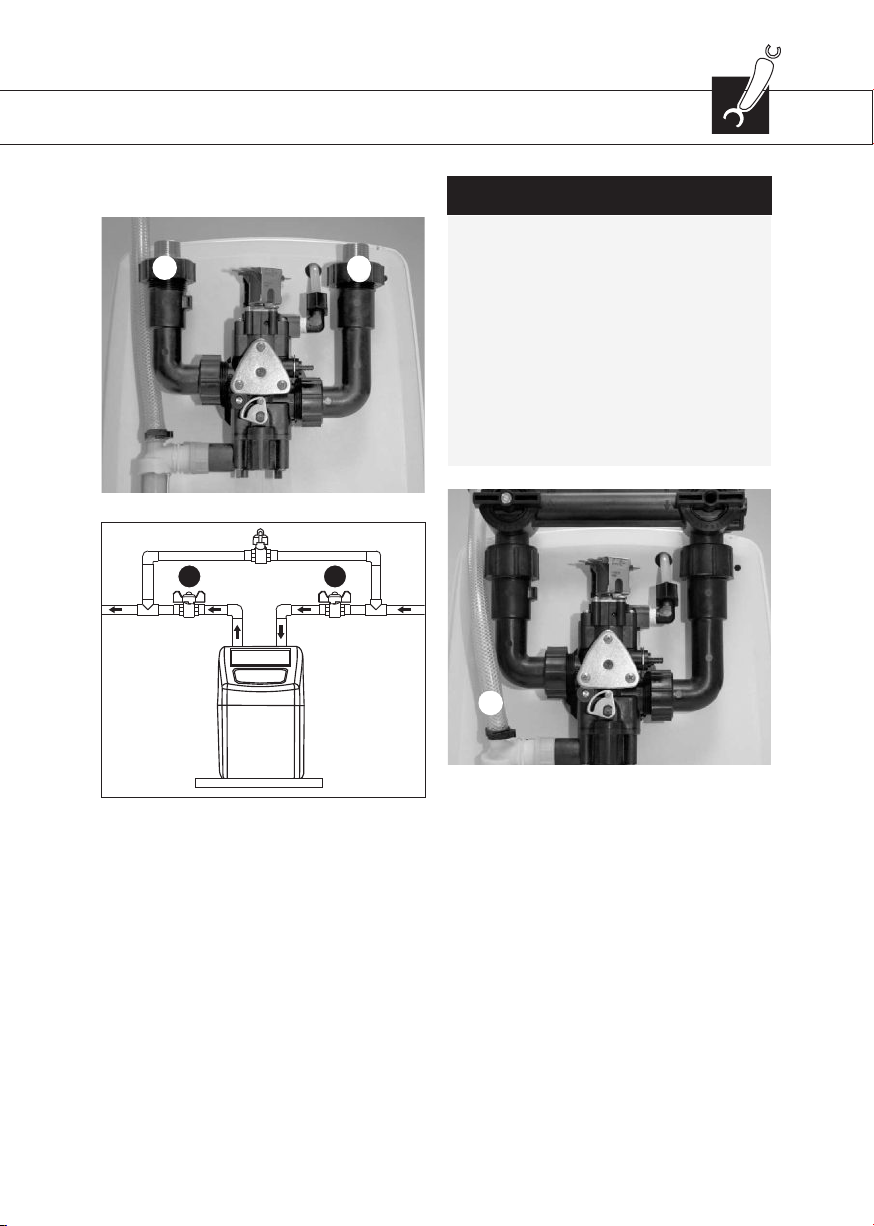
- Installation of the appliance should only be undertaken
by a competent person, aware of the local codes in force.
All plumbing and electrical connections must be done
in accordance with local codes.
OPERATING PRESSURE MIN-MAX: 1,4-8,3 bar / 20-120 psi
- this appliance is configured to perform optimally at an operating pressure of 3 bar (45 psi) ± 1/2 bar (7 psi);
in case of a lower or higher operating pressure the performance may be affected negatively!
- check water pressure regularly.
- take into account that night time water pressure may be considerably higher than day time water pressure.
- install a pressure reducer ahead of the appliance if necessary.
OPERATING TEMPERATURE MIN-MAX: 2-48 °C / 35-120 °F
- do not install the appliance in an environment where high ambient temperatures (e.g. unvented boiler house)
or freezing temperatures can occur.
- the appliance cannot be exposed to outdoor elements, such as direct sunlight or atmospheric precipitation.
- do not install the appliance too close to a water heater; keep at least 3 m (10 ft) of piping between the outlet
of the appliance and the inlet of the water heater; water heaters can sometimes transmit heat back down
the cold pipe into the appliance; always install a check valve at the outlet of the appliance.
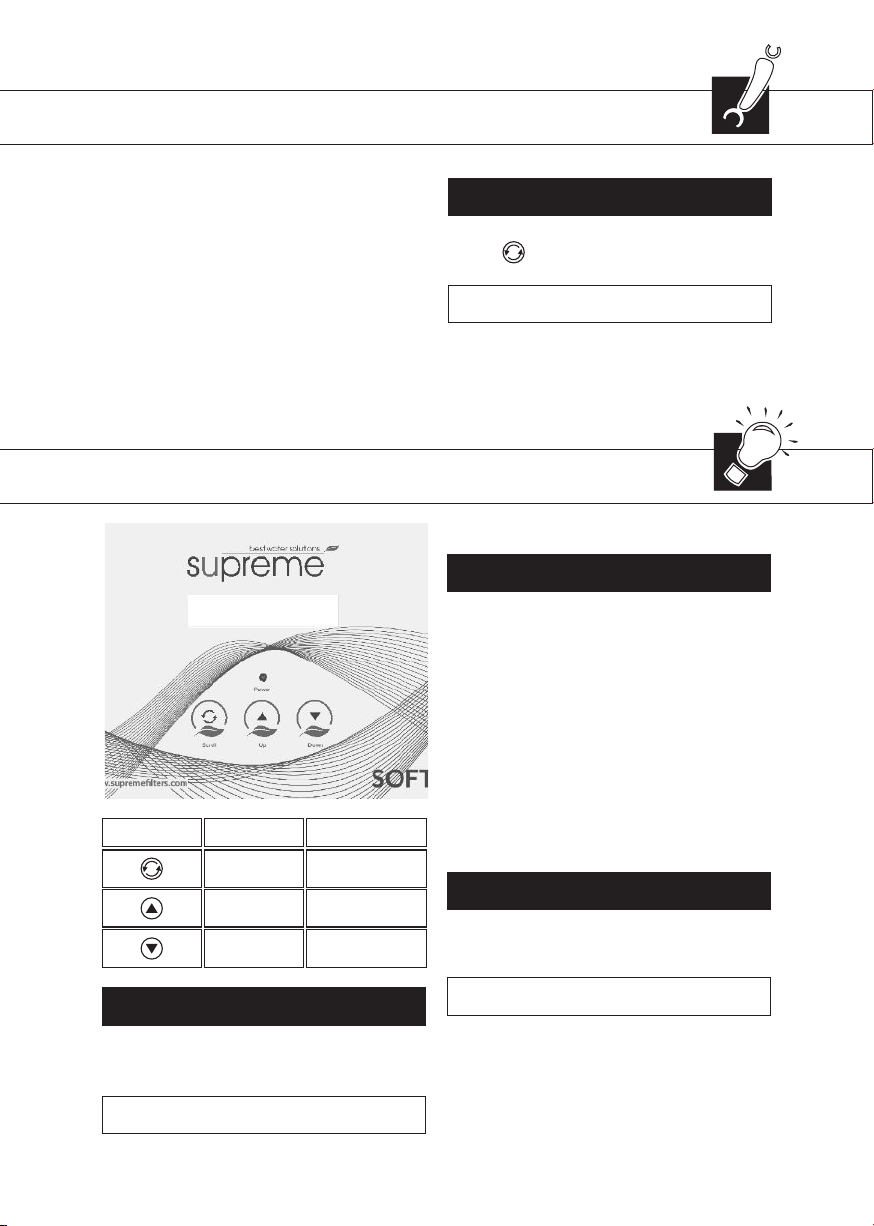
ELECTRICAL CONNECTION:
- the appliance only works on 24V AC; always use it in combination with the supplied transformer.
- make sure to plug the transformer into a power outlet, which is installed in a dry location, with the proper rating
and over-current protection.
- Before setting up the appliance, make sure to check
it for any externally visible damage; do not install or use
when damaged.
- Use a hand truck to transport the appliance. To prevent
accident or injury, do not hoist the appliance over your
shoulder. Do not lay the appliance on its side.
- Keep these Instructions in a safe place and ensure that
new users are familiar with the content.
- The appliance is designed and manufactured
in accordance with current safety requirements
and regulations. Incorrect repairs can result in unforeseen
danger for the user, for which the manufacturer cannot
be held responsible. Therefore repairs should only
be undertaken by a competent technician, familiar
and trained for this product.
- In respect of the environment, the appliance should
be disposed of in accordance with Waste Electrical
and Electronic Equipment requirements. Refer
to national, local laws and codes for correct recycling
of the appliance.
IMPORTANT INFORMATION
OPERATING CONDITIONS AND REQUIREMENTS
5

To facilitate the installation, you may want to remove
the salt lid and main cover from the appliance.
- In case of high concentration of impurities in the inlet
water, we recommend the installation of a sediment filter,
ahead of the appliance.
- We strongly recommend the use of flexible hoses
to connect the appliance to the water distribution
system; use hoses with a large diameter in order
to limit the pressure loss.
- If the appliance is not equipped with the factory bypass
(optional), we strongly recommend to install a 3-valve
bypass system (not included with this product!) to isolate
the appliance from the water distribution system in case
of repairs. It allows to turn off the water to the appliance,
while maintaining (untreated) water supply to the user.
INLET & OUTLET
1. mains water supply (untreated water).
2. inlet of appliance (untreated water).
3. outlet of appliance (treated water).
4. house/application (treated water).
STEP 1. Screw the factory bypass onto the elbow
connections of the appliance (2 & 3); make sure to install
the gasket seals. Tighten the nuts firmly by hand.
STEP 2. Screw the connection kit with nuts onto the factory
bypass (1 & 4); make sure to install the gasket seals.
Tighten the nuts firmly by hand.
STEP 3. Connect the mains water supply to the adaptor
on the inlet port of the factory bypass (1).
STEP 4. Connect the house/application to the adaptor
on the outlet port of the factory bypass (4).
WITH FACTORY BYPASS (optional).
2
3
41
6
INSTALLATION

1. mains water supply (untreated water).
2. inlet of appliance (untreated water).
3. outlet of appliance (treated water).
4. house/application (treated water).
STEP 1. Install the 3-valve bypass system.
STEP 2. Screw the connection kit with nuts onto the elbow
connections of the appliance (2 & 3); make sure to install
the gasket seals. Tighten the nuts firmly by hand.
STEP 3. Connect the 3-valve bypass system to the adaptors
on the in (2) and out (3) elbow connections.
STEP 4. Connect the mains water supply to the inlet
of the 3-valve bypass system (1).
STEP 5. Connect the house/application to the outlet
of the 3-valve bypass system (4).
- We recommend the use of a stand pipe with air trap.
- To prevent backflow from the drainage system into
the appliance, always make sure to have an air gap
between the end of the drain line and the drainage
system itself; as a rule of thumb, the air gap should
be minimum 2x the diameter of the drain line.
- Always use separate drain hoses for the control valve
(evacuation of rinse water) and the cabinet's overflow.
- Lay-out the drain hoses in such a way that pressure
loss is minimized; avoid kinks and unnecessary elevations.
- Make sure that the sewerage system is suitable
for the rinse water flow rate of the appliance.
DRAIN
WITH 3-VALVE BYPASS SYSTEM
(not included).
2
3
1
7
1
4
INSTALLATION
STEP 1. Connect a 13 mm hose to the drain solenoid
of the control valve (1); secure it by means of a clamp.
STEP 2. Run the drain hose to the drainage system
and connect it to the stand pipe assuring sufficient air gap.
This drain line operates under pressure, so it may
be installed higher than the appliance.
STEP 3. Connect a 13 mm hose to the cabinet overflow
elbow, located at the back side of the appliance; secure
it by means of a clamp.
STEP 4. Run the drain hose to the drainage system
and connect it to the stand pipe assuring sufficient air gap.
This drain line does NOT operate under pressure, so it may
NOT be installed higher than the appliance.

STEP 1. Plug the transformers output lead into the socket
on the appliances power cord; secure it by means
of the TwistLock clamp.
STEP 2. Plug the transformer into an electrical outlet.
STEP 1. Make sure the bypass system is in 'bypass'
position.
STEP 2. Make sure the electronic controller of the
appliance is in service mode.
STEP 3. Open the mains water supply.
STEP 4. Open a cold treated water faucet nearby
the appliance and let the water run for a few minutes until
all air is purged and all foreign material that may have
resulted from the installation is washed out; close the tap.
STEP 5. Gently pressurize the appliance, by putting
it into service:
factory bypass:
1. open the 'outlet' valve;
2. slowly open the 'inlet' valve.
3-valve bypass:
1. close the 'bypass' valve;
2. open the 'outlet' valve;
3. slowly open the 'inlet' valve.
STEP 6. After 2-3 minutes, open a cold treated water
faucet nearby the appliance and let the water run for a few
minutes until all air is purged from the installation
and the resin bed is rinsed (it is normal for the rinse water
to show some discoloration!); close the tap.
ELECTRICAL
8
COMMISSIONING
PRESSURIZING
STEP 7. Check the appliance and all hydraulic connections
for leaks.
After the first regenerations of the appliance, some slight
discoloration of the treated water might occur.
This is totally harmless and will disappear rapidly!
BRINE CABINET
STEP 1. Add water conditioner salt to the brine cabinet.
ELECTRONIC CONTROL PANEL
STEP 1. Program the electronic controller.
NOTE!
3/4 Salt
1/2 Water
Fill the brine tank with salt up to 3/4 of its volume, then fill
the tank with water up to 1/2 of its volume (fill the tank
manually), wait approx. 6 hours until formation of brine
solution.
ADJUSTMENT RESIDUAL HARDNESS
WITH FACTORY BYPASS (optional)
INOUT

COMMISSIONING
Symbol Button Function
SCROLL to advance to
the next parameter
to increase the value
of the parameter
to decrease the value
of the parameter
UP
DOWN
POWER-UP
After power-up the display will show the installed
software version for a period of 5 seconds; f.e.:
EZ3P5f EZ3PB r14 9
ELECTRONIC CONTROL PANEL
STEP 1. Manually initiate a regeneration, by pressing
the scroll button; the display will show:
Regen in 10 sec
STEP 2. Leave the appliance in this position; the
countdown timer will countdown to 0 sec and start
a regeneration.
POWER FAILURE
In the event of a power failure, the program will remain
®
stored in the NOVRAM during an undefined period, while
the SuperCap will maintain the correct time of day during
a period of several hours; consequently, in case
of prolonged power failure, the time of day might
not be maintained; if this happens, the time of day will
be reset to 8:00 when the power supply is re-established,
while the indication will flash, indicating that the time
of day needs to be set.
When the power failure occurs during the execution
of an automatic regeneration, the appliance will
immediately return to the service mode; when the power
supply is re-established, the appliance will resume
the regeneration.
TIMER FAILURE
In the event of a timer failure, the display will show
the message:
If powering off/on the appliance doesn't solve this
problem, professional service is required.
Service Required
PERFORM REGENERATION
STEP 1. Adjust the residual hardness of the water that
leaves the appliance, by means of the adjusting screw,
incorporated in the 'outlet' valve of the factory bypass:
STEP 1A. To raise the residual hardness: turn the screw
counter clockwise; usually 1 turn corresponds to a residual
hardness of ±4 °f (±2 °dH), 2 turns to ±8 °f (±4 °dH).
STEP 1B. To reduce the residual hardness: turn the screw
clockwise.

ELECTRONIC CONTROL PANEL
REGENERATION MODE
CHECKING THE FLOW METER
In regeneration mode the display shows the actual
regeneration cycle and, where relevant, the total
remaining regeneration time and remaining cycle time:
The appliance can be reset to service mode at any time
by pressing the scroll button, as such manually
advancing it through the regeneration cycles.
In case of water usage, the remaining capacity counter
in the service display will count back per unit, i.e. per litre.
This way the correct functioning of the water meter
can be verified.
BRINE FILL
REGEN PENDING
Rgn:XXX CycY:ZZZ
Once the maintenance interval is reached, the display will
intermittently show the message:
While the appliance will continue to operate normally,
it is recommended to have preventive maintenance
performed by a professional.
Maintenance Now
SERVICE MODE
In service mode the display shows the time of day and the
remaining capacity:
8:01 1000L -
- Only available if the maintenance reminder function has been
activated and programmed by your supplier!
10
MANUAL REGENERATION
It is possible to manually initiate an immediate
regeneration or a delayed regeneration
(at the preprogrammed time of regeneration).
STEP 1. Press the scroll button; the display will
show:
Regen in 10 sec
STEP 2. If the control panel is left in this position,
the countdown timer will countdown to 0 sec and start
an immediate regeneration.
To cancel this mode, press the scroll button before
the countdown timer has reached 0 sec; the display will
show:
Language:English
PROGRAMMING INSTRUCTIONS
(BASIC SETTINGS)
- Before entering the programming mode, make sure that the
appliance is in service mode.
- In case no button is pressed in a period of 5 min, the control
panel will automatically return to the service mode;
any changes made will NOT be saved!
Regen @ 2:00
STEP 3. If the control panel is left in this position,
a delayed regeneration will be started at the indicated
preprogrammed time of regeneration.
To cancel this mode, press the scroll button,
the control panel will return to the service mode.
STEP 1. Press the scroll button and hold it for 2 sec
until the display shows:
Set time: 8:01
Press the up or down button to set the language.
STEP 2. Press the scroll button again; the display will
show:
MAINTENANCE REMINDER
HardUnit: °f
Press the up or down button to set the unit
of measure for water hardness. Make sure it is identical
to the unit of measure of the water hardness test kit
or water analysis report that is used to determine
the hardness of the incoming untreated water!
Press the up or down button to set the time
of day.
STEP 3. Press the scroll button again; the display will
show:

ELECTRONIC CONTROL PANEL
11
Exit
Press the up z or down button to save the
®
settings into the NOVRAM and exit the programming
mode.
STEP 5. Press the scroll button again, the display
will show:
Press the up or down button to set the
hardness of the incoming untreated water.
Set Hardn: XX °f
MAINTENANCE
Regularly the user should perform a basic check to verify
if the appliance is functioning correctly, on the basis
of the following control points:
1. Check settings of electronic control panel.
2. Measure water hardness before/after appliance.
3. Check drain line from control valve; there
shouldn't be any water flow (unless appliance
is in regeneration).
4. Check drain line from cabinet overflow; there
shouldn't be any water flow.
5. Check appliance and surrounding area; there
shouldn't be any water leakages.
ROUTINE CHECKS
Occasionally it may be necessary to put the appliance
hydraulically in bypass, i.e. to isolate it from the water
distribution system; f.e.:
- in case of an urgent technical problem;
- when it is not necessary to supply treated water
to the house/application (refill swimming pool, irrigation,...).
BYPASSING THE APPLIANCE
WITH FACTORY BYPASS (optionl)
1
2
INOUT
[1]
1
2
INOUT
[2]
SERVICE POSITION [1]
1. inlet valve to appliance is OPEN.
2. outlet valve from appliance is OPEN.
BYPASS POSITION [2]
1. inlet valve to appliance is CLOSED.
2. outlet valve from appliance is CLOSED.
STEP 4. Press the scroll button again, the display
will show:

MAINTENANCE POSITION [3]
1. inlet valve to appliance is OPEN.
2. outlet valve from appliance is CLOSED.
12
MAINTENANCE
1
2
INOUT
[3]
[1] 1
2
3
[2] 1
2
3
[3] 1
2
3
WITH 3-VALVE BYPASS SYSTEM (not included)
SERVICE POSITION [1]
1. bypass valve is CLOSED.
2. inlet valve to appliance is OPEN.
3. outlet valve from appliance is OPEN.
BYPASS POSITION [2]
1. bypass valve is OPEN.
2. inlet valve to appliance is CLOSED.
3. outlet valve from appliance is CLOSED.
MAINTENANCE POSITION [3]
1. bypass valve is OPEN.
2. inlet valve to appliance is OPEN.
3. outlet valve from appliance is CLOSED.
The appliance needs 'brine' for its periodic regenerations.
This brine solution is made from water, that
is automatically dosed in the brine cabinet by the control
valve, and water conditioner salt. The user should make
sure that the brine cabinet is always kept full of water
conditioner salt. Therefore he should periodically check
the salt level inside the brine cabinet and refill
it if necessary. The salt lid can be removed completely
to facilitate refilling.
Ideally the level of water conditioner salt inside the brine
cabinet is kept between 1/3 and 2/3. A lower level of water
conditioner salt can cause insufficient brine saturation,
resulting in a loss of softening capacity. A higher level
of water conditioner salt can cause salt bridging (hard
crust or salt bridges in the brine cabinet). When you
suspect salt bridging:
- carefully pound on the outside of the brine cabinet
to break loose the salt bridges;
- using a broom (or like blunt tool) carefully push
the salt to break it apart;
- pour warm water over the top of the salt to dissolve it.
WATER CONDITIONER SALT
To retain the appearance of the appliance, simply wipe
it with a damp cloth or clean it with a mild soap solution;
never use abrasive cleaners, ammonia or solvents.
APPEARANCE

MAINTENANCE
This appliance is manufactured from premium quality
material and assembled in safe conditions to assure
it is clean and sanitary. If installed and serviced correctly,
this appliance will not infect or contaminate your water
supply. However, as in any 'device' plumbed-in in your
water distribution system, a proliferation of bacteria
is possible, especially in case of 'stagnant water'.
Therefore this appliance is equipped with a 'days override'
feature, that will automatically rinse the resin bed
periodically, even in case of low or absence of water usage.
If the power supply to the appliance is disconnected
for a longer period of time, we recommend, when
the power supply is re-established, to manually initiate
a complete regeneration.
SANITIZING THE APPLIANCE
Other contaminants (f.e. iron) present in the feed water
can cause the resin bed to foul up, resulting in a loss
of softening capacity. An approved resin cleaner
can be used periodically to thoroughly clean the resin bed.
RESIN CLEANER
13

Prosimy o uzupełnienie poniższych danych
DANE DOTYCZĄCE INSTALACJI
Numer seryjny urządzenia:..........................................................
Model:.......................................................................................
Twardość wody zasilającej:..........................................................
Twardość wody wyjściowej:........................................................
Ciśnienie wody zasilającej:..........................................................
Data instalacji:.............................................................................
Nazwa firmy:...............................................................................
Nazwisko instalatora:..................................................................
Numer kontaktowy:....................................................................
PL
14

- Przed rozpoczęciem instalacji zmiękczacza wody,
zalecamy przeczytanie i dokładne zastosowanie instrukcji
zawartych w niniejszym dokumencie. Zawiera on ważne
informacje dotyczące bezpieczeństwa, instalacji,
eksploatacji i konserwacji produktu. System, który trafia
do Państwa rąk może różnić się nieznacznie od tego
przedstawionego na fotografiach, ilustracjach zawartych
w niniejszej instrukcji.
- Niestosowanie się do niniejszej instrukcji może stać
się przyczyną obrażeń ciała oraz uszkodzeń sprzętu
lub mienia. Tylko prawidłowa instalacja, rozruch
i eksploatacja zapewnia wieloletnie bezproblemowe
działanie zmiękczacza wody.
- Urządzenie zaprojektowane jest do zmiękczania wody
tzn. do usuwania minerałów powodujących dużą twardość
wody, jednakże urządzenie to niekoniecznie nadaje
się do usuwania innych substancji zanieczyszczających
wodę. Zmiękczacz nie będzie oczyszczał wody
ani nie będzie jej uzdatniał w innym zakresie
niż zmniejszenie twardości.
- Tylko kompetentna osoba, znająca obowiązujące lokalne
przepisy, może przeprowadzać instalację urządzenia.
Wszystkie złącza elektryczne i wodociągowe muszą
być wykonane zgodnie z lokalnymi przepisami.
CIŚNIENIE ROBOCZE: min. 1,4 / maks. 8,3 bar / 20-120 psi
- to urządzenie jest skonfigurowane tak, aby pracować optymalnie przy ciśnieniu pracy 3 bar (45 psi) ± 1/2 bar (7 psi);
niższe lub wyższe ciśnienie pracy może wpłynąć negatywnie na jego wydajność!
- należy regularnie sprawdzać ciśnienie wody.
- należy wziąć pod uwagę, że ciśnienie wody w nocy może być znacznie większe niż podczas dnia.
- jeśli jest to konieczne, należy zainstalować reduktor ciśnienia przed zmiękczaczem.
TEMPERATURA ROBOCZA: min. 2 / maks. 48 °C / 35-120 °F
- nie wolno instalować zmiękczacza wody w środowisku, w którym narażony będzie na wysokie temperatury
(np. niewentylowane kotłownie) lub na temperatury powodujące zamarzanie.
- zmiękczacz wody nie może być narażony na kontakt z czynnikami atmosferycznymi, takimi jak bezpośrednie
promienie słoneczne lub opady.
- nie wolno instalować zmiękczacza wody zbyt blisko podgrzewacza wody, zachować odległość przynajmniej
3 metrów orurowania pomiędzy wylotem wody ze zmiękczacza a wlotem wody do podgrzewacza wody;
podgrzewacze wody mogą czasami przekazywać ciepło z powrotem wzdłuż rury wody zimnej do zaworu
sterującego; należy zawsze instalować zawór odcinający na wylocie ze zmiękczacza wody.
ZŁĄCZE ELEKTRYCZNE: 230V-50Hz
- niniejszy zmiękczacz wody pracuje z zasilaniem 24V AC i wyposażony jest w transformator 230/24V-50Hz;
należy zawsze stosować transformator dostarczony z urządzeniem.
- upewnić się, że transformator podłączony jest do gniazda zasilającego, które zainstalowano w suchym otoczeniu
i z właściwymi parametrami znamionowymi oraz z zabezpieczeniem nadprądowym.
- Przed ustawieniem zmiękczacza, należy sprawdzić
czy nie ma on żadnych widocznych zewnętrznych
uszkodzeń, nie wolno instalować uszkodzonego
urządzenia.
- Do transportu zmiękczacza należy stosować wózek
ręczny. Nie przenosić urządzenia na ramieniu, aby
zapobiec wypadkom oraz obrażeniom. Nie kłaść
zmiękczacza na boku.
- Przechowywać niniejszą instrukcję użytkownika
w bezpiecznym miejscu i upewnić się, że nowi użytkownicy
zapoznali się z jej treścią.
- Zmiękczacz wody zaprojektowano i wyprodukowano
zgodnie z najnowszymi wymogami i przepisami
bezpieczeństwa. Niewłaściwe naprawy mogą być
przyczyną nieprzewidzianych zagrożeń dla użytkownika,
za które producent nie ponosi odpowiedzialności.
W związku z tym wszelkie naprawy powinny być
przeprowadzane przez kompetentnego pracownika,
znającego ten produkt i specjalnie przeszkolonego.
- Urządzenie powinno być utylizowane zgodnie
z wymogami dotyczącymi odpadów elektrycznych
i elektronicznych. W tym celu należy działać zgodnie
z obowiązującymi przepisami krajowymi i lokalnymi.
WAŻNE INFORMACJE
WARUNKI PRACY I WYMAGANIA
15

- W przypadku dużej koncentracji zanieczyszczeń w wodzie
zasilającej, zalecamy zainstalowanie filtra sedymentacyjnego
przed urządzeniem.
- Zdecydowanie zalecamy stosowanie elastycznych węży
do połączenia urządzenia z systemem dystrybucji wody;
należy stosować węże o dużej średnicy, aby ograniczyć
spadki ciśnienia.
- Jeżeli urządzenie nie jest wyposażone w fabryczne obejście
(opcjonalne), zdecydowanie zalecamy zainstalowanie
trójzaworowego systemu obejścia (nie dołączono
do niniejszego produktu!), w celu odizolowania urządzenia
od systemu dystrybucji wody w trakcie jakichkolwiek
napraw. System taki pozwala na wyłączenie wody
doprowadzanej do urządzenia, podczas gdy utrzymany
zostaje dopływ (nieuzdatnionej) wody do użytkownika.
Aby ułatwić proces instalacji, zdjąć pokrywę zbiornika
solanki oraz pokrywę główną urządzenia.
WLOT I WYLOT
OBEJŚCIE FABRYCZNE (opcjonalne).
2
3
41
INSTALACJA
1. główny dopływ wody (woda nieuzdatniona).
2. wlot do urządzenia (woda nieuzdatniona).
3. wylot z urządzenia (woda uzdatniona).
4. złącze odprowadzające wodę
do mieszkania/aplikacji (woda uzdatniona).
KROK 1. Nakręcić fabryczne obejście na złącza kolankowe
urządzenia (2 i 3); upewnić się, że zainstalowano uszczelki.
Mocno ręcznie dokręcić nakrętki.
KROK 2. Dokręcić przyłącza nakrętkami na obejście
fabryczne (1 i 4); upewnić się, że zainstalowano uszczelki.
Mocno ręcznie dokręcić nakrętki.
KROK 3. Połączyć główny dopływ wody ze złączką
na króćcu wlotowym obejścia fabrycznego (1).
KROK4. Połączyć złącze odprowadzające wodę
do mieszkania/urządzenia z króćcem wylotowym obejścia
fabrycznego (4).
16

1. główny dopływ wody (woda nieuzdatniona).
2. wlot do urządzenia (woda nieuzdatniona).
3. wylot z urządzenia (woda uzdatniona).
4. złącze odprowadzające wodę
do mieszkania/aplikacji (woda uzdatniona).
KROK 1. Zainstalować trójzaworowy system obejścia.
KROK 2. Nakręcić przyłącza nakrętkami na złącza
kolankowe ur z ądzen ia (2 i 3); upewnić s i ę,
że zainstalowano uszczelki. Mocno, ręcznie dokręcić
nakrętki
KROK 3. Połączyć trójzaworowy system obejścia
z króćcami na wlocie (2) i wylocie (3) złącz kolankowych.
KROK 4. Połączyć główny dopływ wody z wlotem
trójzaworowego systemu obejścia (1).
KROK 5. Połączyć złącze odprowadzające wodę
do mieszkania/urządzenia z wylotem trójzaworowego
systemu obejścia (4).
- Zalecamy stosowanie połączenia z instalacją kanalizacyjną
(spustową) przy pomocy syfonu.
- Aby zapobiec tzw. „cofkom” z systemu odprowadzającego
wodę do urządzenia, upewnić się, że zawsze ma miejsce
szczelina powietrzna pomiędzy końcem węża spustowego
a samym systemem odprowadzającym; bazując
na doświadczeniu, szczelina powietrzna powinna mieć
wymiar równy co najmniej dwukrotności średnicy węża
spustowego.
- Zawsze stosować oddzielne węże spustowe dla zaworu
sterującego (odprowadzenie wody płuczącej)
oraz dla przelewu w obudowie urządzenia.
- Rozmieścić węże spustowe w taki sposób, aby zminima-
lizować straty ciśnienia; unikać załamań i niepotrzebnych
wzniesień.
- Upewnij się, że system odprowadzania jest odpowiedni
do przepływu wody w trakcie regeneracji urządzenia.
SPUST
TRÓJZAWOROWY SYSTEM OBEJŚCIA
(nie załączony).
2
3
1
4
INSTALACJA
1
KROK 1. Podłączyć 13 mm wąż do cewki cylindrycznej
spustu w zaworze sterującym (1); zabezpieczyć zaciskiem.
KROK 2. Poprowadzić wąż spustowy do systemu
spustowego i podłączyć go do orurowania stałego
zachowując odpowiednią szczelinę powietrzną. Ten wąż
spustowy działa pod ciśnieniem, dlatego można
go instalować powyżej zmiękczacza wody.
Krok 3. Podłączyć 13 mm wąż do kolanka przelewu,
zlokalizowanego z tyłu urządzenia; połączenie zabez-
pieczyć zaciskiem.
Krok 4. Poprowadzić wąż spustowy do systemu
spustowego i podłączyć go do orurowania stałego
zachowując odpowiednią szczelinę powietrzną. Ten wąż
spustowy NIE działa pod ciśnieniem, dlatego NIE można
go instalować powyżej zmiękczacza wody. 17

ROZRUCH
PODŁĄCZENIE ELEKTRYCZNE
KROK 1. Podłączyć przewody wyjściowe z transformatora
do gniazda przewodu zasilającego w urządzeniu;
zabezpieczyć go za pomocą zacisku TwistLock.
KROK 2. Podłączyć transformator do gniazdka elektry-
cznego.
KROK 1. Ustawić system obejścia w pozycji zamkniętej
(obejścia).
KROK 2. Upewnić się, że elektroniczny sterownik
urządzenia jest w trybie roboczym.
KROK 3. Otworzyć główny dopływ wody.
KROK 4. Otworzyć kurek zimnej wody uzdatnianej
zlokalizowany w pobliżu urządzenia i pozwolić na przepływ
wody przez kilka minut, aż wypłukane zostaną wszelkie
zanieczyszczenia, powstałe wskutek działań instala-
cyjnych; zamknąć kurek.
KROK 5. Wytworzyć niewielkie nadciśnienie w urządzeniu,
poprzez włączenie go:
obejście fabryczne:
1. otworzyć zawór wylotowy;
2. powoli otworzyć zawór wlotowy.
obejście trójzaworowe:
1. zamknąć zawór obejścia;
2. otworzyć zawór wylotowy;
3. powoli otworzyć zawór wlotowy.
KROK 6. Po 2-3 minutach, odkręcić kurek zimnej wody
uzdatnianej zlokalizowany w pobliżu urządzenia
i pozwolić na przepływ wody przez kilka minut, aż całe
powietrze zostanie usunięte z instalacji; zamknąć kurek.
KROK 7. Sprawdzić szczelność urządzenia i wszystkich
złączy hydraulicznych.
WYTWARZANIE NADCIŚNIENIA
ZBIORNIK SOLANKI
KROK. 1 Dodać sól uzdatniającą do zbiornika solanki.
Po pierwszych regeneracjach urządzenia, może pojawić
się lekkie przebarwienie wody uzdatnionej.
Jest to nieszkodliwy objaw i powinien szybko zniknąć.
ELEKTRONICZNY PANEL STEROWANIA
KROK. 1 Zaprogramować sterownik elektroniczny.
USTAWIENIE RESZTKOWEJ TWARDOŚCI WODY
Z OBEJŚCIEM FABRYCZNYM (opcjonalne)
INOUT
18
UWAGA!
3/4 sól
1/2 woda
Napełnić zbiornik solanki solą do 3/4 jego objętości,
następnie napełnić zbiornik wodą do 1/2 jego objętości
(zbiornik napełniać ręcznie), odczekać ok. 6 godz. do czasu
wytworzenia roztworu solanki.

KROK 2. Pozostawić urządzenie w tej pozycji; licznik
odmierzy czas do 0 sek. i rozpocznie regenerację.
ROZPOCZĘCIE REGENERACJI
KROK 1. Manualnie rozpocząć regenerację naciskając
przycisk przeglądania wyświetlacz pokaże:
REGEN. ZA 10 SEK
ROZRUCH
ELEKTRONICZNY PANEL STEROWANIA
Symbol Przycisk Funkcja
PRZEGLĄDANIA przejście do
kolejnego parametru
zwiększa wartość
parametru
GÓRA
zmniejsza wartość
parametru
DÓŁ
WŁĄCZENIE ZASILANIA
Po włączeniu zasilania, wyświetlacz pokazuje
zainstalowaną wersję oprogramowania:
EZ3P5f EZ3PB r14
AWARIA ZASILANIA
W przypadku awarii zasilania, ustawienia programu
®
zostaną przechowane w NOVRAM przez czas
nieokreślony, a wbudowany kondensator SuperCap
zapamięta właściwą godzinę przez okres kilkunastu
godzin. Jeżeli jednak awaria będzie się przedłużała
to godzina może nie zostać zapamiętana i cyfry wskazujące
godzinę będą migać po ponownym załączeniu zasilania,
wskazując na konieczność ponownego ustawienia
godziny.
Gdy awaria zasilania ma miejsce podczas automatycznej
regeneracji, urządzenie natychmiast wróci do pozycji
roboczej; po ponownym załączeniu zasilania, urządzenie
powróci do trybu regeneracji.
AWARIA CZASOMIERZA
W przypadku awarii czasomierza, wyświetlacz pokaże
komunikat:
Jeśli odłączenie zasilania urządzenia nie rozwiąże
problemu, wymagany jest profesjonalny serwis.
Po osiągnięciu zaprogramowanej częstotliwości serwisu,
na wyświetlaczu pojawi się informacja:
KONTAKT SERWIS
PRZYPOMNIENIE O SERWISIE
- Dostępne w przypadku, gdy funkcja przypomnienia o serwisie
została aktywowana i ustawiona przez dostawcę!
19
KROK. 1 Wyreguluj twardość w wodzie wyjściowej
z urządzenia za pomocą śruby regulującej zintegrowanej
z wyjściowym zaworem fabrycznego obejścia:
KROK 1A. Aby zwiększyć twardość przekręć śrubę
w kierunku przeciwnym do ruchu wskazówek zegara;
zwykle jeden obrót odpowiada zmianie twardości o ±4 °f
(±2 °d), dwa obroty o ±8 °f (±4 °d).
KROK 1B. Aby zmniejszyć twardość, należy przekręć śrubę
w kierunku zgodnym z ruchem wskazówek zegara.

W takim przypadku urządzenie będzie pracowało
normalnie, lecz jest zalecane wykonanie serwisu
przeprowadzonego przez specjalistę.
SERWIS NATYCHM
TRYB ROBOCZY
TRYB REGENERACJI
W trybie roboczym wyświetlacz pokazuje godzinę oraz
objętość wody pozostałą do wykorzystania przed kolejną
regeneracją:
W trybie regeneracji wyświetlacz pokazuje bieżący cykl
regeneracji oraz, gdy ma to zastosowanie, całkowity
pozostały czas regeneracji oraz pozostały czas danego
cyklu:
8:01 1000L -
UZUPEŁNIĆ SÓL
ZASOLENIE
RGN:XXX CYKY:ZZZ
ELEKTRONICZNY PANEL STEROWANIA
REGENERACJA MANUALNA
SPRAWDZANIE PRZEPŁYWOMIERZA
W przypadku zużycia wody, licznik pozostałej objętości
w trybie wyświetlania roboczego będzie przeliczał wstecz
w danej jednostce np. w litrach. W ten sposób można
sprawdzić właściwe działanie przepływomierza.
Urządzenie może zostać przywrócone w tryb roboczy
w dowolnej chwili poprzez naciśnięcie przycisku
przeglądania oraz manualne przejście przez cykle
regeneracji.
Możliwe jest manualne rozpoczęcie regeneracji
natychmiastowej lub opóźnionej (wg zaprogramowanego
czasu regeneracji).
KROK 1. Naciskać przycisk przeglądania ,
aż wyświetlacz pokaże:
REGEN.ZA 10 SEK
KROK 2. Jeżeli panel sterowania pozostanie w tej pozycji,
czasomierz odmierzy czas do 0 sek i rozpocznie
regenerację natychmiastową.
Aby anulować ten tryb nacisnąć przycisk przeglądania
zanim czasomierz osiągnie 0 sek; aż wyświetlacz
pokaże:
KROK 3. Jeżeli panel sterowania pozostanie w tej pozycji,
opóźniona regeneracja zostanie uruchomiona według
wskazanego, zaprogramowanego czasu regeneracji.
Aby anulować ten tryb, należy nacisnąć przycisk
przeglądania następnie wyświetlacz powraca
do pokazywania komunikatów w trybie roboczym.
RGN:CZAS: 2:00
INSTRUKCJE PROGRAMOWANIA -
PODSTAWOWE USTAWIENIA
- Przed wejściem w tryb programowania, upewnić się,
że urządzenie jest w trybie roboczym.
- W przypadku nienaciśnięcia przycisku w ciągu 5 min, panel
kontrolny wróci automatycznie do trybu roboczego; a żadne
zmiany NIE zostaną zapisane!
Nacisnąć przycisk góra lub dół aby ustawić
język.
KROK 2. Nacisnąć ponownie przycisk przeglądania
wyświetlacz pokaże:
JĘZYK: POLSKI
Nacisnąć przycisk góra lub dół aby ustawić
godzinę.
KROK 3. Nacisnąć ponownie przycisk przeglądania
wyświetlacz pokaże:
C ZAS: 8:01
KROK 1. Nacisnąć przycisk przeglądania
i przytrzymać go przez 2 sekundy, aż wyświetlacz pokaże:
JEDNOSTK: °f
20
Table of contents
Languages:
Other SUPREME Water Filtration System manuals
Popular Water Filtration System manuals by other brands

National
National DLS2000 instruction manual

Pure Water Technology
Pure Water Technology PW90 CT Service manual

Envirco
Envirco MAC 10 LEAC Installation operation & maintenance

inventum
inventum IPF600R user manual

Whirlpool
Whirlpool WHED20 Installation and operation manual

Plymovent
Plymovent Smart"one" user manual