Ozone Forza Manual

Pilots Manual

CONTENTS
Thank You01
Warning02
Team Ozone 03
Your Forza04
Preparation 05
UnderseatMousse 05
SpeedSystem 05
ReserveParachuteInstallation 07
Fitting 11
Adjustments 13
ShoulderStraps 13
LumbarSupport 13
Leg/ChestStraps 13
FineTuningofthePod 14
Features 15
IntegratedCockpit 15
Anti-GPocket 15
HydrationAccessSystem 15
VelcroShoulderMounting 16
PulletAttachmentLoop 16
PodCatcher 16
RadioPocket 16
PenHolder 16
Care and Maintenance 17
Inspection 17
ChangingthePod 17
Technical Specications 19
Sizing 19
Materials 19
Towing 19
Ozone Quality Guarantee 20
v1.4 July 2017

THANK YOU WARNING
EN
02
01
Thank you for choosing Ozone.
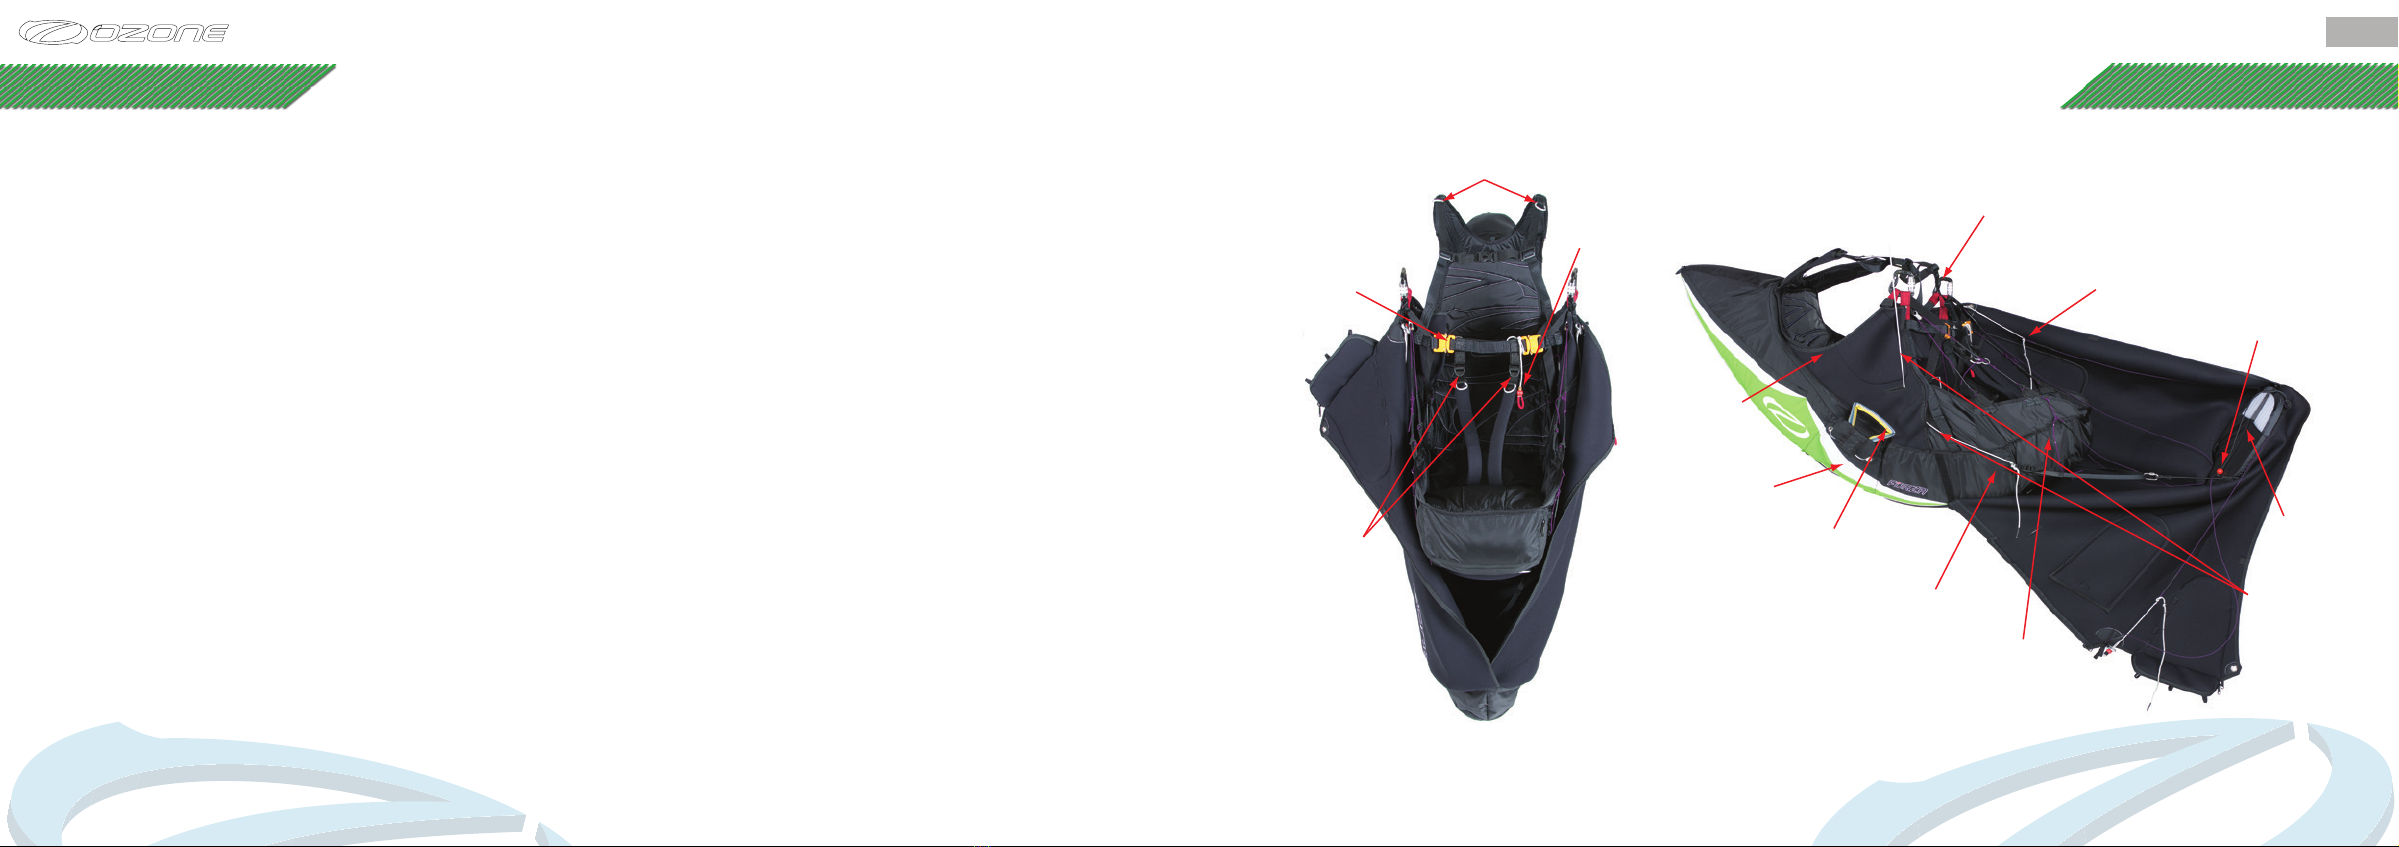
The Forza is a modern sleek high performance solo harness intended for experienced pilots. It is comfortable, light-
weight and aerodynamic, ideal for soaring, XC and competition ying. Ergonomically designed from the ground
up, the Forza is a versatile harness with all the necessary features required by the modern discerning pilot. The
board-less seat gives great handling and comfort whilst the minimilistic design and careful choice of materials al-
lows weight and bulk to be kept to a minimum and aerodynamic efciency to a maximum.
As a team of free ying enthusiasts, competitors and adventurers, our mission is to produce paragliding equipment
of the highest quality using cutting edge designs and the best technical materials available.
Our development team is based in the south of France. This area, which includes the sites of Gourdon, Monaco
and Col de Bleyne, guarantees us more than 300 yable days per year. This is a great asset in the development of
the Ozone range. We know that quality and value for money are essential considerations when choosing equip-
ment, so to keep costs low and quality high we build all our wings and harnesses in our own production facility.
During production all Ozone products undergo numerous rigorous quality control checks. This way we can guar-
antee that our equipment meets the same high standards that we expect ourselves.
If you need any further information about Ozone, the Forza, or any of our products please check www.yozone.
com. Or you can contact your local dealer, paragliding school or any of us here at Ozone.
It is essential that you read this manual before using your Forza for the rst time.
Safe Flying!
Team Ozone
• Paragliding is a potentially dangerous sport that can cause serious injury including bodily harm, paralysis and death. Flying an
Ozone harness is undertaken with the full knowledge that paragliding involves such risks. As the owner of an Ozone harness you
take exclusive responsibility for all risks associated with its use. Inappropriate use and or abuse of your equipment will increase
these risks. Any liability claims resulting from use of this product towards the manufacturer, distributor or dealers are excluded.
• Use only certied paragliders, harnesses with protector and reserve parachutes that are free from modication and use them only
within their certied weight ranges. Please remember that ying outside of certied congurations may jeopardise any insurance (e.g.
liability, life etc) you have. It is your responsibility as the pilot to verify your insurance cover.
• Make sure you complete a thorough daily and pre-ight inspection of all of your equipment. Never attempt ying with unsuitable or
damaged equipment.
• Always wear a helmet, gloves and boots.
• All pilots should have the appropriate level of license for their respective country and third party insurance.
• Make sure that you are physically and mentally healthy before ying.
• Choose the correct wing, harness and conditions for your level of experience.
• Pay special attention to the terrain you will be ying and the weather conditions before you launch. If you are unsure do not y, and
always add a large safety margin to all your decisions.
• NEVER y your glider in rain, snow, strong wind, turbulent weather conditions or inside clouds.
• If you use good, safe judgment you will enjoy many years of paragliding.
• The magnets used to close the cockpit may interfere with traditional magnetic compasses causing inaccurate readings. It is
therefore recommended to NOT use magnetic compasses with the Forza harness, if your ight instrument has an integrated
magnetic compass then this option should be disabled. The magnets have no detrimental effect on GPS reception or accuracy.
• Respect the environment and look after your ying sites. If you need to dispose the wing, do so in an environmentally responsible
manner. Do not dispose of it with the normal household waste.
Remember, PLEASURE is the reason for our sport!

TEAM OZONE YOUR FORZA
EN
04
03
Everyone at Ozone continues to be driven by our passion for ying, our love of adventure and our quest to see Ozone’s
paraglider development create better, safer and higher performing paragliders.
The paraglider design team is led by David Dagault; Dav has a wealth of experience both in competition, adventure
ying and paraglider design. Also on the design team are Luc Armant, Fred Pieri and Russell Ogden. Luc is a top
competition pilot and XC addict with a background in naval architecture, he brings a wealth of knowledge and ideas
to the design team. Fred is a mathematician, mechanical engineer and vol Biv specialist. Together with Luc he works
closely with Dav in the design process. Russ is a top competitor and test pilot, he can usually be found putting the latest
creations through a series of test manoeuvres. Harness development is lead by Erich Lotscher. Erich has a great deal
of experience designing and developing harnesses and is responsible for many of the latest Ozone harnesses including
the Ozium and Forza.
Mike Cavanagh is the boss and multiple winner of the UK XC league. When he’s not out ying he generally keeps
control of the mayhem. Promotion and team pilots are organised by BASE jumping legend and mini wing specialist Matt
Gerdes. He works closely with graphic designer Loren Cox. Loren is a keen pilot from Salt Lake City, USA.
Back in the ofce Karine Marconi, Chloe Vila and Isabelle Martinez run the show. These wonderful ladies look after the
ordering system, the dealers, the design team and the general day to day running of the company - without them it
would be chaos.
Our manufacturing facility in Vietnam is headed up by Dr Dave Pilkington who works relentlessly manufacturing gliders
and producing prototypes as well as researching materials and manufacturing processes for our future products. He is
backed up by a superb team managed by Khanh and Phong with over 700 production staff.
Shoulder
adjustment straps
Main Hangpoints
Reserve parachute
container
Ballast pocket
Back protecon pocket
Leg/chest strap
buckles
Foot plate
Foot plate angle
adjustment
Speed system
Reserve handle
Leg strap
adjustments
Lumber support
adjustment strap
An-forget loop
Pod catcher

PREPARATION
EN
06
05
ThenpassthelinethroughtheRonstanpulley,ensuringthatthepulleyisnottwistedbeforeroutingthelinethrough
thesmallgapintothepodcompartment.
Ensurethatthelinesruncleanlybetweenthepulleysandpassontheoutsideofallstructuralwebbing
straps.Double-checkthelineshavenotinadvertentlywrappedaroundanyofthestructuralwebbing
straps.AttachthespeedbarwithaBowlineknotandrepeattheprocedureontheotherside.
IMPORTANT: The speed bar lines must be of equal length, ensure they are not too short as this will inadvertently
activate the speed system when under tension in the air. Always double-check lengths and symmetry whilst on the
ground before ying.
Onceintheair,andwhenitissafetodoso,checkthatyoucanplaceyourfootonthebareasilyandthatthesystemoperatessmoothlyalltheway
tofullspeed.
UNDER-SEAT MOUSSE
Upondeliverytheunderseatmousseneedstobeplacedintothestructureoftheharness.
Insertthemousseintothesecond,rearmostzippedpocketlocatedinsidethepodandundertheseat.Donot
trytoforceitintothesmallerfrontballastpocket.Themousseismarkedtopandfront,ensurethatitisinserted
correctly,thenarrowendshouldbefacingforwards.
It should be a snug t but you should be able to close the pocket
withoutforcingthezip.
SPEED SYSTEM
Anintegratedspeed-barisincluded.
Toattach the speed bartothe Forza, rst routethe free end of oneof the accelerator systemlinesdown
throughthesmallreinforcedslitfoundonthesidepaneloftheharness.

EN
08
07
Attachtheharnessbridlestotheparachute’sbridleusingasuitableconnector(notsupplied).
Please note, the Forza is only suitable for reserve parachutes with a short bridle.
Open the reserve parachute container on the rear of the
harnessbyopeningthezips.Placethedeploymentbaginthe
space provided with white arrow on the deployment handle
facinguppermostso that it matches the white arrow on the
harness, the parachute lines should be underneath and the
handlepositionedcorrectlyasshown.
Payattentiontothebridles.Donotallowthemtobecomeentangled,theyshouldremainneatlyinplace
tothelefthandsideoftheparachutewheninserting.
RESERVE PARACHUTE INSTALLATION
TheForzahasanintegralreserveparachutecontainerwithitsownspecicparachutedeploymentbag.Thereservepocketiscertiedforparachutes
withavolumeofbetween3and6litres,itwillacceptmostmodernrescueparachutesincludingsteerableRogallotypes.
IMPORTANT: It is strongly recommended to use the deployment bag supplied with the harness.
WARNING: Ozone strongly recommends that the reserve parachute system is installed by a qualied professional.
Always seek experienced advice if you have any doubts.
Makesureyouperformapracticethrowfromastatichangpoint.Notonlydoesthisensurethecorrectfunctioningofyourdeploymentsystemitalso
allowsyoutobecomemorefamiliarwiththeinstallationprocess.
Please note, the parachute can only be deployed with the right hand.
To install a reserve parachute you should rst pack the parachute so that it matches the shape and
dimensionofthesupplieddeploymentbag.
Inserttheparachuteintothedeploymentbagandsecurethedeploymentbagwiththelinesinthe
normalway.Dependingonthesizeofyourparachuteyoucanuseeithereyeletforthebestt.

EN
10
09
The container can be closed by running both zips
forwardtowardsthereserveparachuteopening,allthe
waytotheeyelets,andthenbackagainunderneaththe
harnesstosecurethezips
Gentlypulltheparachutehandleandtopapoutofthewaysotheyareclearofthebottomaps
Usingsuitablepiecesofmagicstringorplasticpullthewhiteloopsthroughtheparachutecontainer
eyelets.
Closethelefthandap,whiteloop1shouldbepulledthrougheyelet2,andwhiteloopAthrougheyeletB
Therighthandapcannowbeclosed.Whiteloop1shouldbepulledthrougheyelet3andwhiteloopAthrough
eyeletC
Nowthetopapcanbepulledintoposition.Thehandlesitsbehindtheexteriormaterialofthetopap.
Passthenylonpinsofthereservehandlethroughthegapsinthematerialjustabovethetopapeyelets.
Pullthewhiteloopsthroughbothtopapeyeletsandpushthepinsthroughthewhiteloops.Themagneticsection
canbewrappedaroundthehandleandsecuredbehindittokeepitneatlyinplace.
Finallytheendsofthenylonpinscanbeneatenedintotheavailabletunnelasshown.

FITTING
EN
12
11
Beforeyourrstight,werecommendtosuspendtheharnessfromasuitablystrongpointtocheckthat
ittsyoucorrectlyandtobecomefamiliarwiththefeaturesandadjustments.Youcansettheshoulder
adjustment-strapstondthebestt,andadjustthelumbersupportsothattheyleaveyouinacomfortably
reclinedposition.
Toputtheharnessonrstplacetheshoulderstrapsoveryourshouldersandbringtheleg/cheststrap
throughyourlegs.
Fastentheleg/cheststrapwiththeorangebuckles.Ensurethatthebucklesareclosedproperlyand
thatboththeupperandlowerbuttonsclickintoplace.
The automatic pod closing system should now be
connected.Firstattachtheredloopofthelefthandpod
aptotheredballsituatedunderthemaillonontheright
handsideoftheharness.Theredballgoesthroughthe
redloop.
Nextpasstheredloopoftheanti-forgetsystemthrough
theeyeletontherighthandpodnexttotheinstrumentpanel.
Theredballfoundunderthelefthandmaillonshouldnow
bepassedthroughtheloopoftheanti-forgetsystem.
Theshoulderstrapretainerclipshouldnowbefastened.

ADJUSTMENTS
EN
14
13
LEG SUPPORT ANGLE
Theangleofthelegsupportcanbeadjustedusingwiththeknotsontheshortpurpleline.Usingthehigher
knotincreasesthesupportunderyourthighs.
FINE TUNING OF THE POD
Theharnesshasbeensetupsothatitwillsuitethemajorityofpilotsandfurtheradjustmentsshouldnotbenecessary,howeverifyouwishtomake
changesitispossibletodoso.Thismustbedoneonthegroundandisnotpossibleintheair.Thefootplateattheendofthepodissupportedby4
lines(purple),thesecontroltheoveralllengthofthepodandtheangleofthefootplate.
Minoradjustmentstotheoveralllengthofthepodcanbemadebymovingthepositionoftheknotsonthe
upperanti-forgetlines(grey)andthelower(purple)knots.
Theangleofthefootplatecanalsobechangedbymovingthe
positionofthebottom(purple)linesontheknots.
IMPORTANT: If any adjustments are made, make sure that the lines are symmetrical. If you do choose to make a
change, take your time to nd the position that suites you best, only make small adjustments each time.
SHOULDER STRAPS
ThelengthoftheShoulderstrapscanbemodiedusingtheadjustmentstraps.Adjusttheshoulderswhilst
standingupwiththeharnessonsothattheyarecomfortablysnug.Whilstsuspendedintheseatedposition
ensurethestrapsarecomfortableandsupportive,theyshouldnotbetootightnortooloose.
LUMBER SUPPORT
TheLumbersupportshouldbeadjustedforacomfortableyingposition.Preciseadjustmentscanbemade
intheairsothatyourlowerbackiscompletelysupportedandthereisnotensioninyourstomachmuscles.
Besuretoadjustthelumbersupportscarefully,settingthemtooloosewillresultinaveryreclinedposition
intheair.
LEG STRAPS/CHEST STRAP
The length of the leg straps and chest strap affects the overall stability of the harness. For maximum
weightshiftthecheststrapandlegstrapsshouldbeleftintheirlongestposition.Forgreaterrollstabilitythe
strapscanbetightened.Itisimportanttotestyandadjusttondthepositionthatisbestforyourstyleof
yingandoverallcomfort.

EN
16
15
VELCRO SHOULDER MOUNTING
Ontheoppositeshoulderstrap,thereisalightweightVelcromountingpointforasmallvario,Spotorothertracking
device,oraradio.
ADDITIONAL PULLEY ATTACHMENT LOOP
Locatednexttothenormalspeedsystempulleys,theadditionalloopsare
ideallysituatedifyouwishtoattach40mmRatchetpulleys(notsupplied).
POD CATCHER
Thepodcatcherallowsquickandeasylocationofthepodaftertakeoff.
Securetheredplasticballunderthelacesofyourshoe,thepodwillnow
beeasytolocateandaccessonceintheair.
RADIO POCKET
TheForzacomesequippedwitharemovableradiopocket,itissituatedontheinsideoftherighthandsidehangpoint.
PEN HOLDER
Ontherightsideoftheangledcockpitisapenholderfor
thosethatliketokeeptrackoftasksonpaper.
INTEGRATED COCKPIT / ANTI-G POCKET
TheCockpit is integraltothe pod, instruments canbe
attachedeitherdirectlytothecockpitoralternativelyto
theadditionalangledVelcoplate.Intheairitrestsover
the top of the chest strap to make it easy to view the
instruments.
Thecockpitfeaturesalargetoppocket,lowerbatterypocket,andamagnetsealed
pocketthatcanalsobeusedtostoreanAnti-Gdroguechute.Thisisaccessedfrom
themagneticallyopenedsidepocketontherighthandside.
PleasereadtheAnti-Goperatinginstructionsbeforeuse.
IMPORTANT: The magnets used to close the cockpit may interfere with traditional magnetic compasses causing
inaccurate readings. It is therefore recommended to NOT use magnetic compasses with the Forza harness, if your
ight instrument has an integrated magnetic compass then this option should be disabled. The magnets have no
detrimental effect on GPS reception or accuracy.
HYDRATION ACCESS SYSTEM
TheForzaincludesahydrationaccesssystemconsistingofaninnerpocketlocatedintherearstorage
pocketwithanopeningandanchorpointsforyourhydrationtube.
IMPORTANT: Make sure to route the drinking tube BELOW the reserve bridles
FEATURES

CARE AND MAINTENANCE
EN
18
17
TheForzawilllastyoumanyightsandmanyyearsiflookedaftercorrectly.Tokeepyourharnesscleanandairworthy,pleasenotethefollowing:
•AvoidexcessiveexposuretoUV,heatandhumidity.
•Packtheharnessdryandstoreinacooldryplace.
•Neverdragyourharness.
•Keepyouharnesscleanofdirt,oilsandanycorrosivesubstance.
•Usewaterandaclothtoclean.
INSPECTION
Forsafety,routineinspectionofallofyourequipmentisvitallyimportant.Ozonerecommendsaserviceintervalof12monthsinadditiontotheusual
preightchecks.
Forinspection,visuallycheckthestitching,webbingandallstructurallyimportantareas.Payparticularattentiontothewebbingaroundthehangpoint
areaunderthekarabiner,asthisiswhereabrasionismostlikely.
Ifyoundanydamageorifyouareinanydoubtmakesuretheharnesscheckedbyaprofessional.
REPLACING THE POD
ReplacementpodsareavailablefromyourOzonedealer.Itispossibleaftermanyhoursofuse,orafteranincidentthatresultsindamagethatthe
podrequireschanging.Toremovetheoldpod:
1. DisconnectthethinblackloopsfromtheCarabinners
2. Undobothzips(oneeachside)
3. TearthepodofftheVelcro.
4. Removethelongpurplelinesthatrunthroughthepulleysonbothsidesofthepod.
5. Disconnectthemaillonthatsecuresthespeedbartothefootplateelastic.
Replacing the pod is the reversal of the above procedure. Use a larks foot to connect the pod lines and make sure the thin red pod loops are
connectedtothecarabiner(step1).Ensuretousetheredloops,theshorterblueloopsareforattachingthepodtoanOzium(1)structure.
IMPORTANT: Ensure that the red pod loops (1) are attached to the carabiners. Failure to do so will put excessive load
through the zip causing failure.
3. Velcro
2. Zips
1. Red pod loops on carabiners
4. Purple pod lines
5. Speed bar attachment
IMPORTANT: Ensure the red
pod loops (1) are attached
to the carabiners. Failure
to do so will put excessive
load through the zip causing
failure.

OZONE QUALITY GUARANTEE
TECHNICAL SPECIFICATIONS
EN
20
19
AtOzonewetakethequalityofourproductsveryseriously,allourharnessesaremadetothehigheststandardsinourownmanufactur-
ingfacility.Everyharnessmanufacturedgoesthroughastringentseriesofqualitycontrolproceduresandallthecomponentsusedare
traceable.Wealwayswelcomecustomerfeedbackandarecommittedtocustomerservice.Ozoneguaranteesallofitsproductsagainst
manufacturer’sdefectsorfaults.Ozonewillrepairorreplaceanydefectiveproductfreeofcharge.Ozoneanditsdistributorsprovidethe
highestqualityserviceandrepair,anydamagetoproductsduetowearandtearwillberepairedatareasonablecharge.
Ifyouareunabletocontactyourdealerthenyoucancontactusdirectlyatinfo@yozone.com.
Summary
Safetyisparamountinoursport.Tobesafe,wemustbetrained,practisedandalerttothedangersaroundus.Toachievethiswemust
yasregularlyaswecan,groundhandleasmuchaspossibleandtakeacontinuousinterestintheweather.Ifyouarelackinginanyof
theseareasyouwillbeexposingyourselftomoredangerthanisnecessary.
Everyyearmanypilotsgethurtlaunching;don’tbeoneofthem.Launchingisthetimethatyouaremostexposedtodangersopractice
itlots.Somelaunchsitesaresmallanddifcultandconditionsaren’talwaysperfect.Ifyou’regoodatgroundhandlingyou’llbeableto
condentlyandsafelylaunchwhilstothersstruggle...practiceasmuchasyoucan.You’llbelesslikelytogethurtandmorelikelytohave
agreatday’sying.
Respecttheenvironmentandlookafteryouryingsites.Whentheharnesscomestotheendofitsusefullife,removeallthemetalparts
anddisposetherestinanenvironmentallyfriendltymanner.
Finally,RESPECTtheweather,ithasmorepowerthanyoucaneverimagine.Understandwhatconditionsarerightforyourlevelofying
andstaywithinthatwindow.
Happyying&enjoyyourForza.
TeamOzone
155 - 165 cm S S 5.00
165 - 175 cm M S 5.20
175 - 185 cm M M 5.35
185 - 195 cm L M 5.50
195 - 205 cm L L 5.65
Pilot height Harness Pod
SIZING
Theharnessesstructureisavailableinthreedifferentsizes;S,M,andLwhichcanbecombinedwiththreedifferentpodsizes;S,M,andLsuitable
forawiderangeofpilotheightsandbodycongurations.Werecommendthefollowingharnessandpodcombinations:
Weight*
*Includespod,rescuehandle,parachuteinnerbag,mousseandcarabiners.Excludesangledightdeck(130gr)
MATERIALS
Outer fabric (Cover)
NylonOxford210DPU2
Structure fabric
NylonOxford210DPU2
Pod
Neoprene3.0mm
Main webbing
Polyster25mm2000kg
Chest strap closure system
AustrialpinAluCobrabuckles
Bridle connection
DyneemaRope5mm,2400kg
TOWING
TheForzaissuitablefortowing.Thetowbridlesshouldbeattachedtothemaincarabiners,Ifyouhaveanydoubtsaskaqualiedtowing
instructororseetheoperatinginstructionssuppliedwithyourtowreleasesystem.

1258 Route de Grasse
Le Bar sur Loup
06620
France
Table of contents
Other Ozone Accessories manuals