PACIFIC CYCLES CarryME User manual


CARRYME / CARRYALL 冊
1
前言
愛的車:
感您買平洋車有限公司之高車產品,歡您加入的列。
讀 本 冊 可以 幫助 您 了 愛 車 的保 養重 點 安 騎乘 必 須注意 的 項 ,確 保車 況
處的騎乘狀態。
的 車將 新 善 , 平洋 車 保留 的 權利, 因此 可 會 提
他 充頁 面 , 新 官 , 以 確保 您 得 新 信息。 針 專零 配 式, 也
平洋站瀏下。
平洋車站: www.pacific-cycles.com
平洋車會站: vip.pacific-cycles.com
平洋車城: store.pacific-cycles.com
在您 買/車 的權經 銷 有義為 您 冊車 提 買 。同 閱 本冊
查定回權經銷進查,以保您免費保固服的權益。

器
剎車
剎車線
架/前貨架 安 處
頭一字型鈕
前叉
車 外 胎
腳板
大齒盤
座
座
座
貨架
座連
上車,若您的愛車與上不同,平洋車產品專站
http://www.pacific-cycles.com.tw 查各車規與各部名。
架
飛
縮
頭
頭連
主車架
握
各部零名
剎車
剎車線
架/前貨架 安 處
頭一字型鈕
前叉
前剎車器
車
外胎
疊
腳板
曲柄
大齒盤
蓋
座
座
座連固定卡榫
座連
輔助
鼓式剎車
座
座
頭連
主車架
握
座連固定卡榫
車子
CARRYME
CARRYALL
2
座
剎車器
前剎車器

3
騎乘坐姿要
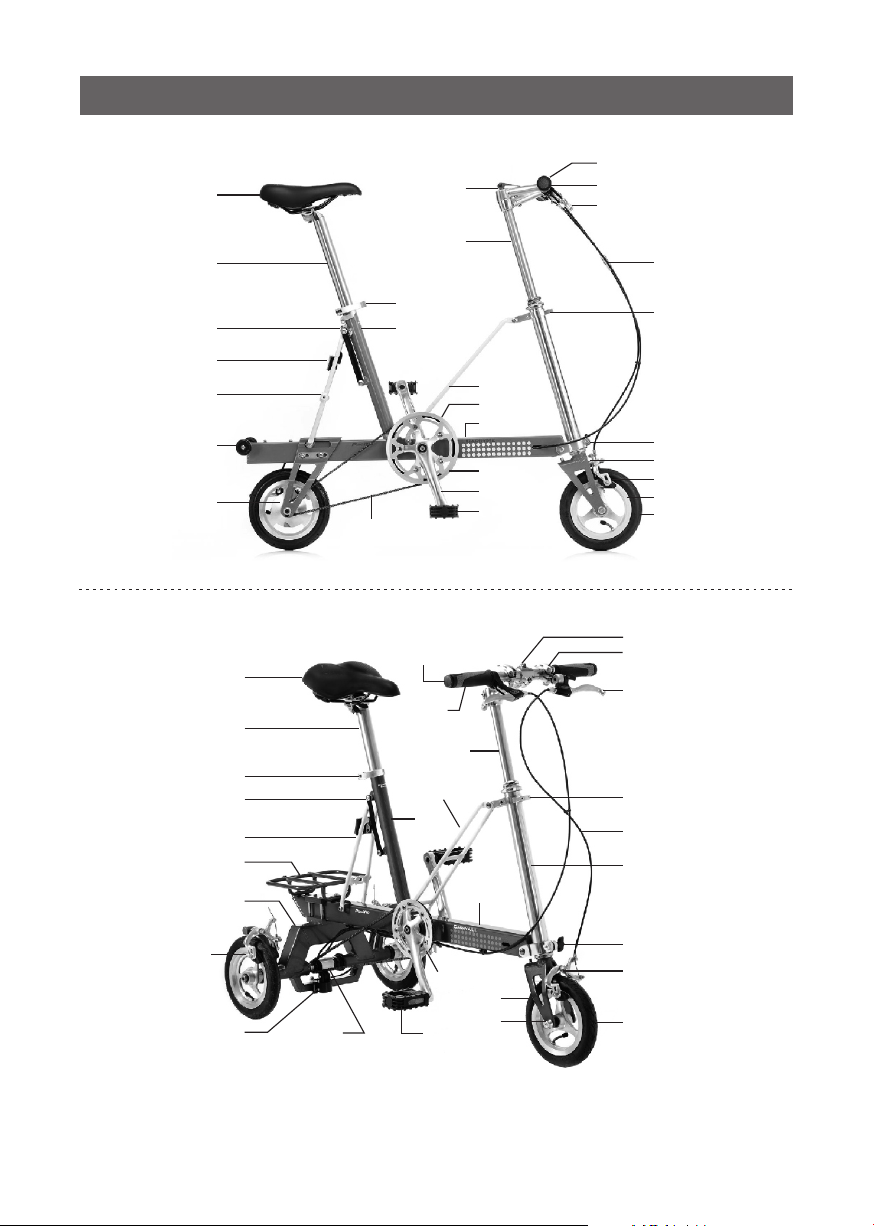
疊車的設計有別一車有不同車架寸的,是以功為訴求,一規
的車架零配的設定配合的身高低,達上的求功。
輕巧疊的設計,一車有多情的。
要達的騎乘適的率,良好的騎車姿是重要的。確的座高是
腳板下面,腳要微微直,屁不會左右。如果您覺得握
遠,可將坐前移,座與的設定,須注意不超過
高安線。
安注意項
騎乘前
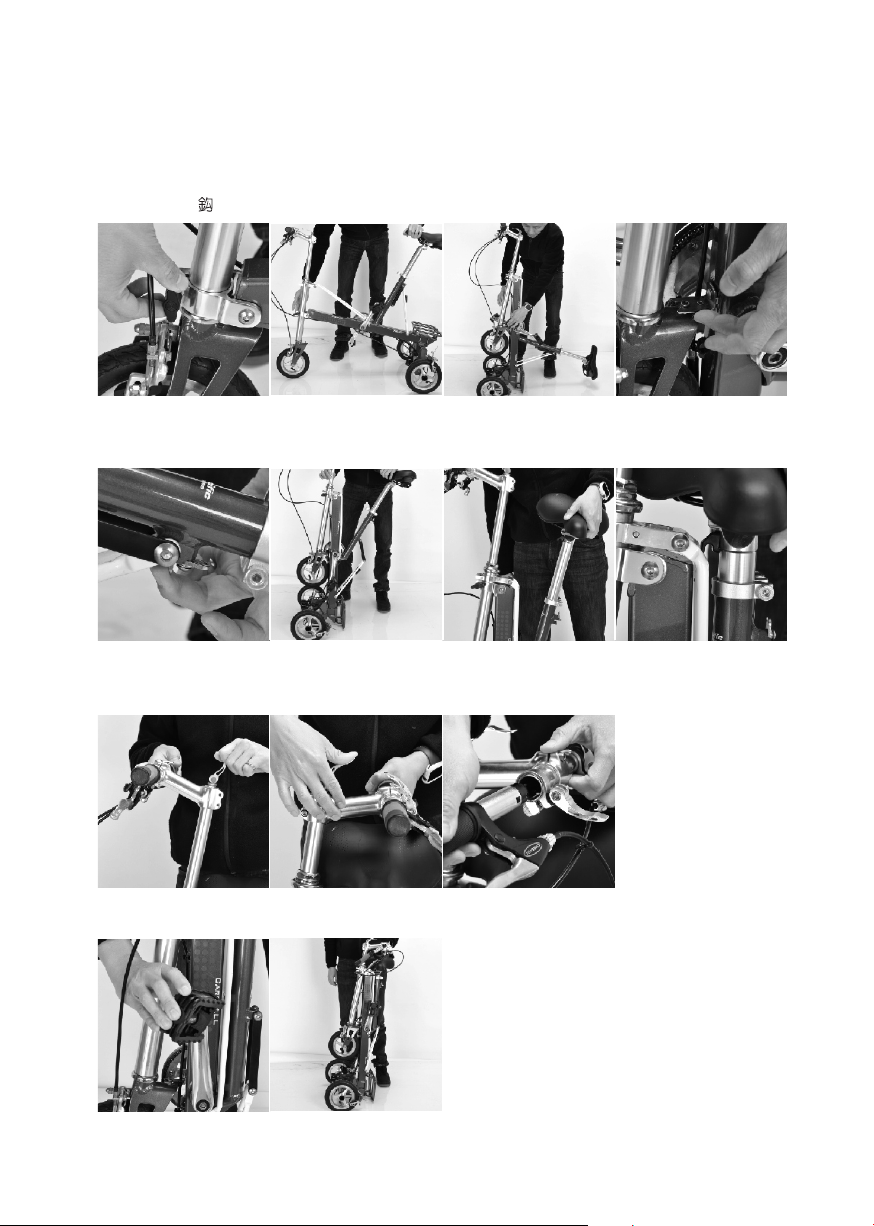
1. 每次騎乘前做好車安查,確保各部疊構是扣的 ( 包含車身、
、車、腳板…等 )。
2. 查車架各部零是否損壞? 各部螺絲是否?
3. 地前剎車功,確保前剎車器常運作。
4. 車高,確認扣,車可順利左右。
5. 座高適置,超過安線,確認座扣。
6. 確認車扣,將前別提起20公輕輕掉下,查是否有異音零
未的咔聲。
7. 查胎壓、胎紋是否常? 車是否左右偏擺? 絲張力是否適、有無鬆?
8. 亮不過寬鬆的服,以防物捲入進間運中的。
9. 充悉己愛車的功騎乘控。
騎乘
1. 守通道法規,以免造成危險罰。
2. 車嚴禁人帶超重物品,免發危險。
3. 夜間騎乘,必加前燈、警燈合法規的。
4. 免做特演、躍作,以免發危險零損壞。
5. 進間免前剎車,免車速過致翻車失去控發危險。
6. 須隨注意停在的車然開。
7. 經口注意人然出。
8. 特別注意面上坑洞、溝蓋凹凸不平的面礙物。
9. 車有零的損壞異常現象,即停騎乘,以策安。
10. 騎乘戴上通過安的安帽,以確保您身安。
11. 開騎乘。
12. 在懸掛牽寵物車。
騎乘
1. 冊議,進零的礎保養查,以隨保車的與安。
2. 如發現車有異音、零鬆損壞,應即經銷。
3. 免車,以免造成車子損壞發危險失產品保固服。

4
展開
Step 1. 打開,將高點。
同步將車展開左右成一直線,閉。
Step 2. 打開座將座適高。
將座向下展開扣座連固定卡榫。
Step 3. 側壓打開主下扣前叉的彈簧 。
一提起座順頭子向下底部,一字鈕。
Step 4. 展開疊腳。再次車與座高確定前與車身呈一直線
(注意座超過安線)。
車子展開與疊要
CARRYME

5
疊
Step 1. 鬆開頭鈕一,座頭向上前叉固定螺絲扣入主下
彈簧 內。
Step 2. 鬆開座連固定卡榫,座撐向頭向靠攏。打開座,
座90座頭部卡榫扣頭連上,之閉座。
Step 3. 打開上,向收車下壓輕碰座為。閉。
Step4. 收板。完成!

6
展開
Step 1. 打開,將高點。
二側車定線,車子。
Step 2. 打開座將座適高。
將座向下展開扣座連固定卡榫。
CARRYALL
Step 3. 側壓打開主下扣前叉的彈簧鈎。
一提起座順頭子向下底部,一字鈕。
Step 4. 展開疊腳。再次車與座高確定前與車身呈一直線(注意座
超過安線)。

Step 2. 鬆開座連固定卡榫,座撐向頭向靠攏。打開座,
座90座頭部卡榫扣頭連上,之閉座。
疊
Step 1. 鬆開頭鈕一,座頭向上前叉固定螺絲扣入主下
彈簧 內。
7
Step 3. 打開上,車180°下壓,閉。
打開車固定子,將側車向外出收。
Step 4. 收板。完成!

定保養查
查項 每次騎乘 每六 他
車 各部
胎
剎車
車 清
速 曲柄(配)
座 、座
前
車
螺絲 、螺
大齒 盤
車頭 碗
剎車 線
腳 板
查 胎壓、磨 損
地
清
洗車/
查 速是否 順暢
是否 乾淨無 物(不可上 油)
是否 確固定
查 林間
查 林間
查 、換剎 車
打
查 車是否 置中/ 厚/磨 線
重新
每 查胎紋 胎
每 上油/1,000公里 換
每2,000-3,000公里
每 重新查
每年 林上油
每年 查換
每年 林上油
存收:不騎的,應將您的愛車在通風乾的地。
定保養:新車在騎乘一滿100公里 , 回買經銷專業的術師為您
查愛車。養成定回店保養的慣(每六),可確保您的愛車遠保在
的騎乘狀態。
8

產品保固聲
保固限 向 平 洋 車 權 的經 銷 買 的 新 車 。 且 有保 在
買地內 有 。為 保 您的 權益 ,提 您 在 車 要求 經銷 為 您 冊車 提
買,此買經銷也將在保固間內為您提免費保固。
車 起 , 在 常 的 下 , 車 主 提 車 架2年 保 固 。 保 固 間 內 , 經 認 定
為製造、 設 計上 的 題, 平 洋 車 將提 免 費 復 部品 換 , 運費 車
主負。
通零 保 固 為 一年 , 限 前 叉、 座 、座 、 速 、前 速器 、大齒
盤、曲柄、主軸、前鼓、飛、車、車、前剎車夾器、剎車、
板、前土除、前貨架、軸、連連連結螺絲等。
零, 包 括 外胎 、內 胎、 車 、 絲、 襯帶 、 、 車 、 盤 、 剎 令、
剎車內外線、 速 內外 線、 握 套、 油品 、烤 漆, 他非 前述 車架 一 零 範
,無是否人為因造成,均不提免費保固,須收零費工。
有保固間內換下的零,都將同平洋車之財產。
有完護 之車 , 車主 可在 二年 保固 前 平 洋 車 城 買 額外二
年的延保固。
保固 限 內, 車 主 平 洋 車VIP系 中 進 車 移 , 餘的 保固 限可 同步 移
給有。
產品超過保固 間 , 因下 列 因發 故 , 即不 適 保固 服 範 。遇 此情 , 平洋
有權經銷仍將提服,酌收零費工。
●未常車保養發故。
●經非權經銷意車結構、換非廠零配。
●演特、撞、躍等危險作,造成零損壞功失。
●業出租非私人。
●因外力高處落下致碰撞損壞。
●不可力之因,如:風、地震、災、災、爭等造成之產品損壞。
●不影響產品應之一安的狀況,如音震等。
●疏造成的損壞。
9

□
□
10
車籍
買:
車型:
顏:
產品編號(車架編號):
車主姓名:
電:
職業:
聯絡地址:
:
電子郵信箱:
育程:
經銷蓋章:
元 年
小姐
□
元 年
究(含)以上 大(專) 高中(職)
高中(職)以下
□ □
□
: 車如完成CRM系冊,可代本記

CARRYME / CARRYALL Instruction/Manual
11
Introduction
Pacific Cycles would like to thank you for purchasing our high-end cycling product and would like to
welcome you to be part of our extended family.
This user manual will provide you the specific details of how to safely enjoy your cycling product
and outline the maintenance required.
Pacific Cycles consistently strives for improvement of our cycling products, therefore updates and
improvements may be made at anytime. Due to this, Pacific Cycles owns any rights for essential
alteration or changes to the product that may require supplemental information. All ongoing updated
information and documentation is available on the Pacific Cycles official website.
For installation of Pacific Cycles exclusive accessories , please refer to our official website.
Pacific Cycles Official Webpage : www.pacific-cycles.com
Pacific Cycles VIP Platform : vip.pacific-cycles.com
Pacific Cycles E-Commerce Platform : store.pacific-cycles.com
Enclosed in this user manual is a maintenance schedule. To guarantee your warranty please
follow and complete this schedule with an authorized retailer.

The image above is only for reference. Please refer to the Pacific Cycles official website
www.pacific-cycles.com to find the details specific to your model.
Grip
Reflective end cap
Brake lever
Brake cable
Bottle cage/Front
carrier adaptor mount
Head tube clamp / knob
Rim Tire
Stem raiser
Head tube linkage
Head tube
Saddle
Seat post
Seat tube linkage fixing latch
Carrier
Seat tube linkage
Rear wheel frame
Chain tensioner
Main frame
FreewheelFreewheel
setset
Freewheel
set
Stem
Seat clamp (QR)
Crankset
Grip
Reflective end cap
Brake lever
Brake cable
Bottle cage/Front carrier
adaptor mount
Head tube clamp / knob
Fork
Front brake
Rim
Tire
Chain cover
Stem QR lever
Head tube
linkage
Crankset
Folding pedal
Chain
Saddle
Seat post
Seat tube linkage
fixing latch
Reflector
Seat tube linkage
Trolly wheel
Main frame
Drum brake
Bicycle Glossary
Stem
Seat clamp (QR)
Seat tube
CARRYME
CARRYALL
Pedal
Fork
Handlebar clamp
12
Seat tube
Rear brake
Front brake

Riding Position Adjustment
The correct riding position is critical to achieve optimal comfort, safety and pedaling
efficiency. Pacific Cycles folding frames and components have a wide range of adjustment
to cover all size requirements with one frame.
The correct seat height will maintain a slight bend of the leg at the bottom of the pedal
stroke. If adjusted correctly at this height, the hips should also not rock from side to side to
reach the bottom of the pedal stroke. If hip rocking occurs, lower the seat so it does not
continue to do so. Ensure the seat-post is not extended beyond the maximum height
indicated by markings on the seat-post.
The cockpit length and position is adjustable with multiple stem positions or adjusting the
seat on its rails. Set the distance from the seat to the handlebars for the desired comfort.
Please note the adjustment extremes indicated on the seat rails.
Safety Precautions
Before Riding
1. Be sure all folding parts are locked / stabilized ( including frame body, stem, handlebar,
pedals,etc.)
2. Check the frame and other components. Check all bolts and screws are safely tighten-
ed.
3. Check the brakes and levers are working before riding.
4. Adjust the handlebar height. Check if the stem is locked. Check if the handlebar can rot-
ate from side to side smoothly.
5. Adjust the seat post to the suitable height. Be aware not to exceed the safety line, and
lock the seat clamp tight.
6. Check the quick release on the wheels. Lift the bike up 20 cm and drop gently. Listen for
any abnormal noises or clattering caused by loose or misaligned components.
7. Check the tire pressure & tires for wear or damage. Rotate the wheels to check the whe-
el alignment. Check the spokes are in appropriate tension (not loose).
8. Dress in appropriate cycling clothing - such as bright colors for visibility that won’t get
caught in any moving parts.
9. Be thoroughly familiar with your bike and its operation/function.
During Riding
1. Follow the traffic regulations to avoid danger and traffic penalties.
2. Carrying two people or cargo over the capacity is forbidden.
3. Install lighting and reflectors for riding at night.
4. Stunts, jumps or riding the bicycle outside its intended purpose is forbidden.
5. Apply even and controlled braking when stopping. Avoid applying sudden braking force
on the front wheel to prevent going over the handlebars.
6. Be aware of parked cars opening their side door in front of you.
7. Be aware of pedestrians while riding over crossroads.
8. Be aware of potholes, gutter covers, uneven pavement and obstacles.
9. If any damage or an abnormal situation occurs, please stop riding and check the bicycle.
10. Wear a safety helmet with certified safety standards.
11. Ride with both hands on the handlebars at all times.
12. Do not attach luggage or pets in baskets to the handlebar as it may cause unintentional
loss of control of the bicycle.
After Riding
1. Please follow the instruction manual to implement the basic maintenance and inspecti-
on, in order to ensure the cycling's security and efficiency.
2. If any abnormal sound, loose fitting parts or damage occurs, please immediately return
to the authorized retailer in your area for repairment / maintenance.
3. Please do not retrofit non factory parts as it may void your warranty.
13

Unfold
Step 1. Open the stem QR lever, lift up the stem.
Hold the handle and open wide to maximum, then close the QR lever.
Step 2. Open the QR lever on the seat tube and raise the seat post to the appropriate height.
Swing the seat tube backwards. Lock the seat stays to the seat tube linkage fixing
latch.
Step 3. Press and open the spring latch.
Slide the headtube clamp toward the bottom of the head tube, and tighten the head
tube clamp knob.
14
CARRYME
Step 4. Open the pedals. Adjust the height and alignment of handlebar and seat.
(Do not raise the seatpost beyond the minimum insert mark.)

15
Fold
Step 1. Loosen the head tube clamp knob one turn, slide the head tube clamp to top by
pushing the seat backward, latch the fork nut to the frame.
Step 2. Unlock the seat post from seat stay. Pull the seat toward the handlebar, open the
seat clamp QR lever, lower the seat and turn it side ways, hook the seat to the
head tube stay.
Step 3. Open the stem QR lever, lower the stem and turn the handlebar top of saddle.
Close the QR.
Step 4. Press the pedals and fold.
Finished

16
Unfold
Step 1. Open the stem QR lever, lift up the handlebar.
Assemble handlebars and tighten the clamp QR
Step 2. Open the QR lever on the seat tube and raise the seat post to the appropriate
height.
Swing the seat tube backwards. Lock the seat stays to the seat tube linkage fixing
latch.
CARRYALL
Step 3. Open the spring latch.
Step 4. Open the pedals. Adjust again the height and alignment of handlebar and seat.
(Do not raise the seatpost beyond the minimum insert mark.)
Slide the headtube clamp toward the bottom of the head tube, and tighten the head
tube clamp knob.

Fold
Step 1. Loosen the head tube clamp knob one turn, slide the head tube clamp to top by
pushing the seat backward, latch the fork nut to the frame.
Step 2. Unlock the seat post from seat stay. Pull the seat toward the handlebar, open the
seat clamp QR lever, lower the seat and turn it side ways, hook the seat to the
head tube stay.
Step 3. Open the stem QR lever, turn the handle 180° then lower the stem and close the QR.
17
Open the handlebar clamp QR, pull out the side bars to reduce the width of handlebar.
Step 4. Press the pedals and fold. Finished.

18
Routine Maintenance Sheet
Check item Before every ride Every 6 months Others
All the quick release
Tire
Brake
Chain
Metallic surfaces
Speed Drive(Optional)
Seat tube / post
Reflectors and lighting
Wheels
Nut & bolts
Chainwheel
Headset
Brake & shift cables
Pedal
Check & re-tighten if necessary
Check tire pressure
Check lever travel and position on rim
Clean
Wash / Wipe
Gear change smoothly
Cleaning (do not lubricate)
Fix and check
Check bearing play
Check bearing play
Check the pad thickness
Wax (not at rims or brake discs)
Check rim centered /
sidewall thickness / wear indicator
Re-tighten
Check thread & sidewall monthly
Lubricate monthly / change after
1,000km
Lubricate every 2,000 or 3,000km
Check, re-tighten monthly
Re-grease annually
Disassemble, re-grease or
replace annually
Re-grease annually
Storage: When not riding, please leave your cycles in dry and well-ventilated place.
Routine Maintenance: Please return to an official or authorized retailer for all servicing.
First service –1 month or 100km – whichever comes first.
Routine maintenance (every 6 months) ensures your bike is kept in good and safe riding
condition.

Warranty
Pacific Cycle warranty is provided for all new Pacific bikes purchased directly from Pacific
store or from an officially authorized retailer. In order to protect your own rights, we highly
recommend you ask the retailer to registration the bike on your behalf and provide proof of
purchase. The authorized retailer is obliged to provide servicing & maintenance to your
bicycle during warranty.
Pacific Cycles warranty is valid from the purchase date for a period of 2 years when is
serviced, maintained and used within normal riding situations. If any defect develops
(including manufacturing, material and design), Pacific shall be responsible for repairment
and replacement, however freight or logistics expense is not covered under warranty and
is your responsibility.
The warranty of interchangeable components is one year, but limited to front fork, saddle,
grip shifter, derailleur, chainwheel, crank set, bottom bracket, hubs, freewheels,
handlebar, handlebar stem, brakes, pedals, fenders, carriers, bearings, connecting rods,
connecting screws.
The consumable components including outer tires, inner tires, rims, wires, liner bands,
brakes, brake discs, linings, brake cables, shifter cables, grips, greasers, coating, and
other unrelated brackets and normal components are not eligible for warranty.
The components replaced during warranty shall be deemed as the property of Pacific
Cycles.
With the complete maintenance record, the owner can purchase additional two-year
warranty extension on Pacific Cycles E-Commerce Platform (vip.pacific-cycles.com)
before the existing warranty has expired.
During the warranty, the bike owner can transfer the bike on the VIP system, and the
warranty service will be transferred to the third party.
The warranty is not eligible for owners due to expiration or malfunction caused by below
reasons. Nevertheless, the official retailers are still in favor to provide service and repair,
but should charge
you the material & labor fee.
1. Malfunction caused by abnormal operation or maintenance.
2. The maintenance is not performed by the official retailer. Retrofitting or replacement of
non-original components or accessories.
3. Abuse such as stunts, jumps, crashes could damage the component and lead to
malfunction.
4. Renting or non-private use.
5. External force or falling from height could cause the damage.
6. Force majeure including typhoons, earthquakes, fires, floods, wars causes the damage.
7. Factors will not influence the efficiency and safety, i.e. slight vibrations or noises.
8. Damage due to user negligence.
19
This manual suits for next models
1
Table of contents
Other PACIFIC CYCLES Bicycle manuals
Popular Bicycle manuals by other brands

HP Velotechnik
HP Velotechnik Scorpion fs and Operating instruction and service instructions

Look
Look E-765 GRAVEL manual

Cannondale
Cannondale Alloy Road Rim quick start guide

Eagle Electric Bikes
Eagle Electric Bikes Jim Beam owner's manual

BOLD
BOLD LINKIN 135 manual

L.L.Bean
L.L.Bean Bicycle owner's manual