Pacific Sun Kore 7th User manual

Kore 7th
Ultimate dosing station
User Manual
ver. 2.0
Cloud Interface
www.Pacific-Sun.eu
IOcloud

Page 2
Kore 7th Manual / kHLab Edition
Table of Contents
1. Introduction......................................................................................... 3
1.1. Product Information and Features................................................................................3
1.2. The Kore 7th / kHLab Edition Package ........................................................................3
1.3. The Kore 7th / kHLab Device Features....................................................................... 4
1.4. kHLab Device Technical Specifications...................................................................... 4
2. Kore 7th / kHLab Device installation .................................................. 5
2.1. Proper device setup and installation............................................................................5
2.2. Kore 7th Connection Ports............................................................................................5
2.3. kHLab Magnetic Stirrer Preparation.............................................................................8
2.4. Tubing and cables connection.....................................................................................9
2.5. Calibration With Precise Digital Scale and Stand/Holder......................................... 11
3. pH Probe Setup, Maintenance and Preparation ...............................12
3.1. Initial pH Probe Preparation - First Use After Purchase............................................13
4. Reagent Solution Preparation...........................................................14
5. Kore 7th Wi-Fi Cloud Pacific Sun network setup..............................15
5.1. Connecting Kore 7th to your home Wi-Fi network ...................................................15
5.2. Adding Kore 7th to Pacific Sun Cloud........................................................................17
6. kHLab Pumps Calibration and Accuracy Check...............................21
6.1. Calibration With Precise Digital Scale and Stand/Holder........................................ 22
6.2. Channel #1 Calibration Process - Water Sample..................................................... 23
6.3. Channel #3 Calibration Process - Waste Water....................................................... 24
6.4. Channel #2 Calibration Process - Reagent.............................................................. 25
6.5. pH Probe Calibration process with PS Cloud Wizard.............................................. 26
9. Device Working Modes .....................................................................28
9.1. Monitoring Mode ........................................................................................................ 28
9.2. Control Mode.............................................................................................................. 28
7. Alkalinity Test Intervals ....................................................................28
8. Parallel Calibration............................................................................28
11. Device Working Stages.....................................................................29
10. Carbonate Solution Preparation ......................................................29
12. Kore 7th Software and Firmware Upgrade ......................................30
13. Troubleshooting................................................................................36

Page 3
Kore 7th Manual / kHLab Edition
1. Introduction
Congratulations on your Purchase!
The Pacific Sun Kore 7th dosing station and kHLab module are made with the highest
quality materials, and are built to last, helping you to take your reef to the next level!
The Pacific Sun Research and Development team is continuously testing, developing,
and releasing new products with new features.
This document serves to cover the basics of the Kore 7th dosing station and the kHLab
module. Details will be made available about additional new products and features as they
are released.
For questions, please contact us at service@pacific-sun.eu.
1.1. Product Information and Features
Why the Kore 7th/kHLab was developed?
The kHLab module automatically measures seawater alkalinity in the reef aquarium and
maintains the KH set value by automatically controlled Kore 7th doser pumps performance.
What distinguishes Kore 7th dosing station and kHLab from the competition’s products
is that it regulates the dosing of Alkalinity Additive solution (Sodium Bicarbonate or
Carbonate) as well as Calcium (Ca) and Magnesium (Mg) fluids and Mineral Salt.
Another important feature of kHLab/Kore 7th is the ability to control external Calcium
Reactors by controlling CO₂ dosing into the reactor chamber.
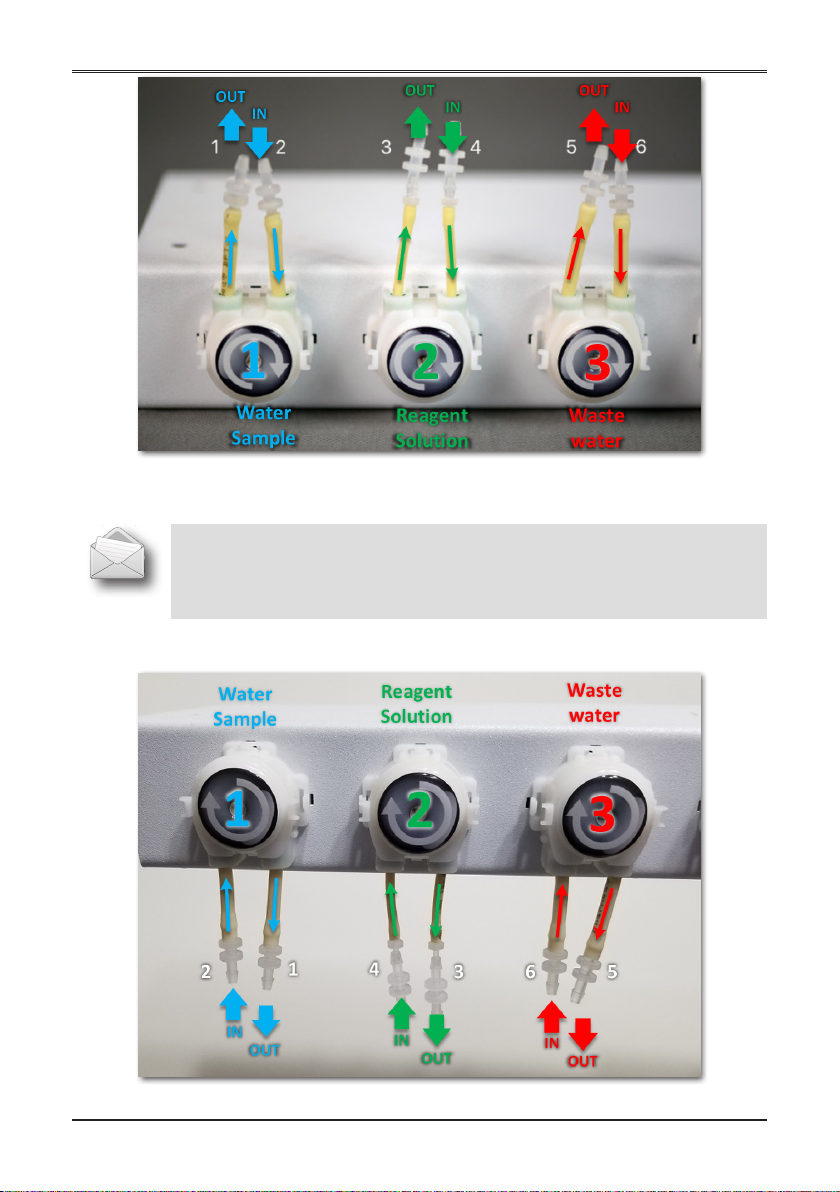
The Kore 7th/kHLab device and device performance should be monitored and serviced
on a regular basis. This includes service activities such as regular pH probe calibration
(in 4.0pH and 7.0pH solutions) and checking the dosing efficiency of channels #1 (Water
Sample) and #2 (Reagent Solution) as these can have a big impact on accuracy and proper
device operation.
An incorrect and/or unstable alkalinity level or sudden and/or accidental alkalinity level
changes in the aquarium water can significantly affect the condition/life of demanding
corals such as SPS which are becoming increasing popular in home aquariums. A correctly
configured and programmed device will quickly became a necessary tool for the aquarist in
maintaining alkalinity at a proper and stable level.
1.2. The Kore 7th / kHLab Edition Package
The Kore 7th / kHLab includes:
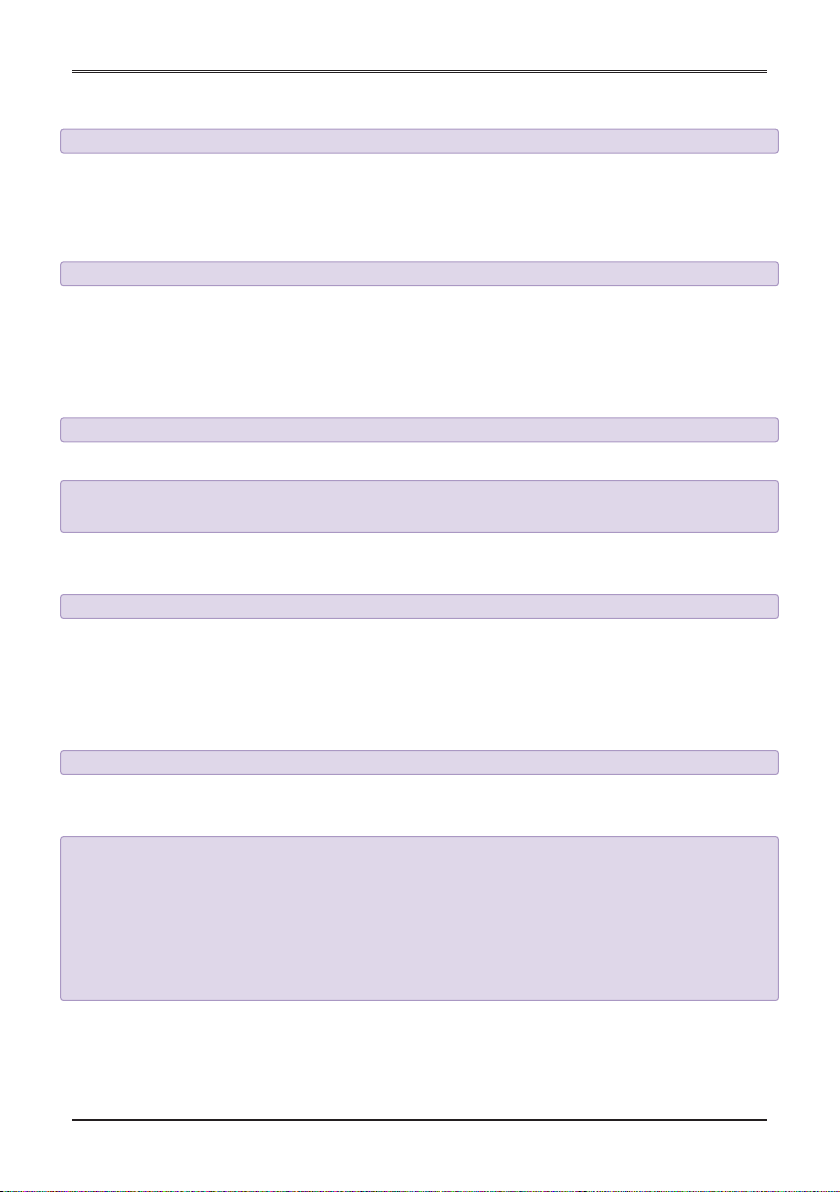
• Kore 7th dosing station with Wi-Fi antenna,
• kHLab module with control connection cable,
• 12V/2A Power supply (USA/EU/AUS/JAP),
• High-Quality Lab Grade pH Probe,
• 4.0pH and 7.0pH Calibration Fluids,
• 1000 ml super concentrated reagent (1 liter allows to prepare 50 liters ready for
use reagent and allows for about 1000 tests),
• Digital Scale with calibration holder/stand for very precise fluids calibration (0.01g),
• Connection tubings for kHLab,
• Magnetic stirring bar/pellet (inside kHLab module cylindrical chamber).

Page 4
Kore 7th Manual / kHLab Edition
1.3. The Kore 7th / kHLab Device Features
The kHLab has an ability to measure alkalinity with lab grade accuracy. It can provide
KH measurement values with 0.1 dKH accuracy. It’s a minimal confirmed resolution during
continuous device function. In the case of performing tests manually (in a small time
intervals) resolution can be greater.
1.4. kHLab Device Technical Specifications
‒ Systematic error ISO: ±0.03ml
‒ Numeric division: 0.05ml
‒ Random error: ≤ 0.05ml
‒ Alkalinity range: 5 to 15dKH
‒ Resolution: 0.1 dKH
‒ Device can work in two modes:
1. Monitoring mode
2. Control mode
‒ kHLab module dimensions:
L105 x D95 x H172 mm (L4-1/8 x D3-3/4 x H6-3/4 in) – w/out pH probe
‒ Kore 7th dimensions:
L510 x D120 x H50 mm (L20-1/8 x D4-3/4 x H2 in)
Monitoring (passive) and Control (active) modes:
1. Monitoring mode
During this Monitoring mode, the device measures the Alkalinity level and
registers all the values in memory, and displays them on doser LCD screen. It
makes no adjustments to the Alkalinity level.
2. Control mode
During Control mode device automatically adjusts and maintain the
amount of dosing fluids in channels 4/5/6/7 (Alk/Ca/Mg/Mineral Salt) to control
Alkalinity level. Channels are simultaneously controlled (at the same time).

Page 5
Kore 7th Manual / kHLab Edition
2. Kore 7th / kHLab Device installation
2.1. Proper device setup and installation
For optimum performance, the height difference between the kHLab device and the
water level surface from where the device will take the water sample for testing should
NOT exceed about 50-60cm (20-24”) and connection tubing length between the kHLab
module and Kore 7th doser should NOT exceed 100cm (59”).
The kHLab device can be mounted directly on a wall with the supplied wall mount, or it
can operate sitting on a flat surface.
Kore 7th Ultimate Wi-Fi dosing station
2.2. Kore 7th Connection Ports
Kore 7th Dosing Station back panel
1
2
3
4
5
6
7

Page 6
Kore 7th Manual / kHLab Edition
USB Port for Firmware upgrade.
DC pump Port for DC pump (ATO refill pump).
Optical sensor Connection port for optical sensor (used for ATO/AWC).
Temp sensor Digital temperature sensor port.
Floating sensors port Not used in newest version of software/firmware and designed
for future applications.
Antenna port External Wi-Fi antenna port. Required for proper work!
Reset button Hardware reset switch (short push generate reset signal to
main CPU).
Power supply port Required 12V 1A/2A power supply with 2.1mm plug.
kHLab Digital I/O port Used for connection kHLab Module or Magnetic Stirrer, DC
AWC pump etc.
pH #1 Connection port for pH probe nr 1 (kHLab module).
pH #2 Connection port for pH probe nr 2 (Calcium Reactor).
Important!
1. Make sure that a water mixing magnetic stirrer bar/pellet is put inside
kHLab module test cylindrical chamber.
2. Make sure to connect silicone tubing properly to individual Kore 7th
dosing pumps:
– Pump nr 1 - supplies watersample (aquarium water) to kHLab
test chamber. Do NOT exceed 100cm (39”) length between the
place of taking test water and the kHLab device.
– Pump 2 - supplies reagent solution for testing. Try to place
the reagent solution bottle as close as possible to the doser and
at a similar level.
– Pump 3 - removes waste water (tested water) from the
kHLab test chamber. This water can be drained into the aquarium
(we suggest near the pump sucking in water to the protein
skimmer). The length of the silicone tubing from the pump outlet
should not exceed 150cm (59”).
3. Make sure to connect the control cable between the kHLab device
and the Kore 7th dosing station.
1
2
3

Page 7
Kore 7th Manual / kHLab Edition
Pumps with connectors facing DOWN
Note:
Pumps heads can function with all connectors facing UP or DOWN.
Pumps with connectors facing UP

Page 8
Kore 7th Manual / kHLab Edition
kHLab module – top view
kHLab module – side view
2.3. kHLab Magnetic Stirrer Preparation
Make sure that inside the kHLab module test/mixing cylindrical chamber is a dedicated
water mixing magnetic stirrer bar/pellet (small white bar). That bar/pellet is necessary for
proper water sample mixing during perform tests. Also, connect the kHLab module to the
Kore 7th dosing station by using the dedicated 8-pin plug cable.

Page 9
Kore 7th Manual / kHLab Edition
2.4. Tubing and cables connection
Kore 7th and kHLab connection setup examples

Page 10
Kore 7th Manual / kHLab Edition
Connector 1 OUT Test Water Sample outlet to the kHLab module
- using silicone tubing, connect to the Water port at the top of the
kHLab module.
Connector 2 IN Test Water Sample inlet from the sump
- connect the silicone tubing to the acrylic tubing holder and
make sure the tubing end is always under water, including during
aquarium maintenance or any aquarium service work when the
main return pump is OFF.
Connector 3 OUT Reagent Solution outlet to kHLab module
- connect to kHLab top connector with label “Reagent”.
Connector 4 IN Reagent Solution inlet
- connect to the container/bottle with reagent solution - make sure
that the silicone tubing END is right at the container/bottle bottom
and NEVER exposed to air. Make sure that the container/bottle is
NEVER empty.
Connector 5 OUT Waste Water (tested) outlet from kHLab mode
- connect silicone tubing and best, place to the sump close to the
skimmer pump inlet.
Do NOT slide in the tubing to the skimmer pump inlet.
Connector 6 IN Waste Water (tested) outlet from the kHLab module
- connects the kHLab module to the connector with the label
“Waste”.
Waste Water
Reagent Solution
Water Sample

Page 11
Kore 7th Manual / kHLab Edition
Digital Scale
Calibration station setup
2.5. Calibration With Precise Digital Scale and Stand/Holder
The Precise Digital Scale and Stand/Holder are required for the Reagent Solution
Preparation and Kore 7th calibration process.

Page 12
Kore 7th Manual / kHLab Edition
3. pH Probe Setup, Maintenance and Preparation
Use only dedicated Pacific Sun pH probes for these calibrations. If you use probes from
another manufacturer, Pacific Sun cannot guarantee the accuracy that measured results
will match actual conditions. The typical lifespan for a pH probe in kHLab is about 16-18
months, but this time can be shortened in the case of long-term exposure to seawater. The
safe replacement time guaranteeing high accuracy is 12 months.
In order to obtain accurate measurements and best performance, the pH probe needs
to be calibrated at two points - pH 4.0 and pH 7.0. Remember to use only dedicated
calibration fluids at aquarium water temperature before performing pH probe calibration.
Closed bottles with calibration fluid for both pH 4 and pH 7 can be placed in aquarium
water to acclimate them to the system temperature.
Warning!
Do NOT let the tip of the pH probe dry out as damage to the probe will
result. The clear cap (small container) protects the pH probe from drying
out.
Warning!
The pH probe must always be calibrated before use. Remove the clear
cap (small container) from the pH probe before starting the calibration
process and before the use of the pH probe.
pH 4.0 and pH 7.0 calibration solutions

Page 13
Kore 7th Manual / kHLab Edition
Preparation steps for the calibration process:
1) Remove the storage clear cap (small
container) from the pH probe.
2) It's strongly recommended that before
first calibration the pH probe should be
immersed in tap water to a minimum 4cm
(1.5”) depth (maximum 9cm (3.5”)) and
soak for 24 hours. During this period of
time, occasionally, gently move and rotate
the pH probe several times in the water.
This process will stabilize the pH probe
parameters.
3) After removing the pH probe from tap
water, gently shake the excess water and
wipe using a fresh paper towel. Never
wipe the end probe tip. Just dry by
gently touching/dabbing the end tip with
a paper towel.
Important!
Never expose pH probe to the air for more than 3-4 minutes. The pH probe
should be always in the water or in it's transport protection container.
3.1. Initial pH Probe Preparation - First Use After Purchase
BEFORE calibration
soak for 24h
in Tap Water
Important!
Due to its physicochemical properties, the pH probe will take some time
to stabilize and provide accurate/repeatable results. Consequently, it is
recommended that during the first days/weeks of using the pH probe, the
calibration procedure be carried out more frequently than recommended.

Page 14
Kore 7th Manual / kHLab Edition
4. Reagent Solution Preparation
This device preparation step is very important. If the reagent dilution ratio is not correct,
the tested results may differ from the actual alkalinity levels. To obtain accurate results, we
strongly suggest using the digital scale for reagent dilution.
Important!
The 1000ml of SUPER Concentrated Reagent included in the package
has to be diluted with RO/DI water (TDS=0) before use in 149 ratio.
EXAMPLE: 100ml of concentrated reagent has to be added to 4900ml of
RO/DI water (TDS=0).
Before beginning the reagent solution preparation steps, prepare two containers:
‒Measuring Container - must have a minimum of 100ml capacity for measuring
the correct amount of concentrated reagent and RO/DI water (TDS=0);
‒Target Reagent Solution Container - must have a minimum of 500ml capacity
for mixing concentrated reagent with RO/DI water (TDS=0).
To prepare ready to use 500ml of reagent solution follow these steps:
1) Prepare an empty Measuring Container.
2) Place the Measuring Container on the digital scale.
3) Turn ON the digital scale.
4) Wait a few seconds and then zero-out the digital scale by clicking (T) Tare button.
Before starting reagent measurement, the digital scale must show 0.00 g on the
LCD display.
5) Make sure that the digital scale is showing [g] as the weight unit. If not then start
clicking (M) button until you see [g] gram unit on the display.
6) Measure exactly 10g of reagent (from a 1000ml bottle with SUPER concentrated
reagent included in the package).
7) Pour out the measured amount into the Target Reagent Solution Container.
8) Place the empty Measuring Container back on the digital scale.
9) Wait a few seconds and then zero-out the digital scale by clicking (T) Tare button.
10) Pour in exactly 490g of RO/DI water into the Measuring Container, then add that
measured RO/DI water into the Target Reagent Solution Container.
11) After adding the whole (10ml of SUPER concentrated reagent and 490ml of RO/DI
water) mix everything by shaking the Target Reagent Solution Container several
times.
The prepared reagent solution is ready for use. We recommend preparing no more than
5000ml of ready to use Reagent Solution. This amount of solution can last for up to 37
days of performed Alkalinity tests (12 tests/day).
SUPER Concentrated
Reagent RO/DI water Reagent Solution
10ml 490ml 500ml
100ml 4900ml 5000ml

Page 15
Kore 7th Manual / kHLab Edition
1. Connect power to Kore 7th.
Find your doser on you Wi-Fi network
list devices.
Click Connect directly to the Kore7th
Wi-Fi Network.
2. Find a sticker on the Kore 7th with
a Wi-Fi network password:
KORE####
Note: #### - it's your unique number
5. Kore 7th Wi-Fi Cloud Pacific Sun network setup
5.1. Connecting Kore 7th to your home Wi-Fi network
3. Enter your Kore 7th-### Wi-Fi
network password.
Next Click Join
4. Make sure you are connected to
Kore 7th-### Hotspot.
Connected
Kore 7th is ready for
the PS Cloud setup
1
1

Page 16
Kore 7th Manual / kHLab Edition
5. Open the Kore 7th WiFi
network setup.
Open your Internet Browser
and type the Kore7th doser
WiFi network IP address
192.168.4.1 into the address
field.
http://192.168.4.1
Switch to STA+AP mode
Under WiFi Association
you should see Scanning for
available home Wi-Fi networks.
6. Connect Kore 7th to Home
WiFi network.
Select your Home WiFi
network under Network
SSID.
Type in your Home WiFi
network in the password
field under the WiFi
password, if applicable.
Next Click: Connect!
After this Kore7th will be available
under your Home WiFi network
usually with IP address format:
192.168.#.###
1
1
1
1
2
3
2
3
7. Restart Kore 7th.
Power OFF and ON the Kore 7th.
Disconnect power and Connect
back.
On the LCD screen, see and
take a note of the IP Address in a
similar format.

Page 17
Kore 7th Manual / kHLab Edition
5.2. Adding Kore 7th to Pacific Sun Cloud
1. Connect to your home
Wi-Fi internet network, open
Internet Browser, and go to the
following address:
https://cloud.pacific-sun.eu
Click Create an account
2. Create Cloud Pacific Sun
account.
Enter Email address
Enter Password
Enter Password Again
Next Click Submit
1
2
3
1
1
2
3
1
3. After login, on the
Dashboards:
+
Click Add new tank
1
1

Page 18
Kore 7th Manual / kHLab Edition
4. Add a Tank:
Type in your preferred Name
Click Add tank
1
1
5. Under your tank Name:
+
Click Add Device
1
1
6. Select Kore 7th from the list
of devices:
Click Add Device
1
1

Page 19
Kore 7th Manual / kHLab Edition
7. Under your Client ID:
Click the GREEN icon
1
1
8. Connect Kore 7th to your
Wi-Fi:
Step
Click Next
9. Configure device and
Ready:
Step and
Use your Kore 7th
IP address
Click Configure!
Note: You can see the Kore7th
IP address on the LCD screen
after power OFF/ON in a
similar format:
192.168.#.###
1
2
3
4
5
5
4
1
2
3
1
2
3

Page 20
Kore 7th Manual / kHLab Edition
10. Kore 7th added to the
PS Cloud, and ready for
the calibration process,
configuration and
operation.
Other manuals for Kore 7th
2
Table of contents
Other Pacific Sun Laboratory Equipment manuals