pagertec PT760 User manual

Instructions for PT760 with AT-102

2
Thank you for choosing Pagertec
Thank you for choosing Pagertec as your provider for your wireless paging requirements.
We greatly appreciate your condence in our products. At Pagertec our greatest commitment
is providing you with total customer satisfaction. Please take a few minutes to review this
manual prior to installing and operating your system. The manual will provide you with
installation instructions, and offer suggestions to ensure you receive all of the many
benets your system can provide. Additionally, this manual will assist you with problem
determination and offer helpful advice when seeking customer service. We are condent
Pagertec has the most responsive customer service available within the industry. Please
do not hesitate to contact out Customer Care, if you have any questions. We look forward
to a long and mutually rewarding partnership.

3
PT760 With AT-102
PAGING SYSTEM

4
Installing the Transmitter
The rst consideration in the placement of the transmitter is convenience. It should be
readily accessible in a central location within the paging area. Pay close attention to
nearby obstructions such as walls, pipes, ducts, mirrored glass, or other similar barriers
that may weaken or misdirect transmitted signals. Certain materials and construction,
especially metal, have the potential to partially or completely block the paging signal. The
next consideration involves safety. Ensure the unit is securely mounted and away from
liquids, extreme heat and possible physical damage. Also remember that the transmitting
unit requires a 110V AC power outlet. Be sure an antenna is attached prior to applying
power to avoid damage to the transmitter. An optional molded plastic cover is available
as an accessory purchase, to protect the transmitter, especially in areas where spillage is
possible.
For best results, the transmitter antenna must be vertical. Ideally the transmitter should
be centrally located within the area where paging is to occur. Since this is not always possible,
range testing at different locations may be required to obtain the desired performance. Once the
Desktop Transmitter and antenna have been installed, plug in the power adapter. Once
powered the transmitter will display ‘Enter Number’’ indicating it is ready to send a page.
We recommend some type of surge suppressor on the power supply for protection. Power
surges are not covered under system warranty.
SYSTEM PROGRAMMING
To enter programming mode, press the “SETUP” button on the transmitter and enter the
password “4545” followed by “ENTER”. If the password is accepted, the display will show
“MENU OPTION UP DOWN”. (Use the “↑”& ”↓” key to scroll through the different menu
options or press “CANCEL” to exit the system programming menu.)

5
SET TIME
With this feature, you can setup current time into the Transmitter. At the “SET TIME”
menu press “ENTER” set the hour using Number key and then press, use “#” to set AM/
PM. Once you have set the correct time press “ENTER”
SET ALERT MODE
(Feature Not Available)
SET ALERT TIME
(Feature Not Available)
SET PAGER OFF
(Feature Not Available)
SET OUT OF RANGE
(Feature Not Available)
FIELD TEST
(Feature Not Available)
SET KEY TONE
With this Feature you can turn ON/OFF the beeping sound of the transmitter when the
buttons are being pressed on the transmitter. To change the option press “ENTER” and
use the up and down arrow until you select your desired choice. Then Press “ENTER”.

6
PT- 760 PAGER Functions
Turn Pagers On: The pagers come with the battery installed. To turn a pager on, press
the “GREEN” button.
Handing out the pagers: Give the manager a pager. Note their pager number (on the
back of the pager). Tell the Staff Member that the pager will vibrate if they are needed.
Tell them to press the “GREEN” Button 2 times to stop the page.
Changing the Alert (OPTIONAL – not enabled on some pagers) Press the “RED”
button. The display shows “The Menu” Use the “Right” and “left” button to go to the
different options and press the “Red” button to select the desired function. Press the
“RED” button again to save the new alert.
To Page a Manager pager: From the transmitter, press the corresponding pager number
then Press “SEND”. The Staff pager will vibrate and display will display a message
(Display Message is OPTIONAL – not enabled on some pagers). Press the “GREEN”
button 2 times to stop the alert.
To Delete a Message: Select the message to be deleted by pressing the “RED” button.
Press the “RIGHT” button 3 times and the display will show “DEL ALL MSG?” Press the
“RED” button 2 times to delete the message.
Turn Pagers Off: Press the “RED” button, then press the “RIGHT” button 2 times until
“ON/OFF Pager” appears in the LCD window. Press the “RED” button to conrm and turn
the pager OFF.

7
KEYS
ICONS
FUNCTION KEY
READ KEY
SHIFT RIGHT KEY
SHIFT LEFT KEY
------------------------------- In-Range indicator
------------------------------- Tone Alert Indicator
------------------------------- Vibration alert Indicator
------------------------------- Silent Alert Indicator
------------------------------- Message Indicator
------------------------------- Low Battery Indicator
------------------------------- Alarm Function Active
------------------------------- Delete All Messages
------------------------------- Mail-drop (alert setting menu)
------------------------------- Normal message (alert setting menu)
------------------------------- Escape
------------------------------- Set Alert
------------------------------- Pager On / Off
------------------------------- Set Time
------------------------------- Duplicate Message
------------------------------- Silent Receiving
------------------------------- Set Vibrator Alert
------------------------------- Set Alarm
------------------------------- Auto On / Off set

8
------------------------------- Timer
------------------------------- LCD contrast adjustment
------------------------------- Power on Indicator
------------------------------- Duplicate Message
------------------------------- New Unread Normal Message
------------------------------- Read “Normal Message” Indicator
------------------------------- Protect / Lock Message
------------------------------- New unread Mail-drop Message
------------------------------- Read Mail-drop Message
READING NORMAL MESSAGES
From stand-by press the READ KEY twice to view message icons. When a normal message
is received pager will display KEY to select the message to be read. Once the message is
read display will show S for the read messages.
READING MAIL-DROP MESSAGES
If the pager programmed to receive Mail-Drop message this will be indicated with a different
alert tone and pager will display for each unread message. From stand-by press READ
KEY twice to select message icon. To read the message, press and hold the RIGHT
SHIFT KEY to remove the cursor to Mail-Drop icon if the cursor is under normal message
icon. Press the “READ KEY” to read the message. If there are more then one message
then press Left or Right shift keys to select and read the other messages.

9
SAVING MESSAGES TO NOTEBOOK
Select the message to be read either from Normal Message or Mail Drop then press the
FUNCTION KEY once. Move cursor to using the SHIFT RIGHT KEY. Press the FUNC-
TION KEY once and the message will be stored in the notebook memory.
READING NOTEBOOK MESSAGES
From standby-by, press “READ KEY” twice to view message icon. When a notebook message is
stored notebook icon is displayed. Move cursor to note book icon using the SHIFT RIGHT
KEY. Then press READ KEY to read stored message. To read additional messages stored
in Note book continue press the READ KEY. for each unread message. Use the SHIFT
RIGHT KEY or SHIFT LEFT
STARTING TO OPERATE PAGER
Insertion of Battery
12:31
10/25 SAT
FO P1 1.515V
UNICOM
Insert AAA battery. Screen will display Condition of battery. After a short period screen will
change automatically and will display Supplier Name/User name/Company Name etc., and
then screen will change to normal receive/stand by mode. mode.
10
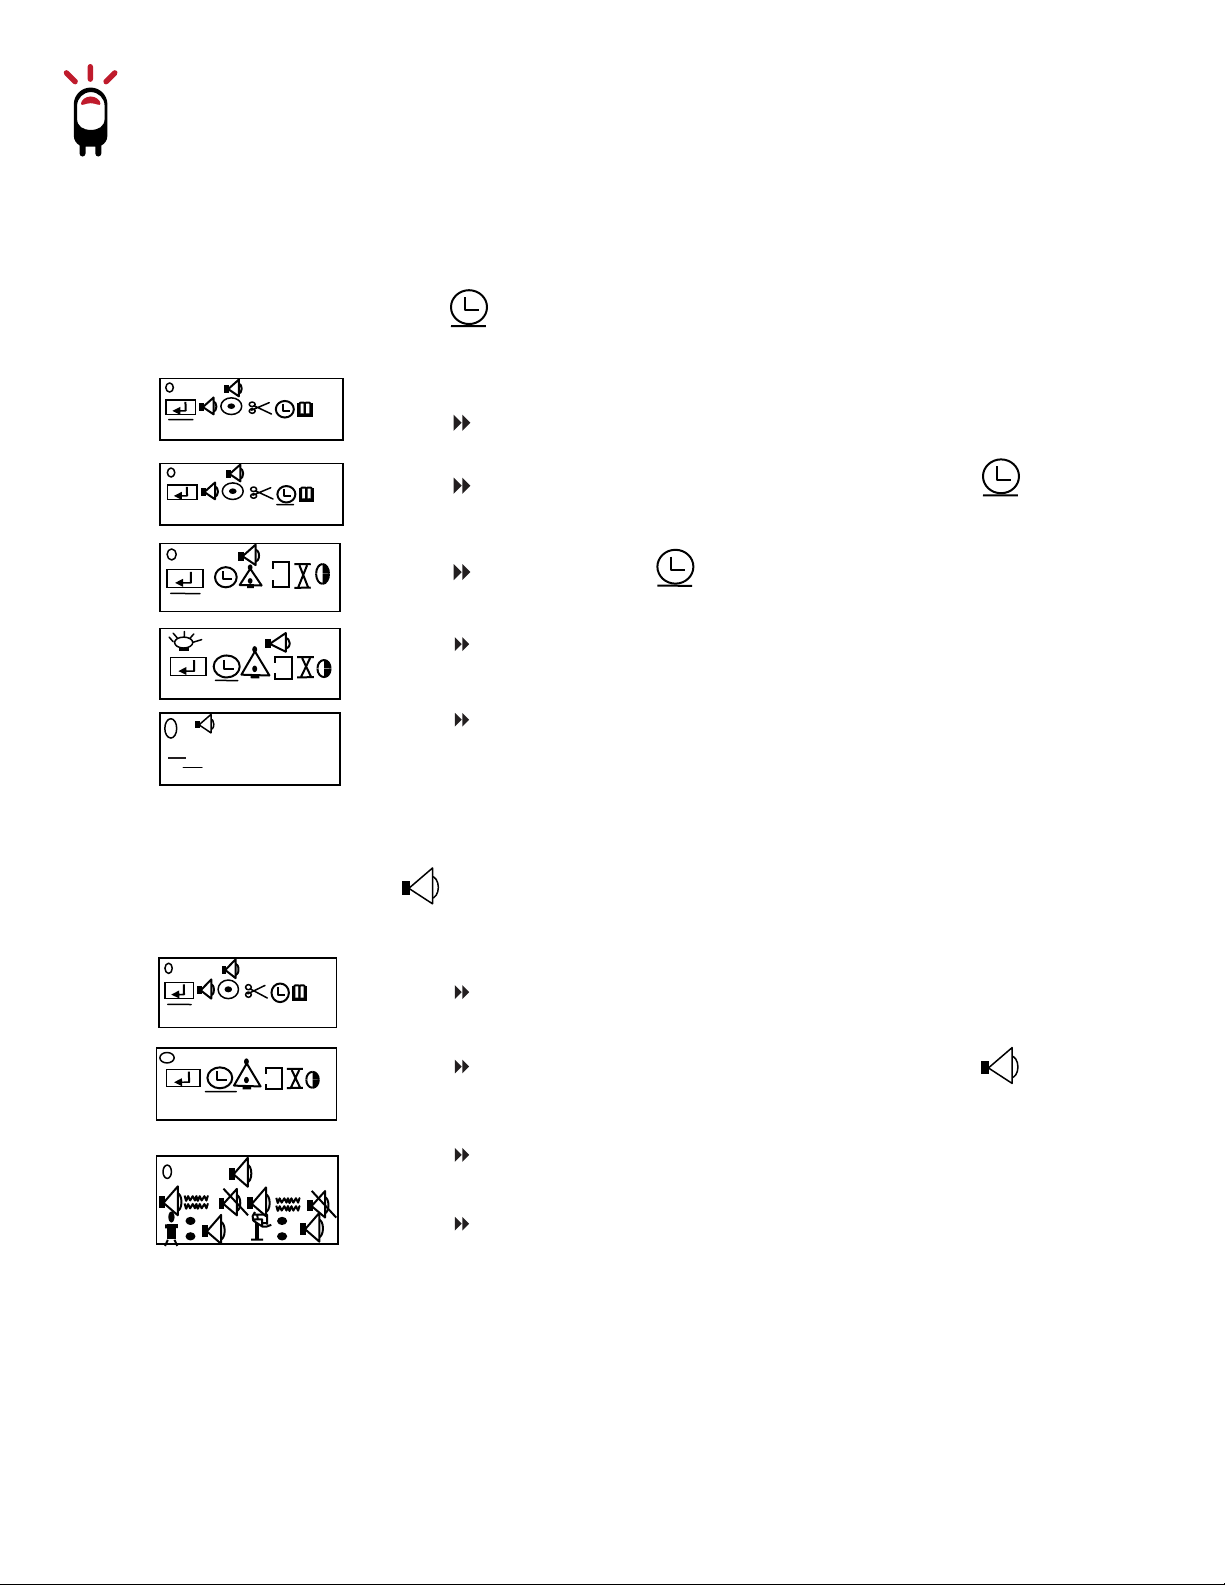
FUNCTIONS
Time Date Year Setting:
ALERT FUNCTIONS
Aa
ESCAPE
Aa
SET TIME
ESCAPE
SET TIME
00 :37
01-01 SUN
Press FUNCTION KEY twice from stand by mode
Press FUNCTION KEY twice from stand by mode
Press SHIFT RIGHT KEY and move cursor to
SET TIME
Press SHIFT RIGHT KEY and move cursor to
SET ALERTA
Press FUNCTION KEY on SET ALERT
Press FUNCTION KEY to change the alert
functions press SHIFT KEY to move the cursor.
Move cursor to SET TIME
Press FUNCTION KEY screen will display
Press FUNCTION KEY to set the right data and
press SHIFT KEY to move the cursor. Then
press READ KEY to return to stand-by mode
after setting the correct time and date.
Aa
ESCAPE
SET ALERT
Table of contents
Other pagertec Microphone manuals


