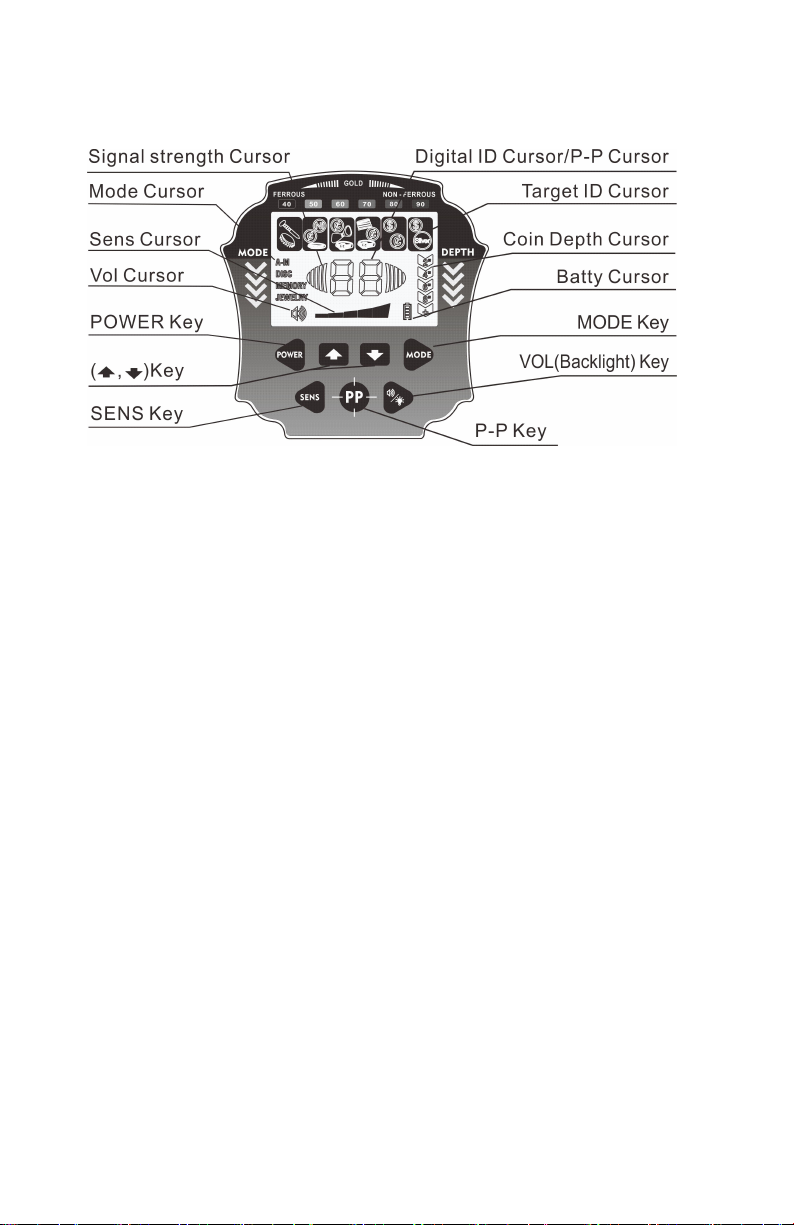
Pallipartners 970P User manual

User Manual


1
Thank you for choosing our Metal Detector. Please read this
manual carefully and become familiar with the function of the
detector before use. After reading, please keep it safe for future
reference.
TIPS
1. The detector is used for outdoors. There are too many
interferences indoors.
2. In the higher sensitivity range, the detector will be more
sensitive to the electromagnetic interference. By reducing
sensitivity you can get rid of interference.
3. When detecting, move the search coil at a constant speed. Let
the search coil be parallel with the ground and about 1/2 inch
from the surface, do not to swing it like a pendulum.
4. The depth indication is accurate for coin-sized objects. Large
objects or irregularly-shaped objects will reduce accuracy.
5. Most of the valuable metal objects will send consistent signals. If
the signal isn't consistent, it's mostly a false signal.
6. The Panel LCD will automatically turn off every 10 minutes. Hold
vol button for 2 seconds to lighten it again.
7. If the pinpoint mode malfunctioned, sending a signal even when
not close to any metal , lift the detector in the air, press the P-P
button once to solve the problem.

2
SPECIFICATIONS
• Operation Mode: 4+1
Motion Mode: ALL-METAL,DISC,MEMORY,JEWELRY
Non-motion Mode: PINPOINT
• Coins Depth Indication: 2’’,4’’,6’’,8’’ and+
• Sensitivity Control: 5 grades
• Target Metals Discrimination: 6 kinds
0 to 99 double digits
•
Signal Strength Indication:5 grades
•
Sound Frequency: 3 kinds of frequency indicating different
metals
•
Volume Indication: 3 grades
•
LCD Backlight: White
• Battery Indication: 4 grades
•
Turn off prompt: sound a prompt tone every ten minutes
•
Search Coil: waterproof search coil
•
Earphone Jack: 1/8 inch earphone jack
•
Power Supply: two 9V alkaline battery
ASSEMBLY
The structure of the detector is shown in the Fig.1 below.
Fig.1

3
1. Loosen the lock knob on the lower stem, take down the bolt.
install the lower stem on the search coil, and lock it tightly (See
Fig.2).
Fig.2
2. Loosen the lock nut on the middle stem, press the silver button
on the lower stem, insert to the middle stem (See Fig.3).
Fig.3
3. Loosen the lock nut on the other end of the middle stem. Press
the silver button on the upper stem, and insert it into the other
end of the middle stem (see Fig.4).
Fig.4

4
4. Adjust the length that the lower stem inserts to the middle stem.
Also, you can adjust the total length of the stem, making you
detect comfortable with your arm straight.
5. Wind the cable of the search coil around the aluminum stem,
elastic moderate, let it not sway. plug the cable plot into the
lower right of the control box, aim at the slot, and plug into the
end (see Fig.5). Note do not pull the cable, pull the plug.
BATTERY
Please use two 9V alkaline battery.
Open the battery cover and install the battery according to the
polarity sign in the battery box, let the ribbon be under the batter. If
you are not going to use the detector for a long time, please
remove the battery from the battery case.
Fig.6

5
PANEL(LCD and Button)
Fig.7
LCD
• Mode Cursor: indicate the operation mode, altogether divided
into four kinds.
• Target ID Cursor: divided into 6 categories. it is used to indicate
the target metals.
• Digital ID Cursor/Pinpoint Cursor: two digits of 01 to 99
accurately indicate the metal material. it also acts as a P-P
cursor, when P-P showing, it enters the pinpoint mode.
• Coin Depth Cursor: divided into five grades. indicates the
approximate depth of 25¢silver coin in neutral soil.
• Signal strength cursor: indicates the signal strength when in the
pinpoint mode.
• Volume cursor: indicates the volume.
• Sensitivity indication cursor: divided into five grades, sensitivity is
highest when all cursor light.
• Battery power cursor: divided into four grades, indicating battery
power. When the battery pattern is flashing, which means the
battery should be replaced.

6
Button
•VOL-(backlight) button:
VOL-(backlight) button: Short press to regulate the volume
circularly. Long press and hold the button for about 2 seconds,
and the backlight is lit for about 10 minutes.
• POWER button:
Power button: power on/off
• MODE-SENS button:
1. Press the MODE button, cycle selection in four ways.
A-M: All metal mode, the detector will respond to all metal.
DISC: Discrimination mode, in this mode you can eliminate
certain kind of metal then the detector won't respond to it.
MEMORY: Remember some kind of metals you choose, and will
only respond to this metal.
JEWELRY: Eliminate iron, it won't respond to iron, but it will
respond to other metals.
2. Press the SENS button, ( , ) buttons to adjust the sensitivity.
• ( , ) button: There are two functions.
1. Press SENS button, the sensitivity cursor will flash, and the ( , )
button is used to adjust sensitivity.
2. In DISC mode, the ( , ) button is used to set the discrimination
targets.
• P-P button: Press the “P-P” button, and the detector will convert
to PINPOINT mode, to locate the target accurately. Press the
"P-P" button once again, to exit the PINPOINT mode.
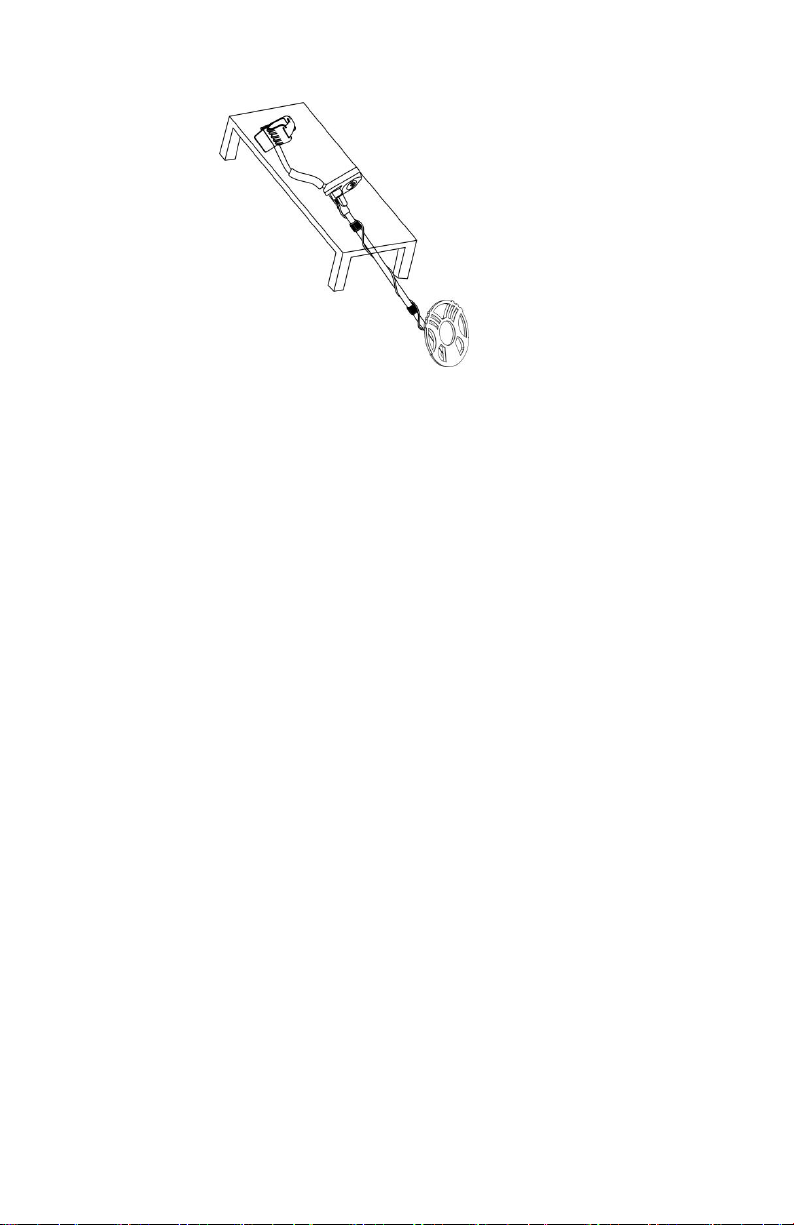
QUICK- START
1. Lay the detector
Put the detector on a wooden or plastic table, and let the search
coil stretch out of the table about 30cm, keep away from walls,
ceilings and floors, turn off all kinds of electrical appliances that
will cause electromagnetic interference, remove watches and
rings from hands. (see Fig 8)

7
Fig.8
2. Turn on
Press the POWER button, the detector will sound two moo tones,
and all LCD patterns will be lit for a moment. And the detector is
set by default last shutdown.
3. ALL METAL mode test
Press the MODE button, the A-M cursor will light. Sweep six
sample metals (iron nail, 5¢nickel coin, pull-tab, 1¢Zinc coin,
10¢copper coin and 25¢silver coin)above the search coil 7-
10cm respectively.
a) The detector sounds three different tones in turn.
b) The depth cursor indicates the second grade.
c) The target cursor flashes respectively. The digital cursor shows
the corresponding number.

8
As shown in the table:
Sample
Iron
nail
5¢
nickel
coin
Pull-tab
1¢
zinc
coin
25¢
copper
coin
50¢
silver
coin
Tone
Low
tone
Low
tone
Middle
tone
Middle
tone
High
tone
High
tone
Identification
Cursor
indication
Digital cursor
indication
10-40
41-50
55-70
72-75
80-83
86-88
(See Fig.9 take iron nail as an example)
4. DISC mode test
a) Press the MODE button again, the DISC cursor is lighted.
b) Press ( , ) button, set the discrimination target, to eliminate
some metals which do not need to be detected. For example, to
reject three kinds of metals such as iron, nickel and pull-tab.
Press the ( , ) button, making the three target cursors on the
left removed.
c) Sweep the six metal samples about 7 to 10cm above the search
coil in turn.
d) When sweeping the iron nail, 5¢nickel coin and pull-tab, the
detector will not respond, they are eliminated.
e) When sweeping the other three samples, the corresponding
target cursor flashes, and the digital cursor shows the

9
corresponding number.
(See Fig. 10, take 50 ¢silver coin as an example)
5. MEMORY mode test
a) Press the MODE button again, the MEMORY cursor is lighted.
And the target discrimination cursor is all lighted.(see Fig.11)
b) If you want to search 50¢silver coin and eliminate the other
metals, you can follow the procedure below:
Let the 50¢silver coin scan above the search coil about 7-10cm,
the target discrimination cursor that the 50¢silver coin cursor
consistently lighting, while the other discrimination cursors are
removed.(See Fig.12)
d) Sweep the six samples about 7-10cm above the search coil.
e) When sweeping the 50¢silver coin, the detector responds,

10
indicating that the detector has memorized the 50¢silver coin.
When sweeping the other five samples, the detector does not
respond.(see Fig.13 , take the 50¢silver coin as an example)
f) If you want to search other material metals, press the “MODE”
button again. The MEMORY cursor still lights up, and still shows
the same as Fig.11.Then repeat the above operation.
g) To quit the MEMORY mode, press the MODE button, making
the detector return to the state of Fig.11. Then press the MODE
button again, to quit the MEMORY mode, and enter the next
operation mode.
6. JEWELRY mode test
Press the MODE button again, the JEWELRY cursor is lighted.
The first target cursor on the left removed, showing that the iron
is eliminate. It only responds to other metals.(See Fig.14,take
1¢zinc coin as an example)
7. PINPOINT mode test
a) Press the “P-P” button lightly, and the PP cursor lights and
flashes.The detector completes the balance, and the PP cursor
stops flashing.

11
The identify cursor and digital cursor are extinguished, the depth
cursor is full, and the detector sounds a slight single frequency
tone.(See Fig.15)
b) Take a 25¢silver coin and let it approach the search coil slowly.
At the position of about 7” to 8”, the first set of signal strength
cursor begins to appear, the sound becomes louder and the
tone becomes higher. Continue to move the 25 ¢silver coin,
the signal strength cursor is fast full, the sound is louder, and
then the depth cursor indicates the depth down until only one is
left, indicating that the metal is gradually approaching the center
of the search coil.(See Fig.16)
c) Press the "P-P" button lightly again, the PP cursor will be
removed, and exit the PP mode.
Done this step, you has a basic knowledge to the detector, and
you can move to next step of basic operation.
BASIC OPERATION
The detector is used for outdoors. There are too many objects
indoors, and all kinds of electrical equipment that will bring
interference signals. So it is not fit for using the detector indoors.

12
Field detection is more complicated, the composition of the
regional soil, the component, size, shape and the oxidation degree
of the underground metals will all affect the detection results. This
chapter is only the general steps of the field detection. You should
operate again and again, accumulate experience to achieve good
results.
1. Turn On
Hold the detector, keep the search coil be away from the ground.
Press the Power button, the detector will sound two moo tones,
and all the LCD patterns are lighted for a while. And the detector
is restored to the setting of last time.
2. Set the operation mode
In general, the user could choose the ALL METAL mode. At this
time, the detector will respond to all kinds of metals.
3. Choose the sensitivity
The user always expects to set the sensitivity higher. However,
in the higher sensitivity range, the detector will be more sensitive
to the electromagnetic interference that comes from the power
lines or cables around, and it will react abnormally to the
mineralization soil or electrical conductivity soil. If you move the
search coil in the detection area, and the detector sends an
unstable false signal, please decrease the sensitivity.
If you operate the detector with your partner at the same time,
please pay attention to keep more than 10 meters away from
each other, and decrease the sensitivity appropriately.
4. Move the search coil
When detecting, move the search coil at a constant speed, not

13
unsteadily. Let the search coil be parallel with and about 1/2 inch
from the surface, not to swing it like a pendulum high and low
above the ground. (See Fig 17)
Fig.17
Most of valuable metal objects will send repeatable signals. If the
signal isn’t repeatable, it’s mostly a false signal. When there is a
clear sound instructing the buried targets. You could read out the
approximate target type and depth on the LCD screen. And you
could also move the search coil above the target objects fast, in
order to get a more stable signal.
5. Make use of the sound, to help discrimination
In the process of detection, you needn't always watch the screen.
And the sound identification system will sound three frequency
tones to help discriminate the targets.
Low pitch-- 5¢nickel coin and so on.
Meddle pitch-- pull-tab, soda bottle and zinc coin.
High pitch-- copper, aluminum and silver metal, such as 1¢,
10¢, 25¢and so on.
6. Make use of the digital cursor, to help discrimination
The following table is used as a preliminary guide. The
approximate ranges of US dollar and pound sterling coins are
listed in the table. When detecting, there may be some changes
in the number, depending on the composition, size, shape,
distance from the search coil and speed of scanning. The

14
surrounding soil also affects the numerical value. There are
differences in casting coins in different years. The values in the
table are the only reference, Gold has a wide numerical range, a
thin ring is about 45, and a rough ring and gold coin may up to
70-80.
Number Range
Possible Metal
Dollar Coin
Pound Coin
01--40
Iron
1P
41--55
Nickel
5¢
5P,10P,50P
55--65
Pull-tab
20P,(10P,50P)
65--75
Zinc, soda bottle
1¢
1£
75--85
Copper, aluminum
10¢,25¢
2£, 2P
85--99
Silver
50¢, 1$
7. Depth indication
The depth indication is accurate for coin-sized objects. Large
objects or irregularly-shaped objects will yield less reliable depth
readings. If sweeping at the same place for several times, but
shows the same depth, and it is the more accurate detection. If
the depth indication varies, try to change the angle of sweep.
There may be more than one target present.
8. PINPOINT
When detecting in the motion mode, as you should persistently
move the search coil, so although you find the region that
burying metals, it's not easy for you to determine the exact
location, it gets the digging difficult. At this time, you should recur
to the PINPOINT mode.
a) Press the PINPOINT button, the PINPOINT cursor is lighted, the
depth cursor will be full scale, and the detector will sound a low
single-frequency tone, the sensitivity is in the highest state.

15
b) Let the search coil approach the ground, move the search coil
slowly in the region, where you find the target. In the position
where the single frequency tone turns louder, and the signal
strength cursor begins to appear, Continue moving the search
coil slowly until the sound turns louder, the signal strength cursor
is full scale, and the depth cursor is the lowest. Now, you have
locked the target location roughly.
c) If the area with the strongest signal is larger and the location is
not accurate enough, you can keep the location of the search
coil unchangeable and exit the PP mode. Then press the PP
button again and repeat the above operation. Until you move the
search coil slightly, and the strongest signal will be smaller. Now,
the position of the metal target has been locked. You can mark
on the ground by the center of the open search coil, to facilitate
the digging.
9. You can choose other operation mode according to your needs
and experience. If there are more scrap metals in the detection
area, you can choose the DISC mode to eliminate the metals
that do not need to be detected. Remind you once again, when
detecting in the wild, due to the impact of the ground condition,
the discrimination indication and depth indication will be all
deviation. The composition, size and oxidation of the metals will
all affect the indication result. It's necessary for you to consider
these factors before choosing elimination a certain metal or
determining whether there are precious metals. Not to eliminate
the precious metals.
In fact, the sensitivity in the non-motion mode is high, search
metals directly using non-motion mode is also a choice. In some
regions. the ground is too narrow to sweep search coil, you could

16
choose the PINPOINT mode. In the severe mineralization or
salinization region, you could try to sweep using PINPOINT directly.
CAUTION
1) In areas with heavy traffic, please not wear earphone, in case
an accident occurs.
2) Always obtain permission before searching any site.
3) Keep away from the region where may bury the electrical line,
cable line or pipeline, in particular, the pipes that are full of
flammable gases and liquids.
4) Do not detect in the military area where may bury bombs or gas
explosives.
5) When excavating the target, use the reasonable method, not
destroy the vegetation. Leave the land and vegetation as it was,
fill in the holes after the excavation.
TROUBLE SHOOTING GUIDE
SYMPTOM
SOLUTION
No power, no boot sound, and
the LCD has no indication.
1.Be sure that the batteries are
installed correctly.
2.Replace the batteries.
Sound a successive "DI" "DI"
tone
1.Make sure that there is no other
metal detector Operating around.
2.Release the sensitivity properly.
The LCD displays normal, but
the unit has no detection
function.
The connection of the search coil is
bad. Plug in the cable plug.
The LCD displays normal, but
the sensitivity is very low.
When turning on, there is metal near
the search coil. Let the search coil be
far away from the ground, and then
turn on the unit again.

17
Sound an irregular tone, or the
target identification cursor
chatters.
1.Don't use it indoors, because there
is many metals there.
2.Make sure whether there is
electromagnetic interference
source, such as power lines,
cables, electronic fences and so
on. Keep away from these areas,
or try to reduce sensitivity.
The signal is unstable, and the
position of the target
identification cursor is
changing.
1.Sweep at a different angle, in order
to determine whether you can get
a more stable signal.
2.If the target is buried deeply, you
could try to increase the sensitivity
or speed up the speed of
sweeping the search coil, in order
to get a more stable signal.
3.Maybe more than one metal
targets buried there, try to increase
the sensitivity or set different
discrimination range to sweep.
4.Maybe you find a severe oxidation
target, or the ground is serious
magnetic, you should try to
decrease the sensitivity.
Using PINPOINT, when the
search coil approach the
ground, the unit will sound a
tone.
1.The ground is serious magnetic. in
the position near the ground, start
the PINPOINT mode, to reduce
the sensitivity.
2.There is large metal under the
ground.

18
CARE AND MAINTENANCE
Your detector is an example of superior design and
Craftsmanship . The following suggestions will help you care
for your metal detector so you can enjoy it for years.
Handle the detector gently and carefully. Dropping it
can damage circuit boards and cases and can
cause the detector to work improperly.
Use the detector only in normal temperature
environments. Temperature extremes can shorten
the life of electronic devices, damage the cases of
the detector.
Wipe the detector with a damp cloth occasionally to
keep It looking new. Do not use harsh chemicals,
cleaning solvents, or strong detergents to clean the
detector.
Keep the detector away from dust and dirt, which
can cause premature wear of parts.
Table of contents