Panametrics DewPro MMY31 User manual

A40251548 Rev. B
April 2022
Panametrics.com
DewPro™ MMY31
Installation & Operation Manual


A40251548 Rev. BPanametrics.com
DewPro™ MMY31
Dew Point Transmitter
Installation & Operation Manual
A40251548. Rev. B
April 2022

ii
[no content intended for this page]

DewPro™ MMY31 Installation & Operation Manual iii
Contents
Chapter 1. General System Information
1.1 Unpacking and Inspection. . . . . . . . . . . . . . . . . . . . . . . . . . . . . . . . . . . . . . . . . . . . . . . . . . . . . . . . . . . . . . . . . . . . . . . . . . . . . . . . . . . . . . . .1
1.2 Model Number Configuration. . . . . . . . . . . . . . . . . . . . . . . . . . . . . . . . . . . . . . . . . . . . . . . . . . . . . . . . . . . . . . . . . . . . . . . . . . . . . . . . . . . . 2
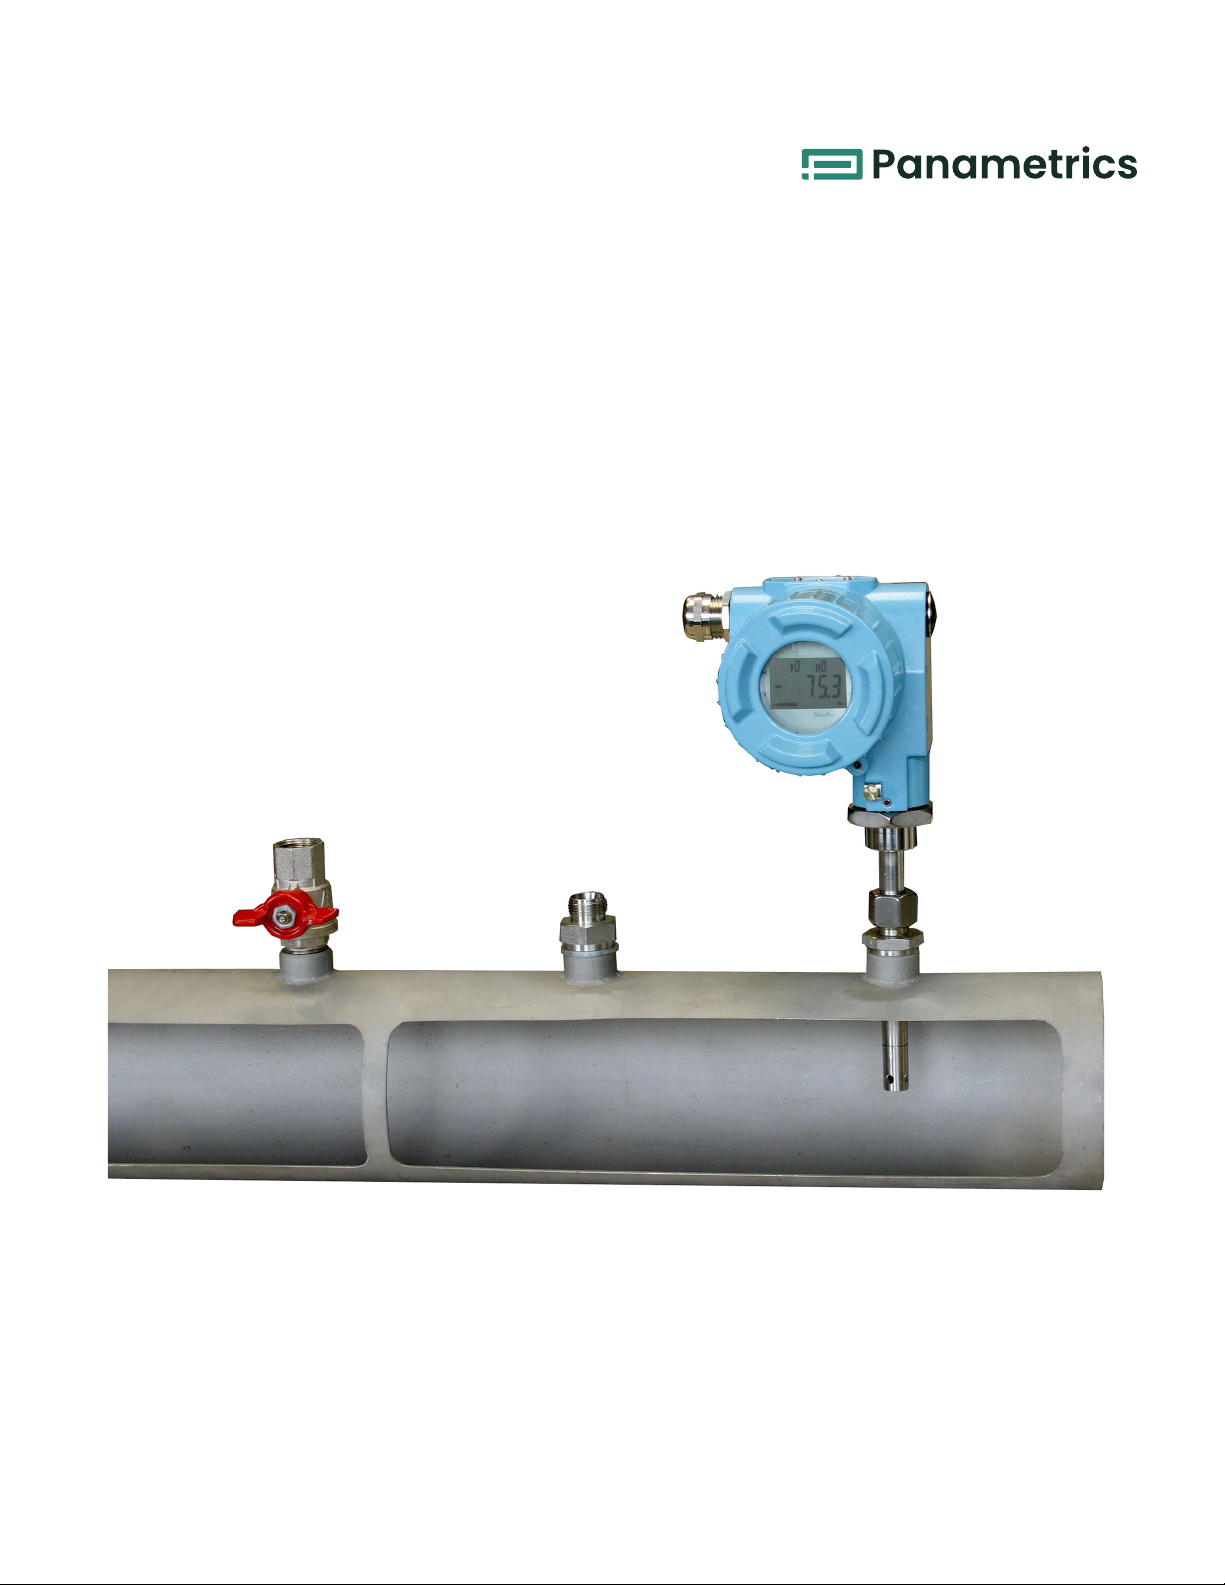
1.3 Introduction . . . . . . . . . . . . . . . . . . . . . . . . . . . . . . . . . . . . . . . . . . . . . . . . . . . . . . . . . . . . . . . . . . . . . . . . . . . . . . . . . . . . . . . . . . . . . . . . . . . . . 3
1.3.1 Unit Description. . . . . . . . . . . . . . . . . . . . . . . . . . . . . . . . . . . . . . . . . . . . . . . . . . . . . . . . . . . . . . . . . . . . . . . . . . . . . . . . . . . . . . . . . . . . . . 3
1.4 Theory of Operation . . . . . . . . . . . . . . . . . . . . . . . . . . . . . . . . . . . . . . . . . . . . . . . . . . . . . . . . . . . . . . . . . . . . . . . . . . . . . . . . . . . . . . . . . . . . . 3
1.4.1 4–20mA Loop. . . . . . . . . . . . . . . . . . . . . . . . . . . . . . . . . . . . . . . . . . . . . . . . . . . . . . . . . . . . . . . . . . . . . . . . . . . . . . . . . . . . . . . . . . . . . . . . 3
1.4.2 Planar Sensor . . . . . . . . . . . . . . . . . . . . . . . . . . . . . . . . . . . . . . . . . . . . . . . . . . . . . . . . . . . . . . . . . . . . . . . . . . . . . . . . . . . . . . . . . . . . . . . 3
1.4.3 Calibration. . . . . . . . . . . . . . . . . . . . . . . . . . . . . . . . . . . . . . . . . . . . . . . . . . . . . . . . . . . . . . . . . . . . . . . . . . . . . . . . . . . . . . . . . . . . . . . . . . 3
Chapter 2. Installation
2.1 Mounting the MMY31 . . . . . . . . . . . . . . . . . . . . . . . . . . . . . . . . . . . . . . . . . . . . . . . . . . . . . . . . . . . . . . . . . . . . . . . . . . . . . . . . . . . . . . . . . . . . . 5
2.2 Wiring Configurations . . . . . . . . . . . . . . . . . . . . . . . . . . . . . . . . . . . . . . . . . . . . . . . . . . . . . . . . . . . . . . . . . . . . . . . . . . . . . . . . . . . . . . . . . . . 7
2.2.1 Designing the Loop. . . . . . . . . . . . . . . . . . . . . . . . . . . . . . . . . . . . . . . . . . . . . . . . . . . . . . . . . . . . . . . . . . . . . . . . . . . . . . . . . . . . . . . . . . 7
2.2.2 In a Normal Environment . . . . . . . . . . . . . . . . . . . . . . . . . . . . . . . . . . . . . . . . . . . . . . . . . . . . . . . . . . . . . . . . . . . . . . . . . . . . . . . . . . . 8
2.2.3 In Environments with Severe Electrical Noise . . . . . . . . . . . . . . . . . . . . . . . . . . . . . . . . . . . . . . . . . . . . . . . . . . . . . . . . . . . . . . . 8
2.2.4 General Wiring Instructions. . . . . . . . . . . . . . . . . . . . . . . . . . . . . . . . . . . . . . . . . . . . . . . . . . . . . . . . . . . . . . . . . . . . . . . . . . . . . . . . . 9
Chapter 3. Troubleshooting
3.1 The Loop Current is Out of Range. . . . . . . . . . . . . . . . . . . . . . . . . . . . . . . . . . . . . . . . . . . . . . . . . . . . . . . . . . . . . . . . . . . . . . . . . . . . . . . . 11
3.2 There Is No Current . . . . . . . . . . . . . . . . . . . . . . . . . . . . . . . . . . . . . . . . . . . . . . . . . . . . . . . . . . . . . . . . . . . . . . . . . . . . . . . . . . . . . . . . . . . . . . 11
Chapter 4. Optional Display/User Interface
4.1 Installation . . . . . . . . . . . . . . . . . . . . . . . . . . . . . . . . . . . . . . . . . . . . . . . . . . . . . . . . . . . . . . . . . . . . . . . . . . . . . . . . . . . . . . . . . . . . . . . . . . . . . .13
4.1.1 Removing the Display . . . . . . . . . . . . . . . . . . . . . . . . . . . . . . . . . . . . . . . . . . . . . . . . . . . . . . . . . . . . . . . . . . . . . . . . . . . . . . . . . . . . . . .13
4.2 Programming Matrix. . . . . . . . . . . . . . . . . . . . . . . . . . . . . . . . . . . . . . . . . . . . . . . . . . . . . . . . . . . . . . . . . . . . . . . . . . . . . . . . . . . . . . . . . . . . 14
4.3 Push Buttons - Special Functions . . . . . . . . . . . . . . . . . . . . . . . . . . . . . . . . . . . . . . . . . . . . . . . . . . . . . . . . . . . . . . . . . . . . . . . . . . . . . . . 16
4.3.1 Reset to “Normal” Display . . . . . . . . . . . . . . . . . . . . . . . . . . . . . . . . . . . . . . . . . . . . . . . . . . . . . . . . . . . . . . . . . . . . . . . . . . . . . . . . . . 16
4.3.2 Display Only . . . . . . . . . . . . . . . . . . . . . . . . . . . . . . . . . . . . . . . . . . . . . . . . . . . . . . . . . . . . . . . . . . . . . . . . . . . . . . . . . . . . . . . . . . . . . . . 16
4.3.3 Default Values. . . . . . . . . . . . . . . . . . . . . . . . . . . . . . . . . . . . . . . . . . . . . . . . . . . . . . . . . . . . . . . . . . . . . . . . . . . . . . . . . . . . . . . . . . . . . 16
4.3.4 Changing Values. . . . . . . . . . . . . . . . . . . . . . . . . . . . . . . . . . . . . . . . . . . . . . . . . . . . . . . . . . . . . . . . . . . . . . . . . . . . . . . . . . . . . . . . . . 16
4.4 Matrix Functions . . . . . . . . . . . . . . . . . . . . . . . . . . . . . . . . . . . . . . . . . . . . . . . . . . . . . . . . . . . . . . . . . . . . . . . . . . . . . . . . . . . . . . . . . . . . . . . . .17
4.4.1 Display and Output Mode. . . . . . . . . . . . . . . . . . . . . . . . . . . . . . . . . . . . . . . . . . . . . . . . . . . . . . . . . . . . . . . . . . . . . . . . . . . . . . . . . . .17
4.4.2 Special Calibration . . . . . . . . . . . . . . . . . . . . . . . . . . . . . . . . . . . . . . . . . . . . . . . . . . . . . . . . . . . . . . . . . . . . . . . . . . . . . . . . . . . . . . . . 18
4.4.3 Mode of Operation . . . . . . . . . . . . . . . . . . . . . . . . . . . . . . . . . . . . . . . . . . . . . . . . . . . . . . . . . . . . . . . . . . . . . . . . . . . . . . . . . . . . . . . . 19
Chapter 5. Specifications
5.1 Technical Specifications. . . . . . . . . . . . . . . . . . . . . . . . . . . . . . . . . . . . . . . . . . . . . . . . . . . . . . . . . . . . . . . . . . . . . . . . . . . . . . . . . . . . . . . . . .1
5.2 Optional Onboard Display with User Interface . . . . . . . . . . . . . . . . . . . . . . . . . . . . . . . . . . . . . . . . . . . . . . . . . . . . . . . . . . . . . . . . . . . 2
5.3 EMC. . . . . . . . . . . . . . . . . . . . . . . . . . . . . . . . . . . . . . . . . . . . . . . . . . . . . . . . . . . . . . . . . . . . . . . . . . . . . . . . . . . . . . . . . . . . . . . . . . . . . . . . . . . . . . 3
Warranty

Contents
iv DewPro™ MMY31 Installation & Operation Manual
[no content intended for this page]

DewPro™ MMY31 Installation & Operation Manual 1
Chapter 1. General System Information
1.1 Unpacking and Inspection
Upon receipt of the DewPro MMY31, examine the shipping carton for broken or open packing, distortion, or any other
evidence of mishandling. If inspection indicates damage to the unit or any of its components, notify the carrier
(within 15 days of delivery) and request an inspection.
Move the carton to a clean work area and unpack it. The carton you receive should contain:
•DewPro MMY31
•Installation and Operation Manual
•Calibration Certificate
Compare the last five characters of the model number with the product model number (see below) to ensure you
have received everything you ordered.
Figure 1: DewPro MMY31 Product Label

Chapter 1. General System Information
2 DewPro™ MMY31 Installation & Operation Manual
1.2 Model Number Configuration
Table 1: Model Number Configuration
Certification/Approvals:
R MMY31 Safe Area Config
A IS Config
B XP Config
C CI.I, Div.2 Config
F Zone 2 Config (self declared)
S Other
Process Connection:
2 ¾” NPT-M compression fitting
3 ½” NPT-M compression fitting
4 ¾” x 16 Oring fitting UNF thread
6 No mounting hardware
8 G½ male compression fitting
S Other
Protective Cap:
A 100 micron sintered filter
B No filter, clean applications
S Other
Enclosure Conduit:
1 M20 x 1.5-F cable gland + plug
2 M20 x 1.5-F ½” FNPT adapter
S Other
Range, Display, Error Status
A –90°C to +10°C blind, error 22 mA
B –90°C to +10°C blind, error Hold
C –90°C to +10°C blind, error 3.6 mA
D 0-100 ppmv blind, error 22 mA
E 0-100 ppmv blind, error Hold
F 0-100 ppmv blind, error 3.6 mA
G integral display, ppmv
S Other
R 8 A 2 A Model Number example

DewPro™ MMY31 Installation & Operation Manual 3
Chapter 1. General System Information
1.3 Introduction
1.3.1 Unit Description
The DewPro MMY31 transmitter is a loop-powered dewpoint measuring device. The transmitter includes a sensor
element, a stainless steel probe, a weather-proof enclosure, microprocessor electronics, and assorted fittings,
all in a compact assembly. It is designed to be installed “in-line.” Various types of mounting hardware, such as flange
and compression fittings, are available for mounting into a process chamber or pipe.
An optional display with user interface feature allows the DewPro to be configured by the user. See Chapter 4 for
more information.
1.4 Theory of Operation
1.4.1 4–20mA Loop
The DewPro MMY31 Transmitter is powered by a voltage supply of 12 to 28 VDC. At the nominal 24 VDC supply, the
maximum loop resistance is 600 ohms. The signal is represented by the 4–20 mA loop current and is directly
proportional to the dewpoint temperature range in °C or °F. In the standard range, 4 mA corresponds to
–90°C (–130°F) and 20 mA to +10°C (+50°F) dewpoint temperature. The optional unit of measure is ppmv in the
standard range 0-100 ppmv, unless ordered differently
1.4.2 Planar Sensor
The heart of the MMY31 is the planar aluminum oxide sensor that provides longer calibration stability, excellent
corrosion resistance, and improved speed of response. The sensor is mounted on a ceramic substrate giving a
reduced temperature coefficient.
1.4.3 Calibration
Each DewPro is factory calibrated against precise NIST certified moisture references and has an accuracy of ±2°C
dewpoint at 25°C temperature.

Chapter 1. General System Information
4 DewPro™ MMY31 Installation & Operation Manual
[no content intended for this page]

DewPro™ MMY31 Installation & Operation Manual 5
Chapter 2. Installation
2.1 Mounting the MMY31
Choose a mounting location which allows enough clearance for the use of tools and for connection of the field
validator. Figure 2 below shows the dimensions of the standard MMY31.
Figure 2: DewPro MMY31 Outline and Compression Fitting
CAUTION! Before installing the unit, please read all the instructions. The MMY31 is designed to
be mounted onto pressurized systems. Take all the necessary precautions when
mounting or removing the unit.
5.56 (141)
4.47
(114)
9.66
(246) 0.79 (20)
0.50 (12.7)
Dimensions are in
inches (millimeters).
4.61 (117)* *without display

Chapter 2. Installation
6 DewPro™ MMY31 Installation & Operation Manual
Mount the MMY31 using a compression fitting connection. Be certain that the tip of the probe does not touch the
inside wall of the pipe.
IMPORTANT: Ensure that your probe has a stainless steel ferrule, which is required for use in pressurized systems.
Adjust the ferrule for a probe insertion length of 1” (minimum) and tighten the compression fitting as follows (see
Figure 2 below):
1. Hand-tighten the nut.
2. Then, use a wrench to tighten the nut 1½ turns. Now the fitting is tight and can withstand pressures to
1750 psig (120 barg).
Figure 3: Mounting the MMY31
Minimum 1 in. (25 mm)

DewPro™ MMY31 Installation & Operation Manual 7
Chapter 2. Installation
2.2 Wiring Configurations
Note: If the DewPro is equipped with an optional display/user interface, please refer to Chapter 4.
Figure 4 below illustrates various power supplies and displays for use with the DewPro MMY31.
Figure 4: Various System Configurations
2.2.1 Designing the Loop
When selecting a power supply, please note that the voltage at the ± terminal of the DewPro should not fall below
12 VDC. The maximum loop resistance is an important measure for selection of the supply voltage. Each device
connected to the loop causes a voltage drop. For instance, using a loop-powered display with an input impedance
of 50 V will cause a voltage drop of 1 VDC at 20 mA, using Ohm's law. Connecting the loop to a PLC will cause a
voltage drop across the input.
When designing your loop, add up all voltage losses across the devices connected to the loop and add 12 V. The sum
will be the minimum supply voltage required from the power supply. Calculate with a 20% safety factor.
CAUTION! The DewPro system includes electronic components that are susceptible to
damage by static electricity. Use proper handling procedures during the
removal, installation, or other handling of internal boards or devices.
’
24 VDC (12...28 VDC)

Chapter 2. Installation
8 DewPro™ MMY31 Installation & Operation Manual
2.2.2 In a Normal Environment
A standard two-wire, stranded cable can be used in a normal environment to interconnect the DewPro with the
power source.
2.2.3 In Environments with Severe Electrical Noise
The DewPro MMY31 meets the EMC requirements of IEC 61326 for equipment used in industrial locations. The MMY31
passed all tests to the standards IEC 61000-4- to the performance criterion A. Test details can be found in Chapter 5
Specifications.
Figure 5: Shielded Cable Wiring Diagram

DewPro™ MMY31 Installation & Operation Manual 9
Chapter 2. Installation
2.2.4 General Wiring Instructions
To wire the DewPro MMY31:
1. Unscrew the cap on the terminal side of the unit.
2. Loosen the cable gland located on the side of the unit.
3. Feed the cable through the conduit opening.
Note: Use a standard signal cable size.
4. Retighten the metal cable gland to meet IP 67 and to relieve any stress on the wire.
5. Verify that a value between 12 and 28 VDC is across the terminals marked + and –.
Note: This is the voltage that appears across the DewPro terminals, not necessarily the power supply voltage due
to voltage loss in wire length, displays, indicators, etc.
6. In order to meet EMI/RFI immunity, a two-wire shielded cable with a common foil shield layer is being used to
power the MMY31. Removing the insulation by 3 inches allows users to pull back the foil, clamping it between the
metal cable gland. The ground wire must be connected to the internal grounding screw.
Figure 6: Electrical Connections
GND LOOP 1
–+
+
–
24 VDC Nominal (12-28V)
External GND/SHIELD Connection
Internal GND Connection

Chapter 2. Installation
10 DewPro™ MMY31 Installation & Operation Manual
[no content intended for this page]

DewPro™ MMY31 Installation & Operation Manual 11
Chapter 3. Troubleshooting
3.1 The Loop Current is Out of Range
The loop current is outside the range of 4-20 mA, as shown on the display or the current meter. For an example of
error current at 22mA, see below.
SOLUTION: The process dewpoint is out of range. If the dewpoint is above +10°C (+50°F), the current will go to
22 mA. Apply dry air for 20 minutes. If the dewpoint doesn't decrease, consult the factory.
If the dewpoint is below –90°C (–130°F), the current will go below 4 mA and then go to the error current,
e.g. 22 mA. Expose the DewPro to ambient air for several minutes. If the error remains, the cause may be
a defective sensor assembly or an electronics malfunction. Consult the factory.
3.2 There Is No Current
SOLUTION: Check the voltage and polarity across +/- terminals with a DC voltmeter. If the voltage is within
12-28 VDC, consult the factory.

Chapter 3. Troubleshooting
12 DewPro™ MMY31 Installation & Operation Manual
[no content intended for this page]

DewPro™ MMY31 Installation & Operation Manual 13
Chapter 4. Optional Display/User Interface
4.1 Installation
If the DewPro MMY31 is equipped with an optional display/user interface, follow the procedure below to access the
buttons.
Figure 7: DewPro MMY31 with Display
4.1.1 Removing the Display
1. Unscrew and remove the protective windowed lid from the DewPro (as shown in Figure 7 above), exposing the
display module below. The buttons V, H, + and – are now accessible.
2. The display unit snaps onto the printed circuit board, resting on four posts. When removing the display, push one
post to the outside, using a small screwdriver, and pull the display out.
3. Then unplug the display cable.

Chapter 4. Optional Display/User Interface
14 DewPro™ MMY31 Installation & Operation Manual
4.2 Programming Matrix
In the DewPro MMY31 transmitter with display option, a matrix-style input is used for programming the unit of
measure, measuring range, error status of output, and output adjustment. The following describes the features and
usage of the various matrix locations as they apply to the MMY31.
Figure 8: DewPro MMY31 Display
The DewPro MMY31 display (see Figure 8 above) continuously shows the current matrix location using the vertical (V)
and horizontal (H) coordinates to designate the row and column, respectively. The bar graph represents the output
current in an analogue fashion.
Movement through the matrix is accomplished by using the V and H buttons to move to another row or column as
shown in Table 2 on page 15. For example, to select location VH 38 (beginning at VH 00), successively press V (V1, V2,
V3) and then successively press H (H1, H2, H3, H4, H5, H6, H7, H8); thus arriving at VH 38.
At any location where a value may be changed by the user, the desired value is programmed using the + and –
buttons. The digit to be changed is flashing.
Table of contents
Other Panametrics Transmitter manuals

Panametrics
Panametrics DigitalFlow XGS868i User manual

Panametrics
Panametrics DewPro MMR30 User manual

Panametrics
Panametrics DigitalFlow XMT868i Owner's manual

Panametrics
Panametrics DewPro MMR101 User manual

Panametrics
Panametrics DigitalFlow XGF868i User guide

Panametrics
Panametrics VeriDri User manual

Panametrics
Panametrics DigitalFlow XMT868i User guide

Panametrics
Panametrics AquaTrans AT868 User manual

Panametrics
Panametrics DigitalFlow XGS868i User guide

Panametrics
Panametrics DigitalFlow XGF868i User manual