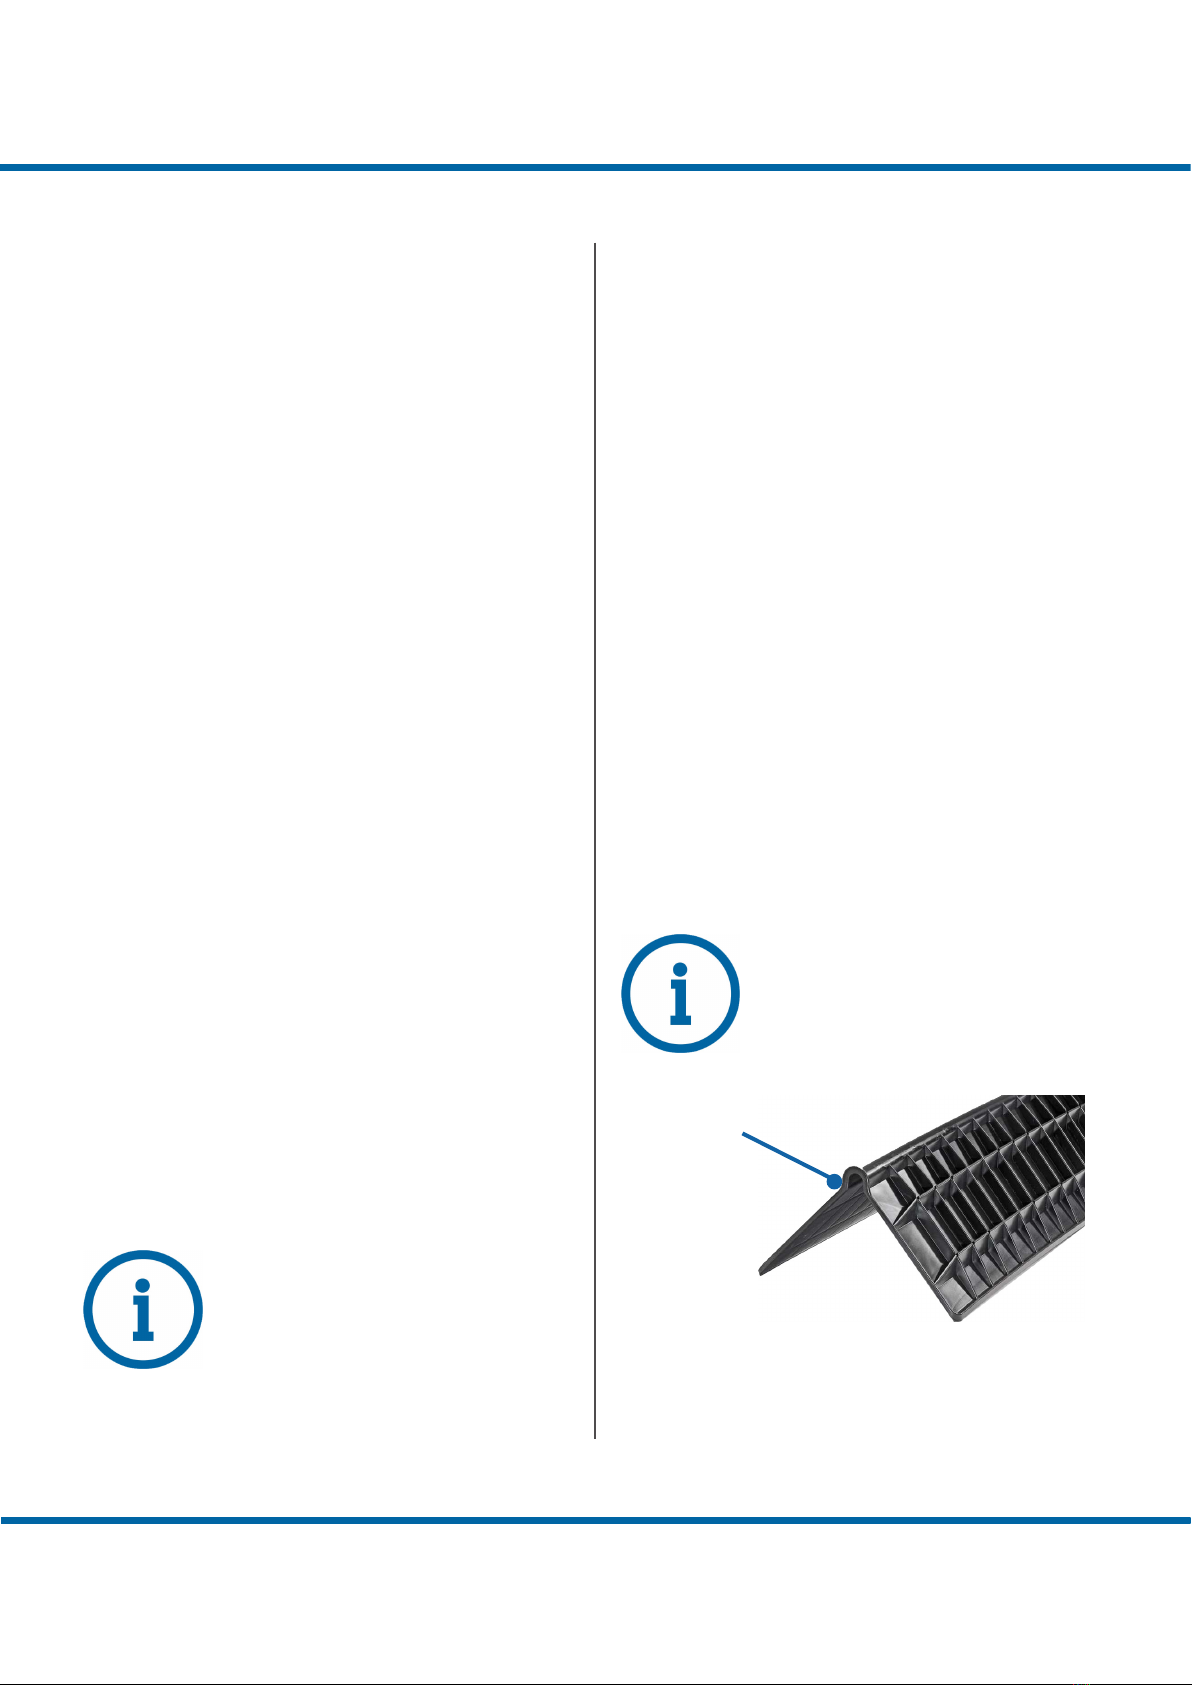
Panasonic HUSSMANN SMED153 User manual

JUN - AJHHAA
INSTALLATION MANUAL
SMED/
SMED
SEMI VERTICAL DISPLAY DOOR CABINET
MEDIUM TEMPERATURE REMOTE CABINET

CONTENTS
AUSTRALIA HEAD OFFICE
66 Glendenning Road, Glendenning NSW 2761
t: +61 2 8805 0400 f: +61 2 9675 2897
GENERAL INFORMATION
1.1 Symbols
1.2 Stop Think Act
1.3 Sta Training
1.4 Electrical Connections
1.5 Refrigerants
1.6 Case Ventilation
3
5
5
5
5
7
01
PRE-INSTALLATION
2.1 Case Service Dimensions
2.2 Operating Environment
2.3 Handling and Transporting Cases
2.4 Shipping Damages and Shortages
2.5 Rating Plates
02
8
9
9
10
11
INSTALLATION
3.1 Positioning and Levelling
3.2 Door Saw Toothing
3.3 Door Adjustment
3.4 Lighting
3.5 Fitting Shelves
3.6 Sealing Case Joins
3.7 Joining The Cases
3.8 Attaching Kickplates
3.9 Connecting Refrigerant Lines
3.10 Installing the Waste Drain
3.11 Installing Sensor Probes
03
13
16
17
19
20
21
21
22
24
25
26
CLEANING & MAINTENANCE
4.1 Commissioning
4.2 Care & Cleaning
4.3 Daily Checks
4.4 Six Monthly Maintenance
4.5 Replacing Fan and Motor Blades
04
27
28
30
31
32
DECOMMISSIONING & DISPOSAL
5.1 Decommisioning
5.2 Disposal
05
33
33
TROUBLESHOOTING
6.1 Troubleshooting
06
34
APPENDIX
7.1 Appendix 1 - Wiring diagrams
7.2 Appendix 2 - Risk analysis
7.3 Appendix 3 - Warranty
7.4 Appendix 4- Disclaimer
7.5 Appendix 5 - Liability
7.6 Appendix 6 -Case Dimensions
07
36
36
38
38
38
39

PAGE SMED SEMI VERTICAL - HUSSMANN
PPE GEAR : Remember to wear
Personal Protective Equipment whilst
installing the case.
NOTE: Not related to personal injury
– Indicate[s] situations, which if not
avoided, could result in damage to
equipment
CAUTION: Indicate(s) hazardous
situation which, if not avoided, will
result in moderate injury.
NO WALK: Do not walk on top or on
any parts of the case. Case damages or
personal injuries may occur.
NO SIT: Do not sit on top or on any
parts of the case. Case damages or
personal injuries may occur.
USE MANUAL: Be sure to follow the
instruction throughly whilst doing the
installation. If not performed correctly,
leakage, electric shock or fire may
occur. Always keep manual in safe
place.
CAUTION: Indicate(s) hazardous
situation which, if not avoided, will
result in moderate or serious injury.
CAUTION: Indicate(s) hazardous
situation which, if not avoided, will
result in serious injury or death.
NO CLIMB: Do not climb on top or on
any parts of the case. This may cause
damage to the case or personal injury.
NO CHEMICALS: Do not use
chemcial substances to clean the case.
This may cause discoloration or could
damage the case.
USE SOAPY WATER: Use soapy
water in a spray bottle to clean the
case.
NO WET AREA: Do not install case
in a wet place or near water. Risk of
Electricity leakage or electrical shock
may occur.
NO OUTDOORS: Do not use or
store the case outdoor. If the case
is exposed to direct sunlight or rain,
leakage of electricity, electric shock or
performance failure may occur.
NO DIRECT WATER: Do not pour
excessive water onto the case. DO NOT
use pressurised hose. eg fire hose. This
can result in electric shock.
1.1 SYMBOLS:
GENERAL INFORMATION

PAGE SMED SEMI VERTICAL - HUSSMANN
NO CONNECTING SOCKETS: Do
not use any connecting socket
or extension cords. Be sure to use
private line or socket as the main
power source. Failure to do so could
result in electric shock or fire.
TURN OFF: Ensure that power source
is disconnected when conducting any
servicing or inspection. Injuries such
as electric shock or burns could occur.
NO FLAMMABLE: Do not expose the
case to any flamable objects. This may
cause ignition and explosion due to
spark.
PRESSURE & VACCUM TEST :
Ensure a pressure and Vaccum test is
conducted. The leakage of refrigerant
may result in poor performance or
NO GAS: Do not install the case where
flammable gas could be realeased.
If gas leaks out and flows around the
case there can be risk for fire.
NO FLAMMABLE : Do not keep any
volatile or flammable materials inside
the case. It may risk explosion or fire.
NO A/C: Do not install case where
air blows directly at the case. This will
disrupt the case airflow and aect
performance.
TECHNICIANS ONLY: Installation
should only be performed by qualified
technicians.
NO OBJECTS ON CASE: Do not
place objects, stack or use the top of
the case as storage. Object may fall
and cause injury to personnel and /or
damage to the case.
WEIGHT: Do not exceed the weight
limit of each shelf. Each standard shelf
has a total maximum weight limit of
180kg/m2.
NO WET HANDS: Ensure not to
touch switches or any component
with wet hands. This may cause
electrical shock.
EARTHING : Ensure case earthed
when proceeding with electical
components. Electric shock or fire may
occur if not correctly processed.
1.1 SYMBOLS:
GENERAL INFORMATION

PAGE SMED SEMI VERTICAL - HUSSMANN
STOP: Take the time to think about
the installation process. Consider the
outcomes of the actions needed to be
taken, worst thing that could happen?
THINK: How are you going to do it, is it
the safest way? if not, how can you do
it better? Do I have the right PPE, tools
and equipment.
ACT: Go about it in the safest way
possible. Follow this installation
manual here and dont rush. STOP if it
can’t be done safetly.
NOTE: These cabinets are heavy, can
have high centres-of-gravity (thus
‘tippy’), use appropriate PPE and tools
and manpower levels.
Installation & Maintenance must be
performed by qualified technical
personnel with appropriate training
and authorisation to work with
flammable refrigerants.
This manual is to be used to understand and safely
execute the installation & maintenance of the
appliance. It is the installer & users responsibility to
carry out the instructions illustrated within the manual
correctly. The installer & user is responsible for setting
out the the training and requirements needed for their
maintenance technician sta to be educated to use the
case correctly. The case should always be kept in good
working order to ensure installer and user safety.
Injury to personnel and damage to the case and its
components may occur if instructions in the manual
are not correctly followed. If information would like to
be added to this manual, or if suggestions would like to
me made, contact Hussmann directly at any time.
Check that the power supply voltage matches that
displayed on the rating plate of the case, and that the
power is adequate. Voltage provided should be ±10%
of rating plate. Electrical should be hard wired by an
authorised electrician to comply with all local electrical
regulations. Failure to do so could result in electric
shock or fire.
R134a :
The refrigerant R134a is not flammable. Pay close
attention during transport, installation and dismantling
not to damage the refrigerant pipelines.
EVENT OF DAMAGE:
Keep flames or sources of ignition away from the
appliance. Properly ventilate the premises for a few
minutes. Turn the unit o and notify the customer
service department. Although not flammable this
material will become combustible when mixed with air
under pressure and exposed to strong ignition sources.
1.2 STOP THINK ACT
1.3 STAFF TRAINING
1.4 ELECTRICAL CONNECTION
1.5 REFRIGERANTS
GENERAL INFORMATION

PAGE SMED SEMI VERTICAL - HUSSMANN
CAUTION: Gas is under high pressure.
TCO2/CO2:
The refrigerant TCO2 & CO2 is a high pressure gas that is
compatiblewiththe environment,butis not flammable.
Pay close attention during transport, installation and
dismantling not to damage the refrigerant pipelines.
EVENT OF DAMAGE:
Keep surrounding flames or sources of ignition away
from the appliance and gad. Properly ventilate the
premises and use a breathing apparatus. Turn the unit
o and notify the customer service department. Fire
and heat may cause gas receptacles to rupture. Use
water spray/not jet or fog to extinguish.
R449a (Solstice® N40) is a non-flammable HFO blend
used in low and medium temperature refrigeration
applications It provides a combination of lower Global
Warming Potential (GWP) and higher energy eiciency.
R449a has a GWP of 1273. It is non-ozone-depleting
which can be used in existing installations or for new
installations.
EVENT OF DAMAGE:
Vapours of this refrigerant are heavier than air and can
cause rapid suocation by reducing oxygen available
for breathing. Contact with liquid can cause frostbite
and severe damage to the eyes. The system including
the refrigerant is under pressure, it should be protected
from sunlight and other heat sources.
R449a:
1.5 REFRIGERANTS
GENERAL INFORMATION

25mm
25mm
25mm
100mm
Check underside of case
PAGE SMED SEMI VERTICAL - HUSSMANN
NOTE: Check underside of case
before liing to ensure no damage to
electrical, drain box or other extrusions
occurs.
AIR FLOW:
Sources of heat or air
flow external to the
cabinet should be
avoided. i.e ventilation
ducts, open doors and
direct sunlight. This will
deter external air from
disrupting the air flow
from the cabinet thus
will help to maintain its
performance.
LOCATION:
The refrigeration case should be positioned in a manner
that optimal air flow can flow through the underside
and rear. This will minimise the risk of condensation on
the back and/or underside. Leave 100mm gap between
the rear of the case and the back wall.
STOCKING SHELVES:
When stocking the shelves, be sure to leave a 25mm
gap in between the stock and shelf to ensure even and
consistant airflow. Not doing this correctly may result
in a blockage of airflow which could freeze the stock at
the rear, and not enough refrigeration being produced
toward the front of the case.
NO OBJECTS ON CASE: Do not
place objects, stack or use the top of
the case as storage. Object may fall
and cause injury to personnel and /or
damage to the case.
1.6 CASE VENTILATION:
FIGURE 1B
FIGURE 1A
FIGURE 1C
GENERAL INFORMATION

PAGE SMED SEMI VERTICAL - HUSSMANN
NOTE: This information is a reference
only. Always refer to the latest Product
Engineering Data sheet (PED).
* SMED153/163 Case Dimensions
found at back of the manual.
2.1 CASE DIMENSIONS & SERVICES
EXAMPLE SMED153
FIGURE 2A - EXAMPLE ONLY
PRE INSTALLATION

Strap Piece
PAGE SMED SEMI VERTICAL - HUSSMANN
NOTE: For demonstration watch:
https://www.youtube.com/
watch?v=C5wPzfFSc8Q
NOTE: These cabinets are heavy, can
have high centres-of-gravity (thus
‘tippy’), use appropriate PPE and tools
and manpower levels.
Cases have been factory tested to AS1731, +25oC at
60% RH, and cross dra of maximum 0.2m/s. For
best performance, we recommend maintaining store
temperature below +24oC at 50% RH.
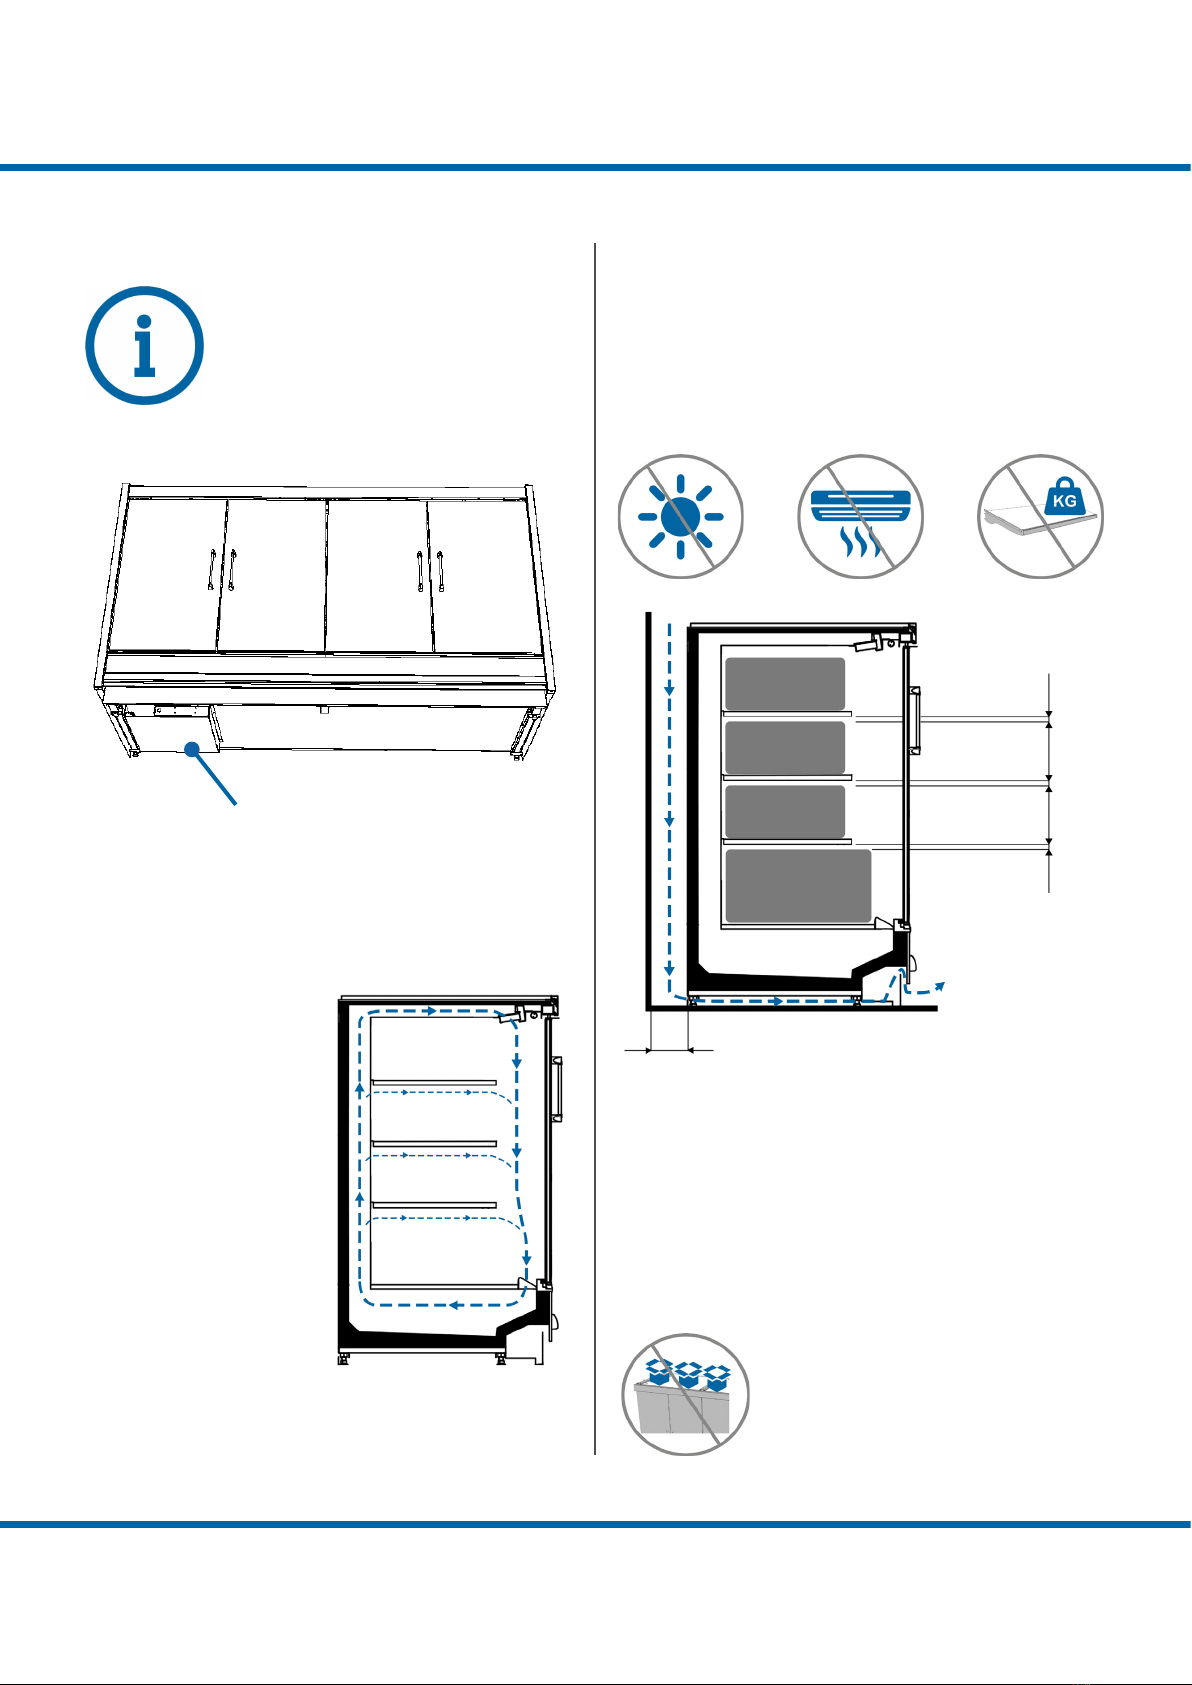
To avoid condensation build-up, cases should be
positioned to allow air to freely circulate around the
underside and rear of the case (refer page 7). Cases
must be level.
Open refrigerated cases are sensitive to excessive air
disturbances. Air currents passing around cases will
seriously impair their operation. Do NOT allow air
conditioning, electric fans, open doors or windows, etc
to create air currents around the cases.
Place the case away from any heat sources as the heat
radiation and heatcurrentswillimpairtheperformance.
The exterior of these cases provide space for air
circulation. However, If the store conditions are outside
the recommended limits, a fan ventilation kit can be
requested.
Case dimensions and case weight can be found on the
rating plate. Also refer to the latest Product Engineering
Data (PED) available from Hussmann Customer Service.
Always ensure that the moving device is of a suitable
type, and has suicient liing capacity for the case
weight and dimension. Always li cases from the
underside.
It is the responsibility of the transport company to
insure adequate loading strategies are implemented to
insure the safe transportation of the Hussmann cases.
Cases should be strapped using the indicated strapping
points highlighted on the case packaging with the “strap
here” stickers’. Cases should be strapped in position
ready for transport with the appropriate rated strapping
and strap corner protector. Cases need to be secured
correctly during road transport to insure damage free
delivery. In Australia, cases should not be transported
without the strap corner protectors to insure that the tie
down web straps used from cutting into packaging and
or causing damage to case panels in transport.
The strap corner protector is a case transport
requirement in Australia, and disregarding using the
protector may cause transport damage. Without
the necessary implementation of correct strapping
protection Warehouse Managers may refuse loading.
Transportation requirements are to ensure case
integrity and prevent unnecessary damage and avoid
delays in the case installation schedule.
2.2 OPERATING ENVIRONMENT
2.3 HANDLING AND TRANSPORTING CASES
FIGURE 2B
PRE INSTALLATION

PAGE
PRE INSTALLATION
Packaging needs to be disposed of responsibly (refer to
page 33). by the installer and/or user.
Aer removing packaging, inspect the case for any
shipping damage and ensure that all case inclusions,
such as trims etc are accounted for. Immediately
report any shipping damage to the carrier and inform
Hussmann Customer Service of any short supplies.
Where possible all packaging and shipping braces
should be removed before cases are put into there
approx final position.
• Apparent loss or damage. If there is an obvious
loss or damage it must be noted on the freight
documentation receipt supplied by the Transport
Company and notification to Hussmann or
representative within seven (7) days of delivery.
2.4 SHIPPING DAMAGES AND SHORTAGES
NOTE: Refer to product MSDS
for all hazardous substances used
during installation in relation to their
application, PPE, first aid, disposal
and emergency management. Refer
page 20 (Risk Analysis) For MSDS
sheet contact your Hussmann
CAUTION: Care must be taken to
avoid damage to drainage outlets and
electrical equipment mounted under
or at the rear of cases
INSPECT UNDERSIDE BEFORE
LIFTING WITH FORKLIFT.
CAUTION: When moving cases
confirm that the equipment used is
approved for such works.
Do not li or drag the case by the Patch
End as this may damage both the case
and/or on ends.
Refer to your companies’ safe working
procedure (SWP) when handling cases
such as forklis, trolleys etc.
2.3 HANDLING AND TRANSPORTING CASES
The cabinets must be stored indoors, with a
temperature ranging between 00C and +400C and a
humidity between 30% RH and 90% RH.
Before storing the cabinets, ensure packaging is
unbroken and does not display defect that may
compromise preservation of the cabinets.
Avoid UV rays:
Permanent deformation of plastic
materials or damage of cabinet
parts. DO NOT store the cabinets
in uncovered areas exposed to
atmospheric agents and to direct
sunlight.
Where possible please recylce as
many items as possible.
• Concealed loss or damage Aer removing all
packing etc confirm with the parts list, attached to
case for any short supplied and or damaged trims,
product fences etc. If required notify Hussmann or
representative within seven (7) days of delivery.
SMED SEMI VERTICAL - HUSSMANN

Rating Plate Packaging Tag (rear)
Asset Tag
PAGE
NOTE: Refer to rating plate to identify
the exact case model. The serial
number and build date are key for
aquiring information regarding spare
parts, warranty, short parts etc.
Each case has a 2 unique & 1 optional label that
includes an identification number.
As well as on the packaging, the case identification
number appears as a serial number on the rating plate
(most commonly located on the ceiling panel le hand
end of the case and le side rear panel) and is printed
on a decal on the rear of the case . The case sequence
number is also written on a ticket on the front panel.
2.5 RATING PLATES:
PACKAGING TAG:
RATING PLATE:
LOCATIONS:
ASSET TAG (Where Applicable):
FIGURE 2C
PRE INSTALLATION
SMED SEMI VERTICAL - HUSSMANN

PAGE
• Model No: Identifies the model type (letters on le)
as well as the model size (numbers on right)
• Serial Number: The unique number given to each
case.
• Asset Code: Optional identification number for
supermarket stores.
• Project: Used to identify location site for the case
• SO Number: Sales Order number
• PO Number: Purchasing Order Invoice number
• Department Type: The type given for
merchandising location, eg bakery, dairy, deli etc.
• Model : Identifies the model type (letters on le) as
well as the model size (numbers on right)
• Climate Class: The climate class relates to the
atmospheric, or ambient conditions outside the
fridge or freezer. These conditions determine
how much energy the unit will utilise in specific
environments.
• Net Volume: The net volume is the total space
inside the case.
• Refrigerant: Identifies the refrigerant used in the
case.
• Voltage: Voltage is the amount of potential energy
between two points on a circuit. This is measured
in volts (V).
• Fans Current: The fans flow of electricity which
results from the ordered directional movement of
electrically charged particles, measured in Amps
(A).
• Asset Code: Optional identification number for
supermarket stores.
• Anti-Sweat Current: The heater thats installed
in the frames and doors of refrigerated cases to
reduce condensation and prevention fogging, this
is measured in Amps (A).
• Defrost and Drain Current; The current from
heaters that are installed in freezer cases to stop the
case from icing up, measured in Amps(A).
• Dimensions: The sizing of the case measured in
milimeters(mm) L x W x H.
• Type: The type given for merchandising location,
eg bakery, dairy, deli etc.
• Net Weight: The net weight is the total weight
including shelving and all part supplied with the
case.
• Date of Manufacture: The date of build.
• Frequency: Frequency is the rate at which current
changes direction per second. It is measured in
Hertz (Hz), an international unit of measure where 1
Hertz is equal to 1 cycle per second.
• Lights Current: The total current of the lighting
modules in a case, measured in Amps (A).
• Configuration ID: Identifies the model type, model
size, the lineup number and the case sequence
number.
• Serial Number: The unique number given to each
PACKAGING TAG:
RATING PLATE:
ASSET CODE:
RATING PLATE (Continued):
PRE INSTALLATION
SMED SEMI VERTICAL - HUSSMANN

PAGE SMED SEMI VERTICAL - HUSSMANN
NOTE: Information in this manual
is to be followed in conjunction with
specifications, work practices and
regulations of the customer, installing
company and relevant industry.
CAUTION: Ensure the liing capacity
of the trolley, etc is suicient for the
case. Refer to the product engineering
data tables at the front of this manual
for case weights and Risk Analysis
(page 36). The rating plates will also
detail weight/size.
To position the cases:
1. If the plinth surface is not level, determine
where the highest point of the plinth is, and
position the case allocated to this position first.
2. Snap a chalk line on the floor to use as a guide for
positioning the front of the cases in the line-up.
Determine the position of the case and choose a
part of the case that will relate to the chalk line.
3. Adjust the case height using the adjustable feet to
ensure the case is level to within +/- 1.5mm from
front to back and side to side and chassis of case is
NOT twisted. Maximum 30mm adjustment.
Refer to and follow the manual handling policies of
your Company when moving cases
Cases must not be positioned in areas that may be
subject to heat or air currents such as ventilation ducts,
open doors or windows, direct sunlight, electric fans or
ovens, etc.
Unwrap the cabinet and remove the shipping braces.
Li up cabinet and remove shipping base.
FIGURE 3A - Remove Shipping Base
FIGURE 3B - Levelling Feet
3.1 POSITIONING AND LEVELLING
INSTALLATION

Level Front to Back
Level Side to Side
PAGE SMED SEMI VERTICAL - HUSSMANN
Make sure case is level:
Front to Back: +/- 1.5mm
Side to Side: +/- 1.5mm (Figure 3C)
NOTE: It is important that all cases are
level for correct case joining and operation
and door alignment. DO NOT SET CASE
LEVELS OFF THE PATCH END fitted to a case
NOTE: It is important that all cases are
lined up.
NOTE: All feet need to be loaded
evenly on the ground. If this is not
undertaken this could cause the
chassis to twist.
NOTE: Use string line to align with
datum point when lining up multiple
cases.
The bumper support and front ticket
strip must be removed before lining up
the cases.
Laser Lines or Spirit Levels are also
good instruments to use while lining a
case up.
USE THE CHASSIS AS MAIN POINT
OF REFERENCE WHEN LEVELLING.
FIGURE 3C - Levelling Case
FIGURE 3D - Lining Up Case
3.1 POSITIONING AND LEVELLING
INSTALLATION

Make sure all feet are adjusted, NOT just the ones at the end of the
case, ensuring case load is fully supported.
Make sure case is level:
Front to Back: +/- 1.5mm
Side to Side: +/- 1.5mm
Example of a 2500mm case - The amount of legs will defer on a
each size case.
Exaggerated Twist
PAGE SMED SEMI VERTICAL - HUSSMANN
NOTE: If feet are not adjusted and levelled correctly. The case chassis could twist causing saw
toothing of the doors and other misalignments.
Front support feet help with the added weight of the door assembly, ensure these are adjusted
correctly.
FIGURE 3E
FIGURE 3F
INSTALLATION

Misaligned / Not Parallel/ Twisted
Aligned / Parallel / Not Twisted
Misaligned / Not Parallel/ Twisted
Aligned / Parallel / Not Twisted
SCHOTT DOOR SCHOTT DOOR
SCHOTT DOORSCHOTT DOOR
BENTCAM DOOR BENTCAM DOOR
PAGE SMED SEMI VERTICAL - HUSSMANN
NOTE: IF SAW TOOTHING OF DOORS
IS EVIDENT THEN IT IS HIGHLY LIKEY
FURTHER ADJUSTMENT IS REQUIRED.
The doors in the images below show the misalignment
(saw toothing) . This should be completely horizontal
and flush with each other. The door system on this
case only has a minor adjustment. If doors cannot be
aligned as per the following examples then the case
chassis has not been leveled to tolerance and needs to
be readjusted.
Case needs to be re-checked for level once fully
stocked. If door saw toothing is apparent and doors
cannot be re-adjusted, then case needs to be re-
levelled correctly.
3.2 DOOR SAW TOOTHING
SCHOTT DOOR : BENTCAM DOOR:
FIGURE 3G
FIGURE 3H
FIGURE 3I
FIGURE 3J
INSTALLATION

Slide
Hinge mechanism in middle of rebate
Doors aer adjustment and cancelling of misalignment
PAGE SMED SEMI VERTICAL - HUSSMANN
If the doors do not align horizontally, they can be
adjusted using the adjustment mechanism in the sill
rail.
Check the vertical gap between the doors , to be
adjusted and the adjacent sets of doors, to see which
door is the one to be adjusted. Make small adjustments
each time. Both doors may need to be adjusted to
achieve the most even result.
To resolve the doors misalignment as shown in below
image adjustment should be done through the hinge
mechanism at the top of door assembly.
The hinge mechanism by default is set in the middle of
the rebate. Shiing the hinge le or right can be done
by untightening of two screws as shown in (Figure 3N).
If the doors cant be adjusted through the hinge
mechanism, then the case needs to be levelled correctly.
3.3 DOOR ADJUSTMENT:
SCHOTT DOOR :
FIGURE 3K
FIGURE 3L
FIGURE 3M
INSTALLATION

Doors aer adjustment and cancelling of misalignment
Slide
PAGE SMED SEMI VERTICAL - HUSSMANN
Cancelling Bentcam door misalignment is basically
similar to the Schott door with this dierence that hinge
mechanism is at the bottom of the door assembly.
Adjust the door by using of the two screws of door
hinge plate at the bottom of door assembly. By moving
the hinge to the right and le the two door legs will be
levelled. Only minor misalignment that can be rectified
by this mechanism.
3.3 DOOR ADJUSTMENT:
BENTCAM DOOR :
FIGURE 3N
FIGURE 3O
FIGURE 3P
INSTALLATION

Tube
Lights
PAGE SMED SEMI VERTICAL - HUSSMANN
FIGURE 3Q
Single Row Canopy LED lighting is standard.
Various optional shelf LED lighting is available and
where fitted is located under each of the shelves.
NOTE: For any information regarding
customer specific lights, reach out to
Hussmann.
It is important that proper cable management is
followed and cables are clipped in correctly. There is
a plastic clip that clips into the bracket that holds the
cable. Ensure all cables are retained into the back panel.
Replacement LED driver
The LED drivers can be found on the top le of the
case in the electric box. If lights appear faulty or not
functioning, contact your nearest service provider for
replacement.
NOTE: Vertical mullion lighting is
standard with Bentcam doors.
3.4 LIGHTING
INSTALLATION

00
300
Back Vertical
Bracket
Shelf Bracket
PAGE SMED SEMI VERTICAL - HUSSMANN
NOTE: The shelves are not able to be
tilted upward.
CAUTION: Do not exceed the weight
limit of each shelf. Each shelf has
a total maximum weight limit of
180kg/m2.
NOTE: If the case shelf arrangement
has been deviated significantly from
original specified setup, then product
temperature may be aected.
The quantity and location of shelving
may aect cabinet performance. Refer
to PED sheet and/or your refrigeration
service provider.
Although the shelf sizes may vary, the installation and
fitting will remain the same.
Using the hook bracket shown down below. Li the
shelf up to the back vertical bracket. The height is
independently adjustable by which holes you put the
bracket on. Make sure you level the shelf by inserted
the bracket in its corresponding hole on the other side.
The shelves can be titled downward in between 00and
300. This is done by the placement of hinges on the
shelf brackets.
3.5 FITTING SHELVES TILTING SHELVES
INSTALLATION
This manual suits for next models
1
Table of contents