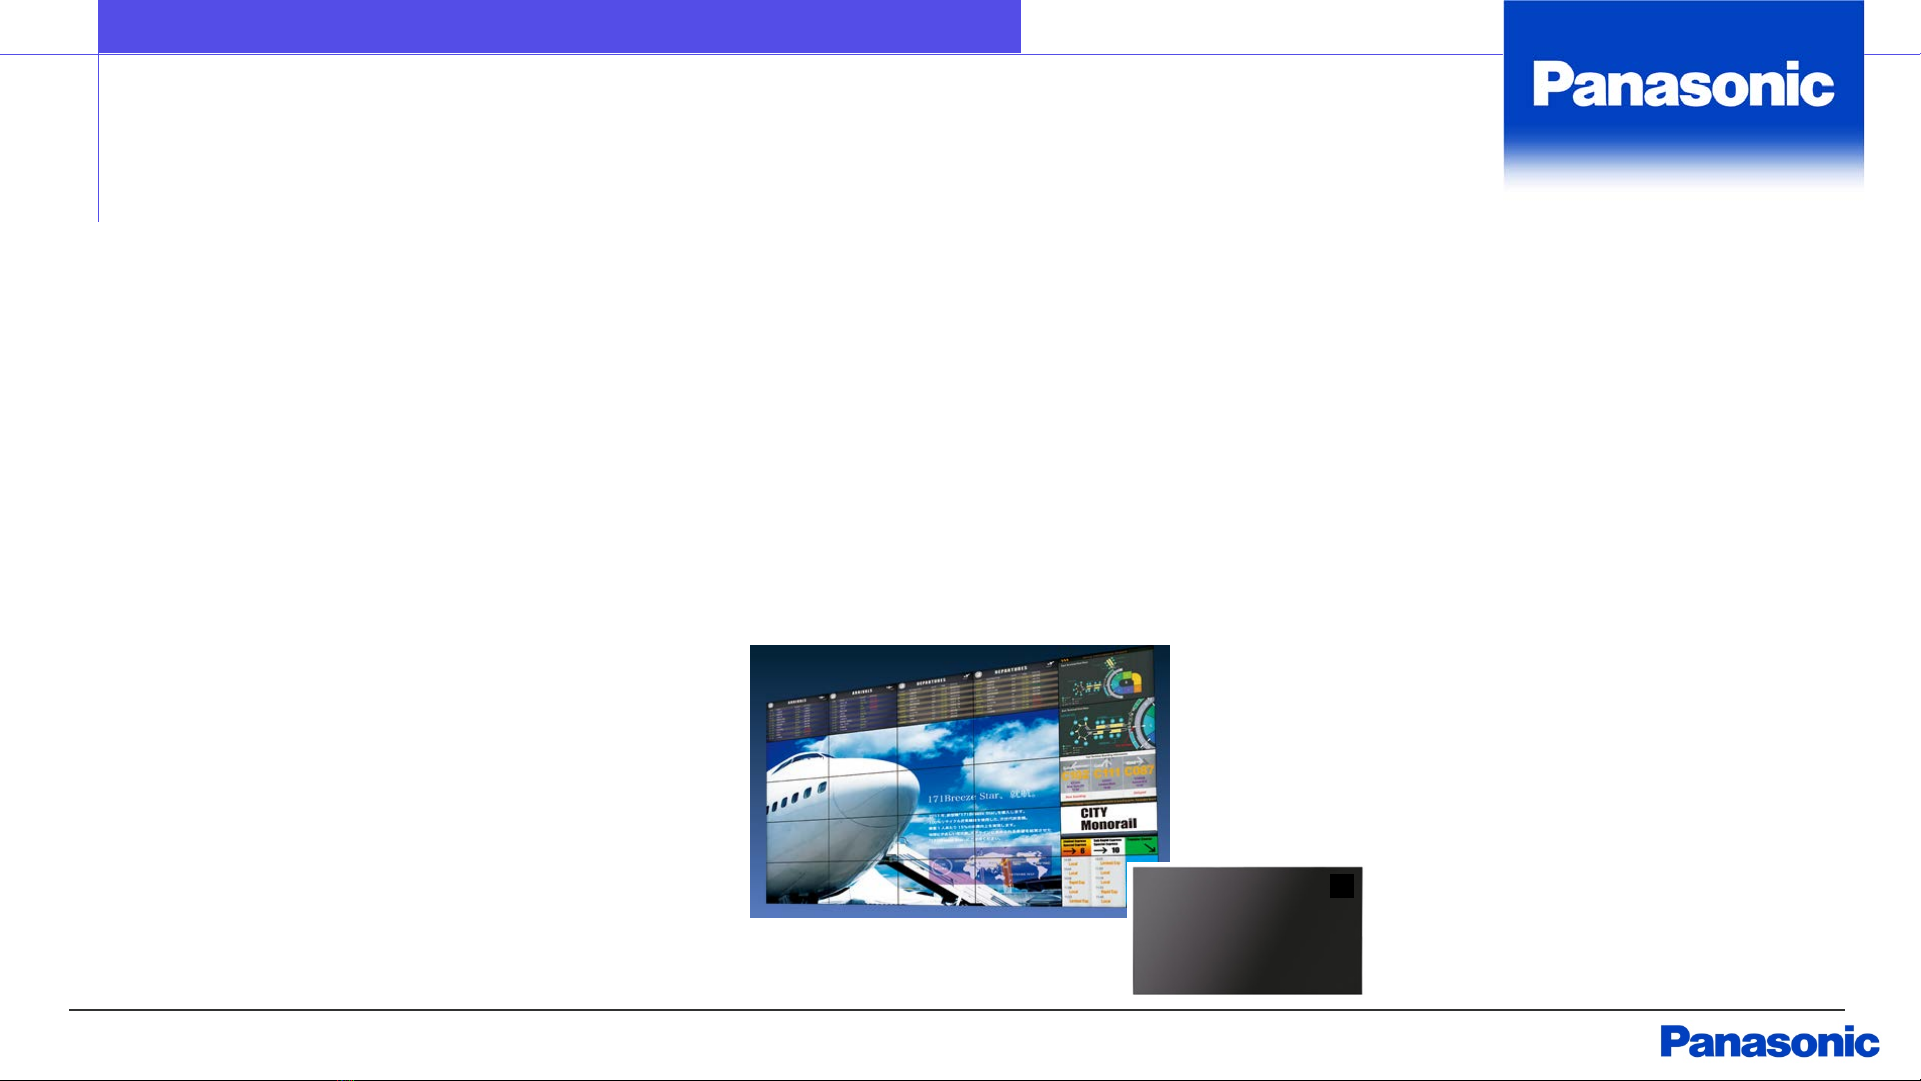
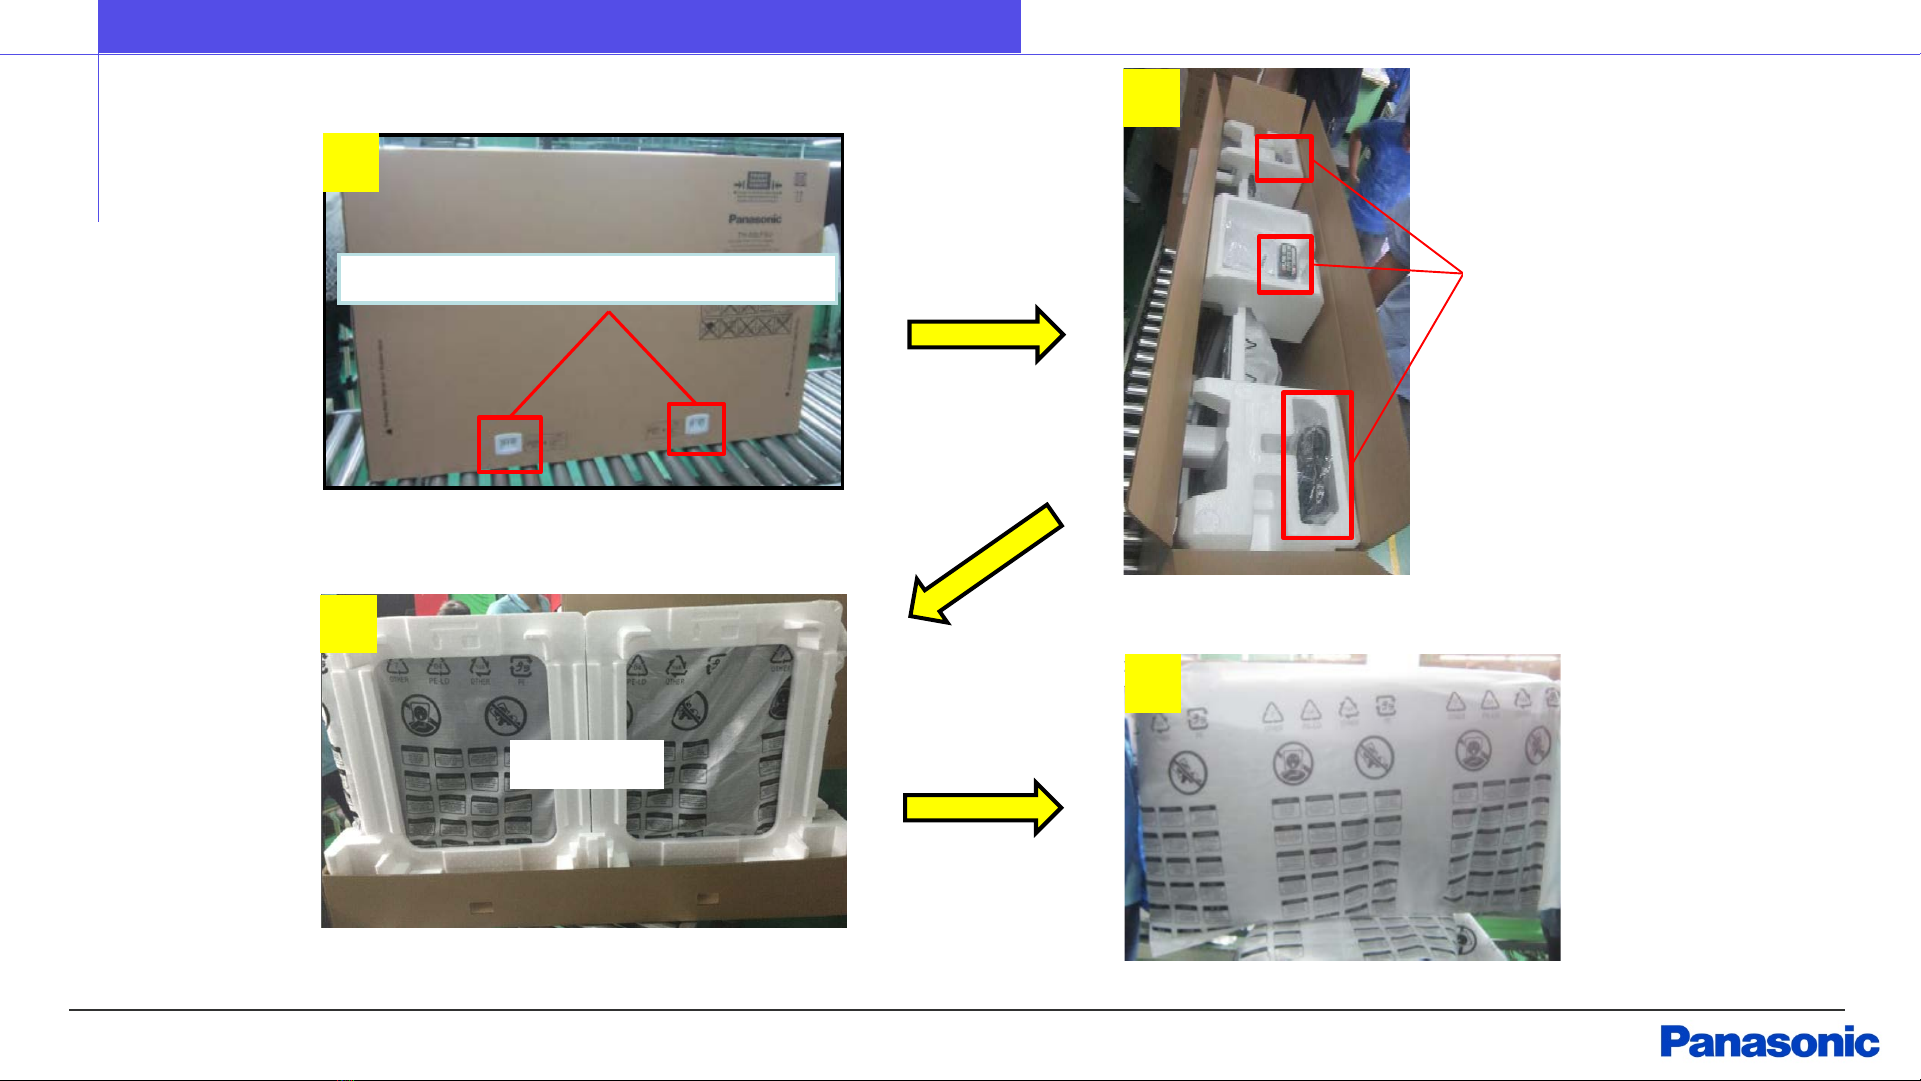
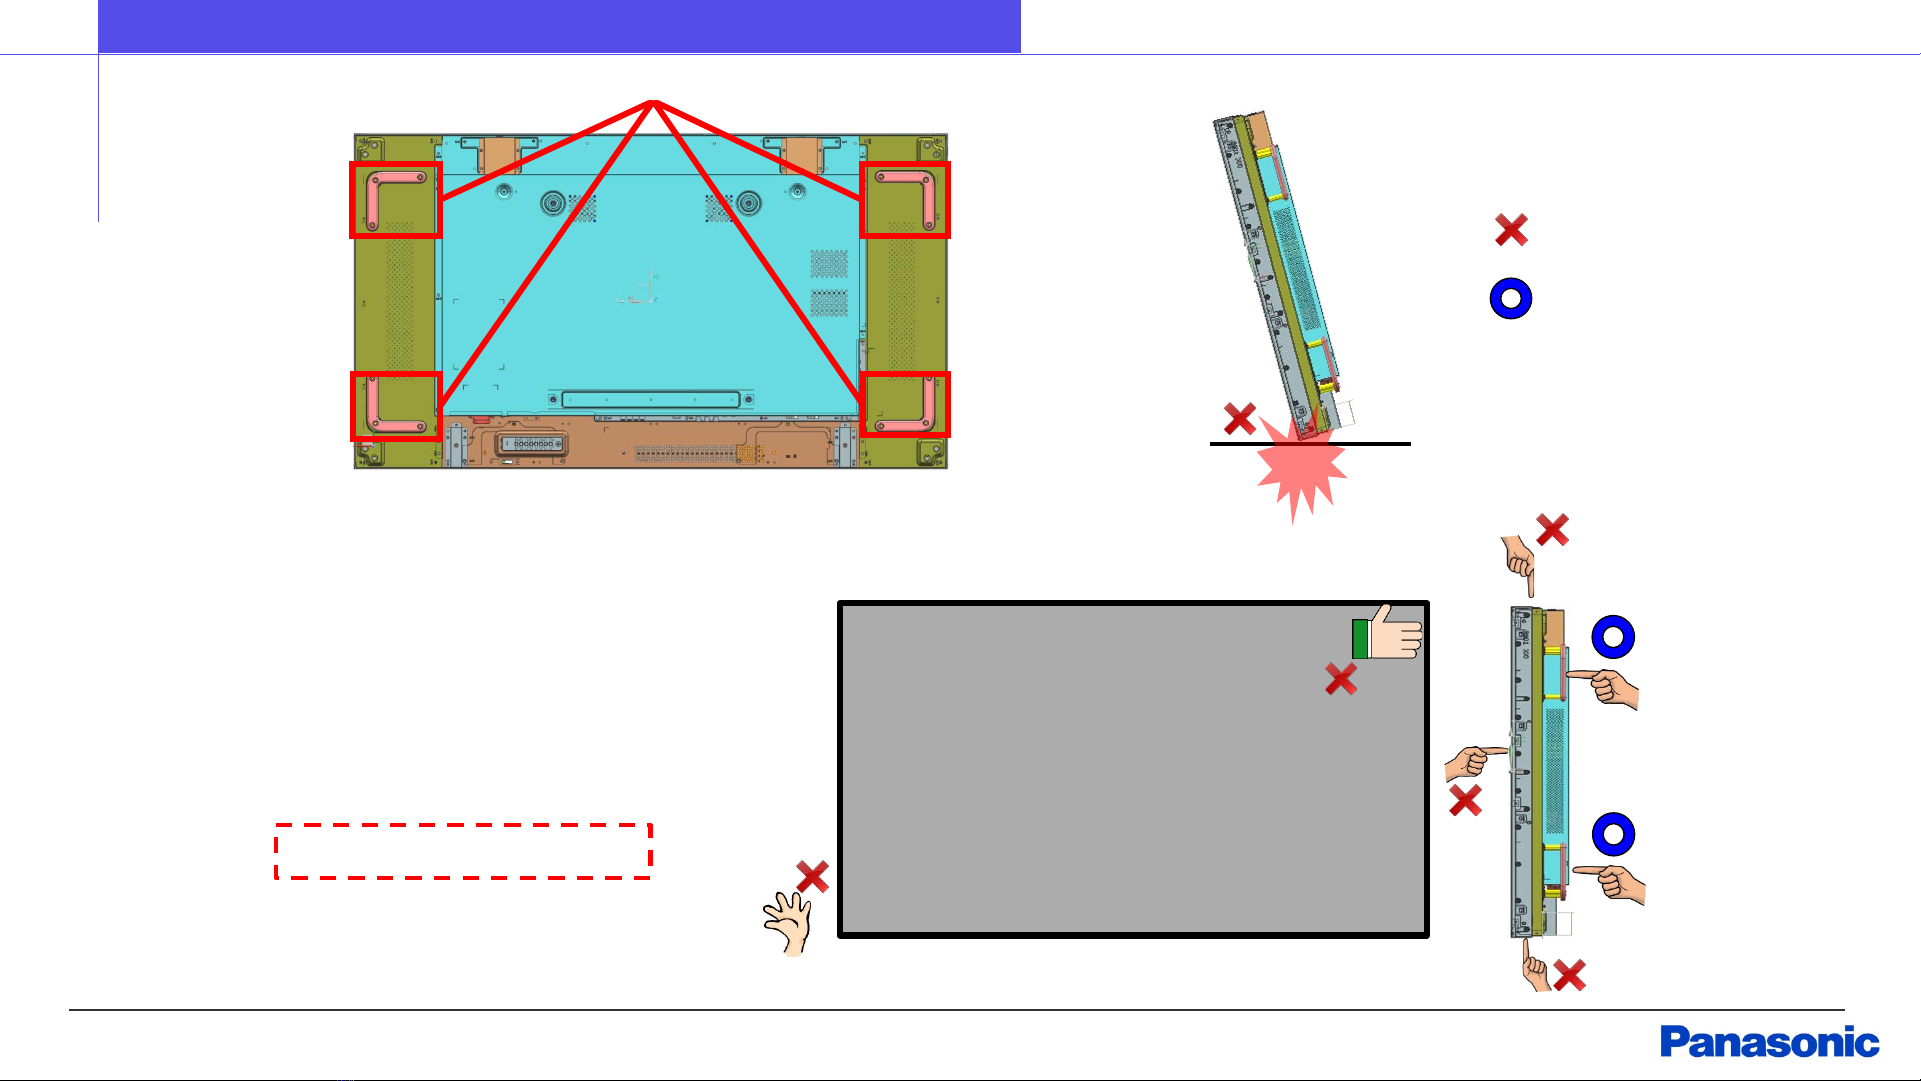
Panasonic VF2H Series Instructions for use

Construction Manual
Video Wall

2
●Unpacking 3
●Installation
Cautions when installing or moving
Wall-mounting bracket
4
6
Installation of mounting bracket 7
Cautions of Video Wall installation 9
Embedding condition 13
Connection to power source 17
Daisy Chain Connection
Remote controller IR signal outreach distance
18
24
●Picture adjustment
Color Calibration 25
●Maintenance
Maintenance 26
Contents

1
2
3
4
Unpacking Procedure
3
Unpacking
Joint (front and back/Each 2 points)Accessory parts
Remove Joint(Total 4)
Take out accessory parts and cushions
Remove upper carton case and front cushions
Remove a protection bag
Front Side

4
Cautions 1
・Please do not move with the monitor as an upswing or a downswing.

5
Cautions 2
・Grab the handles when working.
・Do not take hold any part except the handles.
・Do not touch top/down/left/right side and
also surface of the monitor.
・Do not stand on the floor directly
with surface or rear side of the
monitor.
・Do not make impacts to the monitor.
Do not twist the monitor.
Handle
:No Good
:OK

6
Wall-mounting bracket
When preparing bracket for multiple monitors, please take the following considerations.
1) Ensure the wall on which the monitors will be installed has a smooth surface.
2) Ensure the bracket used to attach the monitors to the wall have enough load
capacity to support them.
3) Ensure the bracket used can be adjusted upward, downward, to the left and right,
forward and backward.
4) When installing or moving, ensure the bracket does not interfere with the back of
the monitor, cable guides, and other structures.
5) Ensure the bracket is constructed so that the monitor can easily be removed.
6) Please do not distort the monitor.
If you can not install in the same way as this manual,
please contact Panasonic sales company.
Caution
Wall-mounting bracket

7
Installation of mounting bracket 1
There are L type protection board (downside) and protection film (monitor surface).
Please remove them.
-16mm longer than the thickness of the
mounting bracket) and tighten them
securely.

8
There is a limitation of maximum units using optional mounting bracket, when we install video walls.
・TH-55VF2H/VF2 : 4row/5column
・TH-55VF1H : 5row/6column
・TH-55LFV9/LFV8 : 9row/11column
Column
Row
Installation of mounting bracket 2
Please set a position dial (up, down, left and right) of the starting bracket to eccentric position of
installation direction side, not a center (default) position.
for example

9
Cautions 1
Cautions of Video Wall installation 1
When we press 70 N power to left
and Right, the wall mount will
move to back
※In case of using TY-VK55LFV1
and TY-VK55LFV2
Please do not press panel active area and corner.
Please press center edge of right and left.
Please press vertically to the panel.
Please increase power in right and left equality.
There is a possibility that if pressure
is added on the bezel towards outside,
the bezel will be distorted.
(The bezel will be open by 20N pressure)
Please add a soft pressure vertically to
the panel.

0.5mm
0.5mm
10
About securing space between monitors
Cautions 2
Cautions of Video Wall installation 2
Please do not distort the monitor.
After turning on, the monitor slightly expands due to heat.
When installing multiple monitors with fixed outer most
peripheries, space (0.5 mm) between monitors (above, below,
to the left and right sides of each monitor) must be secured to
account for expansion due to heat.
Space between sets (same for above,
below, to the left and right directions)

11
Cautions 3
Cautions of Video Wall installation 3
PLATE
FRONT SIDE
BACK
SIDE
After hung up the monitor and adjust position、
Please do not adjust to flat each monitor surface using some material such as “PLATE”.
This case, distortion is added to the monitor, and there is a possibility some picture trouble happen to
the monitor.
Please do not use a hole of rear monitor corner
except for Panasonic option bracket such as
TY-VK55LV1、TY-VK55LV2.

Attention
Main points of attention
12
Secure air circulation to ensure the ambient condition as follows.
Temperature :0°C -40°C
Humidity :10% -90% (Non condensation).
Note
In case of LFV8 model :20% -80% (Non condensation)
Please secure space as follows.
1) Stand-alone installation
Secure 100 mm or more space above, below, to the left and right and 50 mm
or more behind the monitor.
2) Multi-installation
Secure 100 mm or more space above, below, to the left and right and 150 mm
or more behind the monitor.

A B C D E
100 100 100 100 50
A
D
C
E
B
Embedding 1
Embedding space (stand-alone / horizontal installation)
13
Unit :mm
Secure space as follows.
Ambient Condition :Temperature 0ー40 ℃、 Humidity 10-90% (Non condensation)
Note : In case of LFV8 model, from 20% to 80% (Non condensation)

A 100
B 100
C 100
D 100
E 50
AB
C
D
E
14
Embedding 2
Embedding space (stand-alone / vertical installation)
Unit :mm
Secure space as follows.
Ambient Condition :Temperature 0ー40 ℃、 Humidity 10-90% (Non condensation)
Note : In case of LFV8 model, from 20% to 80% (Non condensation)

A B C D E
100 100 100 100 150
AB
C
D
E
15
Embedding 3
Embedding space (multi-system / horizontal installation)
Unit :mm
Secure space as follows.
Ambient Condition :Temperature 0ー40 ℃、 Humidity 10-90% (Non condensation)
Note : In case of LFV8 model, from 20% to 80% (Non condensation)

A 100
B 100
C 100
D 100
E 150
AB
C
D
E
16
Embedding 4
Embedding space (multi-system / vertical installation)
Unit :mm
Secure space as follows.
Ambient Condition :Temperature 0ー40 ℃、 Humidity 10-90% (Non condensation)
Note : In case of LFV8 model, from 20% to 80% (Non condensation)

Connection to power source
About connecting to power source
17
AC Power Cord
J Model
W Model
U Model
C Model
Use only the AC power cord included and connect
securely.
Never use a power cord other than the one included
as it may lead to a smoke emission and/or fire due
to insufficient contact.
Caution

Digital Link cable Digital Link cable
Digital Link cable
DIGITAL LINK Connection (For VF1H/VF2H/VF2 model)
DVI cable
1台目 2台目
1台目 2台目
Daisy Chain Connection 1
ET-YFB200
18
Max:10units
※If contents have HDCP signal,
Max 8units is available.
In case of Digital Link input
In case of DVI input
Third or more monitor
First monitor Second monitor

DVD/BD Player
Digital Link cable
HDMI cable
Digital Link cable
Display Port cable
DIGITAL LINK Connection (For VF1H/VF2H/VF2 model)
19
Daisy Chain Connection 2
Max:10units
※If contents have HDCP signal,
Max 8units is available.
In case of HDMI input
In case of Display Port input
Third or more monitor
First monitor Second monitor

Display Port cable Display Port cable
1台目 2台目
Display Port cable
20
Daisy Chain Connection 3
Max:10units
※If contents have HDCP signal,
Max 8units is available.
Third or more monitor
First monitor Second monitor
Display Port Daisy Chain Connection (For LFV8/LFV9 model)
This manual suits for next models
7
Table of contents
Other Panasonic Industrial Monitor manuals
Popular Industrial Monitor manuals by other brands

Pepperl+Fuchs
Pepperl+Fuchs RM-320P instruction manual

Pepperl+Fuchs
Pepperl+Fuchs VisuNet GMP RM/PC 200 series Hardware manual

I-Tech
I-Tech HNP717 user manual

CyberView
CyberView RP-HF821 user manual

Oriental motor
Oriental motor VEXTA BX Series operating manual

PEHA
PEHA 941 TAB Series Installation and operating instructions