Pantech PG-1910 User manual

Welcome
USER MANUAL PG-1910
Thank you for choosing Pantech PG-1910 and welcome to the wireless
mobile communicationswith the PG-1910, our dual-band GSM mobile
phone.
Pantech is delighted to introduce this brand new portable phone which
will always keep you connected to the network.
This user manual explains in detail its unique features and how to use them.
※Some of the contents in this User Manual could vary from your phone.
It may vary depending on the S/W version and the network provider you
subscribed to.

2
Specification
1. Display
Single Candy-bar 65,536 STN LCD.
z1.5” LCD
zSupports up to 65,536 colours within 128 x 128 pixels
z7 lines for text in basic mode with 16-pixel font
zTwo Soft keys([ Left], [ Right]), and 5-way joystick .
zList and grid menu
2. Melody
64 poly sound
MP3 Ring tones
3. Camera
VGA CCDCMOS built-in Camera.
zResolution up to 640 x 480 (307,200 pixels)
zSelf timer function (5 Secs or 10 Secs)
zPhoto album
4. Dimensions & Weight
zWeight: 80 g
zDimensions: 103 mm x 43.5 mm x 13.7 mm
5. Power Management (Performance)
Battery Type Capacity Standby Time Talk Time
Standard
(Li-ion) 720 mAh 160 Hours 2.5 Hours
-
6. Operating Frequency
zGSM 850, and PCS 1900 networks in, North America, and South
America where these networks are supported.
zGSM 900, and DCS 1800 networks in Europe,Africa, Asia-Pacific
where these networks are supported.zAutomatic band switching.

3
V
iews
Soft#1(Menu)
Numeric 1
Soft#2(Contact)
MicroSD
Camera key
Wrist strap hole

4
Quick & Easy
Keys Functions
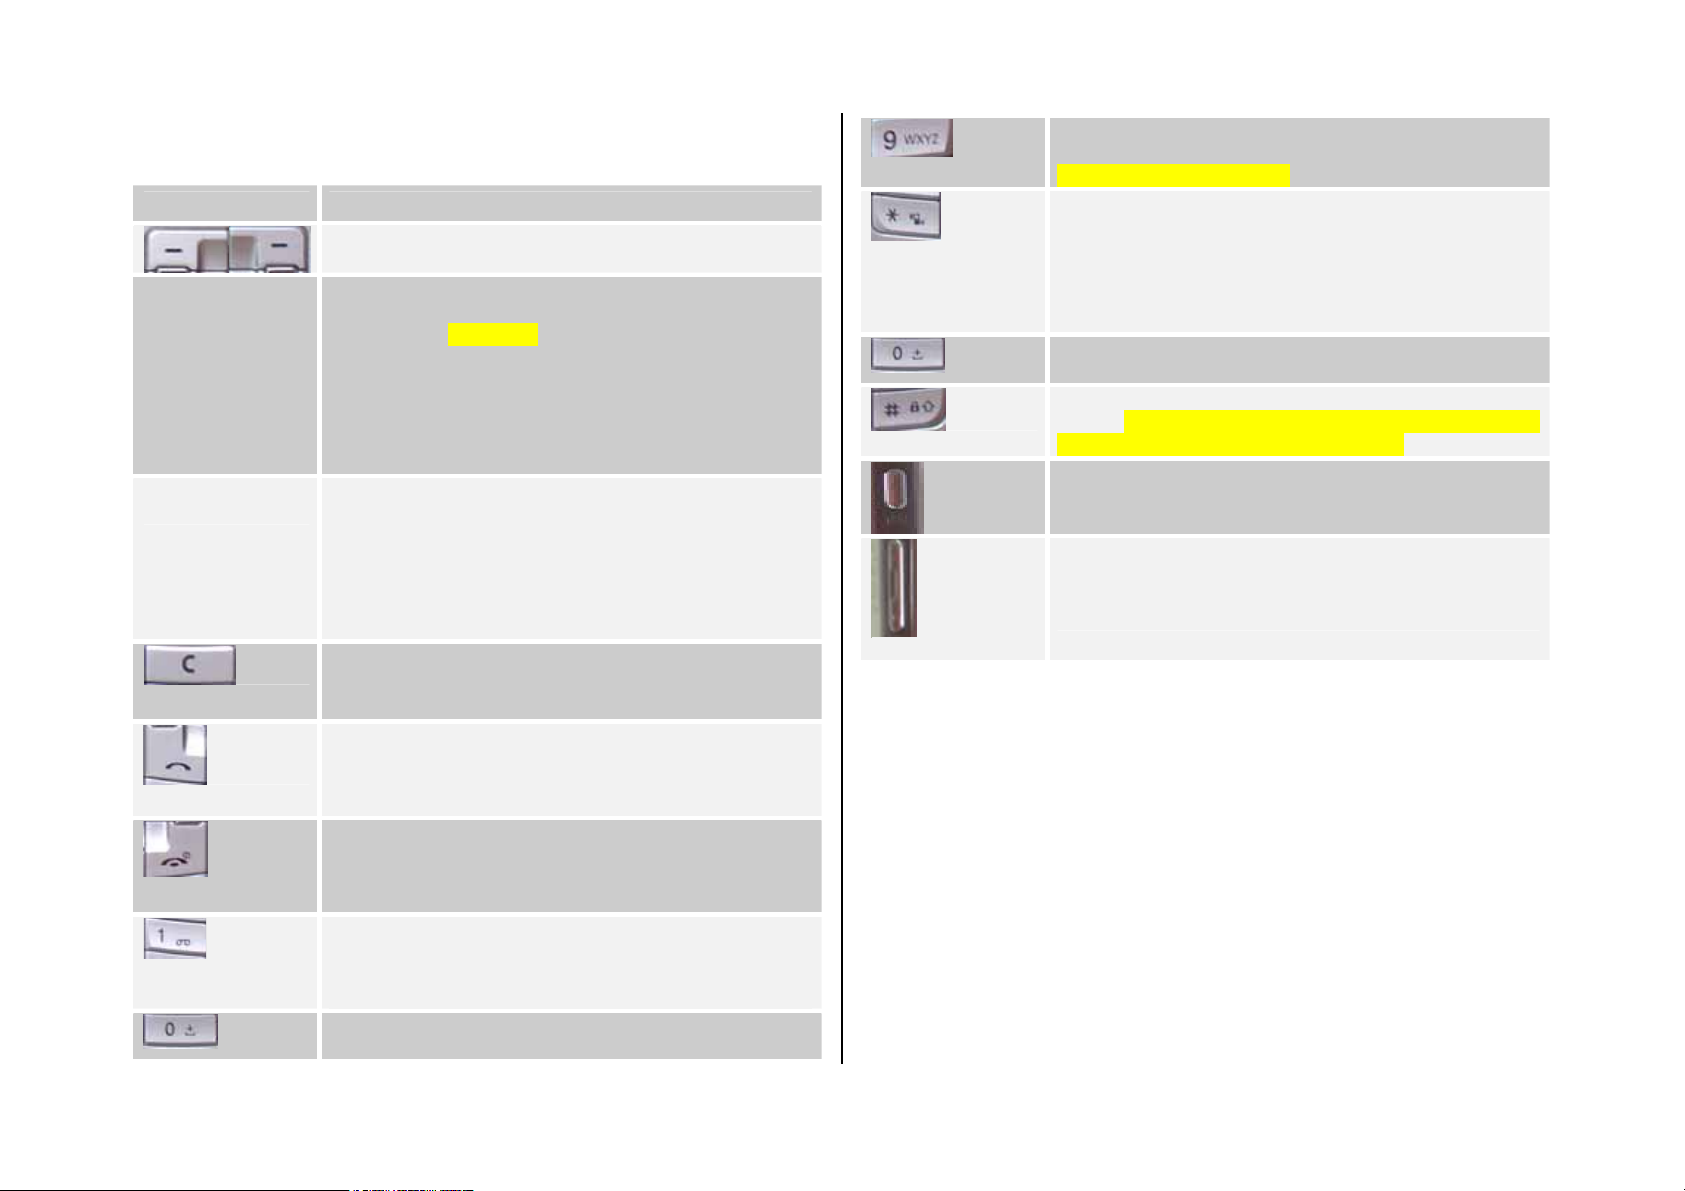
Performs the functions shown at the bottom line of the
display(Soft Keys).
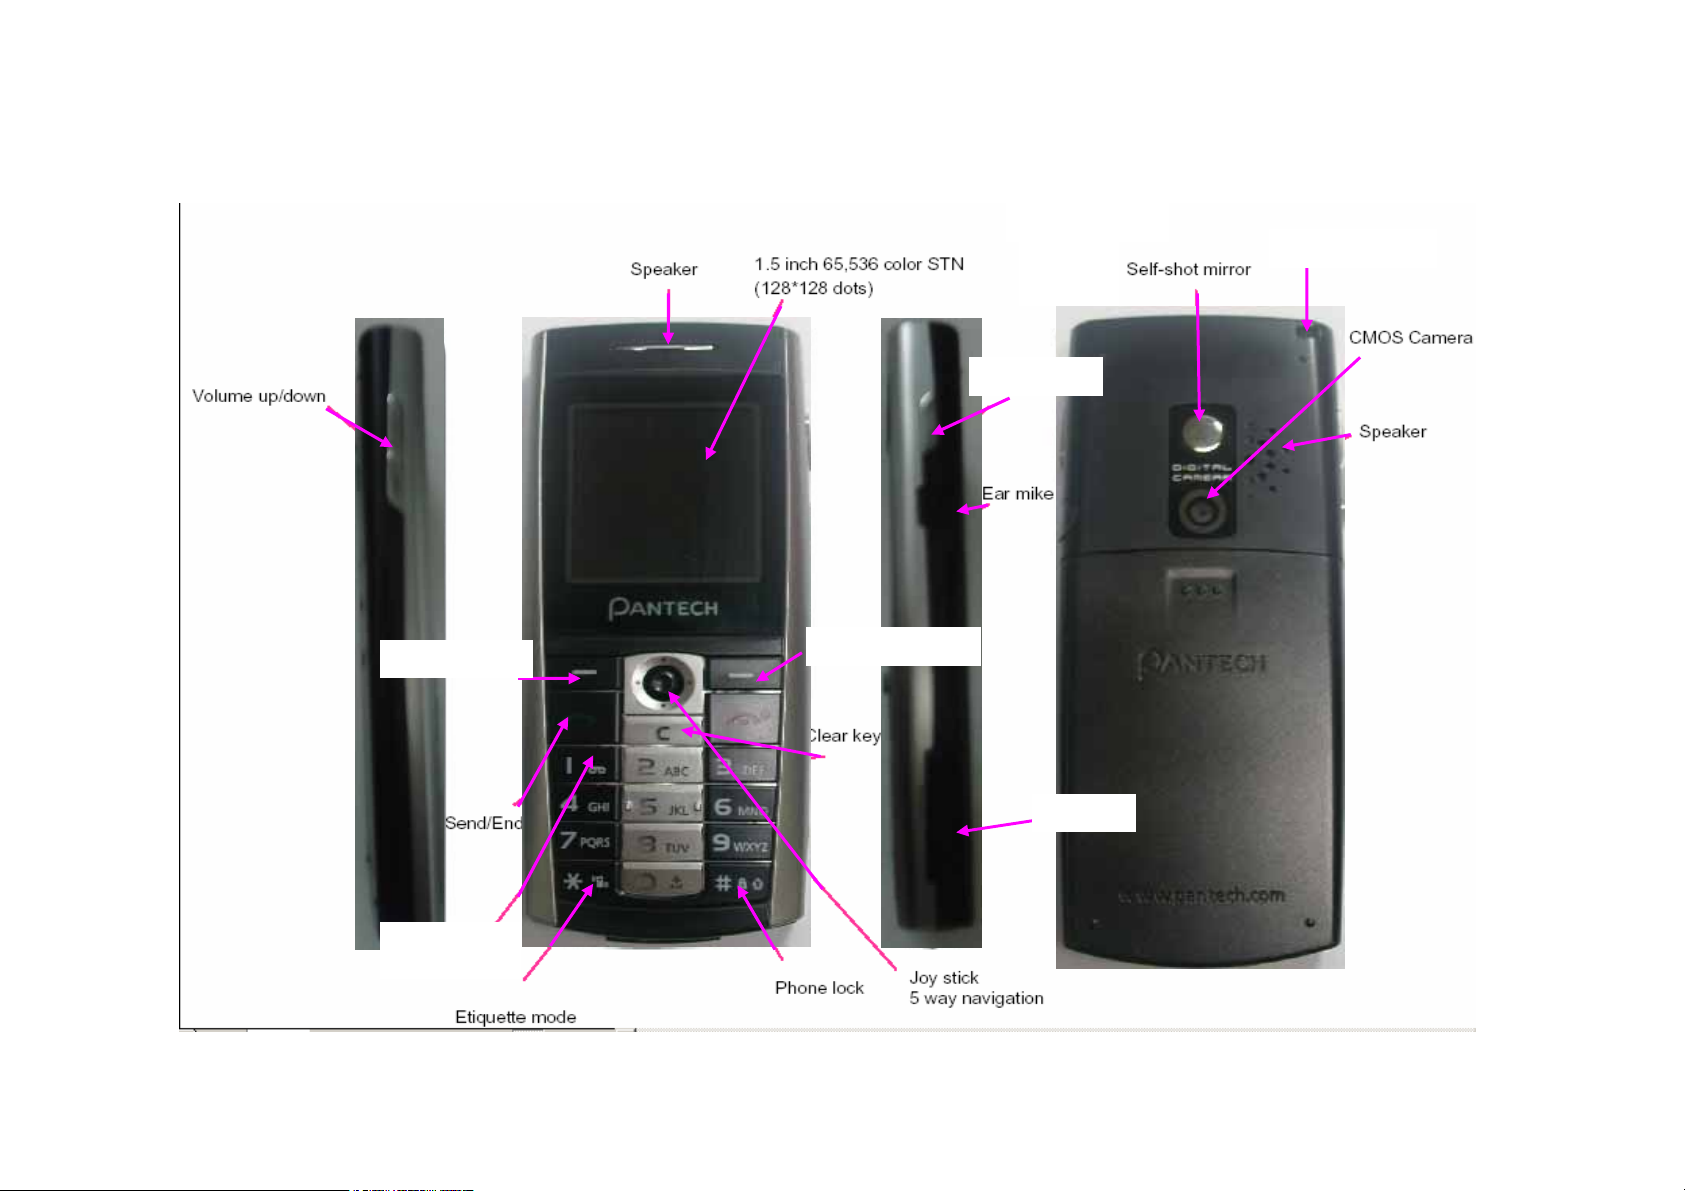
Joystick Scrolls through the menu options in Menu mode.
In standby mode, the default functions,
Push to Left: FM Radio
Right: Message menu
Up: Ring Tone
Down: Contacts
For details, see “Using the Shortcut Key in Standby
Mode”.
Push in on
joystick Opens the WAP (Wireless Application Protocol) menu
list if pressed shortly in standby mode
Launches the WAP browser directly, if pressed and
held in standby mode.
Selects menu function or stores user input
information, such as names, SIM memory. Also used
for confirmation.
Deletes characters in text input mode, or returns
to the previous menu.
Opens Calendar view if pressed shortly in standby mode.
Makes or receives a call.
Shows the recent call listsin standby mode.
Re-dials the last call number if pressed and held, or
pressed twice in standby mode.
Completes the current call.
Turns on/off the phone if pressed and held.
Cancels user input and returns to the standby mode
while in Menu mode.
Quickly connects to the voice mail server, or inputs a
voice mail box number which you want to dial if
pressed and held in standby mode.
~ Enters numbers, characters, or symbols.
Goes to the dial number input mode if pressed in
standby mode.
Makes an emergency call if pressed 9 key and held
if no SIM Card is available
Enters or exits from etiquette mode if pressed and
held in standby mode.
Shows the symbol input screen if pressed and held in
text input mode.
Works in Word search mode if pressed in the
Predictive text input mode.
Enters an international dialling prefix(00, +).
Enters the space character in text input mode.
Locks the keypad if pressed and held in standby
mode. To unlock the keypad, press “#” shortly
when the unlock guidance is shown.
Enters a camera preview mode and takes a photo.
Enters a video recording mode if pressed and held in
standby mode.
Adjusts the earpiece volume level which you want
during a call, and moves the cursor upwards or
downwards in the menu mode.
Controls the key tone volume in standby mode

5
Safety Precautions
Using a phone while driving is prohibited.
Please check local laws and regulations with regard to the prohibition of
phone usage while driving, and comply with them.
- Use of your mobile phone while you are driving may disturb your
concentration and consequently cause accidents. Please turn it off as soon
as possible.
- Should you use your phone in an emergency, please make use of the
hands free device built in your car, or pull your car over to a safe place for
your utmost safety.
- The electronic wave energy emitting from your phone may affect the
electronic devices built in your car. Please be aware of this characteristic.
Mobile Phone Use Restriction Area
Make sure to turn your phone off in a phone usage restricted area.
Using a Phone in an Explosive or Dangerous Area is not
Permitted
Please turn your phone off in areas with explosive or dangerous materials
(such as fuel, fuel stations, or places with chemical goods) and abide by
any instructions or signals. Never try to detach your mobile phone battery
from the phone in such areas.
Boarding an Aircraft
- Please turn your phone off when you are on the aircraft. The electronic
wave from your phone may affect the electronic navigation device in the
aircraft.
Using Medical Equipment
- Please turn your phone off while you are in a hospital.
- Please abide by the regulations or rules of the hospital.
- Please turn off your phone when using medical equipment for private
purposes if possible. You should consult with the manufacturer or an expert
regarding phone usage near medical equipment.
Installing a Vehicle Hands Free Device
- Please keep the vehicle hands free device away from the steering, and air
bag expansion range, or otherwise injury may result.
Effect of Mobile Phone and Electronic Devices
Some electronic devices may be affected by the electronic wave
emitting from the mobile phone in service. Please be careful.

6
Access Code
The following section describes various security codes.
PIN code (4 to 8 digits)
The PIN (Personal Identification Number) code protects your SIM card
against unauthorised user(6. Settings>6. Security Settings>1. PIN
Check). The PIN code is usually supplied with the SIM card. If you input
the incorrect PIN code five times consecutively (trial time depends on
SIM card), the PIN code will be blocked. If the PIN code is blocked, you
need the PUK(Personal Unblocking Key) code before you can use the
SIM card again. See information on the PUK code.
PIN2 code (4 to 8 digits)
The PIN2 code, supplied with SIM card, is required to access functions,
such as call cost counters. (3. Call Logs>6. Call Cost>4. Max Cost>2.
Set Limit. Call Cost menu is SIM Dependent) and FDN(Fixed Dial
Number) (6. Settings>6. Security Settings>8. Fixed Dialling).
Phone Lock code (0 to 8 digits)
The lock code can be used to lock the phone and keypad to avoid
unauthorised use(6. Settings>6. Security Settings>3. Phone Lock).
Note: The factory setting for the lock code is 1234. To avoid
unauthorised user of your phone, change the lock code. Keep the new
code secret and in a safe place separate from your phone.
PUK and PUK2 codes (8 digits)
The PUK (Personal Unblocking Key) code is required to unblock and
change a disabled PIN code. The PUK2 code is required to unblock and
change a disabled PIN2 code. If the codes are not supplied with the SIM
card, contact the operator whose SIM card is in your phone for the codes.
You can change the following codes: lock code(6. Settings>6. Security
Settings>4. Change Lock),PIN code(6. Settings>6. Security
Settings>2. Change PIN), and PIN2 code(6. Settings>6. Security
Settings>9. Change PIN2). These codes can include the numbers from
0 to 9 only.
N/W Password (4 digits)
The N/W password is required when you use the N/W Barring function.
You obtain the password from your service provider when you subscribe
to this function.
You can change this password(6. Settings>6. Security Settings>6.
N/W Barring>7. Change password).
(For further details, see Applications Menu 6.6.6)

7
Menu Tree
1 Messages
1.1 Write New
1.1.1 Text Msgs.
1.1.2 Multimedia Msgs.
1.1.3 Email
1.2 Inbox
1.3 Outbox
1.4 Draft Box
1.5 Sent Box
1.6 Templates
1.7 Settings
1.7.1 Text Msgs.
1.7.1.1 Message Center
1.7.1.2 Message Type
1.7.1.3 Save to
1.7.1.4 Save Message
1.7.1.5 Delivery Reports
1.7.1.6 Message Lifetime
1.7.2 Multimedia Msgs.
1.7.2.1 Profiles
1.7.2.2 Auto Download
1.7.2.3 Delivery Reports
1.7.2.4 Read Reports
1.7.2.5 Save Message
1.7.2.6 Message Lifetime
1.7.3 Broadcast
1.7.3.1 Languages
1.7.3.2 Topic List
1.7.3.3 Receive
1.7.4 Email
1.7.4.1 Max Message Download Size
1.7.4.2 Save Message
1.7.4.3 Email Accounts
1.7.4.4 Email Bearers
1.7.4.5 Saving Memory
1.7.5 Voice Mail
1.8 Memory Info
2 Contacts
2.1 Search
2.2 Add Contact
2.3 Speed Dial
2.4 Groups
2.5 Memory in Use
2.5.1 Phone or SIM
2.5.2 SIM Card
2.5.3 Phone
2.6 Copy All
2.6.1 SIM to Phone
2.6.2 Phone to SIM

8
2.7 Delete All
2.7.1 Phone
2.7.2 SIM Card
2.8 Memory Info
2.9 Service Number∗
3 Call Logs
3.1 Missed Calls
3.2 Received Calls
3.3 Dialled Calls
3.4 Delete Call Logs
3.4.1 Missed Calls
3.4.2 Received Calls
3.4.3 Dialled Calls
3.4.4 All Calls
3.5 Call Timer
3.5.1 Last Call Time
3.5.2 Received Call Time
3.5.3 Dialled Call Time
3.5.4 All Call Time
3.5.5 Reset Call Times
3.6 Call Cost∗∗
3.6.1 Last Call Cost
3.6.2 All Call Cost
∗ SIM Dependent
∗∗ Network Dependent
3.6.3 Delete Logs
3.6.4 Max Cost
3.6.5 Cost Unit
3.7 GPRS Info
3.7.1 Current Info
3.7.2 Last Info
3.7.3 All Info
3.7.4 Delete Logs
4 Media Gallery
4.1 External Memory
4.2 Photo Gallery
4.3 Video Gallery
4.4 Image Gallery
4.5 Sound Gallery
4.6 Memory Info
5 Multimedia
5.1 Camera
5.1.1 Take a Photo
5.1.2 Take a Video
5.1.3 Photo Gallery
5.1.4 Video Gallery
5.1.5 Settings
5.2 MP3 Player
5.2.1 Player

9
5.2.2 Music Album
5.2.3 File Manager
5.2.4 Setting
5.3 Radio
5.4 Java
5.4.1 Games
5.4.2 Connection
5.4.3 Memory Info
6 Settings
6.1 Display Settings
6.1.1 Main Screen
6.1.1.1 Wallpaper
6.1.1.2 Wallpaper Type
6.1.2 Greeting
6.1.2.1 Startup
6.1.2.2 Idle
6.1.3 Backlight
6.1.4 Software Version
6.2 Sound Settings
6.2.1 Ring Tone
6.2.2 Volume
6.2.3 Message Alert
6.2.4 Key Tone
6.2.5 Sound Effect
6.3 Call Settings
6.3.1 Call Forward∗∗
6.3.1.1 All Calls
6.3.1.2 When Busy
6.3.1.3 On No Answer
6.3.1.4 When Not Found
6.3.1.5 Cancel All
6.3.2 Answer Type
6.3.3 Auto Answer
6.3.3.1 Auto Answer
6.3.3.2 Recorded Message
6.3.3.3 Response Message
6.3.3.4 Response Time
6.3.3.5 User Message
6.3.4 Auto Redial
6.3.5 Call Waiting**
6.3.5.1 Activate
6.3.5.2 Deactivate
6.3.5.3 Status
6.3.6 Send Caller ID∗∗
6.3.7 Own Number
6.4 Phone Settings
6.4.1 Language
6.4.2 Time & Date
6.4.3 Favorites
∗∗ Network Dependent

10
6.4.4 Auto Keypad Lock
6.5 Network Settings
6.5.1 Search now
6.5.2 Default setup
6.6 Security Settings
6.6.1 PIN Check∗
6.6.2 Change PIN*
6.6.3 Phone Lock
6.6.4 Change Password
6.6.5 Phone Barring
6.6.5.1 Incoming
6.6.5.2 Outgoing
6.6.6 N/W Barring**
6.6.6.1 Outgoing Calls
6.6.6.2 International Calls
6.6.6.3 Only Local/Home Int. Call except to home country
6.6.6.4 Incoming Calls
6.6.6.5 Incoming Calls When Abroad
6.6.6.6 Delete All
6.6.6.7 Change password
6.6.7 CUG∗∗
6.6.8 Fixed Dialling∗
6.6.9 Change PIN2*
∗ SIM Dependent
∗∗ Network Dependent
∗ SIM Dependent
6.6.10 System Reset
6.7 Software Version
7 Organizer
7.1 Alarm
7.2 Calendar
7.3 Memo
7.4 Voice Memo
7.5 World Time
7.6 Calculator
7.7 Converter
7.8 Stopwatch
8 WAP
8.1 Home
8.2 Resume
8.3 Bookmarks
8.4 Push Messages
8.4.1 Inbox
8.4.2 Receive
8.5 Go to URL
8.6 Profiles
8.7 Cache
8.7.1 Cache Mode
8.7.2 Clear Cache
8.8 Security Cert

11
8.9 Version
9 SIM Toolkit∗
∗ SIM Dependent

12
Table of Contents
Ⅰ. Getting Started
1 Package Contents
2 Displays
3 SIM Card
4 Using the battery
II. New Functions
1. OTA Settings Service
2. DRM/ Forward Lock
III. Basic Functions
1. Switching the Phone On or Off
1.1 Switching the Phone On
1.2 Switching the Phone Off
2. Making a Call
2.1 Making a Call
2.2 Ending a Call
2.3 Using Call Logs
2.4 Using Entry
2.5 Making an International Call
2.6 Speed-dialling from Entry
2.7 Making an Emergency Call
3. Answering a Call
3.1 Answering a Call
3.2 Viewing Missed Calls
3.3 Rejecting a Call
3.4 Adjusting the Calling Volume
3.5 Speaker Phone
4. Calling Options
4.1 Switching the Microphone off (Mute)
4.2 Holding a Call
4.3 Answering a Second Call
4.4 Making a Call
4.5Searching for a Number in Contacts
4.6Using DTMF Tones
4.7Transferring a Call
4.8Using the Message Service
4.9Making a Multi-party Call
4.10 Ending a Call
5. Using the Headset
6. Selecting Menu Functions
6.1 Entering into Menu Functions

13
6.2 Using the Shortcut key in Standby Mode
7. Entering Text
7.1 Input Mode
7.2 Changing Text Input Mode
7.3 Using T9 Mode
7.4 Using ABC Mode
7.5 Using 123 Mode
7.6 Using Symbol Mode
IV. Applications
1. Messages
1.1 Write New
1.2 Inbox
1.3 Outbox
1.4. Draft Box
1.5 Sent Box
1.6 Templates
1.7 Settings
1.8 Memory Info
2. Contacts
2.1 Searching a Name
2.2 Adding a New Contact
2.3 Speed Dial Setting
2.4 Group Setting
2.5 Memory in Use
2.6 Copy All
2.7 Delete All
2.8 Memory Info
2.9 Service Number
3. Call Logs
3.1 Missed Calls
3.2 Received Calls
3.3 Dialled Calls
3.4 Delete Call Logs
3.5 Call Timer
3.6 Call Cost
3.7 GPRS Info
4. Media Gallery
4.1 External Memory
4.2 Photo Gallery
4.3 Video Gallery
4.4 Image Gallery
4.5 Sound Gallery
4.6 Memory Info
5. Multimedia
5.1 Camera

14
5.2 MP3
5.3 Radio
5.4 Java
6. Settings
6.1 Display Settings
6.2 Sound Settings
6.3 Call Settings
6.4 Phone Settings
6.5 Network Settings
6.6 Security Settings
6.7 Reset
7.Organizer
7.1 Alarm
7.2 Calendar
7.3 Memo
7.4 Voice Memo
7.5 World Time
7.6 Calculator
7.7 Converter
7.8 Stopwatch
Ⅳ. Advanced Functions
1. WAP
1.1 Navigating the WAP Browser
1.2 Entering Text in the WAP Browser
1.3 Home
1.4 Resume
1.5 Bookmarks
1.6 Push Messages
1.7 Go to URL
1.8 Profiles
1.9 Cache
1.10 Security Cert
1.11 Version
2. SIM Toolkit
Appendix
Check List
Performance and safety
Glossary
Warranty
Memo

15
Ⅰ. Getting Started
1. Package Contents
2. Displays
3. SIM Card
4. Using the battery
Ⅰ. Getting Started
1. Package Contents
Phone Travel Charger
Battery User’s Manual
※The contents can be vary by regions.

16
2. Displays
This phone has 1 display, and icons on the top of the display
indicate the phone status.
Icon(s) Description
Shows received signal strength.
The more the number of bars, the stronger the signal.
Acall is being made.
Outside the coverage area, you cannot make or receive a call.
Speaker phone is enable during call state.
You have a new voice mail.
WAP is connected
You have a new push message. Select and check a message
from the push message list to contact the WAP page concerned
You have a new message. If the inbox list is full, the icon
will look like . (
용If the inbox list and SIM memory are full, the icon will
look like .(공용아이콘) (멕시코향에만 이 아이콘적용)
Out of the home network range.
When a GPRS session is in progress, the icon will look like
.
Call forwarding feature is activated,
You have set the alarm.
You have set the alert type for incoming call to ring only.
You have set the alert type for incoming call to ring ascent.
You have set the alert type for incoming call to ring and vibrate.
You have set the alert type for incoming call to vibrate then ring.
You have set the alert type for incoming call to quiet
You have set the alert type for incoming call to vibrate only.
You have set the alert type for all tones to be quiet and for all
rings to vibrate only.
Headset is connected.
Battery level. The bar indicates the available battery
charge. If your battery charge is low, this icon will look like
Display Off Mode.
If you do not press any key within 10 secs while the display is dimmed,
Icons Area
Text and Graphic Area
In standby screen, displays textural and
graphical information showing Network
Name, Time & Date, or aGreeting put by the
user
Softkeys

17
the display goes into Off Mode to save power. Press any key to restore
the display.
Selecting Functions and Options.
The phone provides several customized functions, which are arranged in
menus and sub-menus. You can access these functions using the two
Soft keys ([ Left], [ Right])and push in on joystick.
the menu related to a specific function allows you to view and change its
settings
The soft key function varies depending on the current context; the labels
or icons at the bottom line of the display indicate the current function.
To view various functions/options available or select the one that is
required:
1. Press the appropriate Soft key.
2. To select the function displayed or option highlighted, press the Soft
key [ Left or press the joystick. [OK: joystick center] key.
3. To highlight the next option on a list, press the [Up/Down] key . push
up or down the joystick.
4. To move back to the previous function or option on a list, press the
[] key
5. To return to the Standby Mode, press the [ ] key.
In some functions, you may be prompted for a password or PIN input.
Enter the required code and press in on joystick. [OK]key.

18
3. SIM Card
3.1 SIM Card
When you subscribe to your network operator, you will get a SIM
(Subscriber Identity Module) card containing your registration information.
(PIN), the existence of additional service, etc.
Like a credit card, it should be kept securely and handled carefully.
Do not bend, scratch or expose it to moisture.
Avoid static electricity.
To avoid memory corruption of your SIM card, always switch off your
phone before removing or inserting your SIM card.
3.2 Installing/Removing the SIM card
1. Remove the battery from the unit. (그림 수정 필요)
2. If the SIM slot is empty, insert the SIM card into the slot.
3. If you want to remove the SIM card, push the SIM card in the arrow
direction as shown in the picture.

19
4. Using the battery
4.1 Installing the battery (그림 수정필요)
Insert the locators of the battery into the hole located in the upper of the
unit and press the bottom of the battery.
Push the battery until the sound of a ‘click’ is heard.
4.2 Removing the battery[4.2]
Push the battery toward upside and remove the battery.
4.3 Charging the battery
zThis phone uses a Li-ion battery. Make sure to use an
authorised battery and charger only. For more details, please
inquire at your nearest dealer.
zYou can use the phone during battery recharging.
zWhen the battery is mounted within the phone, open the cover
located at the bottom of the phone and connect the adapter. An
adapter is provided with the phone.
zIf recharging is completed, detach the adapter connection from
the outlet.

20
Tip
Your phone is powered by a Lithium Ion (Li-ion) battery.
You can use the following Li-ion battery types for your phone. (Contact
your local dealer for more information.)
4.4 Precautions while Using the Battery
- Do not use a damaged battery or charger.
- Use the battery for the specified purpose only.
- The closer you are to the base station, the longer the phone usage time
because less battery power is consumed for the connection.
- Battery charging time varies depending on the remaining battery
capacity and the battery and charger type in use.
- Battery life is shortened as time passes by.
- Use an authorised battery and charger only.
- Since overcharging may shorten battery life, remove the battery from its
charger once it is fully charged. Unplug the charger, once charging is
complete. Leaving the battery in hot or cold places, especially inside a
car in summer or winter, may reduce the capacity and life of the battery.
Always keep the battery within normal temperatures.
- Do not earth the battery. Earthing may occur when the battery is in
contact with a conductive object. An earthed phone may also damage
the battery.
- Dispose and recycle used batteries in accordance with local regulations.
- Do not dispose of the batteries in a fire.
- Do not use an unauthorised charger.
- In order to prevent injury or burns, ensure that metal objects do not
come into contact with the + and – terminals of the battery.
Table of contents
Other Pantech Cell Phone manuals

Pantech
Pantech Pursuit User manual

Pantech
Pantech C150 User manual

Pantech
Pantech PG-1410 User manual

Pantech
Pantech PN-210 User manual

Pantech
Pantech Pocket Quick start guide

Pantech
Pantech p9090 User manual

Pantech
Pantech Matrix Pro User manual

Pantech
Pantech Hotshot Quick start guide

Pantech
Pantech G800 User manual

Pantech
Pantech Z530i User manual

Pantech
Pantech C610 User manual

Pantech
Pantech C630 User manual

Pantech
Pantech Verse User manual

Pantech
Pantech breEZe C520 User manual

Pantech
Pantech Flex P8010 User manual

Pantech
Pantech TX-215C User manual

Pantech
Pantech Laser User manual

Pantech
Pantech PG-1210 User manual

Pantech
Pantech PN-215 User manual

Pantech
Pantech Caper User manual