PAR PHYSIO-PORT User manual

PHYSIO-PORT and Variant PHYSIO-PORT AS
Recording System for Long-Term Blood Pressure Measurements and Pulse Wave Analyses
Firmware Version 3.0
Operator’s Manual
A8136 ENG Revision A

2
PHYSIO-PORT / PHYSIO-PORT AS
A8136 Revision A
General Information
Note
The information in this manual only applies to PHYSIO-PORT and the product variant PHYSIO-PORT AS, each
with firmware version 3.0. It does not apply to earlier firmware versions.
This manual was created with great care. In case you find details which do not correspond to the system please inform
us so that we can resolve the discrepancies as soon as possible.
Due to continuing product innovation, specifications in this manual are subject to change without notice. To find
out about the status of the latest version, please contact the manufacturer.
© 2018 PAR Medizintechnik GmbH & Co. KG. All rights reserved. Printed in Germany

Table of Contents
3
PHYSIO-PORT / PHYSIO-PORT AS
A8136 Revision A
Table of Contents
General Information 6
1Application, Safety Information 8
1.1 Application..................................................................................................................................................................8
1.2 Functional Description ................................................................................................................................................9
1.3 Safety Information.....................................................................................................................................................10
2Controls and Indicators 12
2.1 Explanation of Signs and Symbols............................................................................................................................13
2.2 Connections...............................................................................................................................................................14
3Setup 14
3.1 Basic Facts about the Battery Supply........................................................................................................................14
3.2 Inserting Batteries......................................................................................................................................................15
3.3 Selecting the Energy Source......................................................................................................................................15
3.4 Charging NiMH batteries ..........................................................................................................................................15
3.5 Akkus mit dem Ladeteil VARTA laden ....................................................................................................................16
3.6 Switching PHYSIO-PORT Devices ON and OFF ....................................................................................................17
3.7 Performance Check ...................................................................................................................................................17
3.8 Clock Display............................................................................................................................................................17
4Application 18
4.1 Applying the cuff.......................................................................................................................................................18
4.2 Performing a Trial Measurement...............................................................................................................................19
4.3 Patient Information....................................................................................................................................................20
4.4 General Information on Ambulatory BP Measurement.............................................................................................21
4.5 Toggling Between Day and Night Phase...................................................................................................................21
4.6 Audio Signal..............................................................................................................................................................21
5Error Codes 22

4
PHYSIO-PORT / PHYSIO-PORT AS
A8136 Revision A
General Information
6Cleaning, Maintenance, Disposal 23
6.1 Cleaning and Disinfection of the Equipment Surface................................................................................................23
6.2 Cleaning and Disinfection of the Cuffs .....................................................................................................................23
6.3 Cleaning and Disinfection of Cables.........................................................................................................................23
6.4 Maintenance ..............................................................................................................................................................24
6.5 Disposal of the Product .............................................................................................................................................24
7Technical Specifications 25
7.1 Blood Pressure Measurement ....................................................................................................................................25
7.2 Pulse Wave Analysis.................................................................................................................................................25
8Order Information 26
9Appendix–Electromagnetic Compatibility (EMC) 27

Table of Contents
5
PHYSIO-PORT / PHYSIO-PORT AS
A8136 Revision A
Revision History
This manual is subject to the PAR Medizintechnik GmbH & Co. KG change order service. The revision index, a letter that
follows the order number, changes with every update of the manual.
Order Number/Revision
Date
Comment
A8136-GER Revision A
2018-03
Initial Release
Establishment from the PHYSIO-PORT manual, revision of
the document structure and addition of the product variant
PHYSIO-PORT AS

6
PHYSIO-PORT / PHYSIO-PORT AS
A8136 Revision A
General Information
General Information
The product PHYSIO-PORT and its variant
PHYSIO-PORT AS bear the CE marking CE0482
(notified body MEDCERT GmbH) indicating its
compliance with the provisions of the Council
Directive 93/42/EEC about medical devices
(including amendment 2007/47/EC) and fulfill the
essential requirements of Annex I of this directive.
The devices have an internal power source and are
MDD class IIa devices. The devices fulfill the
requirements of the Directive 2011/65/EU of the
European Parliament and of the Council.
It has a type BF applied part.
The product fulfills the requirements of the standard
EN/IEC
60601-1 "Medical Electrical Equipment,
Part 1: General Requirements for Basic Safety and
Essential Performance" as well as the safety standard
for automatic sphygmomanometers 80601-2-30 and
the electromagnetic immunity requirements of the
standard EN/IEC 60601-1-2 "Medical electrical
equipment –Collateral standard: Electromagnetic
compatibility –Requirements and tests" and
applicable amendments.
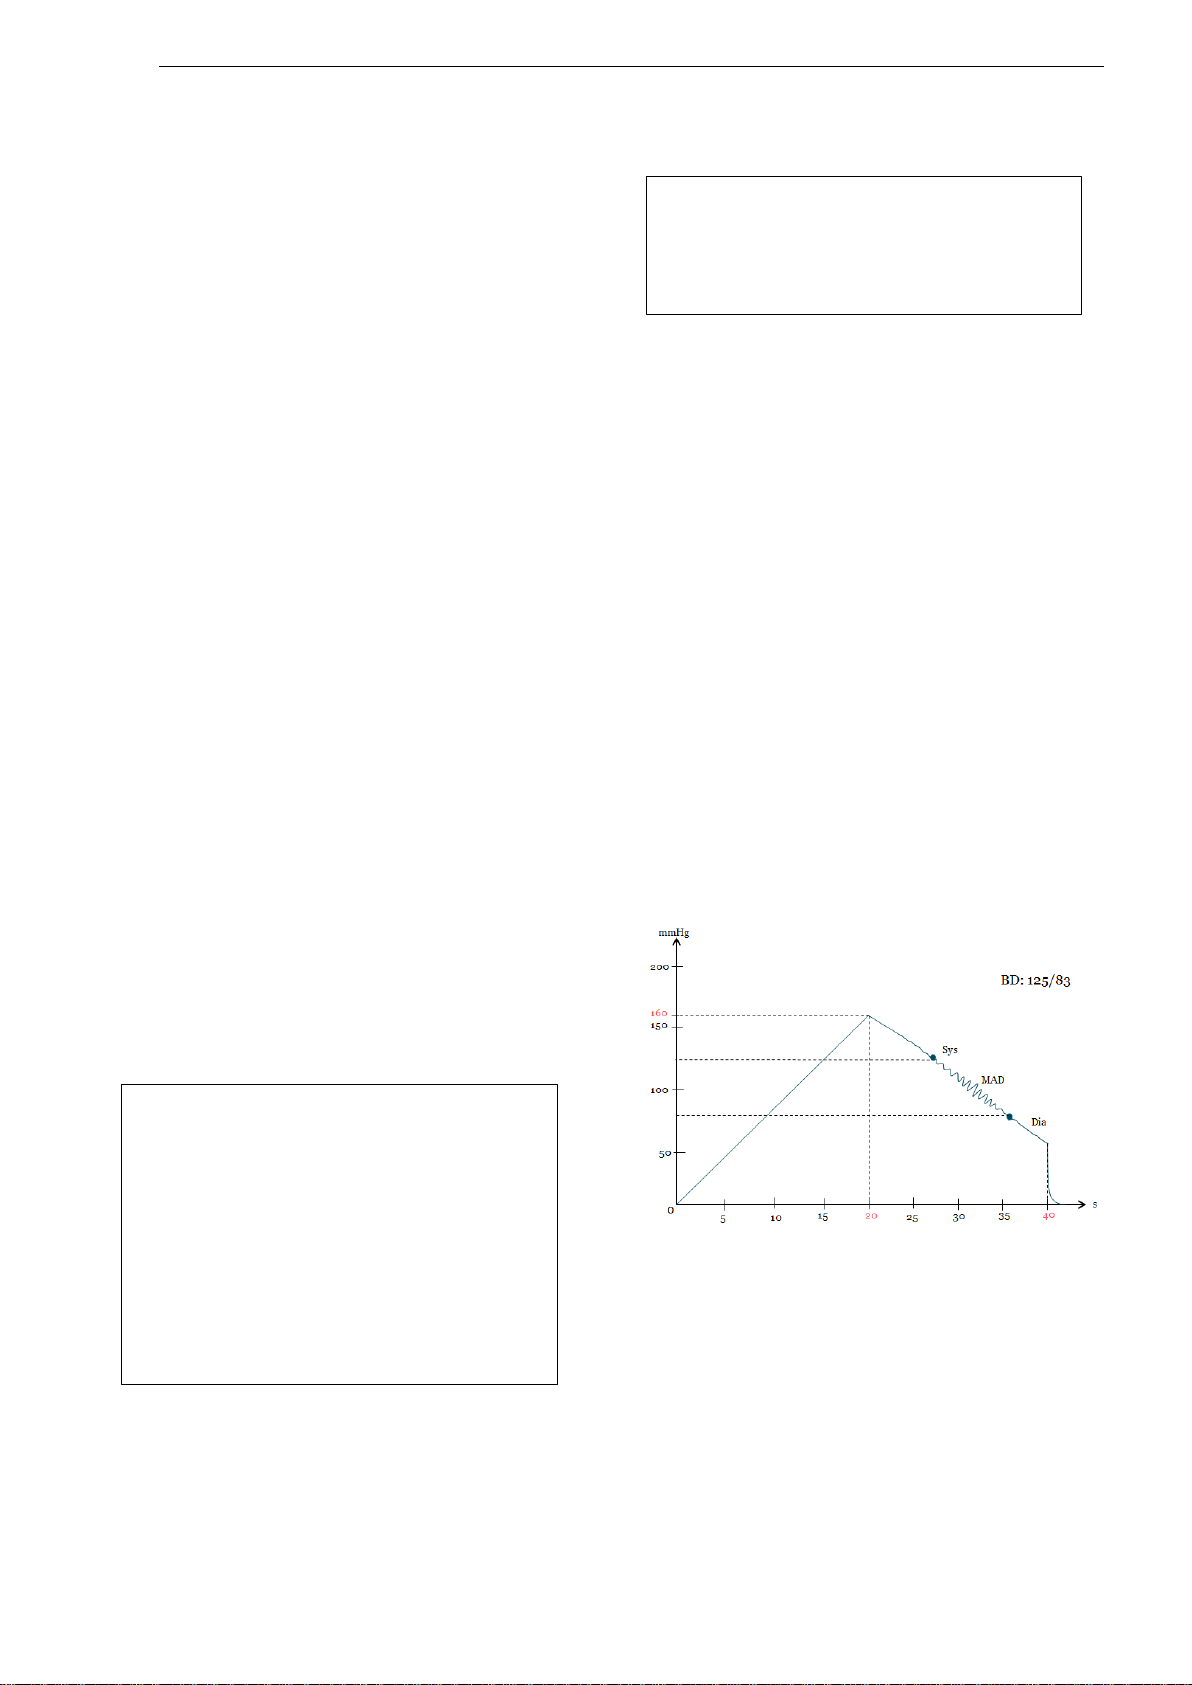
The product is clinical validated. The validation ful-
fills the standard ISO 81060-2:2013 “Non-invasive
sphygmomanometers - Part 2: Clinical investigation
of automated measurement type” and the protocol
ESH-IP 2010 from the European Society of Hyper-
tension.
The radio-interference emitted by this product is
within the limits specified in CISPR11/EN 55011,
class B.
The CE marking covers only the accessories listed
in the "Order Information" chapter.
This manual is an integral part of the equipment. It
will be enclosed in electronic form according to
207/2012 / EU. The data medium with the electronic
manual or the manual in paper form, which can be
requested free of charge from the manufacturer,
must be available to the equipment operator at all
times. Close observance of the information given in
the manual is a prerequisite for proper equipment
performance and correct operation and ensures
patient and operator safety.
Please note that information pertinent to several
chapters is given only once. Therefore, carefully read
the manual once in its entirety.
The symbol means: Follow the instructions
given in the operator manual. It indicates points
which are important to avoid faulty measurements or
injuries like strangulation of the arm.
This manual reflects the equipment specifications
and applicable safety standards valid at the time of
printing. All rights are reserved for devices, circuits,
techniques, software programs, and names appearing
in this manual.
On request PAR Medizintechnik will provide a Field
Service Manual.
The safety information given in this manual is
classified as follows:
To ensure patient safety and interference-free
operation and to guarantee the specified measuring
accuracy, we recommend using only original
accessories available through PAR Medizintechnik.
The user is responsible for application of accessories
from other manufacturers.
Danger
Indicates an imminent hazard. If not avoided,
the hazard will result in death or serious injury.
Warning
Indicates a hazard. If not avoided, the hazard
can result in death or serious injury.
Caution
Indicates a potential hazard. If not avoided, the
hazard may result in minor injury and/or
product/property damage.

7
PHYSIO-PORT / PHYSIO-PORT AS
A8136 Revision A
General Information
PAR Medizintechnik GmbH & Co. KG
Sachsendamm 6
10829 Berlin
Germany
Tel. +49 30 235 07 00
Fax +49 30 213 85 42
The country of manufacture is indicated on the device label.

Application, Safety Information
8
PHYSIO-PORT / PHYSIO-PORT AS
A8136 Revision A
1 Application, Safety Information
1.1 Application
Intended Use
PHYSIO-PORT are small size, portable (long-term)
blood pressure monitors for non-invasive measurement of
the patient’s blood pressure. The blood pressure is
measured using the oscillometric method, optionally in
the inflation or deflation phase using a blood pressure
cuff on the upper arm.
The variant PHYSIO-PORT AS can additionally perform
a pulse wave analysis. During an additional holding phase
after the blood pressure measurement the central blood
pressure and the pulse wave velocity can be determined
in a non-invasive way.
If the approved blood pressure cuffs fit the patient, the
PHYSIO-PORT can be used on adults, children and
infants, to support the physician during his diagnosis of
pathological blood pressure. The variant AS is intended
for patients from 12 years of age, to support the physician
during his diagnosis of pathological vascular alteration.
Measurements should be conducted at rest and not during
excessive physical activity. The devices are not suitable
for blood pressure measurements in neonates and patients
with arrhythmias or acute peripheral occlusion. Also, they
are not suitable for use in intensive-care medicine. The
devices are intended for use following consultation and
instruction by professional medical personnel like
physicians, nurses or medical assistant.
The Oscillometric Measurement Method
The blood pressure is measured by the oscillometric
method. The criteria for this method are the pressure
pulsations superimposed with every systole on the air
pressure in the cuff.
In order to measure the blood pressure, a blood pressure
cuff wrapped around the upper arm needs to be inflated
and subsequently deflated. The blood pressure is deter-
mined either during deflation of the cuff (deflation mea-
surement method) or, by using a novel and faster
technology, already during inflation of the cuff (inflation
measurement method).
The deflation measurement method is the most com-mon
method used. With this technique, the cuff is inflated to a
pressure which must be clearly above the expected
systolic value. Including cuff inflation, the measurement
typically takes approx. 40 seconds. (see Fig. 1-1).
Fig. 1-1 Waveform representing the pressure in the cuff
during a measurement using the deflation mea-
surement method: systolic pressure at 125 mmHg,
diastolic pressure at 83 mmHg
Biocompatibility
The parts of the equipment described in this
manual, including all accessories that come in
contact with the patient during the intended
use, fulfill the biocompatibility requirements
of the applicable standards if used as intended.
If you have questions in this matter, please
contact PAR Medizintechnik or its re-
presentative.
Note
For the visualization of the long-term measure-
ment results, the software PhysioPortWin as of
version 1.5 can be used.

9
PHYSIO-PORT / PHYSIO-PORT AS
A8136 Revision A
Application, Safety Information
The inflation measurement method is a novel method
based on the "Inflation Measurement Technology
(IMT)" developed by PAR Medizintechnik. With this
innovative technique, the cuff is inflated to a pressure
just above the expected systolic value. Once the systolic
value is determined, the cuff can immediately and
quickly be deflated. The measurement typically takes
only approx. 20 seconds. (see Fig. 1-2)
If disturbances occur during measurements with the in-
flation measurement method, which may be due to mo-
tion artifacts, for example, the PHYSIO-PORT devices
will automatically switch to the deflation measurement
method and complete the blood pressure measurement.
Fig. 1-2 Waveform representing the pressure in the cuff
during a measurement using the inflation
measurement method: systolic pressure at 125
mmHg, diastolic pressure at 83 mmHg
With both methods, a pressure transducer measures the
cuff pressure as well as the superimposed pressure pulsa-
tions. During blood pressure measurements the cuff must
be at heart level. If this is not ensured, the hydrostatic
pressure of the liquid column in the blood vessels will
lead to incorrect results. (Each 10 cm difference result in
a pressure deviation of 8.0 mmHg.)
When the patient is sitting or standing during measure-
ments the cuff is automatically at the correct level.
The Pulse Wave Analysis
Electively, the variant PHYSIO-PORT AS (Arterial
Stiffness) can conduct a pulse wave analysis following a
non-invasive blood pressure measurement.
If elected, the pulse wave analysis is performed right after
one of the two blood pressure measurement methods. For
this, the measured mean arterial pressure level (MAD) is
set in the cuff and the pulses in the cuff are recorded for
a fixed period of time (see Fig. 1-3). Disturbances are
removed from the recorded pulses. From the usable
pulses, the pulse that is located centrally at the heart is
reconstructed non-invasively to determine the central
blood pressure and the pulse wave velocity. Both
parameters can be used by the physician to estimate the
patient-specific state of the vessels.
Fig. 1-3 Waveform representing the pressure in the cuff
during a measurement using the inflation
measurement method with subsequent pulse
wave analysis
1.2 Functional Description
The PHYSIO-PORT devices accommodate the blood
pressure measuring system and a microprocessor for
system control and data processing.
A second microprocessor with a second pressure trans-
ducer and a second valve are provided for control of the
technical safety.
The devices are powered by two AA size batteries (either
rechargeable NiMH batteries or alkaline batteries).
The variant PHYSIO-PORT AS holds an additional high-
performance circuit board (PWA module) which is
integrated in the basic version PHYSIO-PORT in order to
perform the pulse wave analysis. This board has its own
microprocessor and works only on command from the
PHYSIO-PORT main system whereby the additional
function has no influence on safety-relevant features of
the basic version.

Application, Safety Information
10
PHYSIO-PORT / PHYSIO-PORT AS
A8136 Revision A
1.3 Safety Information
Danger
Risk to Persons
—
The equipment is not designed for use in
areas where an explosion hazard may
occur. Explosion hazards may result
from the use of flammable anesthetic
mixtures with air or with oxygen, nitrous
oxide (N2O), skin cleansing agents, or
disinfectants.
Warning
Risk to Persons
—
Equipment may be connected to other
equipment or to parts of systems only when it
has been made certain that there is no danger to
the patient, the operators, or the environment as
a result. In those instances where there is any
element of doubt concerning the safety of
connected equipment, the user must contact the
manufacturers concerned or other informed
experts to find out whether there is any possible
danger to the patient, the operator, or the
environment as a result of the proposed
combination of equipment. The standards IEC
60601-1 or IEC 60950-1 must be observed in
any case.
Connection of this device to an IT-network that
includes other equipment could result in
previously unidentified risks to patients,
operators or third parties. The responsible
organization should identify, analyze, evaluate
and control these risks.
Changes to the IT-network could introduce new
risks that require additional analysis.
Changes to the IT-network include:
ochanges in network configuration
oconnection of additional items
(e.g. connecting another device to
another port of the PC can lead to
interference during data transfer)
odisconnection of items
oupdate or upgrade of equipment
PHYSIO-PORT devices may be connected to a
PC with PhysioPortWin. While the PHYSIO-
PORT devices are connected to a PC, they have
to be disconnected from the patient.
Chemicals required, for example, for the
maintenance of the equipment must under all
circumstances be prepared, stored, and kept at
hand in their specific containers. Failure to
observe this instruction may have severe
consequences.

11
PHYSIO-PORT / PHYSIO-PORT AS
A8136 Revision A
Application, Safety Information
Warning
Risk to Persons
—
The equipment has no protection against the
ingress of liquids. Liquids must not enter the
equipment. Equipment into which liquids
have entered must be inspected by a service
technician before use.
Before cleaning, the device must be dis-
connected from other equipment
(e.g. a PC).
Dispose of the packaging material, observing
the applicable waste-control regulations. Keep
the packaging material out of children's
reach.
Incorrect measurements —
Magnetic and electrical fields are capable of
interfering with the proper performance of the
equipment.
For this reason make sure that
external equipment operated in the vicinity of
the device complies with the relevant EMC
requirements. X-ray equipment, MRI devices,
radio systems etc. are possible sources of
interference as they may emit higher levels of
electromagnetic radiation.
Caution
Equipment damage, risk to persons
—
Before connecting the battery charger to the
power line, check that the voltage ratings on
the nameplate match those of your local
power line.
The battery charger is not a medical device.
Its use in the patient environment is not
permitted.
Before using the equipment, the operator
must ascertain that it is in correct working
order and operating condition.
The operator must be trained in the use of
the equipment.
Only persons who are trained in the use of
medical technical equipment and are
capable of applying it properly are
authorized to apply such equipment.
There are no user-replaceable components
inside the equipment. Do not open the
housing. For service or repair, please
contact themanufactureroryour local,
authorized dealer.

12
PHYSIO-PORT / PHYSIO-PORT AS
A8136 Revision A
Application, Safety Information
2 Controls and Indicators
Fig. 2-1 Controls and indicators of
PHYSIO-PORT and PHYSIO-PORT AS
Fig. 2-2 Nameplates of the devices PHYSIO-PORT
and PHYSIO-PORT AS
1Connection for blood pressure cuff
2Liquid crystal display (LCD)
3Button
4Button
5Button
6Nameplate
7Calibration mark
8 Port for connection to PC (USB) at the rear of
the device
9On/off switch
10 Lid covering battery compartment
Button Functions
During a long-term measurement the buttons on the
device have the following functions:
To start and stop a measurement and to
confirm entries
To display the most recent measurement
values or error message. Systolic value
„S“, diastolic value „D“ and pulse rate
„HR“ are displayed successively.
To mark an event, push the info button
while the measured values are being
displayed. As confirmation, “1111” will be
shown on the LCD display. The related
measurement will be marked in the
measurement value table.
To manually switch the measure interval
between the day phase and the night phase
(see section „Toggling Between Day and
Night Phase “)
Note
The manual switching between day and night
phases is only possible if two measure intervals
were programmed when the PHYSIO-PORT
device was started with the PhysioPortWin
software and the day/night button has not been
deactivated.
If more or less than two measure intervals have
been set, the day/night button does not have an
influence on the measure intervals.
1
3
4
5
2
6
7
10
9
8

13
PHYSIO-PORT / PHYSIO-PORT AS
A8136 Revision A
Controls and Indicators
2.1 Explanation of Signs and Symbols
Symbols used on the equipment and on the packaging
Follow the instructions given in the operator
manual.
This symbol indicates that the waste of
electrical and electronic equipment must not
be disposed an unsorted municipal waste and
must be collected separately. Please contact
an authorized representative of the
manufacturer for information concerning the
decommissioning if your equipment.
Type BF applied part (defibrillation-proof,
recovery time tR< 1s)
Order number
Serial number
CE marked per the Council Directive
93/42/EEC of the European Union. Noti-fied
body: MEDCERT GmbH
Protection against ingress of solid foreign
objects and no protection against ingress of
water.
No protection against contact and ingress of
objects and protection against dripping water
when tilted at 15°.
Keep dry
Manufacturer’s identification
Date of manufacture.
The number found under this symbol is the
date of manufacture in the YYYY-MM
format.
Calibration mark, valid in Germany only
(see “Technical Inspection of the Measuring
System”)
Symbols used on the display
Blinks with each detected oscillation; is
continuously displayed when the monitor
contains data.
Blinks when the batteries are almost
depleted; is continuously displayed when
batteries are discharged and no more BP
measurement can be taken.
Day phase selected
Night phase selected
Further relevant symbols used on the battery charger
Eurasian Conformity - Conformity with the
current technical regulations of the Customs
Union
Protection class II equipment
For indoor use only
Symbols used on the blood pressure cuff
Blood pressure cuff is suitable for adults of
the framed size (medium-sized, small,
large, extra-large adults)
Blood pressure cuff is suitable for the
indicated arm circumference
When the blood pressure cuff is applied,
this label must face the skin.
ARTERIA
When applying the cuff, this arrow has to
lie on the brachial artery.
The end of the cuff must be situated within
this range when the cuff is closed.
PVC-free blood pressure cuff.
Latex-free blood pressure cuff.
CE marking, blood pressure cuff complies
with the EU guidelines.
P/N
S/N
PAR MedTech
MTK nach
MPBetreibV
MM|JJJJ
M

Displays and Controls
14
PHYSIO-PORT / PHYSIO-PORT AS
A8136 Revision A
2.2 Connections
Connection of the blood pressure cuff
To connect the blood pressure cuff with the device, the
metal connector on the cuff has to be pushed onto the
connecting piece on the device until it clearly engages.
(see Fig. 2-3).
Fig. 2-3 Cuff connection of the PHYSIO-PORT devices
By pulling the cuff connector’s outer metal sleeve back,
the blood pressure cuff can be disconnected from the
device.
Connection to PC
To start and program as well as read stored measuring
data, the device needs to be connected to the PC via a
mini-USB connection cable (see Fig. 2-4). This USB
cable is connected to a free USB port of the computer.
Fig. 2-4 Connection of the mini-USB connection
cable
3 Setup
3.1 Basic Facts about the Battery Supply
The PHYSIO-PORT devices are powered either by two
rechargeable nickel-metal hydride batteries (NiMH) or by
two alkaline batteries. The device must be set to the
power source used (see section "Inserting Batteries").
Moreover, the device contains a Lithium cell that powers
the clock. The Lithium cell can only be replaced by a
service technician.
The capacity of two fully charged or new batteries is
sufficient for up to 48 h of operation or 400 blood
pressure measurements.
The capacity of rechargeable batteries decreases with
age. If the capacity of fully charged batteries is consider-
ably less than 24 hours, the batteries must be replaced.
Note
To start and program the device prior to a
measurement as well as to read and analyse the
data after a measurement, an additional evaluation
software (e.g. PhysioPortWin) is required.
Caution
Equipment Damage
—
-Only use the original rechargeable, size AA
nickel-metal hydride batteries (from
manufacturers such as Sanyo, Panasonic,
Energizer, Duracell, Varta, GP) with a capacity
> 1500 mAh or high-rate discharge, size AA
alkaline batteries (such as Panasonic Evoia,
Energizer Ultimate, Duracell Ultra, Duracell
Power Pix, Varta maxtech).
Charge the NiMH batteries to capacity before
using them for the first time.
Recharge the NiMH batteries immediately after
use and do not leave batteries uncharged.
Use only the original charger to recharge the
NiMH batteries.
Do not attempt to recharge alkaline batteries.
If the PHYSIO-PORT devices are out of use for
one month or longer, remove the (rechargeable)
batteries from the device.
Batteries must not be disposed as unsorted
municipal waste and must be collected separately.
Please contact an authorized representative of the
manufacturer for information concerning the
decommissioning of the batteries.

15
PHYSIO-PORT / PHYSIO-PORT AS
A8136 Revision A
Setup
3.2 Inserting Batteries
Open the battery compartment on the back of the
PHYSIO-PORT devices (see Fig. 3-1).
Fig. 3-1 Opening the battery compartment
Place the two batteries in the compartment as indicated
by the symbols (see Fig. 3-2).
Fig. 3-2 Observe the polarity of the batteries.
3.3 Selecting the Energy Source
When starting the recorder, the used energy source
needs to be set via the PC software PhysioPortWin.
3.4 Charging NiMH batteries
If the PHYSIO-PORT devices are powered by
rechargeable batteries (4 of them are shipped with the
equipment), they should be recharged immediately after
use (24 hours). Use only the original charger supplied. It
consists of an AC power adapter and the charging unit
itself (see Fig. 3-3).
Note
Observe the correct polarity when inserting the
batteries.
Note
The energy source needs to be selected only
when the BP monitor is put into service for the
first time or when you change from NiMH to
alkaline batteries and vice versa.
Caution
Equipment damage, patient hazard
—
The battery charger is not a medical device.
Its use in the patient environment is not
permitted.
The contact surface of the NiMH batteries
and of the charger must always be kept clean.
The charger is to be used indoors only and
must be protected against oil, grease,
aggressive detergents and solvents to prevent
damage.
If the charger is damaged in any way, e.g.
after a drop or when the contact pins are bent,
the local authorized dealer must be contacted
immediately.
High temperatures affect the charging
process. Ideally, the room temperature should
not exceed 40°C.
After quick charging, please wait for some
minutes before another quick charge.
Otherwise, the temperature sensors will not
function correctly.

16
PHYSIO-PORT / PHYSIO-PORT AS
A8136 Revision A
Application
Fig. 3-3 Connecting the charging unit
Check that the voltage ratings on the nameplate of the
charging unit match those of your local power line.
Connect the cable of the AC power adapter to the
charging unit and plug the AC power adapter into the
wall socket.
Insert the two rechargeable batteries into the charging
unit, observing the correct polarity.
3.5 Akkus mit dem Ladeteil VARTA laden
Fig. 3-4 Battery symbols and bars in the charging unit
display
Insert 4 or 2 batteries. To charge only 2 batteries, insert
them in the two compartments on the right or on the left.
The batteries take up to 3 hours to recharge. Once the bat-
teries are inserted, battery symbols will appear in the
charging unit display where each symbol corresponds to
one of the charger compartments (Fig. 3-4). During the
charge cycle, the corresponding bar in the battery sym-
bols blinks. Note: If the battery symbols and bar do not
light up, only one battery may be inserted or the
batteries are inserted the wrong way round. When the
batteries are charged, the bars are permanently illu-
minated. The charging unit now trickle-charges the bat-
teries to compensate for self-discharging.
The battery temperature is monitored in the charger.
When the temperature is too high, the bar in the battery
symbol is permanently illuminated and the charger
switches to trickle-charging.
If the batteries are correctly inserted and the displayed
battery symbols show no bars, the charger has identified
a battery problem. The charging current will be cut off.
Remove the batteries and discard, observing the
applicable waste disposal regulations.

17
PHYSIO-PORT / PHYSIO-PORT AS
A8136 Revision A
Setup
3.6 Switching PHYSIO-PORT Devices ON
and OFF
The PHYSIO-PORT devices have a power switch inside
their battery compartment. Open the battery compartment
(see Fig. 3-1) and turn the device on and off as follows, if
(rechargeable) batteries have been inserted:
To switch ON: Slide the switch to ON.
To switch OFF: Slide the switch to OFF
3.7 Performance Check
When turned on, the PHYSIO-PORT devices run a self-
test that includes all symbols and segments on the LCD
(Fig. 3-5). Then, the version number of the device
software is displayed (e.g. „P 30“ for version 3.0).
Afterwards, the device checks the inserted
(rechargeable) batteries and indicates the remaining
capacity (see Fig. 3-6). "A 100", for instance, means that
the rechargeable batteries have a capacity of 100%, i.e.,
they are fully charged. "b 50" means that the alkaline
batteries have a capacity of only 50%, i.e., they are half
depleted.
The minimum battery capacity for a 24-hour measure-
ment is 90%.
If the capacity is below 90%, new or fully charged
batteries must be inserted.
BP monitors that have passed the self-test and completed
the battery test will indicate the following information:
the time of day
the measuring phase (day /night ), and
whether data are stored in the BP monitor (M) (see
Fig. 3-7).
The BP monitor will also emit an audio signal if enabled.
Fig. 3-5 Test display on LCD
Fig. 3-6 Battery capacity of 80 %
3.8 Clock Display
Each time the device is started by the PC software, the
clock, which is integrated into the device, is auto-
matically set to the PC time (see Fig. 3-7). Manually
changing the time at the device is not possible.
Fig. 3-7 Example: Display after successful self-test
(M = BP data in memory, measuring
phase: day)

18
PHYSIO-PORT / PHYSIO-PORT AS
A8136 Revision A
Application
4 Application
4.1 Applying the cuff
Select the appropriate cuff size (see cuff label).
When the cuff is too small the BP values will be
overrated, when it is too big, the measured
values will be too low.
Fig. 4-1 Applying the cuff
Fig. 4-2 Applying the cuff
Warning
Risk to Persons
—
The PHYSIO-PORT devices must not be
connected to other equipment (e.g. PC) when the
cuff is applied to the patient.
Warning
Risk to Persons
—
The effect of blood flow interference can
result in a harmful injury to the patient
caused by continuous cuff pressure due to
connection tubing kinking.
Too frequent measurements can cause injury
to the patient due to blood flow interference.
The application of the cuff over a wound can
cause further injury.
The application of the cuff and its
pressurization on the arm on the side of a
mastectomy is not recommended.
The pressurization of the cuff can temporarily
cause loss of function of simultaneously used
monitoring equipment on the same limb.
By watching the limb it is necessary to check
that operation of the PHYSIO-PORT device
does not result in prolonged impairment of
patient blood circulation.
Caution
Incorrect measurements
—
Use only the cuffs listed in chapter „Order
Information“
Replace cuffs on a regular basis. Damaged
Velcro fasteners may cause incorrect
readings.
Select the appropriate cuff size as a cuff that
is too small will lead to overrated BP values
and when the cuff is too big, the measured
values will be too low.

19
PHYSIO-PORT / PHYSIO-PORT AS
A8136 Revision A
Application
Place the cuff on that arm of the patient which is
used less frequently during normal daily activities:
on adults about 2 fingers' breadth above the bend
of the elbow. Bending the arm must not change the
cuff level.
It is recommended to place a hose made of mull
between arm and cuff.
Verify that
The cuff tubing points up towards the
shoulder (Fig. 4-1),
no compression or restriction of connection
tubing can occur
the side with the label is on the
skin
the arrow is located above the brachial
artery
the dashed white line at the end of the cuff
is located between the two dashed
lines when you close the cuff (if this is not
the case, select another cuff size, see Fig.
4-2),
the cuff fits snugly around the arm but does
not compress the blood vessels
the cuff and the PHYSIO-PORT devices are
used inside the ambient conditions for
operation and inside the measuring range (s.
chapter „Technical Specifications“)
4.2 Performing a Trial Measurement
Switch on the PHYSIO-PORT device and place it
in the wearable pouch. There is an aperture in the
pouch to accommodate the cuff connection tube.
Attach the pouch to the patient (shoulder strap,
belt). For reasons of hygiene, it is not advised to
carry the pouch on the bare skin.
Guide the pressure tubing around the patient’s
neck as a strain relief and connect it to the blood
pressure cuff port of the PHYSIO-PORT device
(see Fig. 2-3). Do not wrap the pressure tubing
completely around the neck to avoid strangulation
of the patient. You must hear the connector click
into place. Ensure that the tube is not kinked or
blocked during the measurement.
To avoid erroneous measurements, ensure that
the patient does not move during the trial
measurement. The patient may stand or sit.
Push to initiate the first measurement.
Within a few seconds, the device starts inflating
the cuff. When the inflation pressure has been
reached, the cuff will gradually be deflated
(deflation measurement method) or the pressure
will be released quickly (inflation measurement
method). If PHYSIO-PORT AS is used and the
pulse wave analysis has been activated, the
measured mean arterial pressure level (MAD) is
set and held in the cuff for 15 seconds, directly
after the blood pressure measurement has been
performed. Only then will the cuff pressure be
released completely. The respective measured cuff
pressure is indicated on the display.
The following values are displayed at the end of
the measurement:
the systolic readings (S in mmHg)
the diastolic readings (D in mmHg) and
the pulse rate (HR/min-1).
If an error code is displayed after the
measurement, tighten the cuff a little and push
again (see also chapter „Error Codes).
If the trial measurement has been completed
successfully, the device is ready for automatic
measurements.
Note
Before using a PHYSIO-PORT device, the data in
the memory must be deleted, the time and date
checked and, if wrong, corrected, the desired
measuring program must be selected and the signal
transmitter switched on or off if necessary. The
product variant PHYSIO-PORT AS does not have a
signal transmitter. An additional evaluation
program (e. g. PhysioPortWin) is required for these
activities when starting and programming.

Application
20
PHYSIO-PORT / PHYSIO-PORT AS
A8136 Revision A
4.3 Patient Information
Advise your patient
not to move while a measurement is being taken to
avoid motion artifacts that may lead to erroneous
readings and to keep the cuff inflation time as short as
possible
to place the PHYSIO-PORT device with the wearable
pouch on the night stand while in bed,
how to switch the device manually from the day to the
night phase (see chapter „Toggling Between Day and
Night Phase“),
that important events like driving by car or using public
transport, because this can cause artificial oscillations and
consequently false readings, plus stress situations should
be noted down in a diary that you can interpret the results
correctly,
that measurements can be initiated in these situations by
pressing ,
that the measurement can be stopped at any time with
(the cuff will be deflated),
not to open the battery compartment or the device,
about the audio signal an its meaning,
to protect the device against water, excessive humidity
and excessive temperatures,
not to remove the device from the wearable pouch,
to remove the pressure hose only in emergency situations
(see warning below),
that the cleaning may only be carried out by qualified
medical personnel and not by the patient.
Absolute contraindications:
The application of the cuff is prohibited on an arm with
–dialysis shunt
–fresh operation wounds
–mastectomy
Relative Contraindications:
If the doctor ascertains a positive benefit-risk ratio,
the Application of the cuff is allowed on the arm with:
–lymphedema
–paresis or plegie
–arterial or venous vascular access
Other diagnostic or therapeutic measures do not
negatively affect the blood pressure measurement.
Warning
Risk to Persons
—
Instruct your patient
to terminate the measurement with ,
whenever the cuff is not deflated within about
2 minutes,
to remove the cuff if it is not deflated after
activation of the button. This could be
due to kinked tubing. The cuff must be
reapplied as described earlier before
additional measurements can be taken.
Note
The operator’s manual is restricted to
professional healthcare personnel. Do not
deliver this document to the patient. Please
give the patient a copy of the patient
instruction (see page 31).
Note
The professional healthcare personnel have to
give some information about the accuracy of the
PHYSIO-PORT devices to the patient.
Other manuals for PHYSIO-PORT
1
This manual suits for next models
1
Table of contents
Popular Medical Equipment manuals by other brands

Innomed Medical
Innomed Medical HS112 C-1 user manual

Boston Scientific
Boston Scientific rezum Series manual

LINET
LINET ELEGANZA 5 Instructions for use and Technical description

Getinge
Getinge Arjohuntleigh Citadel Instructions for use

Vive
Vive LVA1034 user manual

Solaire Medical
Solaire Medical InnerSpace InterConnect Update instructions

Baylis Medical
Baylis Medical Nykanen RFK-265 Instructions for use

BED HANDLES
BED HANDLES BA10W USE, ASSEMBLY AND INSTALLATION INSTRUCTIONS

Essilor
Essilor PSL classic Instructions for use

Ossur
Ossur ICEROSS SEAL-IN X Instructions for use

Vive
Vive RHB1019 user manual

Fukuda Denshi
Fukuda Denshi HBX-800 Service manual