Paraclipse Mosquito Eliminator Technical specifications

All other services:
Any servicing other than cartridge or UV lamp
replacement, should be performed by an
authorized service representative.
Call, email, or Fax Paraclipse for the name of
the nearest service representative.
Use Genuine Paraclipse re-
placement Ultraviolet (UV)
Lamps and Cartridges to main-
tain your Paraclipse product in prop-
er working order. Use of Non-
Paraclipse Replacement parts may
cause damage to your Paraclipse
equipment may void warranty.
For replacement parts contact your dealer. Call,
email, or Fax Paraclipse for the nearest dealer.
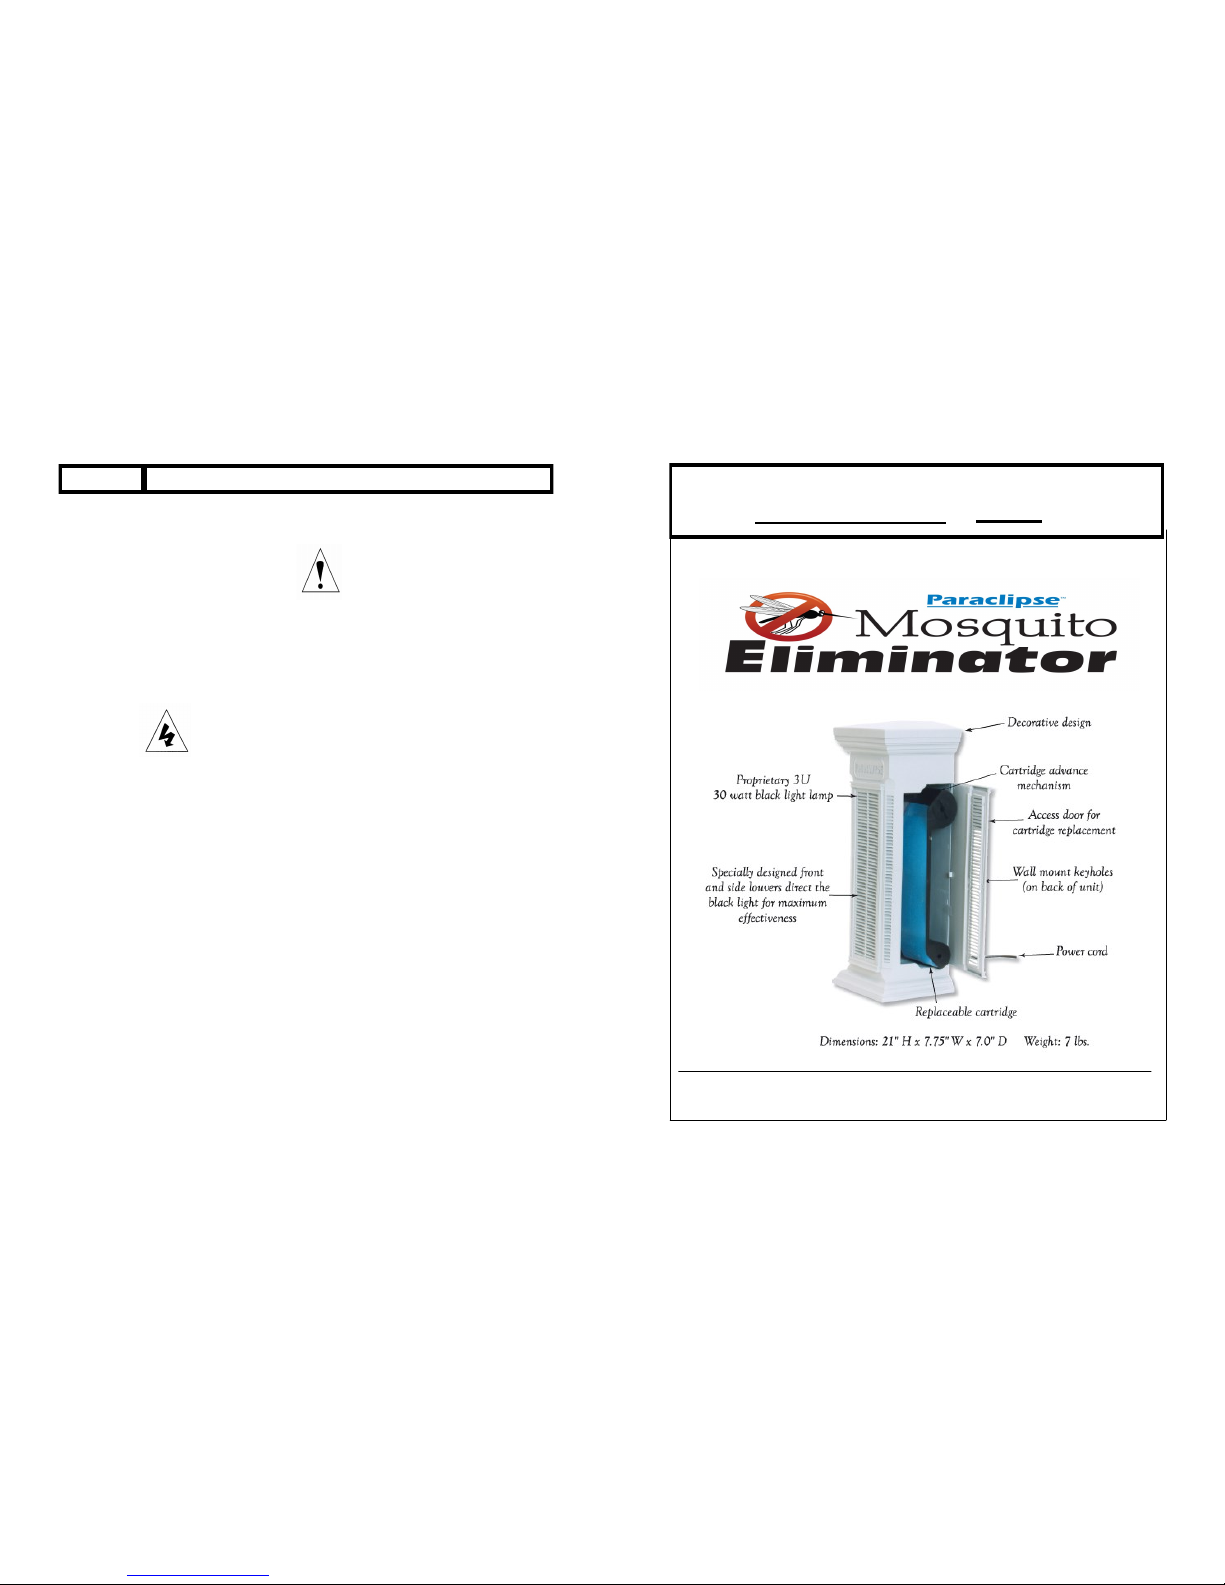
Replacement Parts and Part Number:
Lamp kit # 62651
Cartridge (12 pack) # 63836
To order additional Units:
Paraclipse Mosquito Eliminator # 650110
120 Volt 50/60HZ
Save these instructions
Page 8
Paraclipse
2271 East 29th Ave.
PO Box 686
Columbus, NE 68602-0686 USA
Phone: (402)563-3625 or 1-800-854-6379
Fax: (402) 564-2109
Maintenance Instructions
Care and Cleaning of Unit:
For the best results your unit should be cleaned
regularly when you change the cartridge.
When cleaning do the following:
1. Disconnect power cord from electrical
outlet.
2. Use damp cloth to clean the body of the
trap and lamp. Make sure you remove
excess insect droppings and dead
carcasses.
3. Dry trap thoroughly with soft cloth.
Reconnect to electrical outlet.
62670 04-15-14
SAVE THESE INSTRUCTIONS
62670 04-15-14
Paraclipse ®
Automated Insect Control Division

Save these instructions
Page 2
Paraclipse Mosquito Eliminator™ is their fatal attraction
Features
Decorative unit.
Proprietary black light technology com-
bined with special attractants.
Exclusive, automatic advance 30 day
cartridge trapping system.
Versatile design.
Fresh sticky surface and attractants re-
leased continuously.
The trapping system is environmentally
friendly and meets applicable guidelines.
Features and Benefits Page 2
Important Safety Instructions Page 3
Mounting Instructions Page 4
Ultraviolet Lamp Installation Page 5
Cartridge Installation & Manual Paper Advance Page 6
Maintenance Instructions Page 7 & 8
Benefits
Customers unaware that it is a mosquito/
flying insect trap.
Attracts mosquitoes and other flying
insects.
Replaceable/disposable cartridge
eliminates large quantities of mosquitoes/
flying insects.
Can be wall mounted or free standing.
No scattered insect parts from
electrocution and no hazards from
chemical pesticides.
TABLE OF CONTENTS
62670 04-15-14
Paraclipse Mosquito Eliminator™ Page 7
Maintenance Instructions
Cartridge Maintenance:
The tacky surface of the Cartridge advances slowly and remains effective up to 30 days,
under normal use depending on the volume of insect catch.
1. When tacky surface is no longer available you will need to replace the cartridge.
2. If the tacky surface is filled with a heavy catch of insects, manually advance the
cartridge so fresh surface is available. (See pg. 6)
NOTE: If new cartridge is not available for installation, unplug the unit until a
Geniune Paraclipse replacement cartridge is available.
Ultraviolet lamp Replacement:
1. Disconnect power cord from electrical outlet.
2. Remove old lamp.
3. Insert new lamp Insert UV Lamp into socket and gently push upwards while turning
lamp counter clockwise approximately 1/8 turn until the (2) lamp pins engage into
the socket. Hold by the base of lamp when installing. (see page 5, Fig. 4).
DEAD INSECTS ARE UNSANITARY
Replacement Cartridge
62670 04-15-14

Save these instructions
Page 6
Cartridge Information:
The Paraclipse Mosquito Eliminator ™ is unique
in that the cartridge is automatic. After the initial
start-up, the cartridge will automatically advance.
Manual Paper Advance:
You can manually advance the tacky paper
surface by simply turning the drive spool
clockwise until the desired amount of tacky paper
is available to catch insects. (Fig. 3)
This is required when installing a new cartridge
and advancing the paper due to heavy insect
catch.
To install a replacement cartridge you must first remove access
door. To remove access door, with the door facing you, grab the
middle edge of the door, push towards back of unit and pull to-
wards you (Fig.1). The door will come completely off the unit (Fig.2).
Remove the cartridge by gently pulling out of unit towards you (Fig.4).
Remove Access Door
Remove old Cartridge
Hold the cartridge body in your hand (fig.3) with the drive spool
knob facing you. Slide the cartridge into place (Fig.4) making sure the
drive spindle is engaged with the motor drive shaft (located towards
top of unit) and the supply roll placed on the guide pin (located to-
wards bottom of unit). Once cartridge is in place rotate the drive
spool in the direction of the arrow shown until glue surface spans
the full length of the cartridge. This will require 7 to 8 rotations.
Install New Cartridge
Install Access Door
To put the access door back on simply line up the four
tabs (Fig.2) on the door with the back plate of the unit.
Once the tabs are lined up push the front of the door
closed. The door will firmly snap into place.
Fig.3
Access Door
Fig. 1
Drive Spool
Access Door
Tabs
Fig. 2
Cartridge Body
Access Door
Replacement Cartridge
Fig.4
REPLACEMENT CARTRIDGE PROCEDURES
62670 04-15-14
This symbol is intended to alert you of
the presence of dangerous voltage
within the unit’s enclosure that may be
of sufficient magnitude to constitute a
risk of electric shock.
This symbol is intended to alert you
of the presence of important operat-
ing and maintenance instructions
accompanying the unit.
Caution! To reduce the risk of electric shock, observe the following:
1. Read all instructions before using appliance.
2. Do not unplug by pulling on cord. To unplug, grasp the plug, not the cord.
3. Do not remove the motor enclosure. No user serviceable parts are inside.
4. Disconnect the product from power supply when not in use, before servic-
ing, cleaning, or when changing lamps. Replace lamp with the same type rat-
ed 30 watt lamp.
5. Use only extension cords marked W-A or equivalent. Its electrical rating
must be at least 120 V, 60 Hz, and 10 Amps. Use only extension cords
which have plugs and receptacles which accept product’s plug.
6. Replace or repair damaged cords.
7. Don’t abuse the cord. Never carry the product by the cord or yank it to dis-
connect it from the power source. Keep the cord from heat, oil, and sharp
edges.
8. Extension cords & devices for retaining an extension cord connection to
the power supply cord are available at most hardware stores.
9. Keep out of reach of children.
CAUTION! To avoid risk of contamination, observe the following: Dead insects
are unsanitary. Use care in removing used cartridge.
IMPORTANT SAFETY INSTRUCTIONS
Paraclipse Mosquito Eliminator™ Page 3
SAVE THESE INSTRUCTIONS
62670 04-15-14

Mounting Instructions
Save these instructions
Page 4
Paraclipse Mosquito Eliminator™ Contents:
Operation Manual.
Anchor kit with Instructions.
Two drywall anchors.
Instructions.
Screws.
One Frame Assembly.
One Cartridge.
One UV Lamp.
Unit location on wall - Fig. 1
Select a wall away from windows or competing
light source. For best results, install unit 4’ to
6’ (1.2 m to 1.8 m) above the floor.
Mounting unit to wall - Fig. 2
1. Mark two locations on the wall for your fasten-
ers that are 7” apart. Make sure that the
marks are perpendicular with each other. The
two wall mount keyholes are located on the
back of unit (Fig. 2).
2. Use a Phillips head screwdriver to mount the
frame assembly on the wall. The frame as-
sembly must be securely mounted to the
wall.
NOTE: For other surfaces, such as concrete,
different fasteners or anchors may be required.
These types of fasteners are not included.
.
4’-6’ (1.2m-1.8m) Preferred Height
Note: 6’ 6” (2.0m)
maximum height
Fig. 1
62670 04-15-14
Fig. 2
Keyholes
Paraclipse Mosquito Eliminator™ Page 5
Lamp Installation Procedures
To install a replacement lamp you must first remove access
door. To remove access door, with the door facing you,
grab the middle edge of the door, push towards back of
unit and pull towards you. (Fig.1) The door will come com-
pletely off the unit (Fig.2).
Remove the cartridge by gently pulling out of unit towards
you.
Remove Access Door
Remove Cartridge
Fig.3
Cartridge Body
Drive Spool
Supply Roll
Remove Old Lamp
Remove old lamp by pushing upwards and turning clockwise
on the base of the lamp (Fig.4).
Install New Lamp
Hold the cartridge body in your hand (Fig.3) with the drive
spool knob facing you. Slide the cartridge into place making
sure the drive spindle is engaged with the motor drive shaft
(located towards top of unit) and the supply roll placed on the
guide pin (located towards bottom of unit).
Install Cartridge
Install Access Door
To put the access door back on simply line up the four
tabs on the door with the back plate of the unit. Once
the tabs (Fig.2) are lined up push the front of the door
closed. The door will firmly snap into place.
Insert UV Lamp into socket and gently push up-
wards while turning lamp counter clockwise
approximately 1/8 turn until the (2) lamp pins
engage into the socket. Hold by the base of lamp
when installing.(Fig.4).
Fig.4
Base of Lamp
Access Door
Fig. 1
Access Door
Tabs
Fig. 2
Lamp
62670 04-15-14
Table of contents
Other Paraclipse Insect Control Equipment manuals