Paramount Fitness BM80 User manual

BM80 Planetary Mixer
INSTALLATION / OPERATION
MANUAL
235577-3

The reproduction or copying of any part of this manual by any means whatsoever is strictly forbidden unless authorized previously in
writing by the manufacturer.
In line with policy to continually develop and improve its products, Moffat Ltd. reserves the right to change the specifications and
design without prior notice.
© Copyright Moffat Ltd. December 2016.
MANUFACTURED BY
Moffat Limited
Rolleston 7675
New Zealand
INTERNATIONAL CONTACTS
AUSTRALIA
Moffat Pty Limited
Web: www.moffat.com.au
E.Mail: [email protected]
Main Office: (tel) +61 (03) 9518 3888
(fax) +61 (03) 9518 3833
Service: (tel): 1800 622 216
Spares: (tel): 1800 337 963
Customer Service: (tel): 1800 335 315
(fax): 1800 350 281
CANADA
Serve Canada
Web: www.servecanada.com
E.Mail: [email protected]
Sales: (tel): 800 551 8795 (Toll Free)
Service: (tel): 800 263 1455 (Toll Free)
NEW ZEALAND
Moffat Limited
Web: www.moffat.co.nz
E.Mail: [email protected]
Main Office: (tel): 0800 663328
UNITED KINGDOM
Blue Seal
Web: www.blue-seal.co.uk
E.Mail: [email protected]
Sales: (tel): +44 121 327 5575
(fax): +44 121 327 9711
Spares: (tel): +44 121 322 6640
(fax): +44 121 327 9201
Service: (tel): +44 121 322 6644
(fax): +44 121 327 6257
UNITED STATES
Moffat
Web: www.moffat.com
Sales: (tel): 1800 551 8795 (Toll Free)
(fax): +1 336 661 9546
Service: (tel): 866 673 7937 (Toll Free)
(tel): +1 336 661 1556
(fax): +1 336 661 1660
REST OF WORLD
Moffat Limited
Web: www.moffat.co.nz
E.Mail: [email protected]

Date Purchased .......................................................... Serial No.....................................................
Dealer.............................................................................................................................................
Service Agent ..................................................................................................................................
Contents
Introduction ................................................................................................2
Specifications ..............................................................................................3
Installation..................................................................................................5
Operation ....................................................................................................6
Cleaning and Maintenance........................................................................10
Fault Finding .............................................................................................11
Competency Checklists .............................................................................13
Operations Competency Checklist
Daily Cleaning Competency Checklist
Replacement Parts List .............................................................................16

Introduction
2
Introduction
We are confident that you will be delighted with your PARAMOUNT MIXER, and it will become a most
valued appliance in your commercial kitchen.
A new mixer can seem very complex and confusing at first glance. To ensure you receive the utmost
benefit from your new Paramount Mixer, there are two important things you can do:-
Firstly
Please read the instruction book carefully and follow the directions given. The time taken will be well
spent.
Secondly
If you are unsure of any aspect of the installation, instructions or performance of your appliance, contact
your Paramount dealer promptly. In many cases a phone call could answer your question.
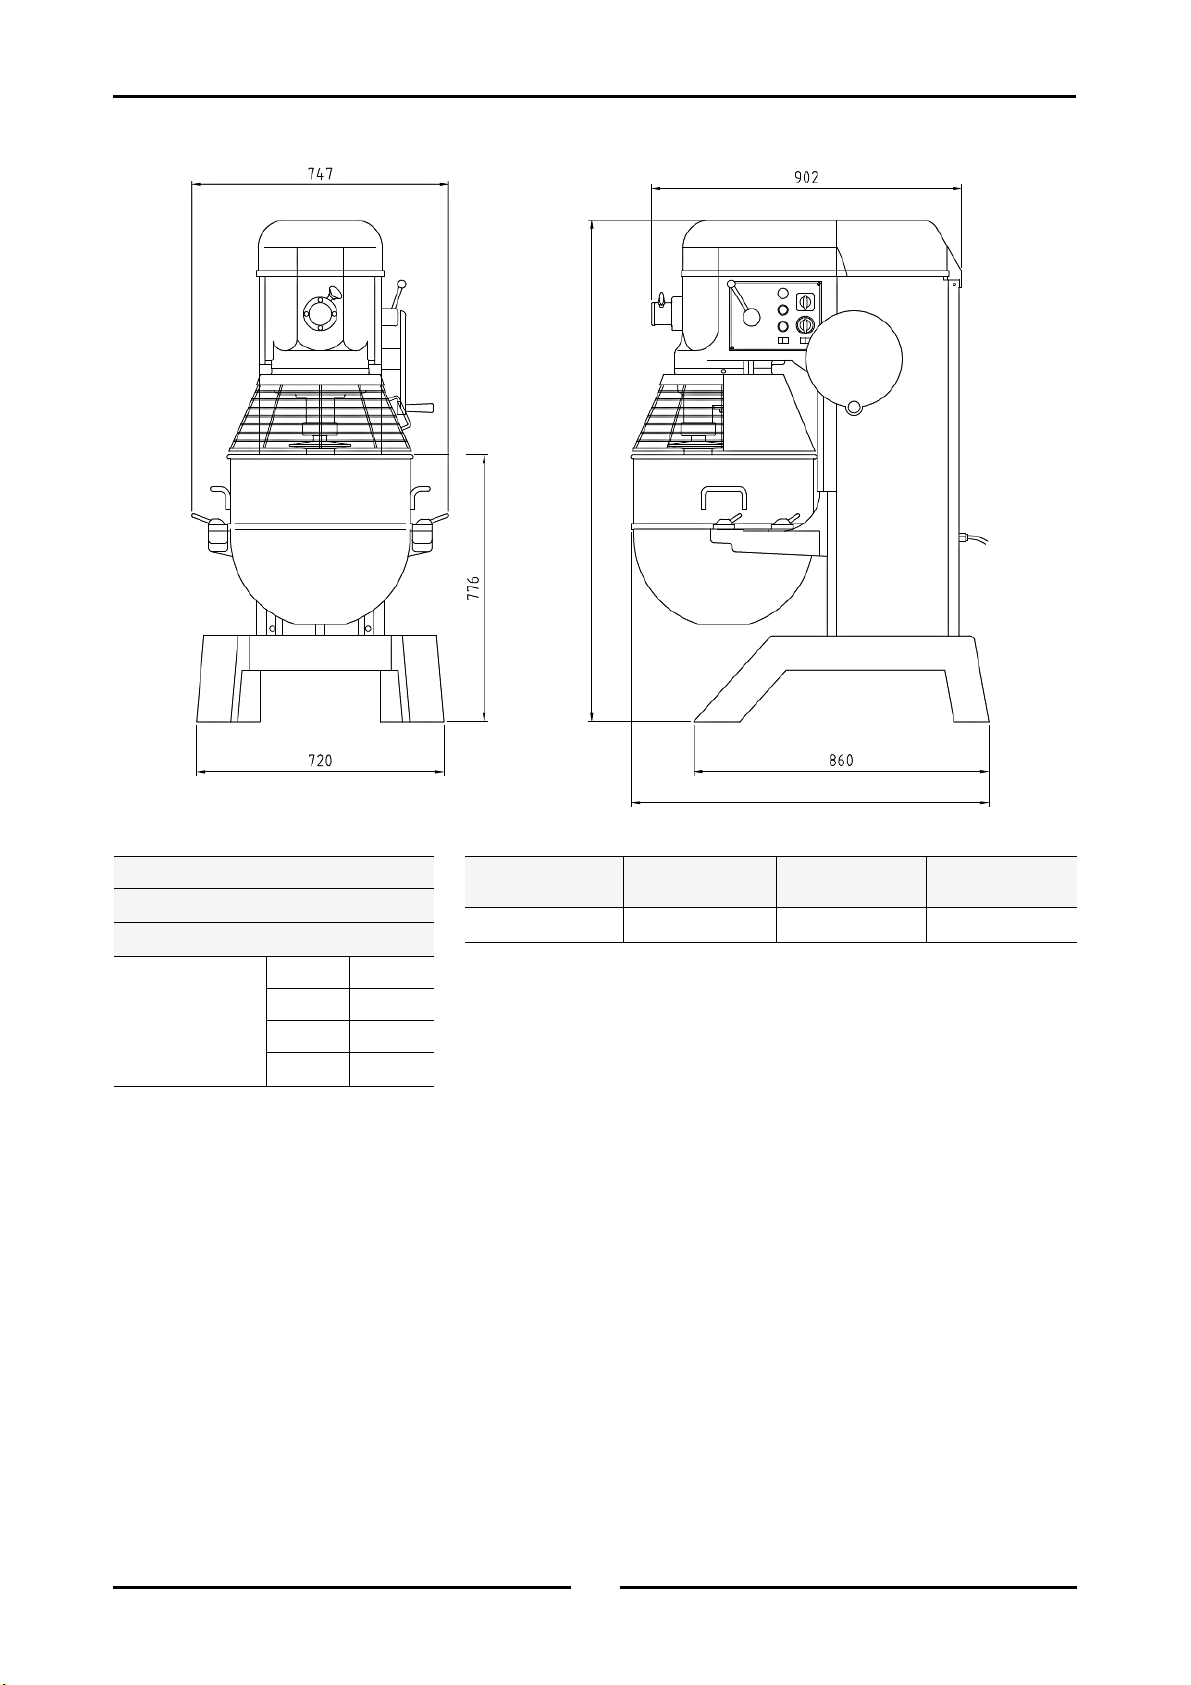
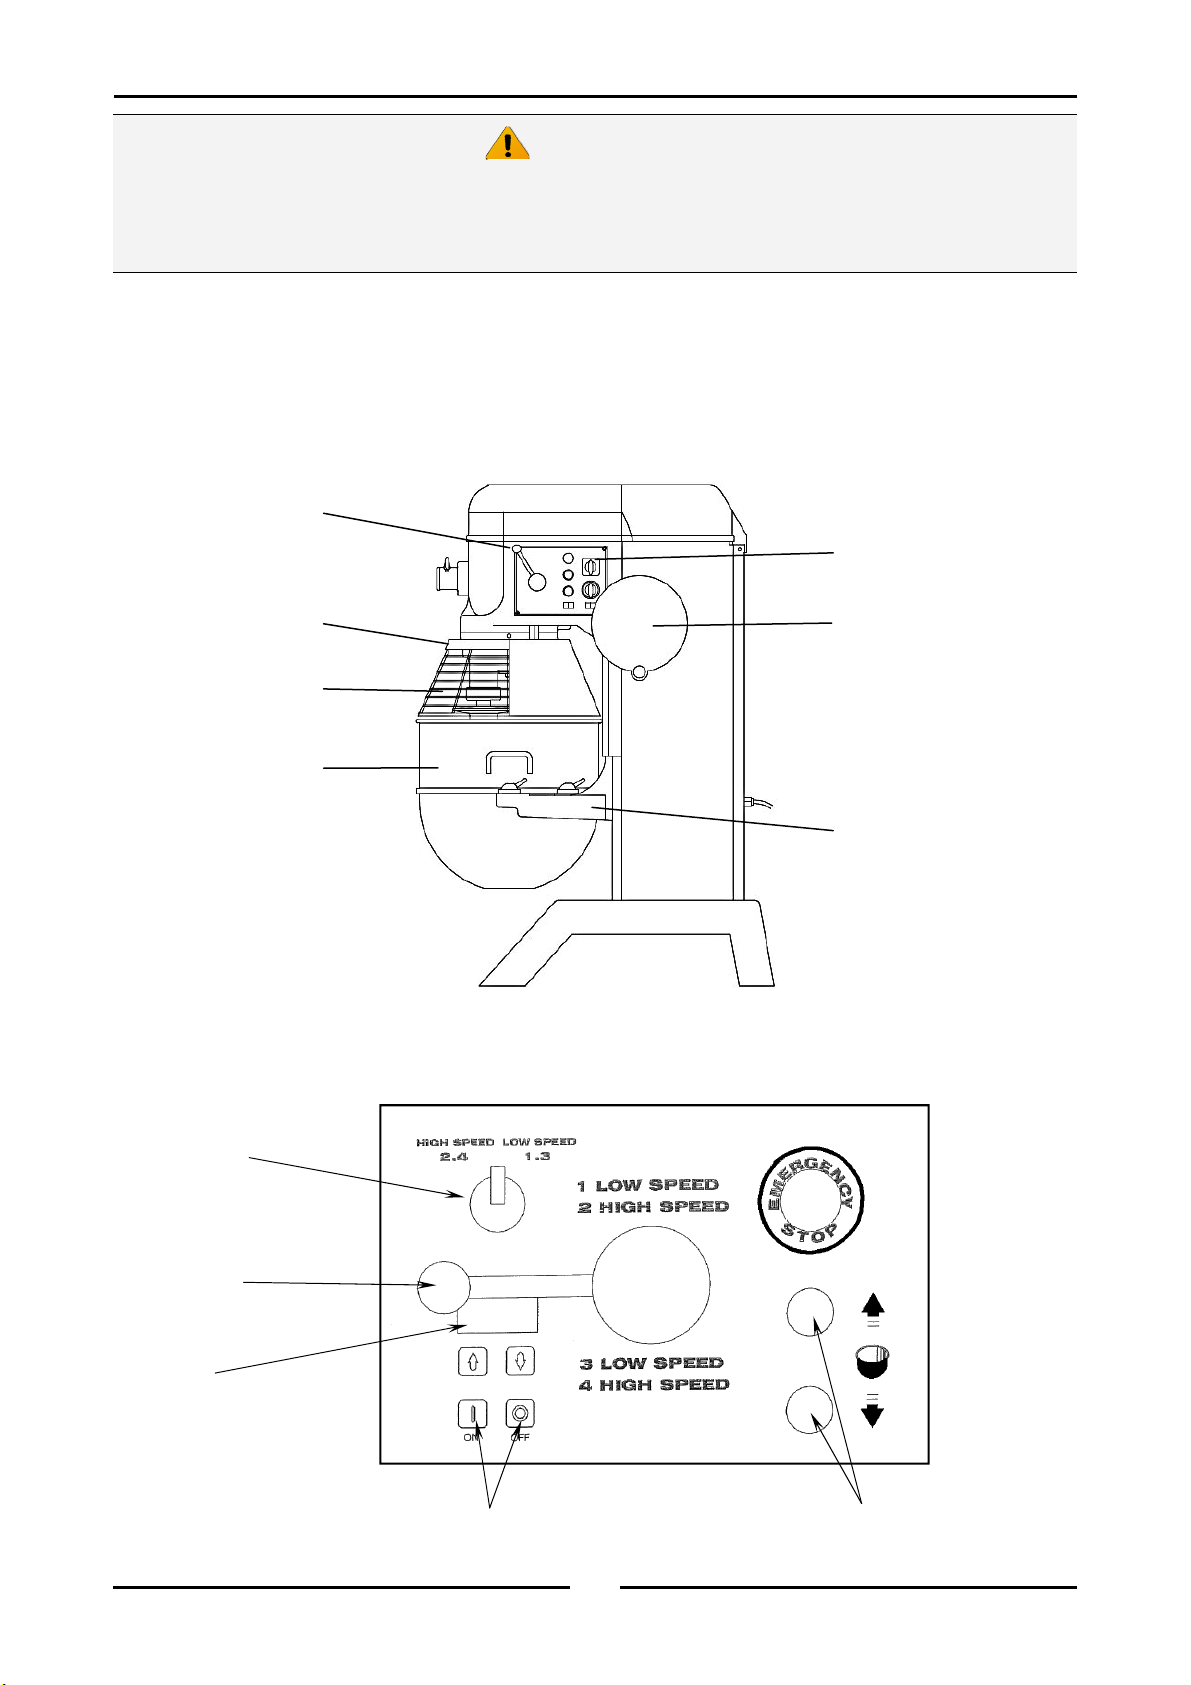
The Paramount BM80 is a dependable mixer for kneading and mixing all kinds of dough. The mixer has 4
speed selections and an electronic timer. The mixer comes with various style attachments which can be
used to obtain the best results. These are made of alloy aluminum or of a food hygiene standard material.
This model Mixer is equipped with a powerful 3HP, 2 speed motor and a 2 speed gear drive design which is
driven through ‘Vee’ drive belts. The constant mesh helical gears are made of hardened alloy steel and are
continually oil lubricated. The oil level can be monitored through an easy view sight glass.
A stainless steel safety guard is optional and is fitted with a limit switch to turn ‘Off’ power when the guard
is in the ‘Open’ position.
With proper operation and maintenance this mixer will give you years of service, and obtain the best
results.
Safety Precautions
• Keep hands and clothing away from the bowl and hub attachments when in operation.
• Keep rigid objects away from the bowl and hub attachments when in operation.
• Do not use this machine for any applications other than food processing.
• Use the machine only with the electrical supply specified on the rating plate.
• Disconnect the machine from its power source before carrying out any maintenance.
• Do not disable or remove any of the safety mechanisms included with this machine.
• Do not leave the machine in operation unattended.
• Observe all maintenance and safety inspection schedules.
• Ensure the appliance and any accessories / attachments are in a stable, upright position before
operating.
• Ensure all safety features of the machine are fitted and operate correctly within the safety
requirements and procedures before operating the appliance.
Improper installation, adjustment, alteration, service or maintenance can cause property damage,
injury or death.
Read the installation, operating and maintenance instructions thoroughly before installing or
servicing this equipment. Failure to do so may result in serious injury or damage.
Caution

Specifications
3
Dimensions
Motor
Two Speed, 3 HP powerful motor, available only in 3 phase.
Electrical Supply
400-415 Volts AC, 50Hz, 3P+E.
1040
1460
Model - BM80 (80 litre Mixer)
Motor Power - 3.0 HP
Net Weight (approx.) - 580 Kg
Agitator Speed
(RPM)
First 93
Second 140
Third 220
Fourth 330
Mixing Capacity,
Flour, Dough
Packing Size
L x W x H (mm)
Machine Weight
(approx)
Stainless Steel
Bowl (mm)
34kgs / 60 kgs 1210 x 900 x 1710 580 kgs φ52 x 48 (80 qt)

Specifications
4
‘Emergency Stop’ Button
The Emergency Stop Button should only be used in cases of emergency and SHOULD
NOT be used as the standard OPERATING method of stopping the mixer.
The Emergency Stop Button is located on the Control Panel, on the right hand side of the machine.
Pressing this button will stop all movement of the machine.
Safety Guard
Stainless steel safety guard smoothly rotates open and is fitted with a limit switch to shut off power
immediately to protect the operator.
Transmission
The two speed transmission provides an excellent range of beater speeds, with gears that are in
constant mesh in a special lubricant (85W/140 Oil) assuring long life; transmission gears are of heat
treated alloy steel and of high accuracy construction. All bearings are either ball or roller bearings.
Positive fibre V-belt drive eliminates slip and speed variation.
Timer
The mixer is equipped with a 30 minute timer which will stop the mixer automatically when the
pre-set time has elapsed.
Attachment Hub
The mixer is fitted with an attachment hub which allows the operator to use any of the standard
attachments that are available for this model of mixer.

Installation
5
Unpacking
Immediately after unpacking mixer, check for possible shipping damage. If this machine is found to
be damaged, save packaging material and contact the carrier within one day of delivery.
Remove all packaging and transit protection including all protective plastic coating from the exterior
stainless steel panels.
Check Mixer and supplied parts for damage. If this machine is found to be damaged after
unpacking, save packaging material and report any damage immediately to carrier and distributor.
Location
Place mixer in its operating location, on a sturdy level surface. There should be adequate space
around mixer for the user to operate the controls and to install and remove the bowl.
Holes are provided in the base to permanently secure the mixer to the floor, although this not
necessary in normal installations.
Floor models must be levelled front to back and from side to side by sliding shims under legs as
required.
Electrical Connection
Electrical connection should be made by a qualified person in accordance with applicable codes and
regulations.
Prior to installation, check that the available electrical supply is correct to as shown on the
Technical Data Plate located on the rear side of the pedestal.
Permissible voltage fluctuation is ± 10% of nominal voltage.
NOTE: Phase rotation direction to follow direction of arrow shown on front of mixer.
Components having adjustments protected (e.g. paint sealed) by the manufacturer, are
only to be adjusted by an authorised service agent.
Lubrication
NOTE: #1 Grade Oil (85W/140) is recommended for
transmission gears. This mixer is already
filled with enough oil when leaving the
factory.
Transmission gears are already filled with enough
#1 Grade Oil (85W/140).
If oil level falls below gauge line, add more oil.
Remove Oil Fill Plug ‘1’ fitted on transmission case
cover and insert tubing, add oil up to fill mark.
Refit and tighten the oil fill plug.
1
2
Important:
Before installing the mixer, check that the available electrical supply matches that of the mixer as
stated on the mixer’s rating plate.
Important:
Installation shall comply with local electrical, health and safety requirements.
It is most important that this mixer is installed correctly and that mixer operation is correct before
use.
If you have any questions regarding the proper installation and / or operation of this appliance,
please contact your local Paramount distributor.

Operation
6
Important:
Great care must be taken to minimise dust emission when handling dry ingredients such as flour. Bags
should opened in the lower part of the bowl and poured from as close to the base of the bowl as possible.
It is recommended that ingredients suppliers’ hazard data sheets are consulted prior to use. The use of
respiratory protective equipment may be required during bowl loading.
Power Lift Control Panel (Optional)
Bowl Lift Slides
Bowl Lift Wheel
(Mechanical Lift)
Bowl
Guard
(If Fitted)
Drip Cup
Gear Speed
Shift Lever
Control Panel
Motor Speed
Shift Switch
Gear Speed
Shift Lever
Bowl Lifting Switches
(Power Lift Optional)
Electronic
Timer
‘On’ - ‘Off’ Buttons
Keep hands, clothing and utensils out of the bowl whilst the machine is in operation.
Failure to follow the operation instructions or improper use of the mixer may result in damage
to the mixer, or cause injury to the operator.
Caution

Operation
7
Emergency ‘Stop’ Button
The Emergency Stop Button should only be used in cases of emergency and SHOULD NOT be
used as the normal OPERATING method of stopping the mixer.
Located on the Control Panel on the right hand side of the machine. Pressing this button will stop all
movement of the machine. ONLY ATTEMPT TO RE-START AFTER THE FAULT IS CORRECTED.
The machine can not be re-started until the Emergency Stop Button is pulled up to release.
NOTE: To start the motor, push the ‘On’ button, a gear speed must be selected using the Gear
Speed Shift Lever. The Gear Speed Shift Lever should not be left in the neutral position.
Speed Selection
Speed selection is made using the ‘Motor Speed Shift Switch’ and the ‘Gear Speed Shift Lever’.
Speed 1 - Set
‘Motor Speed Shift Switch’
to
‘Low Speed’
, and set ‘Gear Speed Shift Lever’
to ‘1 Low Speed’.
Speed 2 - Set
‘Motor Speed Shift Switch’
to
‘High Speed’
, and set ‘Gear Speed Shift Lever’
to ‘2 High Speed’.
Speed 3 - Set
‘Motor Speed Shift Switch’
to
‘Low Speed’
, and set ‘Gear Speed Shift Lever’
to ‘3 Low Speed’.
Speed 4 - Set
‘Motor Speed Shift Switch’
to
‘High Speed’
, and set ‘Gear Speed Shift Lever’
to ‘4 High Speed’.
NOTE: To change the speed of the mixer, the following information should be strictly followed:-
Turn ‘Off’ the motor by turning the ‘Motor Speed Shift Switch’ to the central position,
between the two speed settings.
Select the speed required using the ‘Gear Speed Shift Lever’.
Turn the ‘Motor Speed Shift Switch’ to the speed setting required.
Speed Control
Speed 1 (Low) - For heavy mixtures like dough, heavy batters and potatoes.
Speed 2 (Medium-Low) - For mixing cake batters, mashing potatoes and for developing dough.
Speed 3 (Medium-High) - For mixing maximum amount of air into light batches. The wire whip is
used for whipping cream, beating egg whites, mixing light icings,
meringues etc.
Speed 4 (High) - For accelerated mixing maximum amount of air into light batches similar
to ‘Speed 3’.
Bowl
The stainless steel bowl is a sanitary open rim design to meet todays exacting requirements.
The regular bowl for this mixer has a capacity of 80 quarts (76 litres).

Operation
8
Power Bowl Lift (Optional)
The bowl, on mixers with power bowl lift, can be raised and lowered through contact buttons located on
the control panel. If the ‘Up’ button is pressed, the bowl will raise to the top. If the ‘Down’ button is
pressed, the bowl will lower to the bottom. Auto lift is an option.
Mixers without power bowl lift have a hand wheel on the right hand side of the mixer to raise and lower
the bowl.
Agitators
When placing an agitator on the agitator shaft, lower the bowl, push the agitator up onto the shaft and
turn the agitator until the drive pin on the shaft reaches L-shaped slot in the agitator shank.
Dough Arm
It is frequently used for heavy bread dough, and preferable used at low
speed.
The moisture content of heavy dough is a critical factor when selecting proper
mixing speed. Never use ‘Speed 2’ when mixing heavy dough.
Flat Beater
It is commonly used for thin batters, cake and mashing potatoes, like stuffing
and preferable to be used at middle speeds.
Wire Whip
It is best for whipping cream and beating eggs and preferable to be used at
high speed.
Light
This mixer is fitted with a pilot lamp which illuminates the inner bowl area.
Attachment Hub
The attachment hub is designed to accommodate attachments such as a meat chopper, food chopper and
a food slicer / shredder. The machine should not be used for mixing whilst the hub attachments are
installed. Do not use the attachment hub whilst mixing.

Operation
9
* 1st speed only.
** 1st speed & 2nd speed only.
†If high gluten flour is used, reduce above dough batch size by 10 %.
Attachments
-
Optional
To install an attachment, loosen the thumb screw on the attachment hub and remove the plug. Insert the
attachment into the attachment hub making certain that the square shank of the attachment is in the
square driver of the mixer. Secure the attachment by tightening the thumb screw.
Move the gear shift lever to the desired speed and start the mixer to operate the attachment.
The meat and food chopper attachment should be operated in second or third speed. If material in the
cylinder stalls the mixer, stop the mixer at once. DO NOT attempt to restart the mixer in a lower speed -
remove the adjusting ring, knife, plate, and worm and clear the obstruction.
Mixing Heavy Dough
The moisture content of heavy dough is a critical factor when selecting proper mixing speed. Do NOT use
2nd speed when mixing heavy dough with an Absorption Ratio (AR) of 60% or less. To determine the
Absorption Ratio (AR) of a product, the water weight divide by the flour weight.
Example: Calculate the Absorption Ratio of a mixture containing 2 kg of water and 4 kg of flour.
AR = 2 ¸ 4 = 0.50 = 50 %.
Maximum Capacity Loading (BM80)
Product Agitator Max Load
BM80
Egg Whites Whip 4 ltrs
Mashed Potatoes Beater 27 kg
Mayonnaise (Litres Oil) Beater 30 ltrs
Meringue (Litres Water) Whip 3 ltr
Waffle / Pancake Batter Beater 30 ltrs
Whipped Cream Whip 15 ltrs
Cup / Layer Cake Whip 40 kg
Sponge Cake (with flour & butter) Whip 36 kg
Sugar Cookie Beater 27 kg
Bread or Roll Dough (Light / Medium, 60% AR)† Hook * Flour
35 kg
Bread or Roll Dough (Heavy, 55% AR)† Hook * Flour
30 kg
Thin Pizza Dough, Pasta, Basic Egg Noodle (40% AR†, 5 minutes max mix
time) Hook * Flour
25 kg
Medium Pizza Dough (50% AR)† Hook * Flour
25 kg
Thick Pizza Dough (60% AR)† Hook * Flour
35 kg
Raised Donut Dough (65% AR) Hook * Flour
25 kg
Whole Wheat Dough ( 70% AR) Hook * Flour
35 kg

Cleaning and Maintenance
10
Cleaning Guidelines
The mixer should be thoroughly cleaned daily with a clean damp cloth and plastic scraper (metallic
implements are not recommended.
Never use a metal or stiff brush to clean the mixer. Never clean the mixer with a water hose or any
fluid pressure.
Bowls and agitators should be removed from the mixer and cleaned in a sink. The bowl guard should
be removed periodically and wiped clean.
Maintenance Guidelines
The Transmission Case and Planetary Mechanism
should be inspected weekly for leaks, damage, etc.
Should it become necessary to repack the ball bearings,
an authorized service technician or the manufacturer
should be contacted. Use of non-recommended grease
or lubricants may lead to damage and void the unit’s
warranty.
The Bowl Lift Slides [1], should be lubricated every six
months, or more often under heavy
usage.
Remove the Bowl Support Apron (2) by loosening the
Screws (4), then lubricate the Lift Screw (3).
Add machine oil to the oil cup in the Clamping Ring [3],
of the bowl lift unit.
2
1
3
4
Handwheel
3
1
2
Always turn off electrical power at the mains supply before commencing cleaning.
This appliance is not water proof. Do not use water jet spray to clean interior or exterior
of the appliance.
Caution
Only authorised service persons are to carry out maintenance or servicing operations on
this appliance.
Caution

Fault Finding
11
Fault Possible Cause Remedy
The mixer does not operate /
start.
Not plugged in to the socket at
main switch.
The mains isolating switch on the
wall, circuit breaker or fuses are
'Off' at the power board.
The bowl safety guard is in the
‘Up’ position.
Stop button is still locked in the
down position.
The mixer overload has been
activated.
The mixer electronic timer is set
to '0'.
Plug in and switch on.
Turn 'On'.
Lower the bowl safety guard.
Release by rotating and pulling.
Reset the mixer overload.
Set time setting, or set electronic
timer to '0' to allow manual
operation.
Mixer stops during operation. Mixer overload tripped.
(Ensure that mixer is not being
overloaded).
Call service.
The mixer starts and then stops. Timer has completed cycle.
The mixer overload has been
activated.
Fuse overload at the power board.
Reset cycle time on timer to
continue operation.
Reset the mixer overload.
If overload occurs repeatedly
contact supervisor / Service agent.
Contact supervisor / Service agent.
The mixer labours under load. Dough too stiff / tight.
Mechanical malfunction.
Review and adjust dough
consistency, eg add more liquid.
Contact supervisor / Service agent.
The mixer moves or rocks during
operation.
Floor not level or mixer has been
moved from original position.
Re-adjust level and stabilise by
means of shims under feet.
Excessive flour dust coming from
mixer.
First speed timer set too short. Extend first speed mix / blending
cycle.
The mixer does not stop. Electrical / mechanical
malfunction.
Switch ‘Off’ power at main switch.
Isolate mixer by removing wall
plug.
Attach danger tag to machine.
Contact service agent.
Machine Based Faults

Fault Finding
12
Product Based Faults
Fault Possible Cause Remedy
Bread dough too soft. Excessive water used in dough.
Incorrectly metered / measured
through water meter (equipment
error).
Over-mixed dough.
Review recipe and adjust dough
consistency.
Contact authorised maintenance.
Review/check/change mix cycle.
Final dough temperature too hot. Water temperature too warm.
Dough mixed too long.
Reduce water temperature.
Shorten mix cycle.
Final dough temperature too cold. Water temperature too cold.
Dough mix too short.
Increase water temperature.
Lengthen mix time.
Foreign matter found/seen in
dough.
Mixer not cleaned as per cleaning
instructions.
Poor ingredient quality.
Poor personal / bakery hygiene.
Thoroughly scrape and check
between dough. Review cleaning
instructions.
Contact ingredient supplier.
Review and reinforce correct
procedures.
Dough is difficult to remove from
the mixing bowl.
Dough left in bowl too long.
Dough too soft.
Dough over-mixed.
Remove from bowl earlier.
Refer - dough too soft.
Run food grade oil between dough
and bowl at end of mix cycle to
stop dough sticking.

Competency Checklists
13
Guide Sheets for Staff Training
The pages in the following section of this manual should be copied and used when training staff to
operate the Paramount mixers. It is suggested that the competency assessment checklists be completed,
signed, and a copy kept in the personnel files for future reference.
Supervisors to Ensure
• Competency check lists are copied and completed as part of the training of staff.
• Correct training of staff to the required competency expectations.
• The verification section of the competency check list is signed off.
• A copy of the completed and signed competency check list is placed in personnel records as
evidence of operator competence.

Operations Competency Checklist
14
Paramount Planetary Mixer
Element:
Implement Safe Work Procedures
Assessment Criteria
“Can the Operator”
Identify the purpose and use of:
•Equipment guards.
•Warning signs.
• Safety features.
Related to this equipment?
Identify:
• Machine-related health and safety risks of this equipment?
• Emergency procedures to be used with this equipment?
Operate this equipment correctly in normal and emergency situations?
Identify:
• OH&S reporting procedures related to hazard reporting for this machine?
Comments:
To gain competency in the use of the PARAMOUNT PLANETARY MIXER, the assessor must be
satisfied that the operator has consistently applied the knowledge and skills in all of the above elements.
This form should be signed off only when the assessor is satisfied that the
employee / trainee is competent to carry out all of the tasks described above.
Applicant’s signature: Date: / /
Assessor’s signature: Date: / /
SUGGESTION
— Use this form to train staff, and place a copy in personnel files.

Daily Cleaning Competency Checklist
15
SUGGESTION
— Use this form to train staff, and place a copy in personnel files.
Assessment Criteria
“Can the Operator”
Maintain sound personal hygiene at all times when working with the PARAMOUNT MIXER?
Use appropriate protective and work clothing while working with the PARAMOUNT MIXER?
Identify:
• Product handling requirements during production process?
• Critical points in the process where contamination can be introduced?
• Why it is important to monitor hygiene and sanitation performance?
• The effect of poorly maintained equipment on the control of contamination and spoilage?
• Company policies and procedures regarding hygiene and sanitation?
• Actual and potential contamination and spoilage hazards?
• Solutions to rectify contamination and spoilage problems?
Use work practices and methods that reduce the risk of product contamination?
Remove contamination where appropriate in accordance with:
• Workplace hygiene and sanitation procedures?
• Procedures specific to the PARAMOUNT MIXER?
Paramount Planetary Mixer
Element:
Implement Essential Hygiene and Sanitation Procedures
This form should be signed off only when the assessor is satisfied that the
employee / trainee is competent to carry out all of the tasks described above.
Applicant’s signature: Date: / /
Assessor’s signature: Date: / /
Comments:
To gain competency in the use of the PARAMOUNT PLANETARY MIXER, the assessor must be
satisfied that the operator has consistently applied the knowledge and skills in all of the above elements.

Replacement Parts List
16
When ordering replacement parts, please quote the part number and the description as listed below. If
the part required is not listed below, request the part by description and quote model number and serial
number which is shown on the Rating Plate located on the front lower corner of the right hand side panel.
Part No. Description
11100-12-001 Stainless Steel Bowl.
11100-12-003 Spiral Dough Hook.
11100-12-004 Stainless Steel Wire Whip.
11100-12-002 Batter Beater.
IMPORTANT:
Only genuine authorized replacement parts should be used for the servicing and repair of this appliance. The
instructions supplied with the parts should be followed when replacing components.
For further information and servicing instructions, contact your nearest authorized service branch (contact details
are as shown on the reverse of the front cover of this manual).

Table of contents
Other Paramount Fitness Mixer manuals