Paravan Lancia Voyager User manual

PARAVAN Lancia Voyager
User manual
User manual/Lancia/Version 1.00

Benutzerhandbuch/Paravan Lancia V1.0 Seite 2 von 18
TABLE OF CONTENTS
1. Introduction ........................................................................................................................... 3
2. Operation of Sliding Door and Ramp ......................................................................................... 4
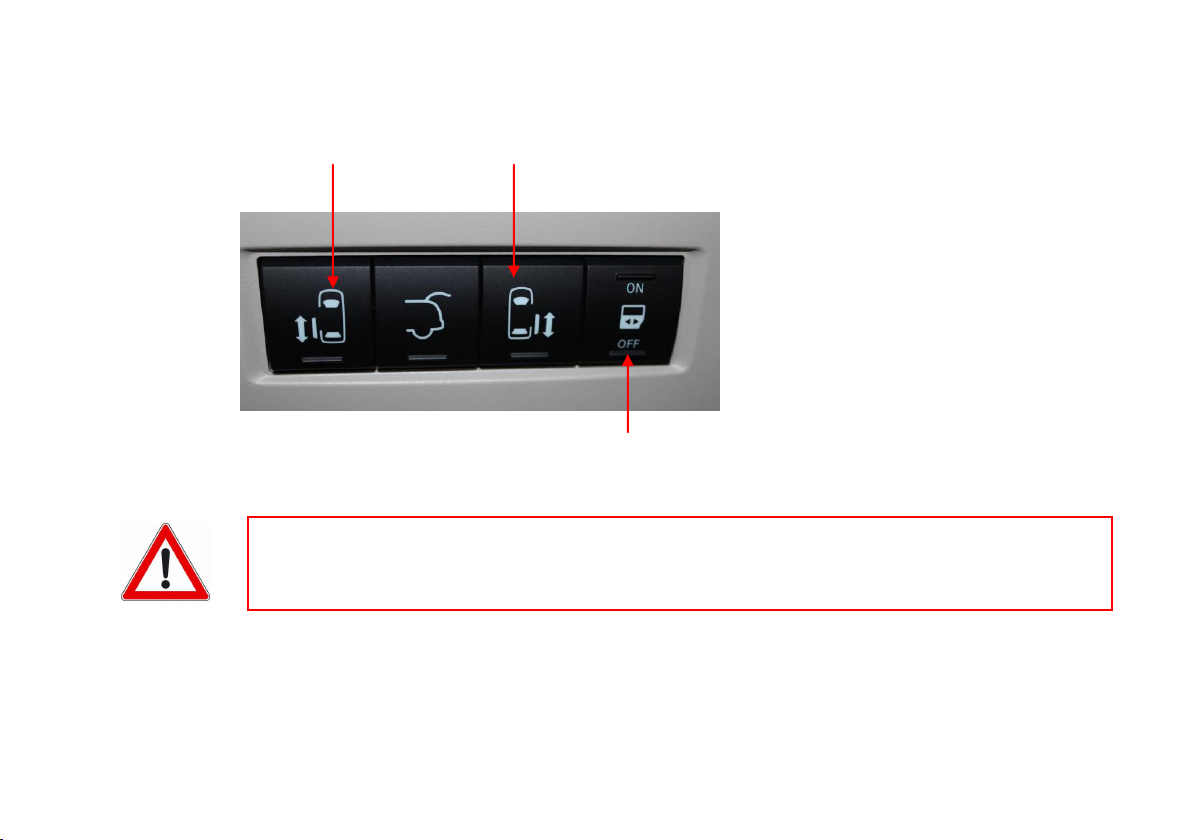
2.1. Operation by using rocker switches .................................................................................... 5
2.2. Manual operation of the sliding door and ramp ................................................................... 6
2.3. Electric operation of the PARAVAN Lancia Sliding Door ........................................................ 7
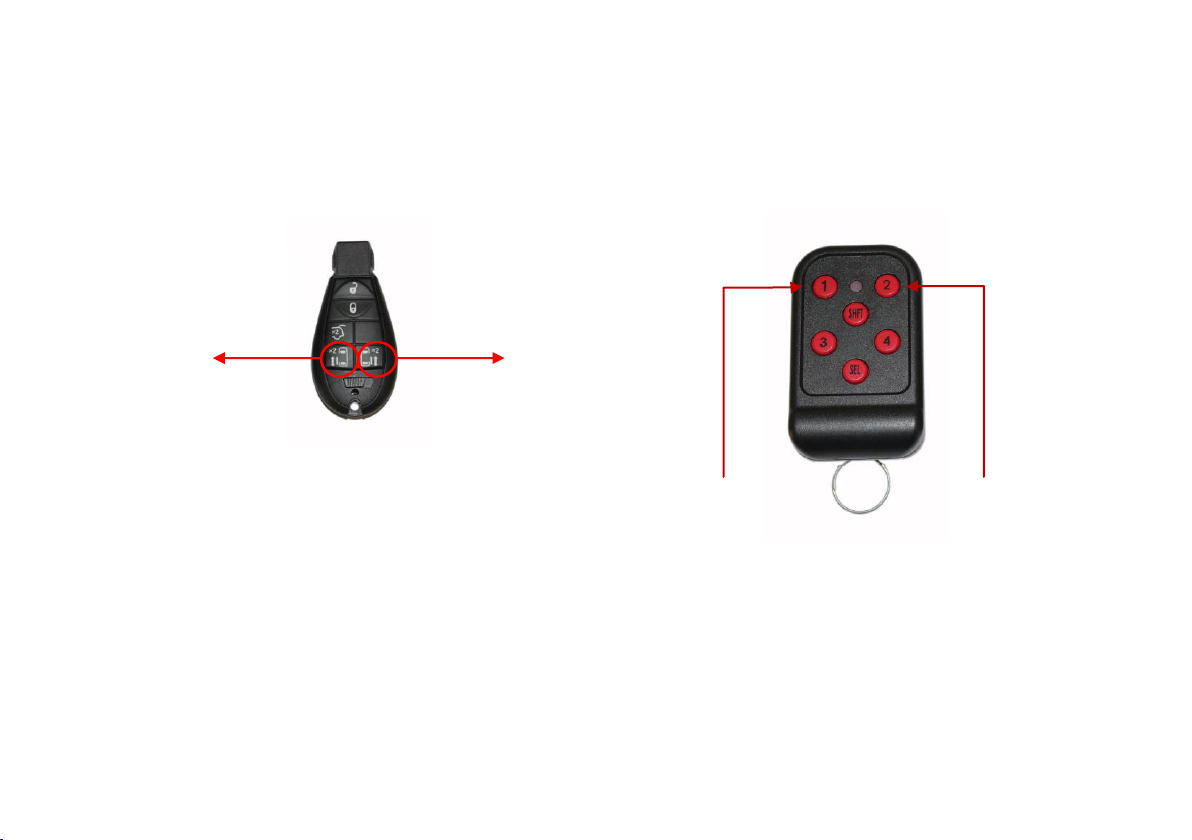
2.3.1. Remote Control (Original LANCIA + PARAVAN) .............................................................. 8
3. Lowered Floor....................................................................................................................... 10
4. Re-routed exhaust-pipe installation .................................................................................... 10
5. Location of spare wheel ....................................................................................................... 11
6. Front Seats with quick-release lock (if equipped) ............................................................... 12
6.1. Dismounting of the seats ................................................................................................. 12
6.2. Mounting of the seats: .................................................................................................... 13
7. Wheelchair anchorage system ............................................................................................. 13
7.1. Tie down of a wheelchair................................................................................................. 14
8. Fuses..................................................................................................................................... 15
8.1. Fuses in passenger compartment –SPACE DRIVE (if equipped) ......................................... 16
8.2. Fuses in motor compartment –SPACE DRIVE (if equipped) .............................................. 17

Benutzerhandbuch/Paravan Lancia V1.0 Seite 3 von 18
Owner`s Manual PARAVAN Lancia Voyager
1. Introduction
Thank you for becoming the owner of a new PARAVAN Lancia Voyager.
This manual will familiarize you with operational, maintenance and safety information about
your new vehicle. PARAVAN offers a great variety of options, components and features for its various
models. Therefore, the equipment described in this manual, along with the various illustrations,
may not all be applicable to your particular vehicle. This manual should remain in the car for your comfort.
Because subsequent owners require this important information as well, this publication should remain with
the vehicle if it is sold. All information contained in the Owner`s Manual is accurate at the time of
publication.
PARAVAN reserves the right to make changes at any time so that our policy of continual product
improvement can be carried out.
Security Advice
You will find various WARNING`s in this manual. These were prepared to enhance your personal safety.
You should carefully read and follow ALL procedures and recommendations provided in these WARNING-`s
Indicates a situation in which harm, serious bodily injury or death could
result if the warning is ignored.
Indicates a situation in which damage to your vehicle could result if the
caution is ignored.
Indicates interesting or helpful information is being provided

Benutzerhandbuch/Paravan Lancia V1.0 Seite 4 von 18
PARAVAN Remote Control
Switch for suspension
2. Operation of Sliding Door and Ramp
To unlock the vehicle use the original LANCIA Remote Control.
Pressing “1” at the PARAVAN Remote Control will open the right sliding door, lower the car (if vehicle is
equipped) and extend the ramp.
The suspension is only active if the switch at the dashboard is in Position “I”
If you don`t want to activate the suspension (i.e. on a high sidewalk), bring the switch in Position “0” before
pressing button “1”, so only the door will open, the ramp will be extended but the vehicle will not be lowered.
ATTENTION: Make sure that no person or article rule in the range of the driven out ramp

Benutzerhandbuch/Paravan Lancia V1.0 Seite 5 von 18
A) At the dashboard
B) on the B-Pillar right side
2.1. Operation by using rocker switches
You can also open the right sliding door, lower the car and extent the ramp by using rocker switches.
They are located:

Benutzerhandbuch/Paravan Lancia V1.0 Seite 6 von 18
Allen Key to unlock the ramp
2.2. Manual operation of the sliding door and ramp
In case of an electric error, the sliding door and the ramp can also be operated manually.
Although all door functions can be used without limitation ( as in the original vehicle)
Unlock doors by using the original LANCIA Remote Control or open sliding door manually.
The door must be opened as far as its end stop and remain in that position.
There is a little whole in the carpet. Use the supplied Allen Key to turn a screw clockwise to unlock the ramp.
Pull out the ramp horizontally of the intermediate compartment in the floor until it reaches the rear end
by using the handle of the ramp that you will find below the ramp cover.
Continues on page 6
ATTENTION: The manual operation of the sliding door and ramp is an
emergency function and can lead o increases wear!

Benutzerhandbuch/Paravan Lancia V1.0 Seite 7 von 18
The ramp can only be lowered to the ground after it has been fully pulled out.
To stow the ramp to its storage position, take hold of it by its handle, lift it and push it back horizontally into
its floor compartment. Make sure to lock the ramp with the Allen Key
2.3. Electric operation of the PARAVAN Lancia Sliding Door
You can also open the sliding door by using the original LANCIA Remote Control.
In this case the ramp will not be not extended.
To lower the car and extend the ramp press button “1” on the PARAVAN Remote Control
ATTENTION: The Sliding Door can only be closed after the ramp has been stowed
properly in the floor compartment. Make sure to lock the ramp !
The ramp does not have an automatic stop and reversal function !
Never intentionally place any object or part of your body in the path of the ramp.
This could result in serious injury or cause damage to the vehicle.

Benutzerhandbuch/Paravan Lancia V1.0 Seite 8 von 18
2.3.1. Remote Control (Original LANCIA + PARAVAN)
To open the sliding door electrically press one of the buttons (left or right ) of the LANCIA Remote Control
for more than 1 sec.
LANCIA REMOTE CONTROL PARAVAN REMOTE CONTROL
“1” Ramp out “2” Ramp in
To lower the car and extend the ramp press button „1“ on the PARAVAN Remote Control
To stop the ramp at any position press “1”again.
To continue extending the ramp press “1” within 10 sec.
To change direction and stow the ramp press “1” during extension, wait for 10 sec. and press “2”
Sliding Door Passenger Side
Sliding Door Driver Side

Benutzerhandbuch/Paravan Lancia V1.0 Seite 9 von 18
2.3.2. Main control buttons on the overhead console
You can also operate the sliding doors by pushing the corresponding main control button on the overhead
console
Make sure the Power ON/OFF button is in correct position, doors can not be operated in OFF modus
The ramp does not have an automatic stop and reversal function !
Never intentionally place any object or part of your body in the path of the ramp.
This could result in serious injury or cause damage to the vehicle.

Benutzerhandbuch/Paravan Lancia V1.0 Seite 10 von 18
3. Lowered Floor
The entire conversion of the vehicle is based on a lowered floor.
It extends from the rear seat bench to the foot pedals
4. Re-routed exhaust-pipe installation
Because of the vehicle’s lowered chassis, the exhaust system has been re-routed through
a sideways running duct in the floor assembly –which is one of the reasons why you should
drive with care. Make especially sure that there is enough clearance underneath the vehicle.
ATTENTION: The ground clearance of the vehicle is reduced, which requires you
take into consideration the circumstances and drive carefully.
The lowest point of the floor is a solid steel-frame construction. Should the
vehicle bottom be damaged in any way, the bottom protection must be
repaired immediately
Table of contents
Other Paravan Automobile Accessories manuals
Popular Automobile Accessories manuals by other brands

TrailFX
TrailFX A1501S manual

Aerpro
Aerpro VE 2 Series Installation & user manual

Yakima
Yakima Whispbar WB200 Installation instruction

Metra Electronics
Metra Electronics 99-7400 installation instructions

Dynojet
Dynojet Power commander V installation instructions

Whispbar
Whispbar K726W Fitting instructions

Discount Car Stereo
Discount Car Stereo A2DIY-MBR Quick Start Bluetooth Installation Guide

walser
walser 30864 (S) User instructions

Steinhof
Steinhof S-279 FITTING AND OPERATION MANUAL

Warn
Warn 98026 installation instructions

Holman
Holman 12004 installation guide

Tuff Country
Tuff Country 10968 installation manual