PARKIT360 FORCE 5K Guide

INSTRUCTION MANUAL / USER GUIDE
VERSION 3.0SUMMER 2018 PARKIT360°
FORCE 5K & 10K
CALL US TOLL-FREE:
1-888-926-5517
Ext. 1 - Sales
Ext. 2 - Administration
Ext. 4 - Technical Support
OFFICE HOURS (WEEKDAYS)
8AM-6PM EST
2
PARKIT360°/ FORCE 5K & 10K MANUAL
MORE PARTS AVAILABLE ONLINE: PARKIT360.COM
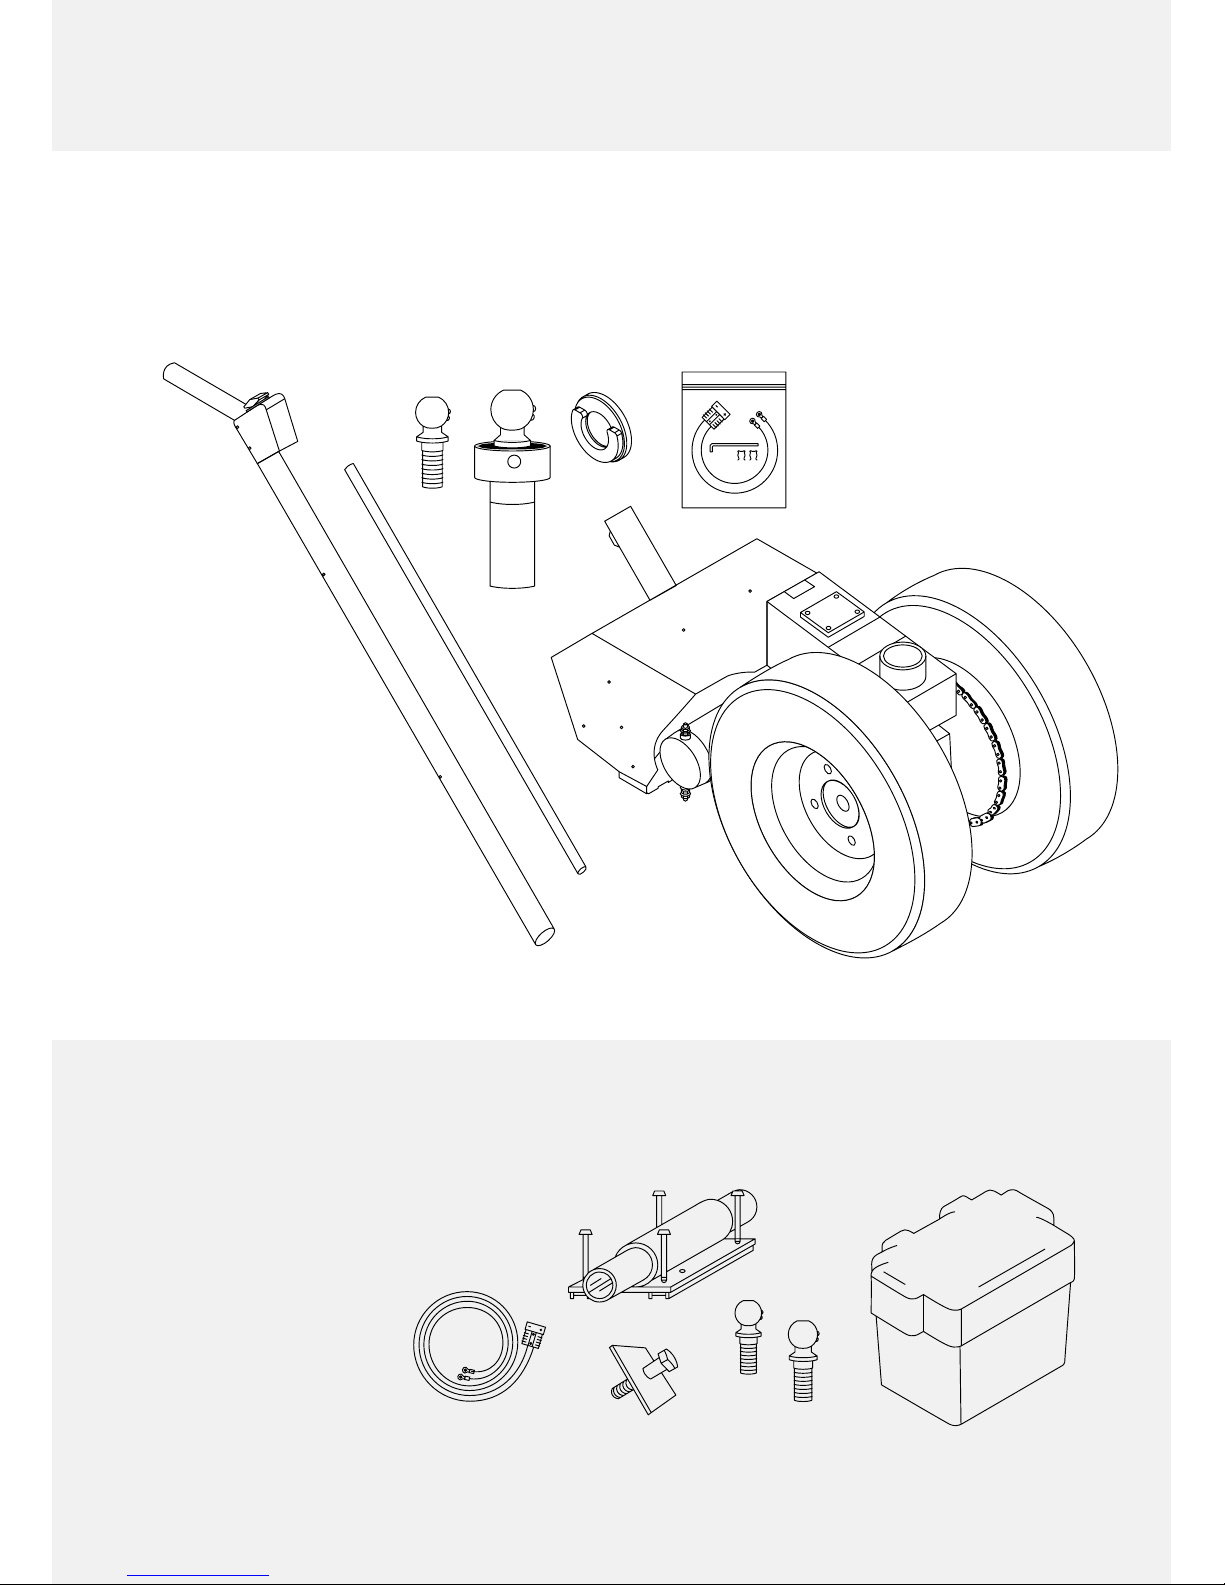
IN THE BOX
ALL FORCE UNITS
COME WITH:
Force Handle
18” Ball Mount with Tightening Bar
Force Unit Body
Two Hitch Balls: 2” and 2 5/16”
Thrust Washer
Hardware Kit:
• 2 Handle Spring Clips
• Allen Key
• 20” Battery Cable
OPTIONAL PARTS
Battery Box (Packaged Separately)
Telescopic Frame Adapter
Pintle Hitch Adapter
80” Battery Cable
1 7/8” Hitch Ball
50mm Hitch Ball
SOMETHING MISSING?
NEED EXTRA PARTS?
CALL US TOLL-FREE:
1-888-926-5517
EXT. 1OR 4

1FORCE FRAME 87 WAY CONNECTOR (SMART BRAKE)
2DRIVE PLATE 9BUILT-IN BATTERY CHARGER
3MOTOR (1.5 HP) 10 FORCE CHARGER BRACKET
4ELECTRONICS MODULE:
-CIRCUIT BOARD
-CIRCUIT BREAKERS
-RELAY
-CONTACTOR (400 AMP)
-VOLT METER
11 FORCE HANDLE:
-ROCKER SWITCH
-RUBBER GRIP
12 SPROCKET:
-CHAIN
-LINKS (MASTER, HALF LINK)
5RECEIVER DISC 13 SHAFT / AXLE
6MOTOR COVER 14 WHEEL BEARING
7SHIELD 15 WHEEL & TIRES (4.5” OR 6.5”)
PARTS LIST
PARKIT360°/ FORCE 5K & 10K MANUAL
3
11
10
15
13
12
14
2
3
1
2
68
9
4
5
7
11
TECHNICAL SUPPORT HOTLINE:
1-888-926-5517
EXT. 4

1
Insert the base of the handle
into the Handle Receiver Tube.
Tighten the Allen Screws to
secure the handle.
Install the 2 Handle Spring Clips
onto the Handle for easy access
to the Tightening Bar. (Optional)
2
Connect the two parts of the
Handle Control Cable.
Make sure the at faces of both
cable heads are aligned.
Do NOT force it together.
Twist the plastic nut over the
connection to secure it.
3
If you purchased a Unit with the
optional Battery Box:
Install it with the strap provided
and place your battery inside.
BATTERY NOT INCLUDED.
12V Group 24 Deep Cycle Battery
recommended.
ALIGN THE ARROWS AS SHOWN.
OPTIONAL:
INSTALL BATTERY BOX
4
ASSEMBLY
PLEASE FOLLOW THESE
STEPS TO ASSEMBLE YOUR
PARKIT360 FORCE UNIT.
PARKIT360°/ FORCE 5K & 10K MANUAL

PARKIT360°/ FORCE 5K & 10K MANUAL
5
THE FREEWHEEL KNOB
To switch gears, gently pull out on the
Freewheeling Knob and turn it clockwise.
You’ll notice a small metal pin at the base
of the Knob Shaft.
To switch between gears, this pin must be
in the proper position.
OPERATION
ALL FORCE UNITS HAVE TWO DRIVE MODES:
FREEWHEEL
Neutral. For moving the Unit to
and from your application without
power while it is NOT under load.
SWITCHING TO FREEWHEEL
REST PIN
OUTSIDE
Starting from Engaged Mode, the
wheels will be locked in the drive
position. Without power, the Unit
will only move an inch forwards or
backwards before stopping.
Rock the unit so the wheels rest in
between these two stop points.
Pull on the Knob and turn it
clockwise. Rest the small pin on
the outer metal, not in the pin hole.
You can now move the unit freely!
ENGAGED
Drive. For connecting the Unit to
your hitch and moving the trailer
with battery power.
SWITCHING TO ENGAGED
PLACE PIN
INSIDE
Ensure your unit is in position and
ready to connect to your trailer.
Pull on the Knob and turn it
clockwise. Ensure that the small
pin ts into the slot.
Rock the unit back and forth.
The knob will pop in with a “click”,
engaging the unit into Drive.
You’re ready to connect to your
hitch and move the trailer!
PULL ON THE KNOB AND
TURN IT CLOCKWISE.

12V BATTERY
TRAILER BATTERY
20” BATTERY CABLE
80” BATTERY CABLE
OPTIONAL:
BATTERY CHARGER
6
Install the battery and connect
the cables as shown:
Single 12V Battery:
Two 12V Batteries:
Connect to Primary Battery
Two 6V Batteries:
The 80” Cable MUST be connected across
both batteries, not just one.
Connect the Battery Cable to the
Red Battery Connection Plug at the
base of the handle:
PARKIT360°/ FORCE 5K & 10K MANUAL
DO NOT CONNECT 80” CABLE TO
BATTERY CONNECTION TERMINALS
THIS CAN CAUSE A SHORT CIRCUIT AND SERIOUS DAMAGE
TO YOUR TRAILER AND PARKIT360 TRAILER DOLLY.
QUESTIONS ABOUT BATTERY CONNECTION?
1-888-926-5517
EXT. 4
POWER OPTIONS

7
SAFETY INSTRUCTIONS
DO NOT OPERATE ON
GRADES STEEPER THAN 6%
DO NOT EXCEED
WEIGHT CAPACITY
Due to the possibility of a runaway trailer, operation
on grades steeper than 6% is not recommended.
Failing to follow these instructions could result in
damage, injury, or death.
The Maximum Safe Trailer Weight of your Unit
depends on the model purchased:
Force 5k: up to 5,000 lbs
Force 10k: up to 10,000 lbs
QUICK SET-UP GUIDE
PARKIT360°/ FORCE 5K & 10K MANUAL
1POSITION Switch the Unit into Freewheel Mode and move it to the trailer.
Position it underneath your Trailer Hitch.
2POWER TURN ON the Unit by Connecting your Battery Cables.
3HITCH Switch to Engaged Mode and Connect your Hitch.
4PARK
Use the Toggle Switch on the Handle to move your Trailer Forwards
and Backwards. Park the trailer in your desired location.
If you notice any play in the connection, repeat tightening procedure.
5DISCONNECT Disconnect the Red Battery Connection Plug to TURN OFF the Unit.
Switch the Unit into Freewheel Mode and Disconnect your Hitch.
6STORE
Move the Unit to desired storage location, preferrably under cover.
If you have the battery charger option, please ensure the unit is kept
level to prevent battery acid overow while charging.
8
PARKIT360°/ FORCE 5K & 10K MANUAL
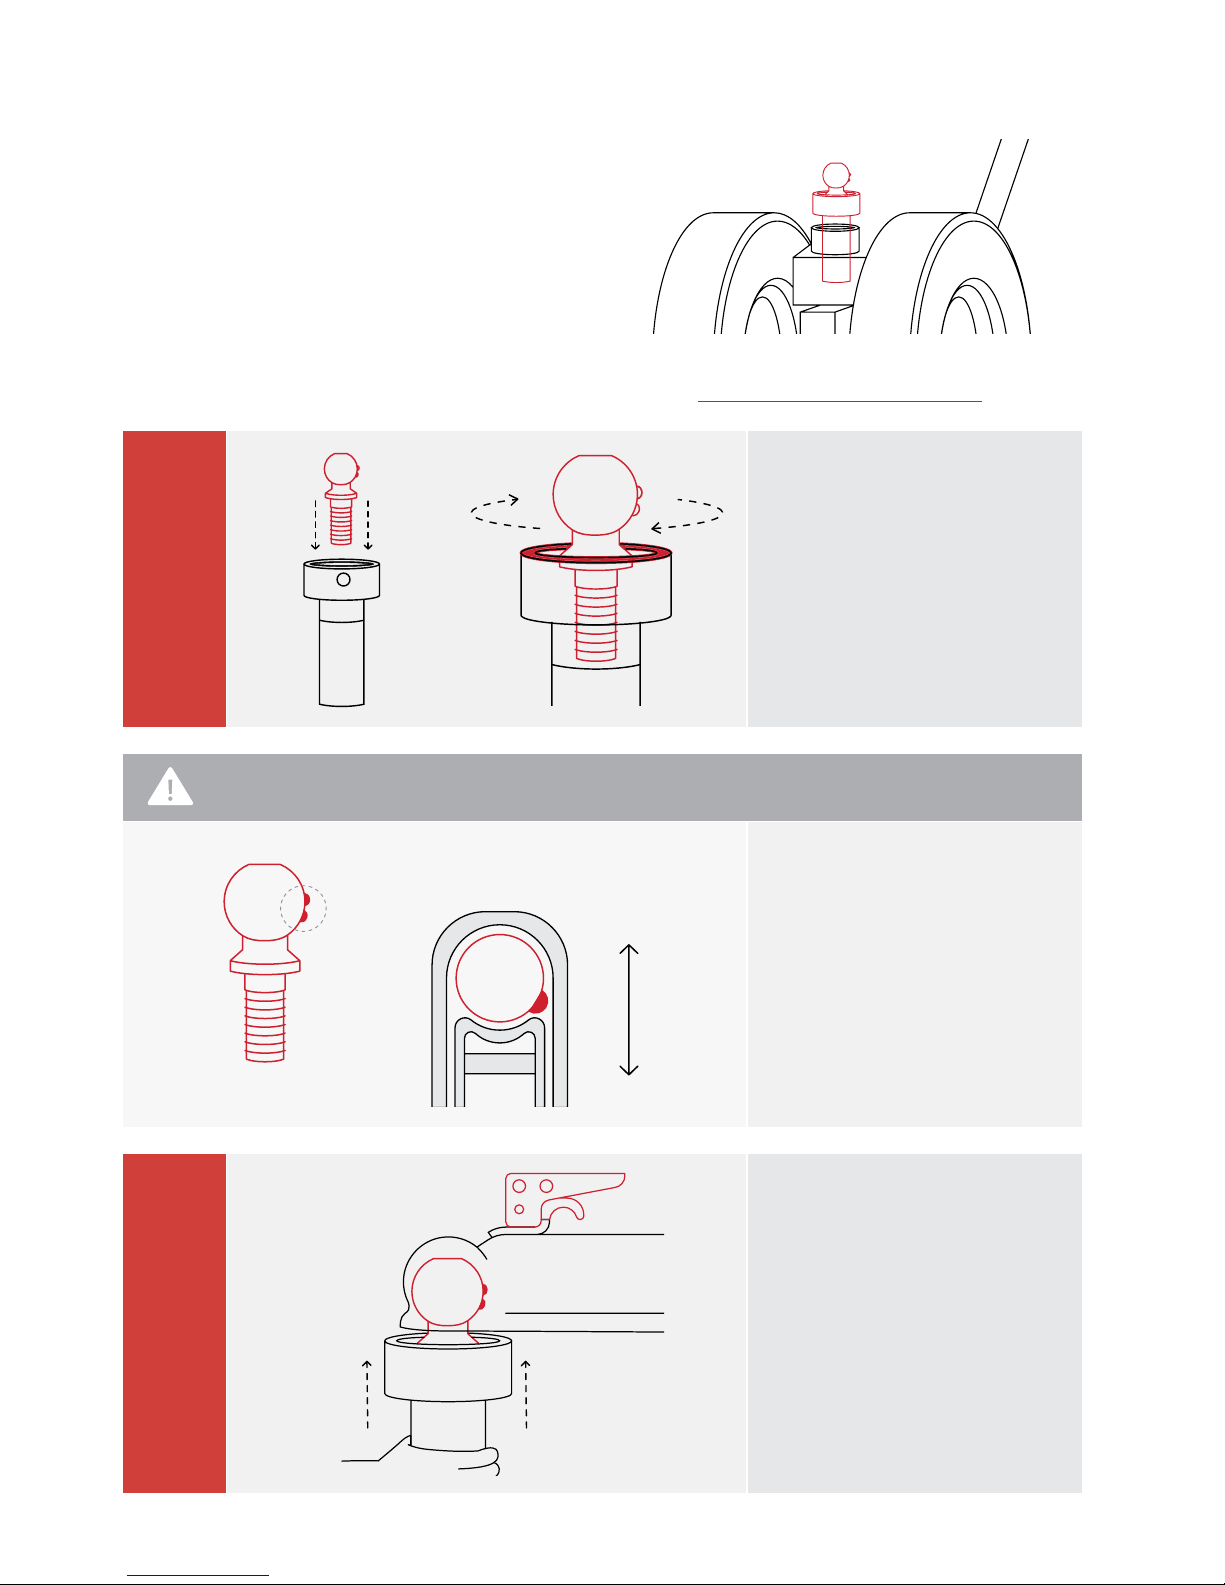
1
Thread the desired Hitch Ball
into the Ball Mount.
Apply a generous portion of
All-Purpose Grease along the top
surface of the Ball Mount Collar.
The bottom shoulder of the Hitch
Ball must be slightly below the top
surface of the Ball Mount Collar.
NOTE: HITCH BALL WELD SPOTS
Make sure the Weld Spots on the
Hitch Ball are pointed towards the
rear left/right side of your trailer.
You will have trouble locking
your hitch if they are not
positioned properly!
2
Hold the assembled Ball Mount
underneath the hitch.
With the Weld Spots in the correct
position, insert the Ball into the
Hitch and lock it as normal.
BALL MOUNT
ADAPTER
CONNECTING TO YOUR TRAILER:
BALL MOUNT TUTORIAL VIDEO:
HTTPS://YOUTU.BE/NZ-_WKINBZS
PROPER WELD SPOT
ORIENTATION INSIDE HITCH:
WELD SPOTS TRAILER
DOLLY

9
3
Turn the Ball Mount Counter
Clockwise until the gap
between the Ball Mount Collar
and Trailer Tongue closes.
The top edge of the Ball Mount
and the Trailer Tongue should
be ush, with no gap.
The connection should be tight
without any ball pivot.
NOTE: THRUST WASHER
Gap in your connection?
Have a Step Down or another
obstruction in the way?
You may need a Thrust Washer.
Find Thrust Washer Installation
instructions on Page 10.
4
Once the connection is secure,
use the Tightening Bar to
ensure that the connection is
as tight as possible.
This may take a few rotations.
5
With the Force Dolly in
Freewheel Mode, move the
dolly underneath the hitch.
Using the Trailer Jack, lower
the Ball Mount into the Dolly’s
Receiver Tube until the bottom
edge is no longer visible.
6
Using the Motor Knob, switch to
Engaged Mode. Move the Dolly
in Reverse to level it out.
Continue lowering the trailer
onto the Dolly to fully insert the
Ball Mount.
Lift the trailer jack all the way
up, and you’re ready to go!
PARKIT360°/ FORCE 5K & 10K MANUAL
PROPER CONNECTION:
FLUSH, FLAT, NO GAP
READY TO GO!

10
PARKIT360°/ FORCE 5K & 10K MANUAL
THRUST WASHER - FOR BALL MOUNT ADAPTER
Place the Thrust Washer on top
of the Ball Mount Collar, with the
open section facing your trailer.
Install the Hitch Ball and continue
Ball Mount connection as normal.
While tightening in Steps 3-4,
hold the Thrust Washer in place
to prevent it from spinning.
JACK POST OPTION
Remove the Ball Mount Adapter.
Lower the trailer jack into the
Dolly’s Receiver Tube, following
the same instructions as Step 5-6.
You’re ready to go!
Lower the trailer as close to the
tires as possible without rubbing on
the trailer frame. This will reduce
strain on the Jack Shaft.
TELESCOPIC FRAME ADAPTER
Remove the Ball Mount. Attach
the adapter to the trailer frame.
Lower the telescoping pipe into
the Dolly’s Receiver Tube and
slide the locking pin into place.
For Articulated Hitches, DO NOT
use the Ball Mount Adapter. Doing
so could cause damage to the unit,
the trailer, or cause serious injury,
including death.
ALTERNATE METHODS
CONNECTING TO YOUR TRAILER:
TELESCOPIC VIDEO:
HTTPS://YOUTU.BE/XJRPA2HDC4G
JACKPOST VIDEO:
HTTPS://YOUTU.BE/X8YNQ5FBM8S
THRUST WASHER VIDEO:
HTTPS://YOUTU.BE/NZ-_WKINBZS
Other manuals for FORCE 5K
3
This manual suits for next models
1
Table of contents
Other PARKIT360 Utility Vehicle manuals


