Parrot Products OP0452A User manual

User Manual Tel: (RSA) 010 140 4900 / Email: [email protected] www.parrot.co.za Projector DLP XGA 3500 Ansi Long Throw- OP0452A

Table of Contents
Key safety instructions ....1Introduction....................... Projector features.......................................3Shipping contents .....................................4External appearance of the projector ........5Device control and functions .....................6Projector Positioning.....12Projection Dimension...............................13Connection.......................14 Connecting to Video source devices .......16Connecting to HDMI devices ...................17To connect the projector to a Component Video source device: ............17Connecting to composite video source devices ....................................................18Operation .........................19Disabling the password function ..............21Setting a password ..................................21If you forget your password .....................21Entering the password recall procedure ................................................22Change Password ...................................22Disabling the password function ..............22Switching input signal ..............................23Changing HDMI input settings .................24Adjusting the projected image .................25Perform keystone correction.....................26Zoom out to see details ...........................27Selecting the aspect ratio ........................27About the aspect ratio...............................28Optimizing the image ...............................29Using Screen Color ..................................29Fine-tuning of image quality in user modes ..............................................30Choosing a location..................................12Hiding the image.......................................34Locking control keys ................................34Lamp Settings...........................................34Extending lamp life ...................................35Timing of replacing the lamp ....................36Replacing the lamp ..................................36Operations at high altitudes .....................363D functions..............................................37Switch off the projector .............................37Menu operations ......................................38Description of each menu ........................41Maintenance.....................45LED Indicator ...........................................46Troubleshooting...............47 ..................48 Projector specifications ............................48Dimensions ..............................................49Ceiling mount installation..........................49Timing chart ............................................50Setting the presentation timer...................32Connect to the computer or monitor .......15Activate the projector................................19Care of the projector.................................45

11
Key safety instructions
Design and testing of your projector has been carried out in compliance with the latest safety standards for information technology (IT) devices. However, it is extremely important for you to follow the instructions and product labels provided in this manual during use to ensure user safety.Safety Instructions ●Please read through this manual before using the projector. Save it for future reference. ●Do not look straight at the projector lens during operation. The intense light beam may damage your eyes. ● ●Always open the lens shutter or remove the lens cap when the projector light source has been switched on. ●In some areas there may be line voltage instability. This projector is designed to operate safely within a mains voltage between 100 to 240 volts AC, but could fail if power cuts or surges of ±10 volts occur. In areas where the mains voltage may a power stabilizer, surge protector or uninterruptible power supply (UPS). ●Do not obstruct the projection lens with any objects when the projector is switched on. ●Place the projector on a flat, stable surface to avoid any damage. ●Do not attempt to disassemble this projector. The projector contains high voltage parts that may cause electrocution or death when it comes in contact with the human body. Do not disassemble or remove any covers. ●Do not place this projector in any of the following environments. - -Environments of extreme heat or cold. -Areas that are extremely humid, dusty, or smoky may contaminate optical components, shortening the projector's life span and darkening the image. - -Locations with altitudes greater than 3000 m (10000 feet).

2 ●Do not block the ventilation holes. If the ventilation holes are seriously obstructed, -Do not place this projector on a blanket, bedding or any other soft surface. - ●Do not step on the projector or place any objects on top of it. These acts may damage the projector itself as well as cause accidents or personal injury. ●Do not place liquids near or on the projector. Liquids spilled into the projector may cause damage. If the projector does become wet, please unplug the power cable from the power socket and contact your local repair center for repairs. ●This product can be mounted on a ceiling suspension mount for back projection.Use only ceiling suspension mounts that meet the relevant requirements and ensure that the installation is safe. ●When the projector is under operation, you may notice some heated air and odour from its ventilation grill. It is a normal phenomenon and not a product defect. ●Do not use the safety lever during transport or installation purposes. The safety lever should only be used with the anti-theft cables sold on the market.Safety instructions for ceiling mounting of the projectorIf you intend to mount your projector from the ceiling, ensure suitable projector ceilingmount bracket and that it is securely and safely installed.There may be safety risks if you fail to use an appropriate projector ceiling mounting kit. the projector to fall from the ceiling.You can purchase a projector ceiling mounting bracket from Parrot Products (Pty) Ltd. the projector may overheat resulting in a fire.Do not place near flammable objects.

3
Introduction
Projector featuresThe projector integrates high-performance optical engine projection and a user-friendly design to deliver high reliability and ease of use. The projector offers the following features. ●Compatible with NTSC, PAL, SECAM and HDTV ●D-Sub 15-pin terminal can be connected to analog video ●Equipped with HDMI connection, supports HDCP (PA501S with no such features) ●Multi-language On-Screen Display (OSD) menus ●Digital keystone correction to correct distorted images ●RS-232 interface supports serial control ●The power saving mode reduces the lamp power consumption by up to 30% when no input signal is detected for a set length of time. ●Presentation timer for better control of time during presentations ●3D Ready supported ●Select Fast Shutdown ●Colour management can be used to adjust the colour according to your preferences ●The screen type correction function can be projected on a variety of pre-set colour surfaces
Note
●
The information in this manual is subject to change without notice.
●
Without the express written consent, reproduction, transfer or photocopying of this document in full or in part is prohibited.

4ContentsCarefully unpack the product and check thany of these items are missing, please contact your place of purchase.The supplied items will be suitable for your region, and may differ from those illustrated.ProjectorPower cordPatternAspectPgUpPgDnFreezeBlankColorModeOnOffVIDEOHDMICOMPSourceAutoSync
VGA cableRemote controlat you have all of the items shown below. If

5External appearance of the projectorFront / rearSideTop / bottom
Warning
●This equipment must be connected to earthed connection. ●convenience. If failures or errors occur during equipment operations, use the power interruption device to cut the power or unplug the power cable from the socket.

6Device controls and functions1.
123467856
Turn the projector power on or off.2. (POWER LED indicator)Please refer to "LED indicator message".3. (TEMP LED indicator)Please refer to “LED indicator message”.4. (LAMP LED indicator)Please refer to "LED indicator message".5. SOURCEA source selection bar display.6. / (Keystone button)Manually corrects distorted images resulting from an angled projection.Left/Right/Up/Down (Navigation button)Selects the required menu option to make adjustments.7. MENU/EXITMenu: Displays or exits the on-screen display menu.Exit: Returns the previous OSD menu, exits and saves the menu settings.8. ENTEREnter the selected on-screen display (OSD) menu item.

7Remote control1.Power2.Computer3.Auto Sync4./Keystone button/// direction button5.My button6.Menu7.Mouse (right button)Mouse (left button)8.9.Mouse10. Lock/ID Set(no function)11.Timer12.Volume13.14.15.
Scale ratio
16.HDMI17.YPbPr (no function)19.Enter20.21. Page up18.Input sourceExitLamp Eco modeAudio mode12344456789101112131441516171819202122.Page down222323. Test pattern2424.Blank screen2525. Help26.Magnify27. Color mode28.Mute262728

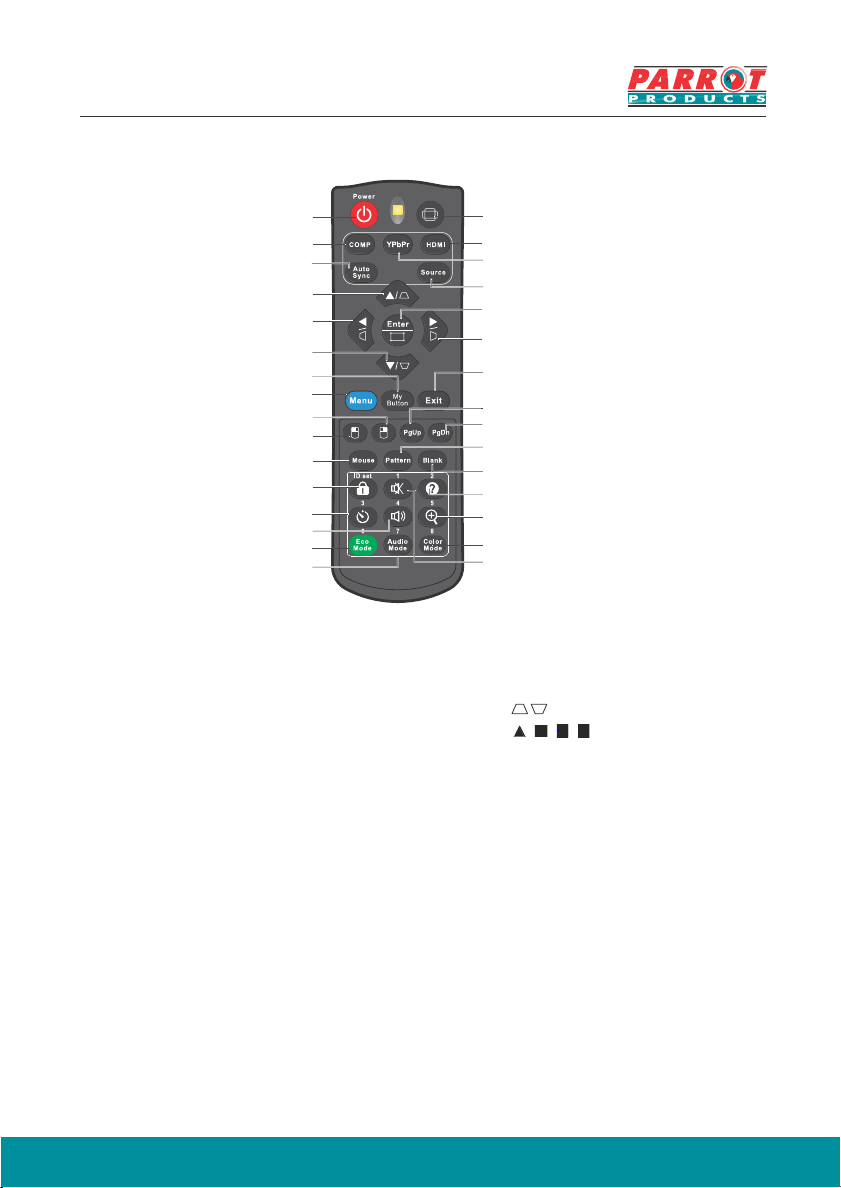
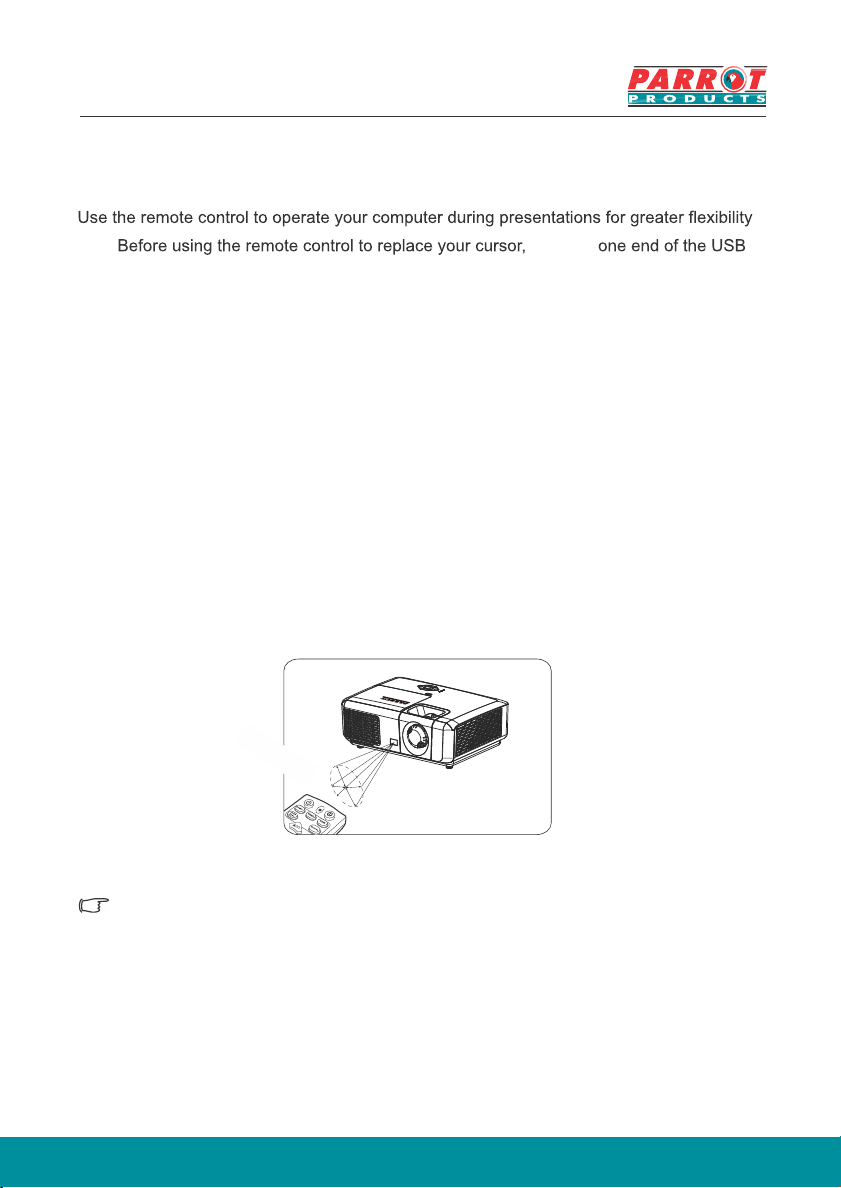
8Using the remote control cursor.1. cable to the projector Mini USB port and the other end to the PC or notebook computer. See “Connect to the computer” for details.2. Change the input signal to D-Sub or HDMI via PC source.3. To use the software displayed on the connected computer (such as Microsoft PowerPoint), go to the previous or next page by pressing the previous page / next page.Remote control effective rangeThere is an infra-red (IR) remote control sensor located at the front of the projector. Holdthe remote control and maintain a perpendicular angle within 30 degrees with the IR remote control sensor to achieve normal remote control functions. The distance between the remote control and the sensor should not exceed 8 meters (about 26 feet).Do not obstruct the IR sensor on the projector as this may block the IR beam.
Note
●
Operate the remote control where you can see the remote sensor.
●
Do not shake or drop the remote control.
●
Store the remote control in a cool, dry place.
●
Do not spill water on the remote control or place moist objects on it.
●
Do not disassemble the remote control.
Approx. 30°
connect

9Replacing the remote control battery1. To open the battery cover, place the remote control with the backside facing upwards. Press down at the indicated area and then slide the battery lid upwards along the indi-cated direction.2. Take out the old batteries (if required) and then place 2 new AAA batteries according to the indicated orientation. The positive pole of the battery should be directed at the (+) direction while the negative pole should be directed at the direction.3. Align the battery cover with the bottom of the remote control and return the cover to its original position to complete the process.Warning ●Do not store the remote control in extreme hot, cold or moist spaces. ●Only use 2 AAA batteries as shown above. ●Refer to the manufacturer’s instructions and local environmental regulations to dispose of old batteries. ● ●battery leaks from damaging the remote control.

10
Projector Positioning
Choosing a locationinstallation. Considerations include size and position of the screen, location of a suitable power outlet, as well as the location and distance between the projector and other equipment.There are 4 potential installation locations for the projector:1. Front TableFor this location, the projector is placed right in front of the screen. This is the most commonly used position. It is quick to setup and highly mobile.2. Front CeilingFor this location, the projector is suspended upside-down from the ceiling in front of the screen.Purchase a Projector Ceiling Mounting bracket from your dealer to mount your projector from the ceiling.After activating your projector, go to System Settings: Projector Position menu and set to Front Ceiling.3. Rear CeilingFor this location, the projector is suspended upside-down from the ceiling behind the screen.Note that a special rear projection screen and Projector Ceiling Mounting bracket are required for this installation location.After activating your projector, go to System Settings: Projector Position menu and select Rear Ceiling.4. Rear TableFor this location, the projector is placed right behind the screen.Note that a special rear projection screen is required.After turning on the projector, go to System Settings: Projector Position menu and select Rear Table.You may refer to the room layout or personal preference to determine the location of

11Projection DimensionRefer to the chart below to determine the screen size and projection distance.Diagonal sizeScreenCenter of lensProjection distanceVertical offsetWideHighFor SVGA / XGA DLP models4:3 screen diagonalScreen sizeProjection distance[Inch (mm)]Vertical offset[Inch (mm)]Diagonal[Inch (mm)]Wide[Inch (mm)]High[Inch (mm)]50 (1270)40 (1016)30 (762)77 (1956)3.8 (96)60 (1524)48 (1219)36 (914)93 (2362)4.5 (115)70 (1778)56 (1422)42 (1067)109 (2769)5.3 (134)80 (2032)64 (1626)48 (1219)125 (3175)6.0 (154)90 (2286)72 (1829)54 (1372)141 (3581)6.8 (173)100 (2540)80 (2032)60 (1524)156 (3962)7.6 (192)120 (3048)96 (2438)72 (1829)188 (4775)9.1 (230)140 (3556)112 (2845)84 (2134)220 (5588)10.6 (269)150 (3810)120 (3048)90 (2286)236 (5994)11.3 (288)

12
Connection
When connecting a signal source to the projector, be sure to:1. Turn all devices off before securing any connections.2. Use the correct signal cables for each source.3. In the connections shown below, some cables may not be included (please refer to “page 4 contents”). You may purchase the required signal cables from an electronics store.The following links and icons are for references only. Connection jacks at the back of the projectors may differ according to the projector model.1. VGA (D-Sub) to HDTV (RCA) line2. Composite video line3. HDMI cable4. USB cable (mini-B to type A)5. VGA cable (D-Sub to D-Sub)6. RS-232 cable7.Audio cable21134567

13Connecting to Video source devicesYjack:• HDMI• Component video• Video (composite video)Only 1 of the aforementioned connection methods is required to connect the projector to the video source device. However, different connection methods would provide a different video quality. The connection method selected would be determined by the presence of matching jacks on the projector and Video source device:Best video qualityHDMI is the best video connection method aHDMI jacks, you will be able to acquire uncompressed digital video quality.Please refer to “Connecting to HDMI devices” for details on how to connect the projector to HDMI devices.If you don’t have any usable HDMI source, the next best video signal would be Component Video (not to be confused with Composite Video). Digital TV tuners and DVD players are provided with Component Video output sockets. If your device includes Component Video, then this would be your primary choice of connection to the (composite) video.Please refer to “To connect the projector to a Component Video source device:” for details on how to connect your projector to Component Video devices. Least video qualityComposite optimal result from your projector, being the least video quality of the available methods described here.Please refer to “Connecting to composite video source devices” for details on how to connect your projector to composite video Connect to the computer or monitorConnect to the computer1. Use the VGA cable provided. Plug one end to the D-Sub output jack at the com-puter end.2. Connect the other end of the VGA cable to the COMPUTER signal input jack on the projector.Many notebooks have not activated their monitor jack after being connected to the monitor. The user can often press FN + F3 or CRT / LCD button to switch the externally connected monitor ON / OFF. Find the function key labeled with the CRT / LCD or monitor icon on the notebook. Press the FN key and the labeled function key. Please refer to the instruction manual provided with the notebook computer for the combination keys and their functions.ou can connect the projector to any of the following video source device with an output vailable. If the source device comes with Video is an analog video and will result in a perfectly acceptable, but less thandevices.

14Connecting to HDMI devicesUse an HDMI cable to establish a connection1. Connect one end of the HDMI cable to the HDMI output jack on the video device.2. Connect the other end of the cable to the HDMI signal input jack on the projector.Tdevice:Examine your output sockets is available:• If so, you can continue with this procedure.• If not, you will need to reassess which method to use to connect to the device.1. Take a VGA (D-Sub) Component adapter cable and connect the end with 3 RCA type connectors to the Component Video output sockets of the Video source device. Match the colour of the plugs to the colour of the sockets; green to green, blue to blue, and red to red.2. Connect the end of the VGA (D-Sub) Component adapter cable (with the D-Sub type connector) to the COMPUTER jack on the projector.If the selected video image is not displayed after the projector is turned on and the correct video source has been selected, check that the Video source device is turned on and operating correctly. You must also check that the signal cables have been connected correctly.Connecting to composite video source devicesExamine your available:• If so, you can continue with this procedure.• If not, you will need to reassess which method to use to connect to the device.1. Take a Video cable and connect one end to the composite Video output socket of the Video source device.2. Connect the other end of the video cable to the VIDEO socket on the projector.If the selected video image is not displayed after the projector is turned on and the correct video source has been selected, check that the Video source device is turned on and operating correctly. You must also check that the signal cables have been connected correctly.When the component video is not available, use the composite video connection method to connect to this device. See “Connecting to Video source devices” for details.o connect the projector to a Component Video source video source device to determine if an unused composite output jack is Video source device to determine if a set of unused Component Video between the projector and HDMI device.

15
Operation
Activate the projectorPlug the power cord into the projector and into a wall socket. wall socket.Press Power to switch on the projector.instructions and select your OSD language.Switch on all connected equipment.The projector will then begin a search of the input signals. The lower right corner of the screen will display the current input signal being scanned. If the projector fails to detect a valid signal, the screen will display a [NO SIGNAL] message until an input signal is found.You can press "Source" to select the input signal required. See “Switching input signal” for details.If the input signal frequency / resolution is outside the operating range of the projector, the blank screen will display the [Out of Range] message. Please change to an input signal which is compatible with the projector's resolution or set the input signal to a lower setting. For more details, please refer to the [Resolution Table].Turn on the switch on the

16Disabling the password functionFor security purposes and to help preveoption for setting up password security. Passwords may be set using the On-Screen Display (OSD) menu. Please refer to the [Using the menus] section for details on OSD menu operations.Setting a passwordOnce a password has been set, the user must provide the correct password after starting the projector. Otherwise, the projector cannot be used.1. Open the OSD Menu and enter System > Security Settings menu.2. Press [Enter]. The Security Settings page will be displayed.3. Select Power Lock, then press and select ON.4. The picture on the right shows 4 arrow keys ( , , , ) each representing (1, 2, 3, 4) respectively. press the arrow keys to enter six digits for the 5. After completing password settings, the OSD menu will return to the Security Settings page.6. Press [Exit] to leave the OSD menu.If you forget your passwordIf the password function is activated, you will be asked to enter the six-digit password every time you turn on the projector. If you enter the wrong password, the password error message as pictured above will be displayed for 5 seconds before the message [INPUT PASSWORD] is shown. You can enter another 6-digit password. You may use the password recall procedure if you forgot your password and did not record it in this manual. See “Entering the password recall procedure” for details.If you enter an incorrect password 5 times in succession, the projector will automatically shut down.
******
nt unauthorized use, the projector includes an password and confirm that password.

17Entering the password recall procedure1. Press and hold the [Auto Sync] button on the remote control for 3 seconds.2. Write down the number and turn off your projector.3. Seek help from the local service center to decode the number. You may be required to provide proof of purchase to verify that you are an authorized user of the projector.Change Password1. Open the OSD and enter System Settings > Security Settings > Change Password menu.2. Press [Enter]. The message [INPUT CURRENT PASSWORD] will be shown.3. Enter the old password. ●If the password entered is correct, another message [INPUT NEW PASSWORD] will be shown. ●If the password entered is incorrect, then the password error message will be displayed for 5 seconds before the screen shows the [INPUT CURRENT PASSWORD]. You will then need to re-enter the password. You can either press [Exit] to cancel the process or try other passwords.4. Enter a new password.5. You have successfully assigned a new password to the projector. Remember to enter the new password next time the projector is started.6. Press [Exit] to leave the OSD menu.Any digit entered will be displayed as asterisks [*] on-screen. We recommend writing down the password and placing it somewhere safe for future reference in case you forget.Disabling the password function1. Open the OSD menu and enter System Settings > Security Settings > Power On Lock menu.2. Press and select OFF.Though the password function is disabled, you need to keep the old password on hand should you ever need to re-activate the password function by entering the old password.

18Switching input signalThe projector can be connected to multiple devices at the same time. However, it can only display one full screen at a time.If you want the projector to automatically search for Quick Auto Search function in the SYSTEM menu is switched ON.You may also press the source selection button on the remote control or search for available input signals to manually select the desired signals.1. Press [Source] to display the source selection column.2. Keep pressing the until you see the desired signal, then press [Enter].Once detected, the selected source information will display on the screen for a fewseconds. If there are multiple devices connected to the projector, repeat steps 1 to 2 to search for another signal.
Table of contents
Other Parrot Products Projector manuals