Parsun F25/20BM User manual

OUTBOARD MOTOR
OWNER’S MANUAL
F25/20BM
F25/20BW
F25/20FW
SUZHOU PARSUN POWER MACHINE CO., LTD

Thank you for owning a PARSUN outboard motor.
Thank you for your trust in our company and products.
“PARSUN” outboard motors are powerful, economic and safe, manufactured with
advanced technology.
Please read this manual carefully before operating your outboard motor. A
through understanding of the manual will help you to know this product for proper
operation, maintenance and care. This will ensure that your outboard motor operates
well under all conditions.
“PARSUN” seeks continuous improvement in product quality. Therefore, while this
manual contains the most current product information available at the time of printing,
there may be minor discrepancies between your machine and this manual. If there is any
question concerning the manual, please consult your local PARSUN dealer.
Data, illustrations or explanations in this Owner’s Manual do not constitute base for
any legal claim against our company.
SUZHOU PARSUN POWER MACHINE CO., LTD

Engine Identification Numbers
Outboard motor serial number
The outboard motor serial number is marked on the label. The label can be found on the bracket left
assembly or on the upper part of the bracket swivel.
Record your outboard motor serial number in the spaces provided to assist you in ordering spare parts from
your dealer or for reference in case your outboard motor is stolen.
1. Outboard motor serial number location
Serial number as follows:
Engine serial number
The engine serial number is carved on the aluminum casting of engine.
Engine serial number as follows:
SN
1

Manufacturer’s Declaration
This outboard motor complies with the requirements of Directive 2003/44/EC in relation to the exhaust and
noise emissions. The following installation and maintenance instructions, if applied, guarantee that the
outboard motor will remain in compliance with:
1. Exhaust emissions limits throughout the normal life or the engine (350 hours or 10 years, whichever
occurs first) and under normal conditions of use.
2. Noise emissions limits under normal conditions of use.
High Altitude Warning
Operation at High Altitude
The density of air at high altitude is lower than at sea level. Engine power is reduced as the air mass
and air fuel ratio decrease. Outboard motor output will be reduced. This is a natural trend and cannot
be changed by adjusting the engine. At sufficiently high altitudes increased exhaust emissions can
also result due to the increased enrichment of the air fuel ratio. Other high altitude issues can include
hard starting, increased fuel consumption and spark plug fouling.
To alleviate high altitude issues other than the natural power loss, dealer can provide a high altitude
carburetor main jet. The alternative main jet and installation instructions can be obtained by contacting
Customer Support.
The part number and recommended minimum altitude for the application of the high altitude carburetor
main jet are listed in the table below.

MODEL MAIN JET PART NUMBER ALTITUDE
F20/25 Standard Main Jet H177-S 2000 Feet (609.6 Meters)
Altitude Main Jet H177×1.08
Operating the engine with the wrong engine configuration at a given altitude may increase its
emissions and decrease fuel efficiency and performance. When the carburetor has been
modified for high altitude operation, the air-fuel mixture will be too lean for low altitude use.
Operation at altitudes below 609.6 meters (2,000 feet) with a modified carburetor may cause the
engine to overheat and result in serious engine damage. For use at low altitudes, have your
dealer return the carburetor to original factory specifications.
WARNING

Table of contents
1. Main components and General information.................. .................................................................1
1.1. Main components..................................................................................................... ................1
1.2. General information.................................................................................................................. 2
1.2.1. Specification.........................................................................................................................2
1.2.2. Fueling instructions...............................................................................................................3
1.2.3. Propeller selection................................................................................................................4
2. Operation.......................................................................................................................................5
2.1. Installation.................................................................................................................................5
2.1.1. Mounting height.....................................................................................................................5
2.1.2. Clamping the outboard motor.................................................................................................6
2.2. Breaking in engine.....................................................................................................................7
2.3. Pre-operation Checks................................................................................................................8
2.4. Filling fuel................................................................................................................................10
2.5. Starting engine........................................................................................................................10
2.6. Warming up engine.................................................................................................................19
2.7. Shifting....................................................................................................................................19
2.7.1. Forward................................................................................................................................20
2.7.2. Reverse................................................................................................................................21
2.8. Tiller.........................................................................................................................................22
2.9. Trim tab...................................................................................................................................24
2.10. Stopping engine.....................................................................................................................24

2.11. Trimming outboard motor........................................................................................................26
2.12. Tilting up and down................................................................................................................27
2.12.1. Tilting up..............................................................................................................................27
2.12.2. Tilting down.........................................................................................................................30
2.13. Cruising in other conditions....................................................................................................31
2.13.1. Cruising in shallow water.....................................................................................................31
2.13.2. Cruising in salt water...........................................................................................................32
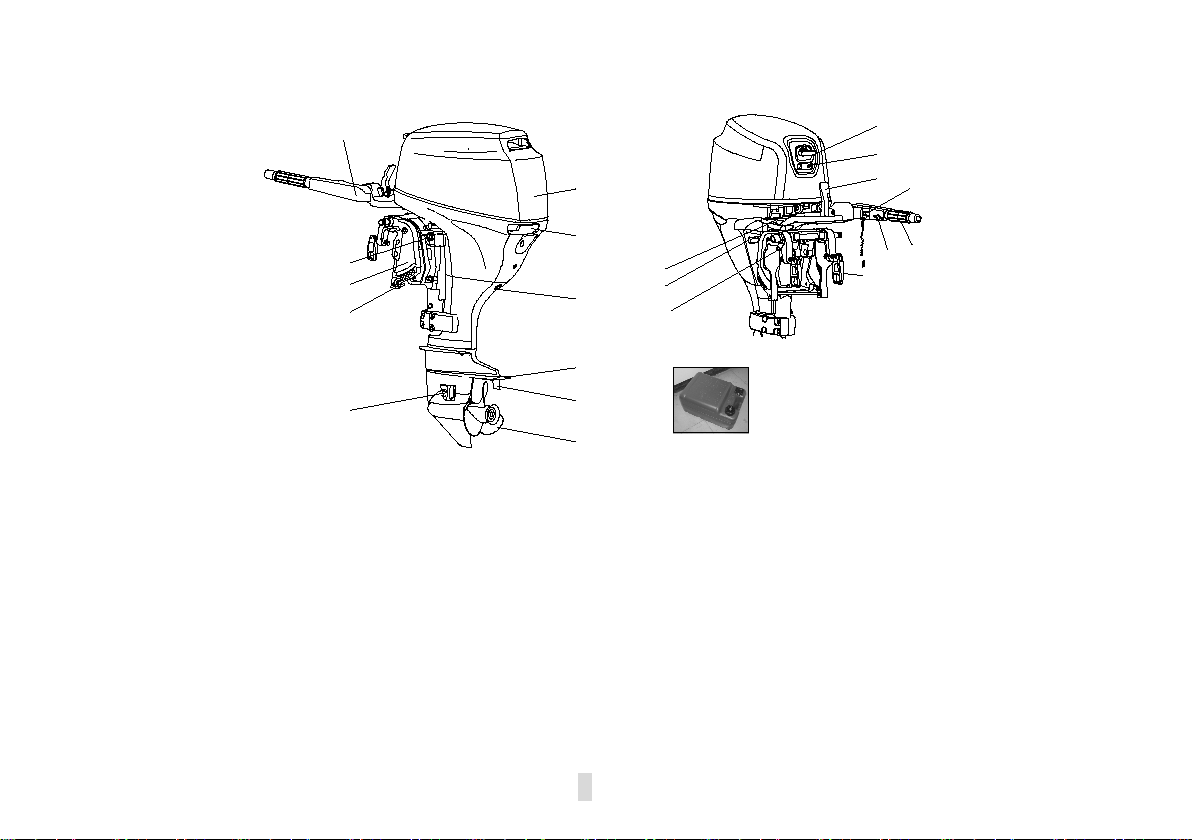
3. Maintenance................................................................................................................................33
3.1. Greasing..................................................................................................................................33
3.2. Cleaning and adjusting spark plug..........................................................................................34
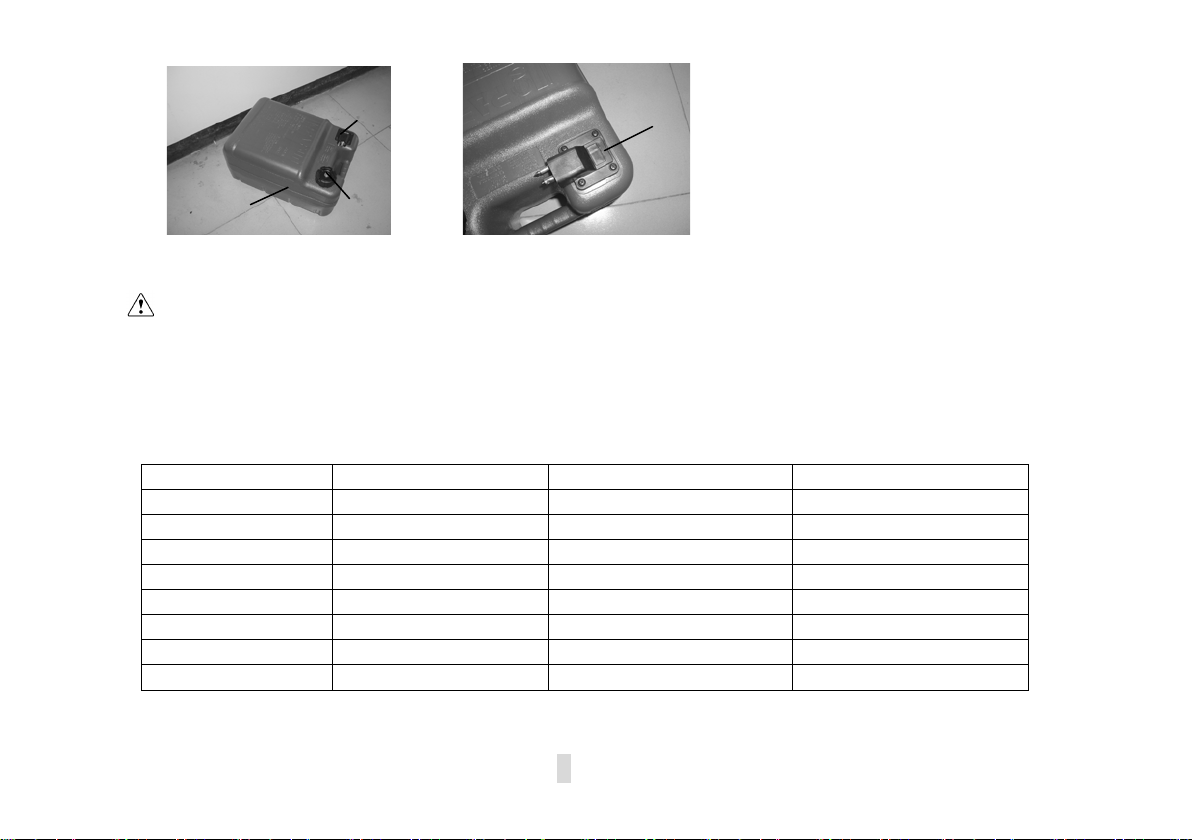
3.3. Checking fuel system..............................................................................................................34
3.3.1. Cleaning fuel filter...............................................................................................................35
3.4. Inspecting idling speed............................................................................................................36
3.5. Changing engine oil.................................................................................................................37
3.6. Checking wiring and connectors.............................................................................................38
3.7. Checking leakage...................................................................................................................38
3.8. Checking propeller..................................................................................................................38
3.8.1. Removing the propeller......................................................................................................39
3.8.2. Installing the propeller........................................................................................................40
3.9. Changing gear oil....................................................................................................................40
3.10. Cleaning fuel tank...................................................................................................................41
3.11. Checking and replacing anode(s).......................................................................................... 42

3.12. Checking top cowling..............................................................................................................42
3.13. Maintenance table.................................................................................................................43
4. Transporting and storing outboard motor...................................................................................45
4.1. Transporting............................................................................................................................45
4.2. Storing.....................................................................................................................................46
5. Action in emergency....................................................................................................................48
5.1. Impact damage.......................................................................................................................48
5.2. Starter will not operate............................................................................................................48
5.3. Treatment of submerged motor..............................................................................................50
6. Troubleshooting...........................................................................................................................51
7. Circuit diagram............................................................................................................................55

1. Main components and General information
1.1 Main components
22
11
6
19
20
21 18
17
14 15
16
13
12
10
9
8
7
5
4
3
2
1
1. Top cowling 9. Clamp bracket 17. Throttle grip
2. Top cowling lock handle 10. Steering friction bolt 18. Clamp bolt
3. Drain screw 11. Tiller handle 19. Rope attachment
4. Anti-cavitation plate 12. Starters handle 20. Tilt lock lever
5. Trim tab 13. Warning indicator 21. Fuel joint
6. Propeller 14. Gear shift lever 22. Fuel tank
7. Cooling water inlet 15. Engine stop button/Engine stop lanyard switch
8. Trim rod 16. Throttle frication adjuster
1

A portable fuel tank includes parts as follows:
1. Fuel tank cap 3. Air vent screw
2. Fuel joint 4. Fuel gauge
WARNING
:
The fuel tank supplier with this engine could only be used as supply of fuel for it’s running and
must not be as a fuel storage container.
1.2 General information
1.2.1Specification
Main technical data
Items
Data
Items
Data
Type of engine
4-stroke L
Weight (L/S/WL/WS)
68Kg/66Kg/70Kg/68Kg
Displacement
498cm3
Recommended fuel
Unleaded regular gasoline
Bore X stroke
65mm
×
75mm
Fuel tank capacity
24L
Gear ratio
2.08
(
27/13
)
Recommended engine oil
SAE10W30 or SAE10W40
Overall length
1151mm
Engine oil quantity
1.7L
Overall width
430mm
Recommended gear oil
Hypoid gear oil SAE
﹟
90
Overall height (L/S)
1280mm/1153mm
Gear oil quantity
320cm3
Transom height (L/S)
508mm/381mm
Spark plug
DPR6EA-9
2
1
3
2
4

Performance
Items
Data
Items
Data
Maximum output 18.4Kw/5500Rpm(25HP) Valve clearance
IN(cool engine) 0.15~0.25mm
14.7 Kw/5500Rpm(20HP)
Spark plug gap 0.8~0.9mm Valve clearance EX
(cold engine) 0.25~0.35mm
Full throttle operating
range 5000~6000Rpm Tightening
torque for
engine
Spark plug 18.0Nm
Idling speed (in
neutral)
975±50Rpm Engine oil
drainbolt
28.0Nm
1.2.2 Fueling instruction
Fueling instructions:
Recommended gasoline:
Regular unleaded gasoline,If it is not
available, then premium gasoline.
If knocking or pinging occurs, use a different brand of gasoline or premium unleaded fuel.
If leaded gasoline is usually used, engine valves and related parts should be inspected after every 100
hours of operation.
WARNING
:
·
Do not smoke when refueling, and keep away from sparks, flames, or other sources of
Ignition.
·
Stop engine before refueling.
·
Refuel in a well-ventilated area, refuel portable fuel tanks off the boat.
·
Do not overfill the fuel tank.
·
Take care not to spill gasoline, if gasoline spills, wipe it up immediately.
·
Tighten the filler cap securely after refueling.
3

·
If you should swallow some gasoline, inhale a lot of gasoline vapor, or get gasoline in your
eye, get immediate medical attentions.
·
If any gasoline spills onto your skin, immediately wash with soap and water. Change
clothing if gasoline spills on it.
·
Touch the fuel nozzle to metal components to prevent electrostatic sparks.
CAUTION:
Use only new clean gasoline which has been stored in clean containers and is not contaminated
with water or foreign matter.
Engine oil:
Recommended engine oil: 4-stroke outboard motor oil SAE10W30 and SAE10W40(1.7L).
WARNING:
·
Do not start the engine when the oil level is low. Serious damage might occur.
·
Always check the oil level before starting the engine.
CAUTION:
All 4-stroke engines are shipped from the factory without engine oil.
1.2.3 Propeller selection
The performance of your outboard motor will be critically affected by your choice of propeller, as an
incorrect choice could adversely affect performance. The outboard motor is fitted with propellers chosen
to perform well over a range of applications, but there may be uses where a propeller with a different pitch
would be more appropriate. “PARSUN”dealers stock a range of propellers and can advise you and install
a propeller on your out board that is best suited to your application.
For a greater boat load and a low engine speed, a smaller-pitch propeller is more suitable. Conversely,
a large-pitch propeller is more suitable for a smaller operating load as it enables the correct engine speed to
be maintained.
4

2. Operation
2.1 Installation
Mount the outboard motor on the center line (keel line) of the boat. For boats without a keel or which
are asymmetrical, consult your dealers.
1. Center line (keel line)
NOTE
:
During water testing check the buoyancy of the boat, at rest, with its maximum load. Check that
the static water level on the exhaust housing is low enough to prevent water entry into the power
head, when water rises due to waves when the outboard is not running.
WARNING:
·
Overpowering a boat could cause severe instability. Do not install an outboard motor with
more horsepower than the maximum rating on the capacity plate of the boat. If the boat does
not have a capacity plate, consult the boat manufacturer.
·
Improper mounting of the outboard motor could result in hazardous conditions. Your dealer
or other person experienced in proper rigging should mount the motor. Ifyou are mounting
the motor yourself, you should be trained by an experienced person.
·
The information presented in this section is intended as reference only. Proper mounting
depends in part on experience and the specific boat and motor combination.
2.1.1 Mounting height
The mounting height of the outboard motor greatly affects your boat running efficiency. If the mounting
5
1

(0-1in)
0~25mm
height is too high, cavitation tends to occur, thus reducing the propulsion. If the mounting height is too low,
the water resistance will increase and thereby reduce engine efficiency. Mount the outboard motor so that
the anti-cavitation plate is between the bottom of the boat and a level 25mm below it.
NOTE:
The optimum mounting height of the outboard motor is affected by the boat and
motorcombination and the desired use. Test runs at a different height can help determine
theoptimum mounting height. For further information, consult your “PARSUN” dealer or boat
manufacturer.
2.1.2 Clamping the outboard motor
1. Tighten the transom clamp screw evenly and securely. Occasionally check the clamp screws for
tightness during operation of the outboard motor because they could become loose due to engine
vibration.
CAUTION:
Outboards that use clamp bracket screws alone are INSUFFICIENT to properly and safely
secure the outboard to the Transom. Proper installation of the outboard includes bolting the
engine to the boat through the transom.
6

WARNING:
Loose clamp screws could allow the outboard motor to fall off or move on the transom. This
could cause loss of control. Make sure the clamp screws are tightened securely,occasionally check
the screws for tightness during operation.
2. If the engine restraint cable attachment is equipped
on your engine, an engine restraint cable or chain
should be used.Attach to a secure mounting point
on the boat to avoid the engine being completely
lost if it accidentally falls off the transom.
3. Secure the clamp bracket to the transom using the appropriate bolts. For details, consult your
PARSUN dealer.
WARNING:
Avoid using bolts, nuts or washers inappropriate. After tightening, test running the engine
and check their tightness.
2.2 Breaking in engine
Your new engine requires a period of breaking to allow mating surfaces of moving
parts to wear in evenly.
CAUTION
Failure to follow the break-in procedure could result in reduced engine life or even severe engine
Damage.
1. For the first hour of operation:
Run the engine at 2000 r/min or at approximately half throttle.
7

2. For the second hour of operation:
Run the engine at3000 r/min or at approximately three-quarter throttle.
3. For the next eight hours of operation:
Avoid continuous operation at full throttle for more than five minutes at a time.
4. Operate the engine normally.
2.3 Pre-operation checks
Fuel
·Check to be sure you have plenty of fuel for your trip.
·Make sure there are no fuel leaks or gasoline fumes.
·Check fuel line connections to be sure they are tight
·Be sure the fuel tank is positioned on a secure, flat surface, and that the fuel line is not twisted
or flattened, or likely to contact sharp objects.
Controls
·Check throttle, shift and steering for proper operation before starting the engine.
·The controls should work smoothly, without binding or unusual free play.
·Look for loose or damaged connections.
·Check operation of the starter and stop switches when the outboard motor is in the water.
CAUTION
·
Do not start the engine out of water. Overheating and serious engine damage can occur.
·
Check the engine and engine mounting.
·
Look for loose or damaged fasteners.
·
Check the propeller for damage.
8

Checking the engine oil level
1. Put the outboard motor in an upright position (not tilted).
2. Check the oil level using the dipstick to be sure the level falls between the upper and lower marks.
Fill with oil if it is below the lower mark, or drain to the specified level if it is above the upper mark.
1. Oil dipstick 3. Lower level mark
2. Upper level mark
CAUTION
Be sure to completely insert the dipstick into the dipstick guide.
9
1
1
2
3

2.4 Filling fuel
WARNING:
Gasoline and its vapors are highly flammable and explosive. Keep away from sparks, cigarettes,
flames, or other sources of ignition.
1. Remove the fuel tank cap.
2. Carefully fill the fuel tank.
3. Securely close the cap after filling the tank. Wipe up any spilled fuel.
2.5 Starting engine
For F25/20BM
1. Connect fuel joints securely after loosing the air vent screw on the fuel tank cap (2 or 3 turns).
10

2. Connect fuel joints securely and squeeze the primer pump with the outlet end up until you feel
it become firm (if equipped the fuel joint).
3.Place the gear shift lever in neutral.
NOTE:
The start-in-gear protection device prevents the engine from starting except when in neutral.
Attach the engine stop switch lanyard to secure place on your clothing, or your arm or leg. Then
install the lock plate on the other end of the lanyard into the engine stopswitch.
WARNING:
·
The engine must be starting in neutral otherwise damage starter and hazard can occur.
·
Do not attach the lanyard to clothing that could tear loose. Do not route the lanyard where it
11

could become entangled and preventing it from functioning
·
Avoid accidentally pulling the lanyard during normal operation. Loss of engine power means
the loss of steering control. Also, without engine power, the boat could slow rapidly. This
could cause people and objects in the boat to be thrown forward.
4. Place the throttle grip in the “START” (start) position.
5. Pull the manual starter handle slowly until you
feel resistance. Then give a strong pull straight
to crank and start the engine. Repeat if necessary.
12
This manual suits for next models
2
Table of contents
Other Parsun Outboard Motor manuals

Parsun
Parsun F40 EFI User manual

Parsun
Parsun F2.6BM User manual

Parsun
Parsun F60 BEL-D User manual

Parsun
Parsun F4BM User manual

Parsun
Parsun F5BM User manual

Parsun
Parsun F6ABM User manual

Parsun
Parsun T15BM User manual

Parsun
Parsun F9.8FW User manual

Parsun
Parsun F15BM User manual

Parsun
Parsun F30 BM User manual

Parsun
Parsun F4BM User manual

Parsun
Parsun F15AEFI BM User manual

Parsun
Parsun TE18BM User manual

Parsun
Parsun T90BM User manual

Parsun
Parsun F15A BM User manual

Parsun
Parsun T40BM User manual

Parsun
Parsun F4ETS User manual

Parsun
Parsun F50 BEL-D User manual

Parsun
Parsun F115 BEX-T User manual

Parsun
Parsun F115 BEX-T User manual