patura Solar Panel 25W User manual

BEDIENUNGSANLEITUNG
Beachten Sie alle Hinweise vor Inbetriebnahme!
MODE D´EMPLOI
Lire toutes les instructions avant l´usage!
USER MANUAL
Read full instructions before use!
Solarmodul 15W / 25W
Mit Halter für MaxiBox
Module solaire 15W / 25W
Avec support pour le MaxiBox
Solar Panel 15W / 25W
With mounting bracket for MaxiBox
Ref. 148431 / 148531

- 2-
Beschreibung
PATURA Solaranlagen sind bei richtiger Dimensionierung für den nachladungsfreien Betrieb des
Elektrozaungerätes von Frühjahr bis Herbst ausgelegt. Ein Zurückschalten des Gerätes auf eine niedrigere
Leistungsstufe ermöglicht den nachladungsfreien Betrieb bis in den Winter hinein.
Technische Daten:
15 Watt: Typ: SP 12/15/36 • max. Leistung: 15 W • Utyp: 17,3 V / Ityp: 0,86 A • Uleer: 21,5 V / Ikurz: 0,96 A
Abmessungen (lxb): 568 x 243 mm • Mindestkapazität des Akkus (nicht im Lieferumfang): 80 Ah (C100)
25 Watt: Typ: SP 12/25/36 • max. Leistung: 25 W • Utyp: 17,3 V / Ityp: 1,44 A • Uleer: 21,5 V / Ikurz: 1,58 A
Abmessungen (lxb): 627 x 360 mm • Mindestkapazität des Akkus (nicht im Lieferumfang): 100 Ah (C100)
Lieferumfang:
1 Stück Solarmodul mit integriertem Laderegler 15 W oder 25 W, mit Anschlußkabel
1 Stück Solarmodulhalter aus Aluminium
4 Stück Schrauben M6x16 für Solarmodul
4 Stück Federringe M6 für Solarmodul
4 Stück Mutter M6 für Solarmodul
2 Stück Schraube M5x16 für Halterung Geräte Stirnseite
2 Stück Stoppmutter M5 für Halterung Geräte Stirnseite
2 Stück Unterlegscheibe M5x15 für Halterung Geräte Stirnseite
1 Stück Schraube M5x20 für Halterung Gerätegriff
Benötigtes Werkzeug: Akkuschrauber/Bohrmaschine, Bohrer 5,5 mm, 1 Schlüssel 8/10 mm,
Kreuzschlitz-Schraubendreher
Einsatzhinweise:
• AusrichtungexaktRichtungSüden,imWinkelvon450zurHorizontalen
(Ganzjahresbetrieb);imWinterevtl.steilerstellen,imSommerflacher
• BeschattungaufdasSolarmodulvermindertdieLeistungerheblich
• RegelmäßigeReinigungdesSolarmodules
Montage Solarmodul
Abb. 15 Watt Modul: Überprüfen Sie
die gelieferte Ware auf Vollzähligkeit
anhand der Stückliste.
Abb. 25 Watt Modul: Überprüfen Sie
die gelieferte Ware auf Vollzähligkeit
anhand der Stückliste.
Setzen Sie den Halter des Solarmodules
(wie auf dem Bild abgebildet) auf das
Oberteil Ihres Weidezaungerätes.

- 3-
Markieren Sie die Bohrlöcher an der
Stirnseite der MaxiBox.
Siehe auch vorherige Abbildung
Bohren Sie die beiden Löcher
(Bohrerdurchmesser 5,5 mm).
Schieben Sie jeweils zwei Schrauben
(M6x16) oben und unten in das
Aluprofilrahmen des Solarmoduls.
Richten Sie die Schrauben mittig auf dem
Solarmodul aus. Bitte Bohrab stände auf
der Alu-Halterung beachten.
Abb. 15 Watt Modul: Schrauben Sie
nun den Halter auf dem Solarmodul
fest (Federring und Mutter M6).
Abb. 25 Watt Modul: Schrauben Sie
nun den Halter auf dem Solarmodul
fest (Federring und Mutter M6).
Danach schrauben Sie den Halter mit
dem Modul auf das Weidezaungerät.
Die Unterlegescheiben an der Stirnseite
innen nicht vergessen.
Führen Sie das Kabel durch die
Aussparung nach innen.
Stecken Sie den Kabelschuh des roten
Kabels auf den freien Steckerplatz der roten
Batterieanschlußklemme. Das schwarze Kabel
ebenfalls wie oben beschrieben an die schwar-
ze Batteriean schlußklemme anschließen.
Links: Abb. 15 Watt Modul
Rechts: Abb. 25 Watt Modul
Nun den 12 V Akku in das Gerät
stellen und anklemmen. Somit
ist Ihr Weidezaun gerät mit
Solarmodul einsatzbereit.

- 4-
Description
A condition de bien choisir leur dimension et de suivre les recommandations suivantes, les installations
solaires de PATURA sont étudiées pour assurer le bon fonctionnement de l’électrificateur sans aucune
recharge du printemps à l’automne, sans autre nécessité d’entretien. Il est même possible de prolonger le
fonctionnement de l’électrificateur jusqu’à l’hiver en diminuant la puissance de l’appareil.
Données techniques :
15 watts: type : SP 12/15/36. puissance max: 15 W • U charge : 17,3 V/l charge : 0,86 A. U circuit ouvert : 21,5 V/l court-circuit : 0,96 A.
Dimensions (Lxl) : 568 x 243 mm. Capacité minimum de la batterie ( non comprise dans l livraison) : 80 Ah ( C100)
25 watts: type : SP 12/25/36. puissance max. :25 W. • U charge : 17,3 V /l charge : 1,44 A. U circuit ouvert : 21,5 V/l court-circuit : 1,58
A.Dimensions ( Lxl) : 627 x 360 mm. Capacité minimum de la batterie ( non comprise dans la livraison) : 100 Ah (C100)
Contenu de la livraison :
1 x module solaire autorégulant 15 W ou 25 W avec câble de raccordement
1 x support pour module solaire en aluminium
4 x vis filetées M6x16 pour module solaire
4 x rondelles filetées M6 pour module solaire
4 x écrous filetés M6 module solaire
2 x vis filetées M5x16 pour le support sur le front de l’appareil
2 x écrous indesserrables filetés M5 pour le support sur le front de l’appareil
2 x rondelles M5x15 pour le support sur le front de l’appareil
1 x vis filetée M5x20 pour le support de la poignée de l’appareil
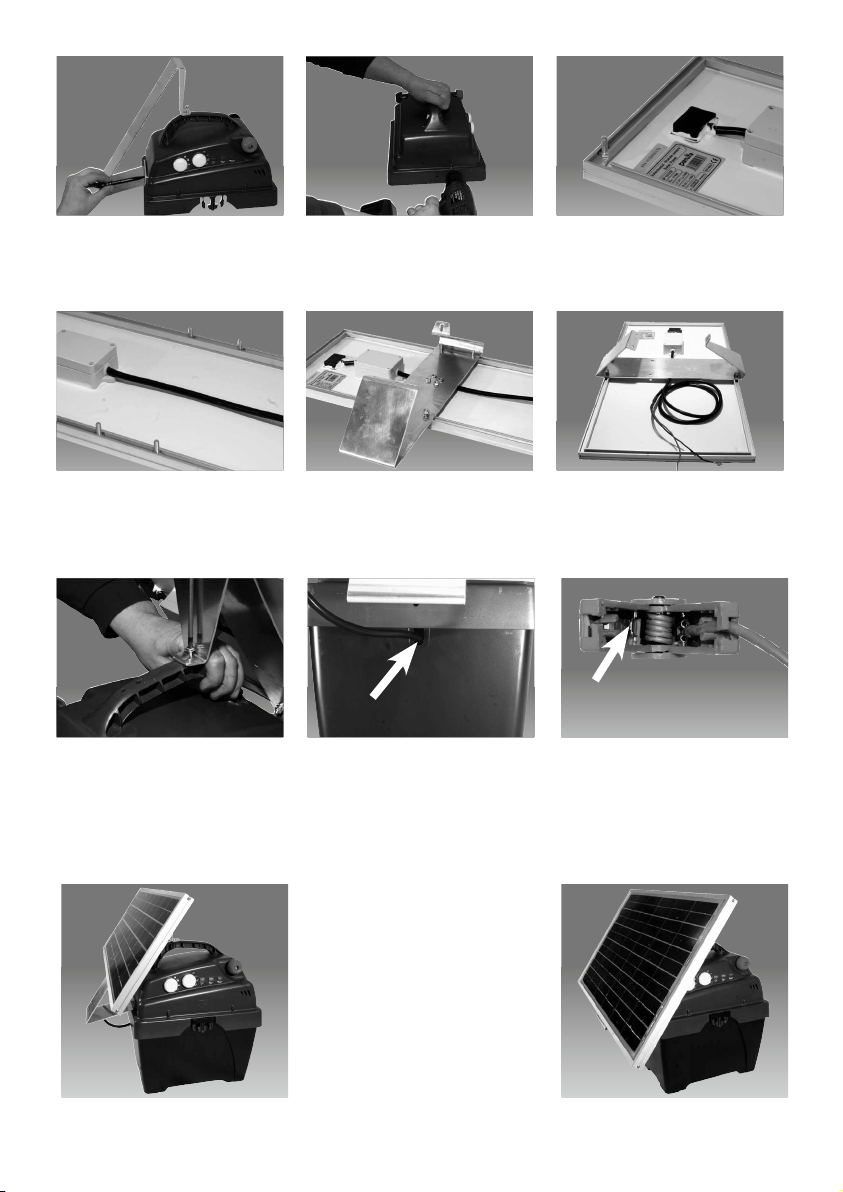
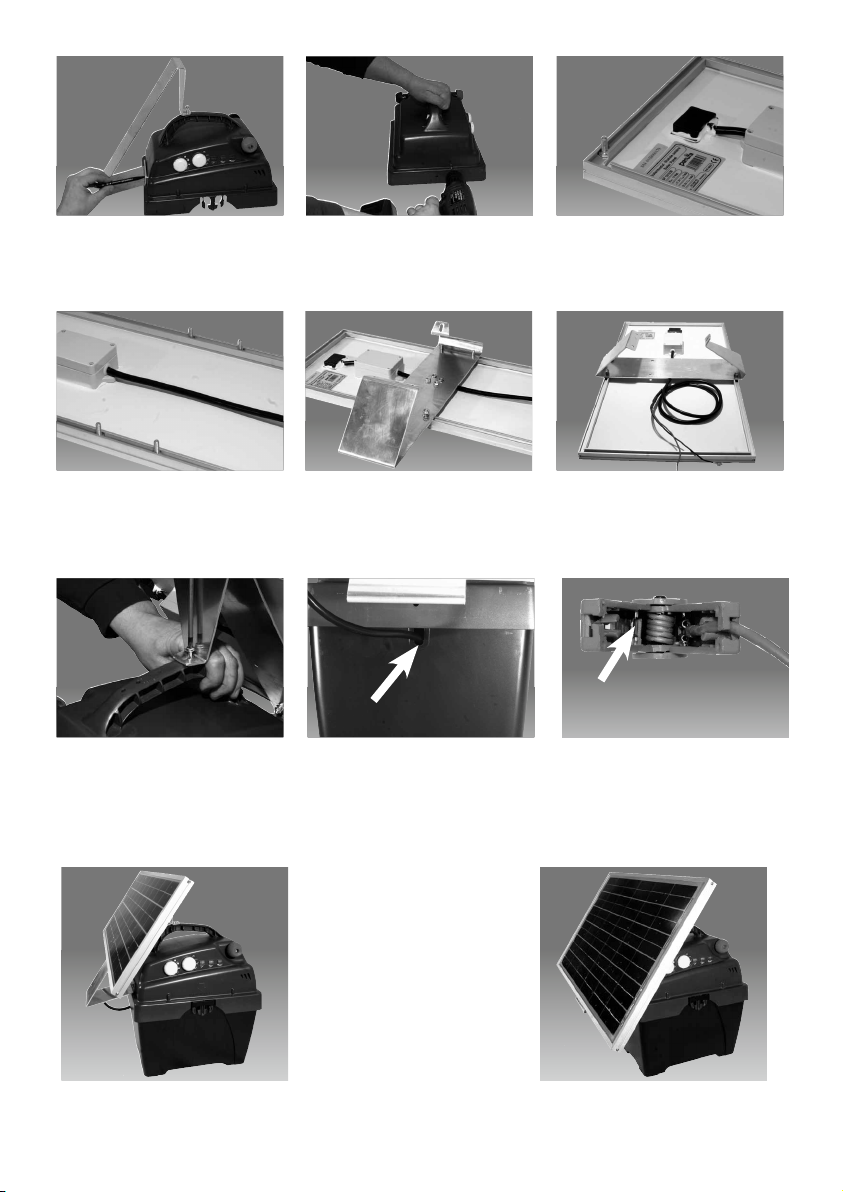
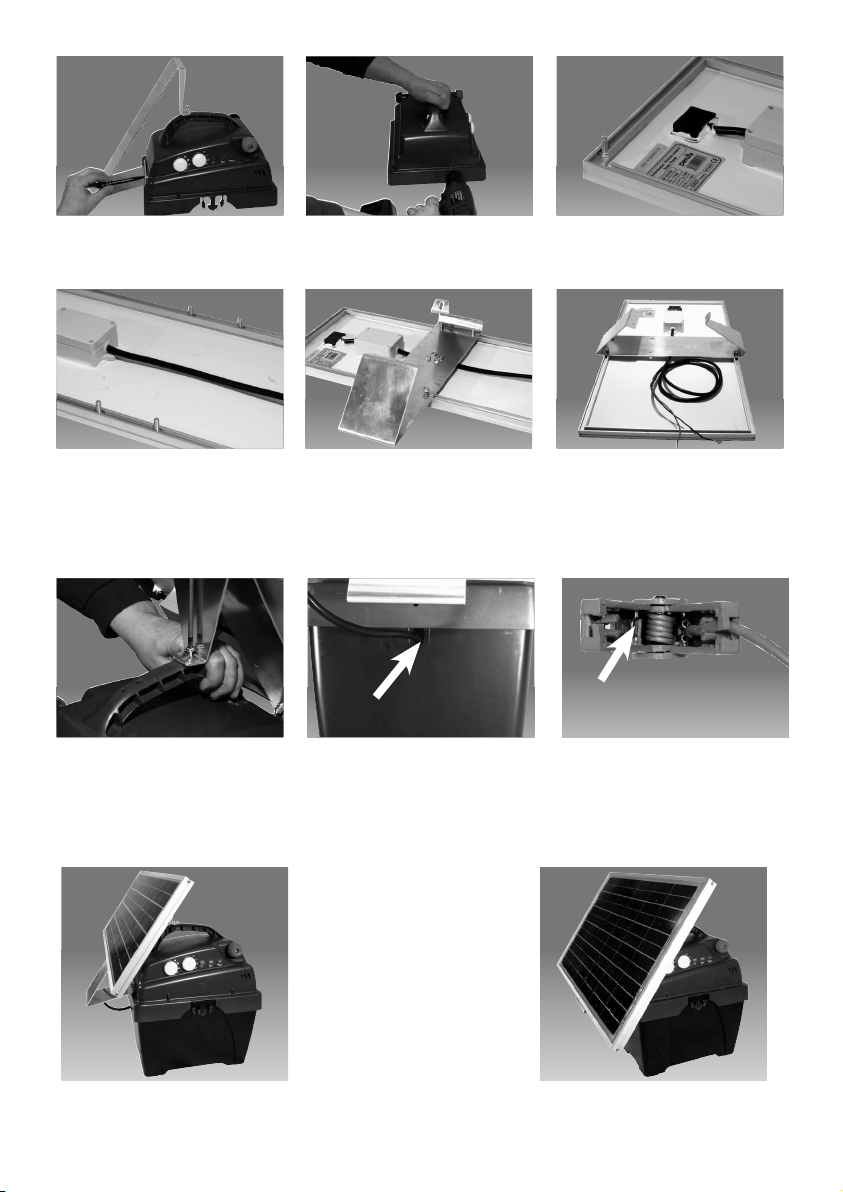
Outils nécessaires : 1 perceuse-visseuse sur accu, 1 foret 5,5 mm, 1 clé à cliquet 8+10 mm, 1 tournevis
cruciforme.
Recommandations d’utilisation :
•
Orienter le module plein sud, incliné à 45°C ; redresser éventuellement le module en hiver
et l’incliner davantage en été.
• Lemoduleperdconsidérablementdesapuissanceenprésenced’ombre.
• Nettoyerrégulièrementlemodule
Module 15 watts : vérifier si la livraison
est complète à l’aide de la liste des
pièces.
Module 25 watts : vérifier si la livraison
est complète à l’aide de la liste des
pièces.
Installer le support du module solaire
(comme illustré ci-dessus) sur la partie
supérieure de votre électrificateur.
Installation du module solaire

- 5-
Marquer l’emplacement du perçage sur
le front de votre MaxiBox. Voir aussi ill.
précédente.
Percer les deux trous. (diamètre du
foret env. 5,5 mm)
Faire glisser dans le profil en alu du
cadre du module 2 vis (M6x16) par le
haut et 2 autres (M6x16) par le bas.
Positionner les vis au centre du module
en veillant à respecter les intervalles des
trous sur le support en alu.
Module 15 watts : Visser à présent le
support sur le module solaire. (rondelle
filetée et écrou fileté M6)
Module 25 watts : Visser à présent le
support sur le module solaire. (Rondelle
filetée et écrou fileté M6).
À gauche : module 15 watts
À droite : module 25 watts
Il ne reste plus qu’à installer la
batterie 12 V dans l’électrificateur
et à fixer le câble de raccordement:
votre électrificateur avec module
solaire est prêt à fonctionner.
Visser ensuite le support et le module
sur l’électrificateur. Ne pas oublier de
placer d’abord une rondelle sur le côté
intérieur du couvercle.
Faire passer le câble à l’intérieur du
boîtier en utilisant le passe-câble prévu
à cet effet.
Enfoncer la cosse du câble rouge dans la fiche
de la borne de raccordement rouge de la
batterie. Faire de même avec le câble noir pour
le relier à la borne de raccordement noire de
la batterie.

- 6-
Description
Whencorrectlysized,PATURAsolarinstallationsaredesignedtorunanelectricfenceinstallation
, mainte-
nance free, from spring through to autumn. If the energiser is switched down to a lower power level, this
maintenance-free operation can be continued throughout the winter.
Technical data:
15 Watts: Type SP 12/15/36 • max. power output: 15 W • Utypical: 17.3 V / Itypical: 0.86 A • Uopen 21.5 V / Ishort: 0.96 A
Dimensions (lxw): 568 x 243 mm • Minimum capacity of the battery (not included): 80 Ah (C100)
25 Watts: Type SP 12/25/36 • max. power output: 25 W • Utypical: 17.3 V / Itypical: 1.44 A • Uopen 21.5 V / Ishort: 1.58 A
Dimensions (lxw): 627 x 360 mm • Minimum capacity of the battery (not included): 100 Ah (C100)
Scope of delivery
1 x Solar panel, with integrated charge regulator, 15 W or 25 W with connecting cable
1 x Solar panel mounting bracket (aluminium)
4 x Screw M6x16 for solar panel
4 x Spring washer M6 for solar panel
4xNutM6forsolarpanel
2 x Screw M5x16 for mounting bracket on front side of energiser
2 x Self-locking nut M5 for mounting bracket on front side of energiser
2 x Washer M5x15 for mounting bracket on front side of energiser
1 x Screw M5x20 for mounting to the energiser handle
Necessarytools:Portablepowerdrill,drillbit5.5mm,1flatwrenche8/10mm(wrenchsize),Phillips
screwdriver.
Application information:
•
Facing due south, at a 45° horizontal angle (year-round operation); for winter
operation increase the angle, for summer operation decrease the angle
• Avoidshadewhichreducespoweroutputsignificantly
• Thesolarpanelneedstobecleanedregularly
Installation: Solar panel
Picture of 15 W panel: check the parts
list to verify that all parts were shipped.
Picture of 25 W panel: check the parts
list to verify that all parts were shipped.
Fit the mounting bracket of the solar
panel (as shown above) on the top part
of the energiser.

- 7-
Mark the drill holes on front side of
MaxiBox (see previous picture also).
Drill the holes (diameter for drill bit:
approx. 5.5 mm).
Insert two screws each (M6x16) at
the top and bottom of the aluminium
frame of the solar panel.
Align the screws in the centre of the solar
panel. Please note the drill hole spacing
on the aluminium mount ing bracket.
Picture of 15 W panel: Screw the mount-
ing bracket to the solar panel (spring
washer and nut M6).
Picture of 25 W panel: Screw the mount-
ing bracket to the solar panel (spring
washer and nut M6).
Screw the mounting bracket with the
solar panel to the energiser. Do not
forget to place the washer on the inside
of the energiser front.
Guide the cable through the opening to
the inside.
Insert the cable socket of the red cable in the
free plug position of the red battery clip. The
black cable should be connected to the black
battery clip as
described above.
Left: picture of 15 W panel:
Right: picture of 25 W panel:
Now, put the 12 V battery in the
energiser compartment and hook
up the connecting cable. The
energiser with solar panel is ready
for use.

- 8-
PATURAKG
•Mainblick1
63925Laudenbach•Germany
+49(0)9372-94740
Fax+49(0)9372-947429
www.patura.com
☎
130422
This manual suits for next models
1
Table of contents
Languages:
Other patura Solar Panel manuals
Popular Solar Panel manuals by other brands

Energizer
Energizer HardCase Sunpack 120W user guide

BenQ
BenQ PM245P01 Series installation guide

Tsun
Tsun TSOL-ESK350 Quick installation guide

Vaillant
Vaillant auroTHERM exclusive VTK SERIES installation manual

BlueSun
BlueSun PV installation guide

NDS
NDS Dometic LSE 160 BF Installation and operating manual