Paws Aboard 5200 Operating and maintenance manual

PRODUCTS AND PERSONS COVERED
This Limited Warranty (the "Warranty") covers your Paws Aboard doggy
ladder product ("Warranted Product") purchased from a dealer
authorized by Paws Aboard. The warranty is extended to the original
owner of the Warranted Product and can be transferred to successive
owners of the product ("Owner").
TERMS OF LIMITED WARRANTY
Subject to the limitations and exclusions set forth below, Paws Aboard
warrants to the Owner that the Warranted Product, will meet the
standards identified herein for a period of ONE (1) year, providing the
Owner has adequately maintained the product according to Paws Aboard’s
recommendations.
STANDARDS
This Limited Warranty shall cover the Warranted Product to the extent
that the Warranted Product does not conform with the original
manufacturer’s specifications and commercially reasonable workmanship
standards.
REMEDIES
If a Warranted Product fails to meet the standard, then Paws Aboard, upon
receiving a bona fide warranty claim, will, subject to the limitations and
exclusions set forth below, repair the existing Warranted Product, or, if
repairing the Warranted Product does not bring the Warranted Product
to a level consistent with the manufacturer’s specifications, Paws Aboard
shall furnish a replacement Warranted Product. In no circumstances,
however, shall the retail value of the repair work or replacement work
exceed the original cost of the Warranted Product. Additional work may
be performed upon request of the Owner at the Owner’s sole expense.
This remedy is the exclusive remedy available under this warranty.
LIMITATIONS AND EXCLUSIONS
This warranty shall not be effective unless each and every piece of
Warranted Product was provided by an authorized Paws Aboard dealer.
This warranty is void is there is:
1. Improper Care after Installation. Warranted Product’s failure due
to Owner’s lack of improper care.
2. Improper Use.
(A) Human Use. Warranted Product’s failure due to use by humans.
Paws Aboard is intended for dog use only. Ladder is not intended for
human use. Injury to person and injury to the boat may occur. Carefully
remove the ladder and securely store before any human attempts to
enter or exit the boat while using the existing apparatus. Be sure to
warn any and all guests that the ladder should not be used by humans.
(B) Use by dogs in excess of ONE-HUNDRED and THIRTY
POUNDS (130 lbs.). Warranted Product’s failure due to use by dogs
weighing in excess of 130 lbs.
(C) Non-removal of Warranted Product while boat is moving
in water. Warranted Product’s failure due to failure to remove the
Warranted Product from the water while the boat is in motion.
Carefully remove the ladder and securely store the Warranted Product
before putting the boat in motion.
(D) Non-removal of Warranted Product while transporting
boat. Warranted Product’s failure due to failure to remove the
Warranted Product from the boat while transporting the boat.
Carefully remove the ladder and securely store the Warranted Product
before transporting the boat.
(E) Use of Warranted Product in heavy wake. Warranted
Product’s failure due to use in heavy wake. This may result in injury to
the dog and/or damage to the boat. Carefully remove the ladder and
securely store the Warranted Product before use in a heavy wake.
(F) Subjection of Warranted Product to extreme
temperatures. The Warranted Product should not subjected to
temperatures below ten degrees Fahrenheit or in excess of ninety-
eight degrees Fahrenheit.
3. Modifications. Warranted Product’s failure due to repairs or
alterations made by any party other than an authorized Paws Aboard
dealer after its original sale.
This warranty does not cover:
1. Direct or Indirect Damage from Natural Causes. Warranted
Product’s failure due to hurricane, tornado, hail, lightning, flood, explosion,
mudslide, earthquake, volcanic eruption, falling objects, aircrafts, vehicles,
boats, accidents, riots, civil commotion, war or acts of God.
2. Damage by objects in water. Any damage due to objects in and/or
on lakes, ponds, oceans, pools, and/or docks that come in contact with the
Warranted Product.
3. Other Acts. Any damage to the Warranted Product as a result of the
human or animal acts, regardless of intention, including, but not limited to,
use of other water craft, use of machines and equipment, use of sporting
equipment and lack of animal control.
DISCLAIMER AND LIMITATION OF LIABILITY
THIS WARRANTY IS IN LIEU OF ANY OTHER WARRANTY, ORAL OR
WRITTEN, EXPRESSED OR IMPLIED, AND, EXCEPT AS EXPRESSLY
PROVIDED HEREIN, PAWS ABOARD DISCLAIMS ALL OTHER
WARRANTIES OR REPRESENTATIONS, INCLUDING BUT NOT
LIMITED TO, ANY IMPLIED WARRANTY OR MERCHANTABILITY OR
FITNESS FOR A PARTICULAR PURPOSE. PAWS ABOARD SHALL NOT
BE LIABLE FOR ANY INCIDENTAL, CONSEQUENTIAL, PERSONAL OR
PROPERTY DAMAGES RESULTING FROM WARRANTED PRODUCT
COVERED BY THIS WARRANTY OR ITS INSTALLATION. SOME
STATES DO NOT ALLOW LIMITATIONS ON HOW LONG AN
IMPLIED WARRANTY LASTS OR THE EXCLUSION OR LIMITATION
OF INCIDENTAL OR CONSEQUENTIAL DAMAGES, SO THE ABOVE
LIMITATIONS MAY NOT APPLY TOYOU. THISWARRANTY GIVESYOU
SPECIFIC LEGAL RIGHTS, AND YOU MAY HAVE OTHER RIGHTS
WHICH VARY FROM STATE TO STATE.
CLAIM PROCEDURE
To make a claim under this warranty, the Owner must, within thirty (30)
days after discovery of alleged defect to which the claim relates, contact
Paws Aboard, Inc. And obtain return authorization. The contact
information is as follows:
Paws Aboard Inc.
9850 East 30th Street
Indianapolis, IN 46229
877-987-PAWS (7297)
1+317-895-2706
www.PawsAboard.com
Do not return product until authorization is obtained.
Paws Aboard reserves the right to have a representative inspect all
Warranted Products that are claimed to be defective under the terms of
this Warranty. Any alteration, removal, or repair of material claimed to be
defective prior to settlement of the claim shall bar any right to seek relief
under this Warranty.
ENTIRE WARRANTY
This document contains the entire warranty and may not be altered by any
wholesaler, dealer or representative. Of course, any wholesaler, dealer or
representative is free to offer its own independent warranty.
If you have trouble fitting your Doggy
Boat Ladder to your boat or have any
questions, please feel free call us:
United States:
toll-free: 1-877-987-PAWS (7297)
International Calls:
+1-317-895-2706
Product Support:
For product support, e-mail us at
CustomerService@PawsAboard.com
Sales and Marketing
Information:
For sales and marketing
information, e-mail us at
Info@PawsAboard.com
Paws Aboard Customer Service
Storage Instructions
The Doggy Boat Ladder can be stored easily in your
boat or in the trunk of your car. Follow these steps
for storage of the Doggy Boat Ladder:
1. Turn the ladder upside down
(steps facing down).
2. Remove the two Stabilizing Bracket Locking
Pins. Next, unclip the two Stabilizing Side
Brackets and place them as shown in Figure 13.
(Note: the Side Support Brackets have tabs
which ‘snap’ into holes on the back of the
ladder for storage).
3. Move the bottom Support Brace Legs
BACK into the top slot ‘storage’ position for
proper ladder storage (reference Figure 5).
4. Lay Support Arms down inside housing.
5. Place the two Velcro straps on top of the
foam flotation piece as shown in Figure 13.
6. Coil and tuck Safety Leash back inside housing.
7. Fold the Doggy Boat Ladder back in half
(all pieces should be contained within the folded
ladder now). Next, secure the two elastic
straps around their posts to secure ladder
together completely.
8. You can now carry and store the
Doggy Boat Ladder safely.
PAWS ABOARD TRANSFERABLE LIMITED WARRANTY
Ladder Storage
(inside view)
Move
2
4
3
For storage,
start with Doggy
Ladder facing
©steps© side down.
1
Remove Locking
Pins and unclip both
side Stabilizing Bracket
Connectors. Next,
snap these into place
(using tabs) as shown.
Move Support
Legs BACK to ladder
©storage© position.
5
Tuck both
Velcro straps back
inside ladder housing.
7
Once Ladder
is folded back in half
-
reattach both Elastic
Fastening Straps to
secure together. The
ladder should close
completely together
and is now ready for
storage or transport.
6
Pull Safety Leash
back into housing
through hole and
coil up rope.
Move Support Arms
(with Claws) into
©down© positions.
Care and Maintenance
of the Doggy Boat Ladder
Maintaining your Paws Aboard Doggy Boat
Ladder is easy. If it has been in saltwater, simply
rinse the ladder with freshwater. The ladder is
made of plastic and stainless steel, so corrosion
is not a problem. Make sure there is no sand or
dirt remaining in the ladder before your store it.
Figure 13
Your Doggy Ladder
folds for easy
transport & storage.
Copyright 2006 Paws Aboard. All rights reserved. Patent No. US 6,941,889 B1 Date of Patent: 9/13/05 Doggy Boat Ladder Part No. 5200
PA Manual 6pg.qxd 2/22/2006 9:55 AM Page 1
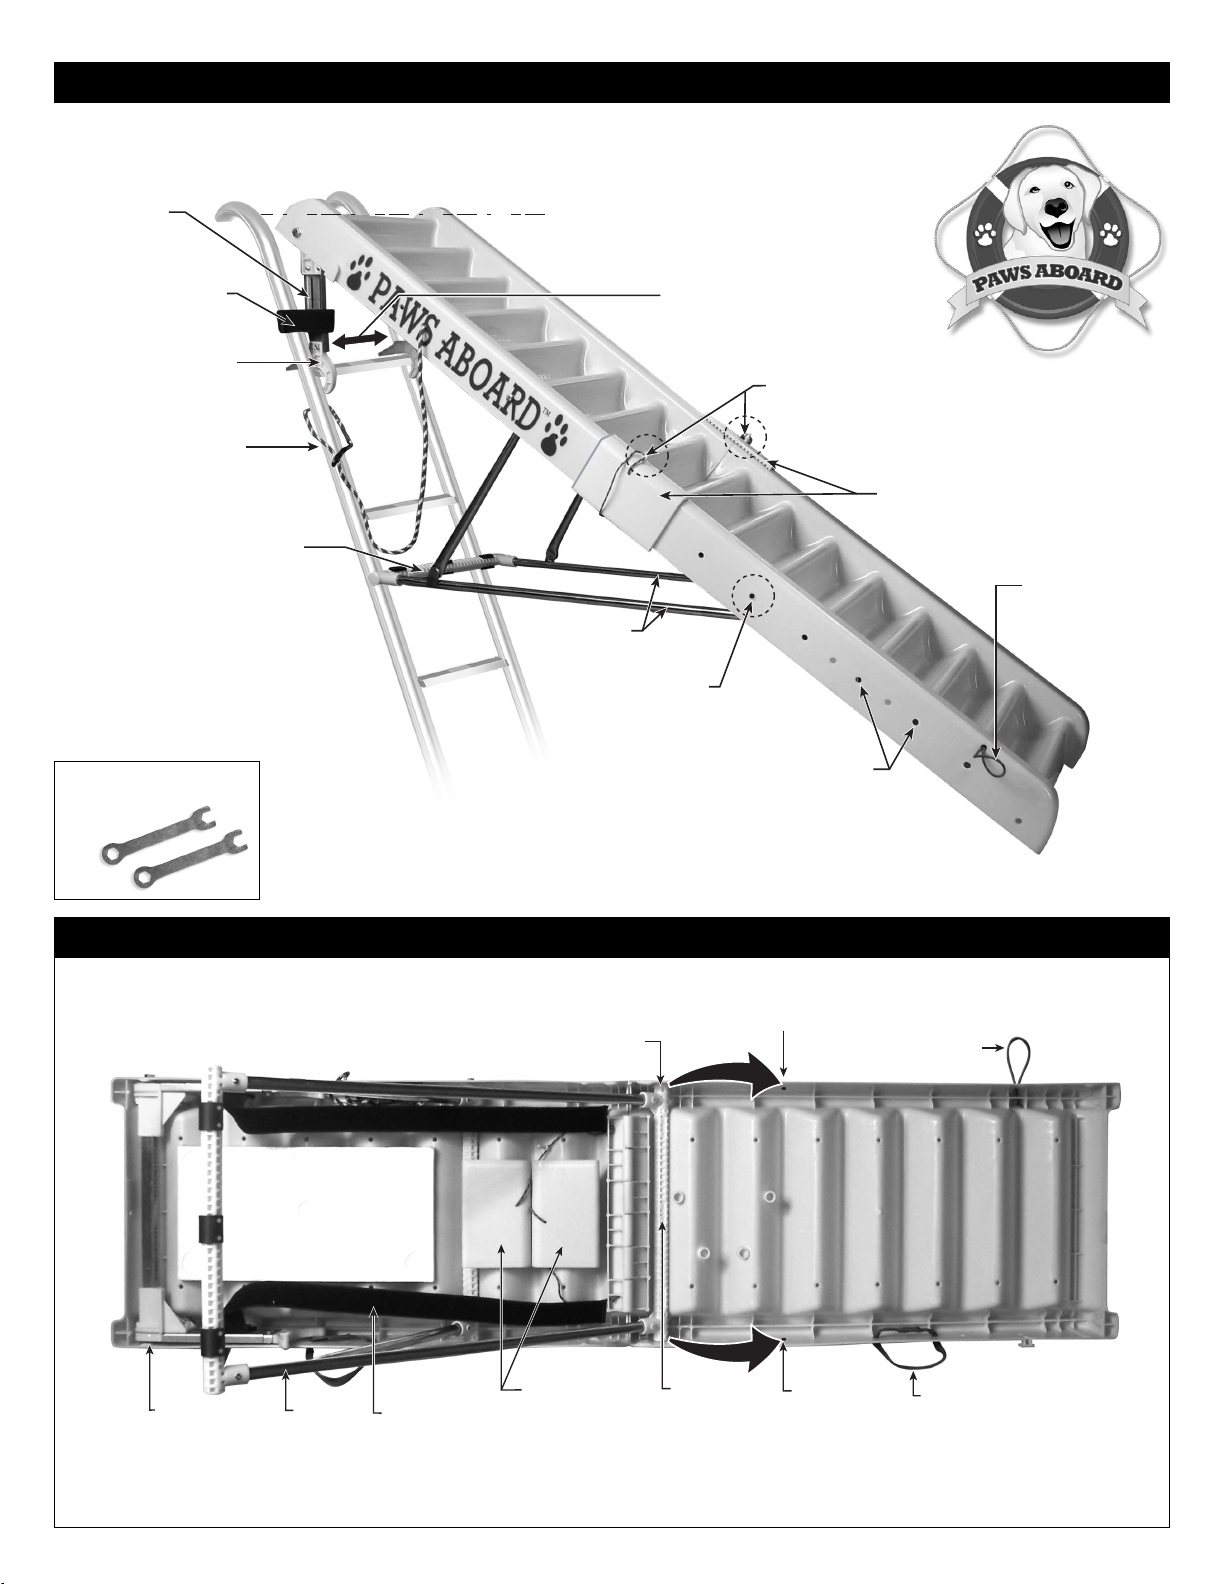
Ladder Setup Instructions
Preparing the Ladder
1. Boat Ladder Measurements. Measure the distance
between the top of the boat’s ladder and the top step of
the ladder (see Figure 3). When installed, the top of the
doggy boat ladder
should meet up to the
bottom of the swim
platform or transom
(refer to Figure 1).
Note: Your boat ladder
MUST be less than 14”
(35cm) wide for proper
Doggy Boat Ladder
attachment. If your boat
ladder is wider than
this, call us toll-free to
order an “Extension”
Support Piece.
2. Preparing the Doggy Ladder. Place the ladder with
logo upside down to open unit. Next, unlatch Elastic
Fastening Straps on both sides of the ladder (Figure 4)
and open.
3. Move the Support Legs down two holes
to the “Primary” Hole Position (Figure 5).
Note:
Depending on
your boat’s
position in the
water, you may
need to move
the support legs
to a different
adjustment hole.
This will change
the angle of the
ladder making it
easier for your
dog to board.
4. Remove the two side Stabilizing Bracket
Connectors and insert them in the appropriate
mounting holes on both
sides of the ladder to affix
the two ladder halves
together. Note: The
Stabilizing Brackets have
two tabs on the underside
of each bracket. Take care
that the tabs are positioned
on the inside of the ladder.
5. Insert the two Locking
Pins into the Stabilizing
Bracket’s TOP SIDES -
and secure pin as
shown in Figure 6.
Note: You may need to
squeeze hole some to
insert pin completely.
6. Flip up the Ladder
Support Arms of your
Doggy Boat Ladder into
the vertical ‘set’ position
(Figure 7).
7. Adjusting Support
Arms Length (optional)
You will need to adjust the
length of the Support Arms
to match the distance
measured in Step #1 for
ladder step height (refer to
Figure 3). Use the two
provided wrenches (Figure 8)
to loosen the four bolts
(w/ Velcro attached to them)
and SLIDE the Support Arms
to match the distance from
Step #1. Do the same to
BOTH Support Arms and
fasten bolts securely when
satisfied with this height.
8. If your Support Arms
are too long for
your boat ladder
configuration, simply
remove the top plastic
claw and sliding arm
section. Next, reattach
ONLY the Claw portion
onto the lower stationary
arm brace. This will allow
for a shorter arm (Figure 9).
9. CONGRATULATIONS! Your Doggy Boat Ladder
is now ready to be attached
to your boat. When installed properly, the TOP of the
Doggy Boat Ladder should ALIGN flush with the swim
platform or transom (see Figure 10).
Attaching the Doggy Boat Ladder
to Your Boat
1. Make certain that the Support Arms and the Support
Legs are in their upright position (Figure 10). Verify both
Stabilizing Brackets and Locking Pins are also in place
(see Figure 6).
2. With the ladder fully extended, set the Support Arm
Claws on the TOP STEP of the boat ladder. Holding
the ladder with one hand, use your other hand to wrap
the Velcro straps around both the boat ladder side rails
and the Support Arms of the Doggy Boat Ladder. Be
sure that the doggy ladder sits snugly against the boat.
Note: The Support Arms adjust and slide inwards for
creating a secure fit to your boat ladder.
Note: If the Doggy Boat Ladder does not seem secure
against the boat’s ladder, you may need to adjust the
Doggy Boat Ladder’s Velcro straps at this point.
Note: The TOP of the Doggy Boat Ladder should be
FLUSH with the swim platform or transom for your
dogs to enter and exit the boat correctly.
3. Attach the Doggy Boat Ladder Safety Leash to the
boat to reduce the risk of losing the ladder (Figure 10).
Note: If you find the angle of the Doggy Boat Ladder
‘angle’ needs adjusted, move the bottom Support Legs
to a different hole.The ideal angle of the ladder
positions the steps as level (Figure 11).
Temporarily Detaching the
Doggy Boat Ladder
If humans want to use
the boat’s ladder, the
Doggy Boat Ladder can
be easily detached by
simply following these
steps. Note: The
Doggy Boat Ladder is
NOT intended for
human use.
1. Release the two Velcro straps, pull the ladder “up”
slightly and let the ladder float off to the side while you
use the boat’s ladder.The Safety Leash will keep the
ladder attached to the boat (Figure 12).
To Reattach the Boat Ladder:
1. Pull the Doggy
Boat Ladder’s
Leash to retrieve
the ladder.
2. Lift the ladder up
and set the Ladder
Claws on the top
step of the boat
ladder - and then
reattach the two
Velcro Straps to
your boat’s ladder
as described
earlier.
Note:The Doggy Boat Ladder should
ALWAYS be removed BEFORE moving
your motor boat through the water.
Fits 14" (35cm)
maximum
standard
ladder width.
Measure
Top Step
Height
Typical Boat Ladder
Unlatch Both
Elastic Fastening Straps
Place Ladder with logo positioned
upside down to open ladder.
Move
Angle
Adjustment
Holes
Support
Legs
Support Leg
©Storage© Hole
Position
Support Leg
©Primary© Hole
Position
Figure 3
Figure 4
Note: You may need to squeeze
plastic rail together slightly to
secure pins completely.
Secure Both Locking Pins
into Holes on Brackets
Support
Arms
Swing
Upright
Vel cro
Claw
Use Both
Wrenches to
Loosen Nuts
and Adjust
Arm Length
Slides
Up
Angle
Adjustment
Holes
Move Support Legs
(if needed) to Adjust
Ladder Angle
Support
Leg Primary
Hole Position
(3rd Hole)
Top of Ladder should
be flush with the swim
platform or transom.
Safety
Leash
Locking
Pins
Support
Legs
Angle
Adjustment
Holes
Boat
Ladder
Top of Ladder should be flush with
the swim platform or transom.
Stabilizing Bracket
Connectors
Elastic
Fastening
Straps
Ladder
Support
Arms
Velcro Straps
Claws
(top step)
Support
Brace
(extension
widths available)
Support
Leg Primary
Hole Position
Ladder Support Arms
slide inwards to create
a tight fit with your ladder.
DOGGY BOAT LADDER (Setup & Attached View)
-
Model 5200
Includes Wrenches
for Adjusting Ladder
Support Arms.
Ta b sTa b s
Safety Leash
Attached
to Ladder
Boat Ladder
Top of Ladder should be flush with
the swim platform or transom.
Ladder
Support
Arms Rest
on Top Step Ladder Support Arms
slide inwards to create
a tight fit with your ladder.
Velcro Straps
Fastened
Around Ladder
Support Brace
(Rests on Ladder)
Steps should
appear
horizontal.
Elastic Fastening
Straps
Carrying
Handle
(opened inside view)
Support
Leg Storage
Position
Both Ends of Support
Brace Disengage
Support
Leg Primary
Hole Position
(3rd Hole)
Stabilizing
Bracket
Connectors
(snap into holes
for storage)
Foam Square
for Floatation
of Ladder
Support Arms
(with Claws)
Fold Inside
Velcro Straps
Rest Inside
Ladder
Legs
Support Brace
MOVES to 3rd Hole
for Set-up.
OPENED LADDER (Inside Storage View)
-
Model 5200
Connectors
Swing and
Fasten Into
Position
Locking
Pin
Properly
Installed
Figure 1
Figure 2
Figure 5
Fastened
Position
Figure 6
Figure 7
Figure 8
Figure 9
Figure 10
Figure 11
Figure 12
Shortening
Support
Arms
Safety
Leash
Reattaching
Ladder
PA Manual 6pg.qxd 2/22/2006 9:56 AM Page 2

PRODUCTS AND PERSONS COVERED
This Limited Warranty (the "Warranty") covers your Paws Aboard doggy
ladder product ("Warranted Product") purchased from a dealer
authorized by Paws Aboard. The warranty is extended to the original
owner of the Warranted Product and can be transferred to successive
owners of the product ("Owner").
TERMS OF LIMITED WARRANTY
Subject to the limitations and exclusions set forth below, Paws Aboard
warrants to the Owner that the Warranted Product, will meet the
standards identified herein for a period of ONE (1) year, providing the
Owner has adequately maintained the product according to Paws Aboard’s
recommendations.
STANDARDS
This Limited Warranty shall cover the Warranted Product to the extent
that the Warranted Product does not conform with the original
manufacturer’s specifications and commercially reasonable workmanship
standards.
REMEDIES
If a Warranted Product fails to meet the standard, then Paws Aboard, upon
receiving a bona fide warranty claim, will, subject to the limitations and
exclusions set forth below, repair the existing Warranted Product, or, if
repairing the Warranted Product does not bring the Warranted Product
to a level consistent with the manufacturer’s specifications, Paws Aboard
shall furnish a replacement Warranted Product. In no circumstances,
however, shall the retail value of the repair work or replacement work
exceed the original cost of the Warranted Product. Additional work may
be performed upon request of the Owner at the Owner’s sole expense.
This remedy is the exclusive remedy available under this warranty.
LIMITATIONS AND EXCLUSIONS
This warranty shall not be effective unless each and every piece of
Warranted Product was provided by an authorized Paws Aboard dealer.
This warranty is void is there is:
1. Improper Care after Installation. Warranted Product’s failure due
to Owner’s lack of improper care.
2. Improper Use.
(A) Human Use. Warranted Product’s failure due to use by humans.
Paws Aboard is intended for dog use only. Ladder is not intended for
human use. Injury to person and injury to the boat may occur. Carefully
remove the ladder and securely store before any human attempts to
enter or exit the boat while using the existing apparatus. Be sure to
warn any and all guests that the ladder should not be used by humans.
(B) Use by dogs in excess of ONE-HUNDRED and THIRTY
POUNDS (130 lbs.). Warranted Product’s failure due to use by dogs
weighing in excess of 130 lbs.
(C) Non-removal of Warranted Product while boat is moving
in water. Warranted Product’s failure due to failure to remove the
Warranted Product from the water while the boat is in motion.
Carefully remove the ladder and securely store the Warranted Product
before putting the boat in motion.
(D) Non-removal of Warranted Product while transporting
boat. Warranted Product’s failure due to failure to remove the
Warranted Product from the boat while transporting the boat.
Carefully remove the ladder and securely store the Warranted Product
before transporting the boat.
(E) Use of Warranted Product in heavy wake. Warranted
Product’s failure due to use in heavy wake. This may result in injury to
the dog and/or damage to the boat. Carefully remove the ladder and
securely store the Warranted Product before use in a heavy wake.
(F) Subjection of Warranted Product to extreme
temperatures. The Warranted Product should not subjected to
temperatures below ten degrees Fahrenheit or in excess of ninety-
eight degrees Fahrenheit.
3. Modifications. Warranted Product’s failure due to repairs or
alterations made by any party other than an authorized Paws Aboard
dealer after its original sale.
This warranty does not cover:
1. Direct or Indirect Damage from Natural Causes. Warranted
Product’s failure due to hurricane, tornado, hail, lightning, flood, explosion,
mudslide, earthquake, volcanic eruption, falling objects, aircrafts, vehicles,
boats, accidents, riots, civil commotion, war or acts of God.
2. Damage by objects in water. Any damage due to objects in and/or
on lakes, ponds, oceans, pools, and/or docks that come in contact with the
Warranted Product.
3. Other Acts. Any damage to the Warranted Product as a result of the
human or animal acts, regardless of intention, including, but not limited to,
use of other water craft, use of machines and equipment, use of sporting
equipment and lack of animal control.
DISCLAIMER AND LIMITATION OF LIABILITY
THIS WARRANTY IS IN LIEU OF ANY OTHER WARRANTY, ORAL OR
WRITTEN, EXPRESSED OR IMPLIED, AND, EXCEPT AS EXPRESSLY
PROVIDED HEREIN, PAWS ABOARD DISCLAIMS ALL OTHER
WARRANTIES OR REPRESENTATIONS, INCLUDING BUT NOT
LIMITED TO, ANY IMPLIED WARRANTY OR MERCHANTABILITY OR
FITNESS FOR A PARTICULAR PURPOSE. PAWS ABOARD SHALL NOT
BE LIABLE FOR ANY INCIDENTAL, CONSEQUENTIAL, PERSONAL OR
PROPERTY DAMAGES RESULTING FROM WARRANTED PRODUCT
COVERED BY THIS WARRANTY OR ITS INSTALLATION. SOME
STATES DO NOT ALLOW LIMITATIONS ON HOW LONG AN
IMPLIED WARRANTY LASTS OR THE EXCLUSION OR LIMITATION
OF INCIDENTAL OR CONSEQUENTIAL DAMAGES, SO THE ABOVE
LIMITATIONS MAY NOT APPLY TOYOU. THISWARRANTY GIVESYOU
SPECIFIC LEGAL RIGHTS, AND YOU MAY HAVE OTHER RIGHTS
WHICH VARY FROM STATE TO STATE.
CLAIM PROCEDURE
To make a claim under this warranty, the Owner must, within thirty (30)
days after discovery of alleged defect to which the claim relates, contact
Paws Aboard, Inc. And obtain return authorization. The contact
information is as follows:
Paws Aboard Inc.
9850 East 30th Street
Indianapolis, IN 46229
877-987-PAWS (7297)
1+317-895-2706
www.PawsAboard.com
Do not return product until authorization is obtained.
Paws Aboard reserves the right to have a representative inspect all
Warranted Products that are claimed to be defective under the terms of
this Warranty. Any alteration, removal, or repair of material claimed to be
defective prior to settlement of the claim shall bar any right to seek relief
under this Warranty.
ENTIRE WARRANTY
This document contains the entire warranty and may not be altered by any
wholesaler, dealer or representative. Of course, any wholesaler, dealer or
representative is free to offer its own independent warranty.
If you have trouble fitting your Doggy
Boat Ladder to your boat or have any
questions, please feel free call us:
United States:
toll-free: 1-877-987-PAWS (7297)
International Calls:
+1-317-895-2706
Product Support:
For product support, e-mail us at
CustomerService@PawsAboard.com
Sales and Marketing
Information:
For sales and marketing
information, e-mail us at
Info@PawsAboard.com
Paws Aboard Customer Service
Storage Instructions
The Doggy Boat Ladder can be stored easily in your
boat or in the trunk of your car. Follow these steps
for storage of the Doggy Boat Ladder:
1. Turn the ladder upside down
(steps facing down).
2. Remove the two Stabilizing Bracket Locking
Pins. Next, unclip the two Stabilizing Side
Brackets and place them as shown in Figure 13.
(Note: the Side Support Brackets have tabs
which ‘snap’ into holes on the back of the
ladder for storage).
3. Move the bottom Support Brace Legs
BACK into the top slot ‘storage’ position for
proper ladder storage (reference Figure 5).
4. Lay Support Arms down inside housing.
5. Place the two Velcro straps on top of the
foam flotation piece as shown in Figure 13.
6. Coil and tuck Safety Leash back inside housing.
7. Fold the Doggy Boat Ladder back in half
(all pieces should be contained within the folded
ladder now). Next, secure the two elastic
straps around their posts to secure ladder
together completely.
8. You can now carry and store the
Doggy Boat Ladder safely.
PAWS ABOARD TRANSFERABLE LIMITED WARRANTY
Ladder Storage
(inside view)
Move
2
4
3
For storage,
start with Doggy
Ladder facing
©steps© side down.
1
Remove Locking
Pins and unclip both
side Stabilizing Bracket
Connectors. Next,
snap these into place
(using tabs) as shown.
Move Support
Legs BACK to ladder
©storage© position.
5
Tuck both
Velcro straps back
inside ladder housing.
7
Once Ladder
is folded back in half
-
reattach both Elastic
Fastening Straps to
secure together. The
ladder should close
completely together
and is now ready for
storage or transport.
6
Pull Safety Leash
back into housing
through hole and
coil up rope.
Move Support Arms
(with Claws) into
©down© positions.
Care and Maintenance
of the Doggy Boat Ladder
Maintaining your Paws Aboard Doggy Boat
Ladder is easy. If it has been in saltwater, simply
rinse the ladder with freshwater. The ladder is
made of plastic and stainless steel, so corrosion
is not a problem. Make sure there is no sand or
dirt remaining in the ladder before your store it.
Figure 13
Your Doggy Ladder
folds for easy
transport & storage.
Copyright 2006 Paws Aboard. All rights reserved. Patent No. US 6,941,889 B1 Date of Patent: 9/13/05 Doggy Boat Ladder Part No. 5200
PA Manual 6pg.qxd 2/22/2006 9:55 AM Page 1
Table of contents
Popular Pet Care Product manuals by other brands

Pettec
Pettec ANTIBELL SPRAY-TRAINER PRO operating manual

Ferplast
Ferplast cayman 40 plus user manual

Munters
Munters MWI Series Quick assembly guide

Company of Animals
Company of Animals CLIX Training guide

Garmin
Garmin TT 25 owner's manual

Petsafe
Petsafe Drinkwell Mini Pet Fountain - 1.2 Litres operating guide


