EHEIM Proxima 250 User manual

DBedienungsanleitung
GB USA Operating Instructions
FMode d’emploi
NL Gebruiksaanwijzing
SBruksanvisning
NBruksanvisning
FIN Käyttöohje
DK Betjeningsvejledning
IIstruzioni per l’uso
EInstrucciones de uso
250 350 600
(Typ 2071) (Typ 2073) (Typ 2075)
PManual de instruções
GR Οδηγίες χρήσης
CZ Návod k obsluze
HKezelési utasítás
PL Instrukcja obsługi
SK Navodila za uporabo
SLO Návod na obsluhu
RO Manual de folosin,
t˘a
RUS
Руководство по эксплуатации
CHIN
350
(Typ 2074)

EHEIM
EHEIM
EHEIM

professionel 3e - 350
Typ 2074
➟
➟
➟
➟
➟

31
1
2
3
4
5
6
7
8
9
10
11
12
13
14
15
16
17
18
19
20
21
22
2324
25
26
27
28
29
30

1.
5.
5.
6.
7.
8.
2.
3.
4.
10.
11.
12.
13.
14.
15.
16.
3. (1. – 22.)

6.1(1. – 12.)
17.
18.
19.
20.
8.
9.
10.
11.
12.
1-2x
21.
22.
1.
1.
2.
2.
3.
4.
5.
6.
7.
6.2(1. – 16.)
1.
2.
3.
4.
5.
6.
prof. 3e

8.
9.
10.
7.
11.
13.
14.
6.3(1. – 11.)
9.
10.
11.
1.
2.
3.
4.
5.
6.
8.12.
15.
16.
7.
prof. 3e

2071 2073/2074 2075
1
11
1
22
333
12345
5 5
44

Deutsch
Die EHEIM professionel 3 und professionel 3eAußenfilter bieten mit ihrer neu entwickelten, integrierten Ansaughilfe
und dem funktionsgerechten Sicherheitsadapter optimalen Komfort und höchste Sicherheit. Dabei sorgt das große
Behältervolumen und der große Vorfilter in Verbindung mit dem abgestimmten Filtermassenaufbau für optimale
Wasserklärung und effizienten Schadstoffabbau.
Nur in geschlossenen Räumen für aquaristische Einsatzbereiche verwenden.
Bevor man mit der Hand ins Aquarienwasser eintaucht, alle im Wasser befindlichen Elektrogeräte vom Netz trennen.
Vor dem Öffnen des Filters, diesen generell vom Stromnetz trennen.
Die Anschlussleitung des Gerätes kann nicht ersetzt werden. Bei Beschädigung des Kabels darf das Gerät nicht mehr
benützt werden. Wenden Sie sich an Ihren Fachhändler oder an Ihre EHEIM Service-Stelle.
Dieses Gerät ist nicht dafür bestimmt, durch Personen (einschließlich Kinder) mit eingeschränkten physischen, senso-
rischen oder geistigen Fähigkeiten oder mangels Erfahrung und/oder mangels Wissen benutzt zu werden, es sei denn,
sie werden durch eine für Sicherheit zuständige Person beaufsichtigt oder erhielten von ihr Anweisungen, wie das Gerät
zu benutzen ist. Kinder sollten beaufsichtigt werden, um sicherzustellen, dass sie nicht mit dem Gerät spielen.
Bei diesen Geräten können Magnetfelder elektronische oder mechanische Störungen oder Beschädigungen
hervorrufen. Dies gilt auch für Herzschrittmacher.
Die erforderlichen Sicherheitsabstände sind den Handbüchern dieser medizinischen Geräte zu entnehmen.
Achtung: Bei Wartungsarbeiten besteht Quetschgefahr für die Finger durch hohe Magnetkräfte.
Zu Ihrer eigenen Sicherheit empfiehlt es sich, mit dem Netzkabel eine Tropfschlaufe zu bilden, die
verhindert, dass evtl. am Kabel entlang laufendes Wasser in die Steckdose gelangt. Bei Verwen-
dung einer Verteiler-Steckdose muss die Platzierung oberhalb des Filter-Netzanschlusses erfolgen.
Da eine Vielfalt von Lacken und Polituren bei der Holzverarbeitung verwendet werden, können die
Gerätefüße, hervorgerufen durch eine chemische Reaktion, sichtbare Rückstände auf Möbeln oder
Parkettböden hinterlassen. Das Gerät sollte deshalb nicht ohne Schutz auf Holzoberflächen gestellt
werden.
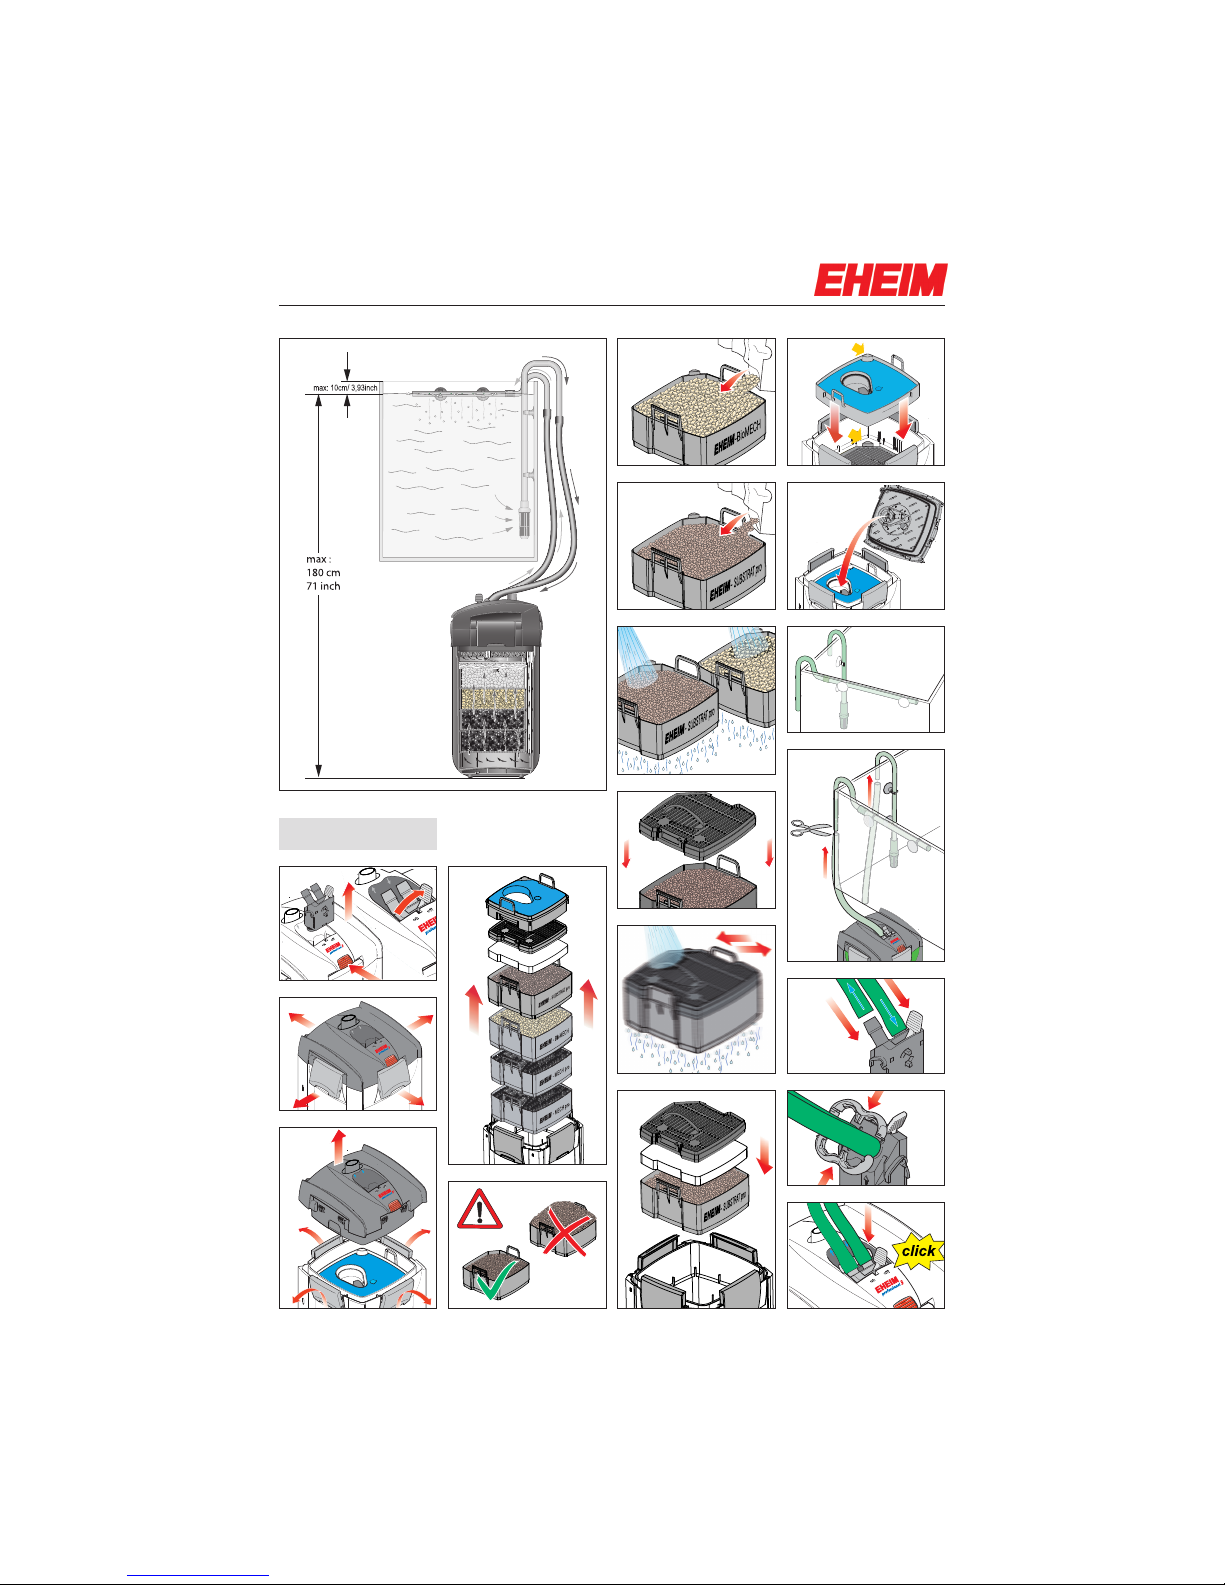
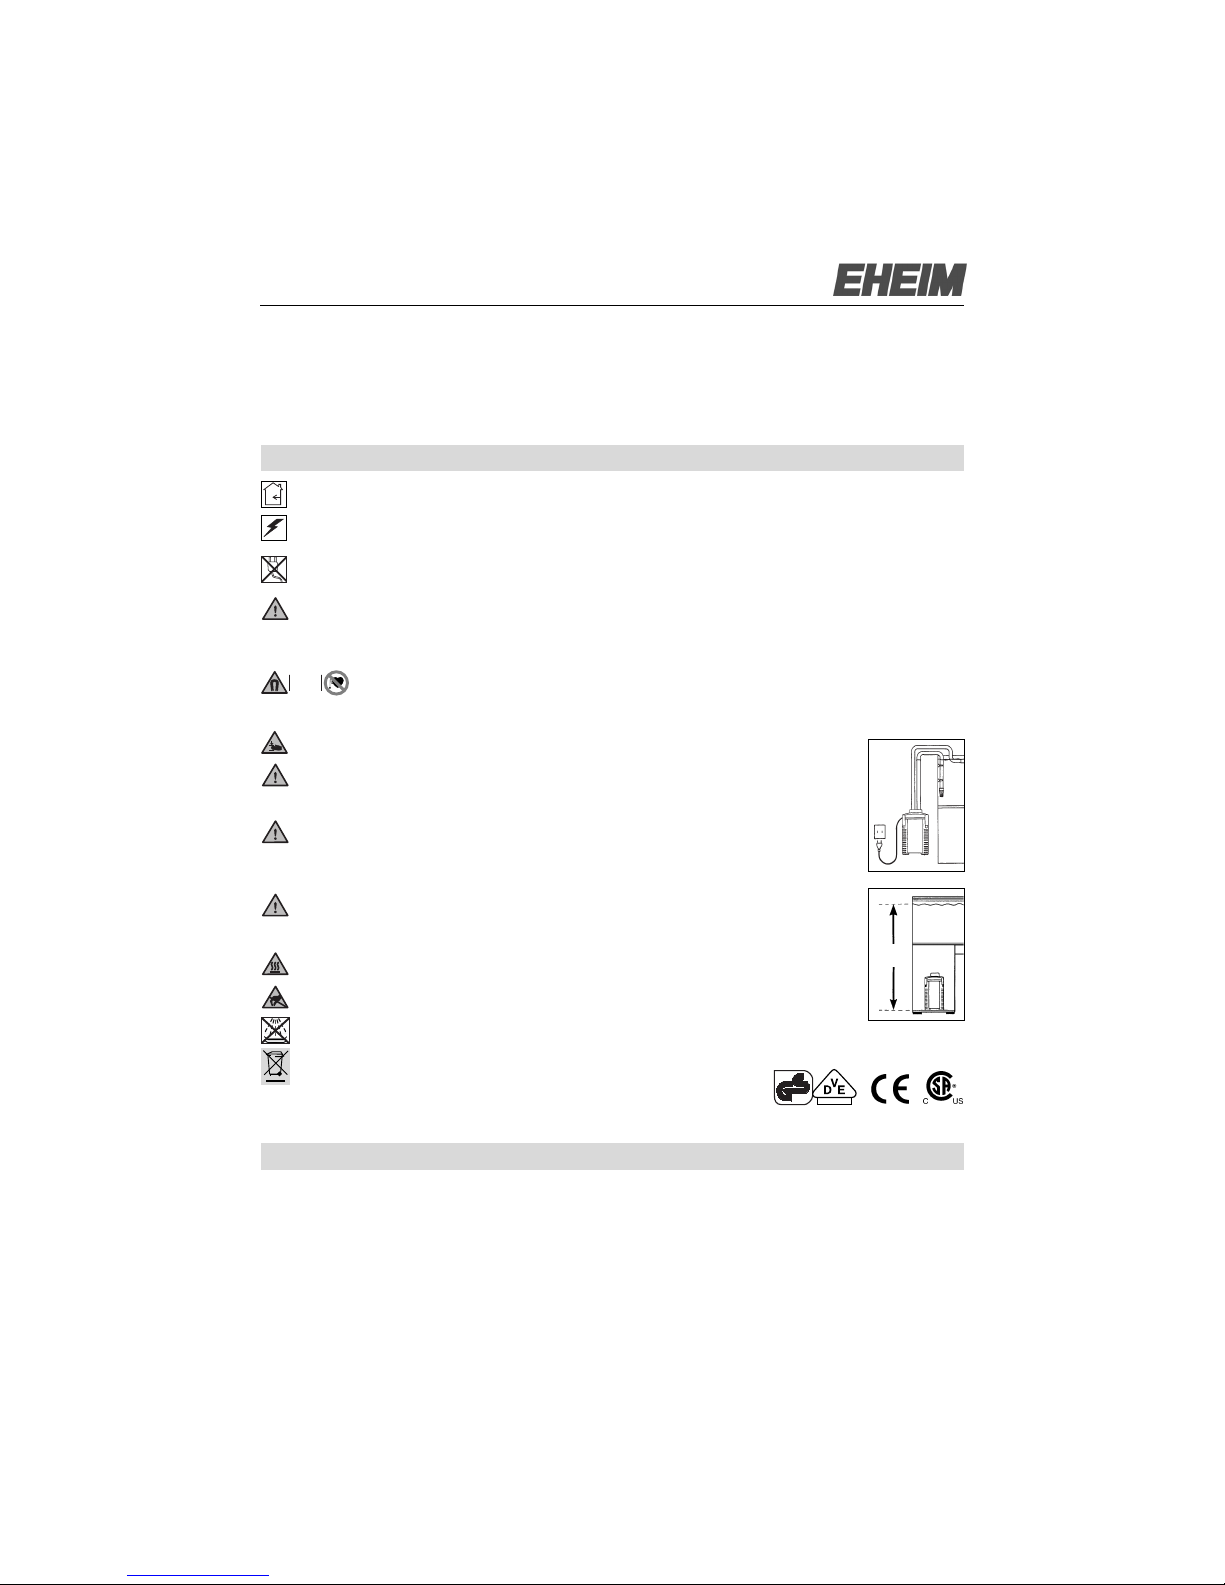
Bei der Wahl des Gerätestandortes auf die Aufstellhöhe achten. Um eine optimale Funktionssicher-
heit zu erzielen, dürfen zwischen Wasseroberfläche und Filterboden max. 180 cm liegen.
Achtung: Filter grundsätzlich nur aufrecht stehend betreiben.
Verbrennungsgefahr: Bei Geräten mit Heizung Vorsicht beim Berühren der Heizspirale.
Vorsichtsmaßnahmen bei Handhabung elektrostatisch entladungsgefährdeter Bauelemente be-
achten.
Gerät – oder Teile davon – nicht in der Spülmaschine reinigen. Nicht spülmaschinenbeständig!
Dieses Produkt nicht mit dem normalen Hausmüll entsorgen. Führen Sie es Ihrer örtlichen Entsorgungsstelle zu.
Das Produkt ist nach den jeweiligen nationalen Vorschriften und Richtlinien
approbiert und entspricht den EU-Normen.
1. Sicherheitshinweise
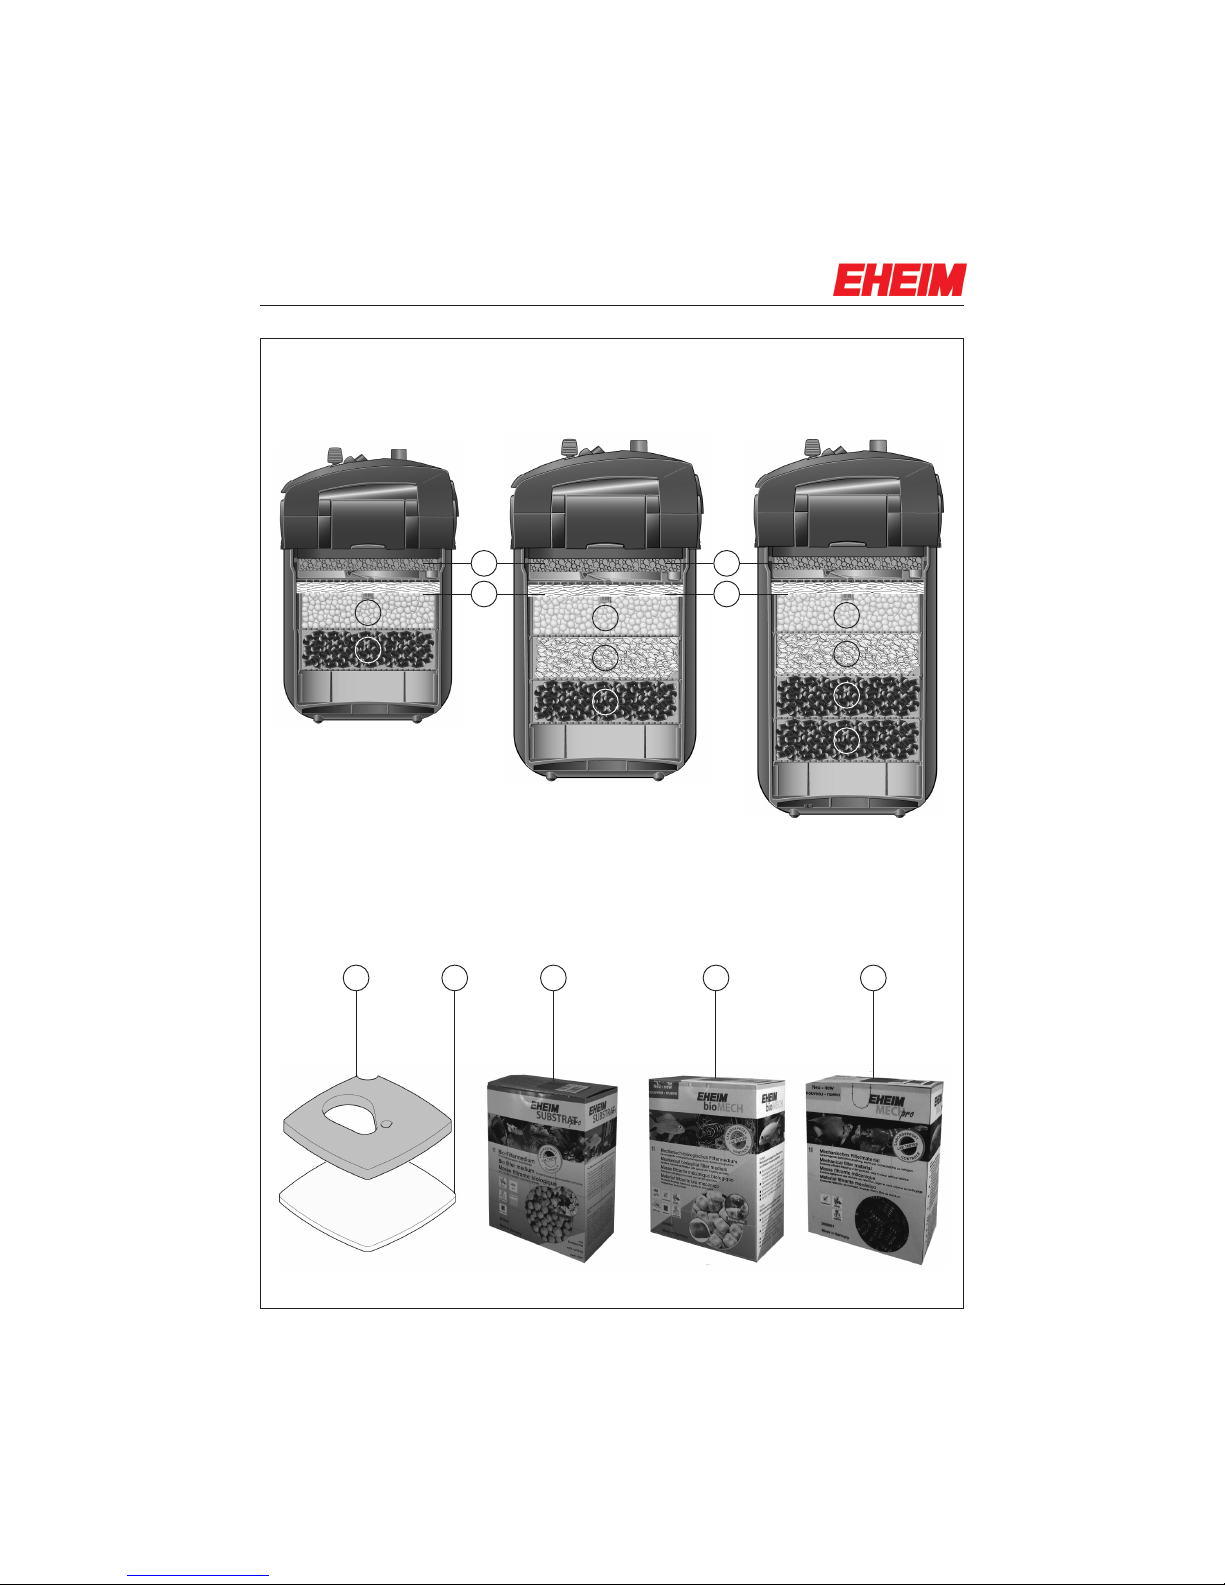
2. Bauteileübersicht (siehe II)
20 cm
geprüfte
Sicherheit
max.
180 cm
1. Filtermatte blau 2. Vorfilterdichtung 3. Vorfilter 4. Vorfilterklappe 5. Abdeckgitter 6. Filtervlies weiß
7. Filtereinsätze 8. Gummipuffer 9. Verschlussclips 10. Filterbehälter 11. Schlauchsicherung 12. Absperr-
hebel 13. Sicherheitsadapter 14. Klammer 15. Schwimmkörper 16. Ansaughilfe 17. Pumpenkopf 18. Adap-
terriegel 19. Bedienfeld (nur bei professionel 3e - 350 Typ 2074) 20. Profildichtung 21. Pumpenrad 22. Pum-
pendeckel 23. Schläuche 24. Auslaufbogen 25. Düsenrohr 26. Ansaugrohr 27. Sauger mit Klemmbügel
28. Netzteil (nur bei professionel 3e- 350 Typ 2074) 29. Ansaugkorb 30. Netzkabel 31. Anschlussbuchse für
EHEIM Interface (optional)
1

Hinweis: Für elektronische Bedienung (professionel 3e) „Bedienungsanleitung Elektronik“ verwenden.
1. Absperrhebel (12) auf „OFF“ stellen und Adapterriegel (18) drücken, bis sich der Sicherheitsadapter (13) löst.
2. Verschlussclips (9) durch Ziehen an der Clipunterkante öffnen. 3. Pumpenkopf (17) abnehmen. 4. Alle Ein-
sätze herausnehmen. Achtung: Filtereinsätze nicht überfüllen, da sie sonst nicht mehr passgenau sitzen. 5. Fil-
tereinsätze mit EHEIM Filtermaterialien befüllen. 6. Befüllte Filtereinsätze mit Wasser ausspülen.
Hinweis: Einfachere Reinigung mit EASY CLEAN Funktion.
7. Befüllten Filtereinsatz mit Abdeckgitter (5) verschließen. 8. Filtereinsatz unter fließendem Wasser schütteln.
Mit allen Filtereinsätzen wiederholen. Achtung: Weißes Filtervlies in den obersten Filtereinsatz einlegen und mit
Abdeckgitter verschließen. 9. Filtereinsätze in folgender Reihenfolge wieder in den Filterbehälter einsetzen (10):
Bei professionel 3 - 250 (Typ 2071): 1. Filtereinsatz mit EHEIM MECHpro. 2. Filtereinsatz mit EHEIM SUBSTRAT
pro, weißes Vlies und Abdeckgitter.
Bei professionel 3 - 350 (Typ 2073) und professionel 3e- 350 (Typ 2074): 1. Filtereinsatz mit EHEIM MECHpro.
2. Filtereinsatz mit EHEIM bioMECH. 3. Filtereinsatz mit EHEIM SUBSTRATpro, weißes Vlies und Abdeckgitter.
Bei professionel 3 - 600 (Typ 2075): 1. Filtereinsatz mit EHEIM MECHpro. 2. Filtereinsatz mit EHEIM MECHpro.
3. Filtereinsatz mit EHEIM bioMECH. 4. Filtereinsatz mit EHEIM SUBSTRATpro, weißes Vlies und Abdeckgitter.
10. Vorfilter (3) mit blauer Filtermatte (1) einsetzen (auf Stutzen aufsetzen ➞Pfeile). 11. Pumpenkopf (17) auf-
setzen (Einbaulage beachten) und Verschlussclips (9) schließen.
Hinweis: Nur EHEIM Originalschläuche verwenden.
12. Vormontiertes Schlauchzubehör am Aquarium befestigen. 13. Schläuche (23) gemäß dem Abstand zwi-
schen Filter und Aquarium zuschneiden und auf Zubehör aufstecken. 14. Schläuche (23) auf Sicherheitsadapter
(13) bis zum Anschlag aufstecken. 15. Schlauchsicherung (11) anbringen. 16. Sicherheitsadapter (13) in den
Pumpenkopf (17) schieben, bis dieser hörbar einrastet. 17. Absperrhebel (12) auf „ON“ stellen. 18. Darauf ach-
ten, dass das Düsenrohr (25) oberhalb der Wasseroberfläche hängt. 19. Ansaughilfe (16) mehrmals schnell hin-
tereinander drücken, bis der Filterbehälter sich selbständig mit Wasser füllt (Im Vorfilter darf kein Wasser sein!).
20. Netzteil (28) am Pumpenkopf (17) einstecken (nur bei professionel 3e- 350 Typ 2074). 21. Netzkabel (30)
einstecken. 22. Zur Entlüftung Ansaughilfe (16) nochmals 1 bis 2 mal drücken und Düsenrohr (25) in die ge-
wünschte Position schieben.
3. Anschluss und Inbetriebnahme
4. Bedienung
Hinweis: Elektronikausführung (professionel 3e):
Das Bedienfeld zeigt an, wenn die Filterteile gereinigt werden müssen. Bei verringerter Filterleistung Wartungs-
arbeiten (ca. alle 3 bis 6 Monate ausführen). Zuerst Vorfilter reinigen (6.1). Sollte Vorfilterreinigung nicht
ausreichen: Alle Filter reinigen (Hauptreinigung 6.2). Sollte Hauptreinigung nicht ausreichen: Pumpenkammer
reinigen (6.3).
5. Wartung und Pflege
Hinweis: Blaue Filtermatte nach der 3. Reinigung erneuern.
6.1Vorfilter reinigen
2

. . . das Filteroberteil sich nicht schließen lässt?
Ursache Behebung
Falsche Einbaulage der Filtereinsätze. Filtereinsätze und Vorfilter so einschieben, dass sie bündig
übereinander liegen.
1. Netzkabel (30) ausstecken. 2. Sicherheitsadapter (13) und Pumpenkopf (17) abbauen (Kap. 3, Schritt 1 - 3).
3. Vorfilter (3) entnehmen. 4. Blaue Filtermatte (1) entnehmen. 5. Blaue Filtermatte (1) unter fließendem, lau-
warmem Wasser ausspülen (falls nötig erneuern). 6. Vorfilter (3) entleeren und ausspülen. 7. Blaue Filtermatte
(1) in den Vorfilter (3) einsetzen. 8. Vorfilter (3) mit blauer Filtermatte (1) einsetzen (auf Stutzen aufsetzen
➞siehe Pfeile). 9. Dichtungen prüfen, gegebenenfalls reinigen und mit EHEIM Pflegespray (Nr. 4001000)
behandeln. 10. Vorfilterklappe (4) muss freigängig sein. 11. Pumpenkopf (17) aufsetzen (Einbaulage beachten)
und Verschlussclips (9) schließen. 12. Filtersystem in Betrieb nehmen (Kap. 3, Schritt 17 - 23).
1. Netzkabel (30) ausstecken. 2. Sicherheitsadapter (13) und Pumpenkopf (17) abbauen (Kap. 3, Schritt 1 - 3).
3. Vorfilter (3), Filtereinsatz mit Abdeckgitter (5) und weißem Filtervlies (6) entnehmen. Weißes Filtervlies (6) bei
jeder Reinigung erneuern. 4. Alle Filtereinsätze entnehmen. 5. Filtereinsätze (7) und Filtermassen mit Wasser
ausspülen (siehe EASY CLEAN Funktion, Kap. 3, Schritt 7 + 8), bis keine Trübung mehr sichtbar ist. 6. Filter-
behälter (10) ausleeren.
Hinweis: Die Schritte 7 - 8 nur bei jeder dritten bis vierten Hauptreinigung durchführen. Durch das Mischen von
gebrauchter und neuer Substratmasse bleiben die benötigten Bakterienkulturen erhalten.
Achtung: Filtereinsätze nicht überfüllen, da sie sonst nicht mehr passgenau sitzen.
7. Ein Drittel gebrauchtes EHEIM SUBSTRAT pro und EHEIM bioMECH im Filtereinsatz lassen. 8. Zwei Drittel
EHEIM SUBSTRAT pro und EHEIM bioMECH nachfüllen. 9. EHEIM MECHpro bei Bedarf komplett austauschen.
10. Alle Filter und Filtereinsätze wieder einsetzen (Kap. 3, Schritt 8 - 10). 11. Schlauchsystem mit EHEIM Uni-
versal-Reinigungsbürste (Nr. 4005570) reinigen. 12. Vorfilter (3) mit blauer Filtermatte (1) einsetzen (auf Stut-
zen aufsetzen ➞Pfeile). 13. Vorfilterklappe (4) muss freigängig sein. 14. Dichtungen prüfen und gegebenen-
falls mit EHEIM Pflegespray (Nr. 4001000) behandeln. 15. Pumpenkopf (17) aufsetzen (Einbaulage beachten)
und Verschlussclips (9) schließen. 16. Filtersystem in Betrieb nehmen (Kap. 3, Schritt 17 - 23).
6.2Hauptreinigung
Achtung: Keramikachse kann brechen. Vorsichtig reinigen!
1. Sicherheitsadapter (13) und Pumpenkopf (17) abnehmen (Kap. 3, Schritt 1 - 3). 2. Pumpendeckel (22) dre-
hen und abnehmen. Dichtring mit EHEIM Pflegespray (Nr. 4001000) einfetten. 3. Pumpenrad (21) ausbauen.
4. Pumpenkammer, Pumpendeckel, Pumpenrad und Schmierkanal mit EHEIM Reinigungsset (Nr. 4009560)
reinigen. 5. Pumpenrad (21) muss sauber und freigängig sein (Pfeile). Einbaulage der Keramikhülse (a) beach-
ten (nur bei professionel 3e- 350 Typ 2074). 6. Pumpenrad (21) in Pumpenkammer einsetzen. 7. Pumpenkam-
mer mit Pumpendeckel (22) verschließen. Aussparung und Zapfen beachten (➞Pfeile). 8. Klammer (14) und
Schwimmkörper (15) auf der Oberseite des Pumpenkopfes (17) ausbauen und reinigen. 9. Rückschlagventil
(14/15) einbauen (Einbaulage beachten. Schwimmkörper muss freigängig sein). 10. Pumpenkopf (17) aufset-
zen (Einbaulage beachten), Verschlussclips (9) schließen. 11. Filtersystem in Betrieb nehmen (Kap. 3, Schritt
17 - 23).
7. Was tun, wenn . . .
6.3Pumpenkammer reinigen
3

. . . der Filter am Oberteil undicht wird?
Ursache Behebung
Verschlussclips nicht richtig geschlossen. Alle Verschlussclips richtig schließen.
Dichtflächen und/oder Dichtflächen reinigen und mit EHEIM Pflegespray (Nr. 4001000)
Profildichtung verschmutzt. leicht einsprühen.
Dichtung nicht montiert, falsch Dichtung korrekt in die vorgesehene Nut einsetzen.
eingelegt oder beschädigt. Auf Beschädigung prüfen und ggf. erneuern.
. . . die Ansaughilfe nicht funktioniert?
Ursache Behebung
Vorfilterklappe im Vorfilter Bereich der Vorfilterklappe auf Verschmutzung prüfen und reinigen.
nicht geschlossen. Vorfilterklappe muss freigängig sein (siehe Kap. 6.2, Schritt 13).
Vorfilter ist mit Wasser gefüllt. Vorfilter entleeren und Ansaugvorgang wiederholen.
Das Ansaugen funktioniert nur bei leerem Vorfilter.
Rückschlagventil verschmutzt/defekt. Rückschlagventil reinigen oder ggf. erneuern (siehe Kap. 6.3).
. . . die Pumpe nicht läuft?
Ursache Behebung
Keine Stromversorgung. Netzstecker einstecken.
Keramikachse gebrochen. Keramikachse erneuern.
Pumpenrad fehlt oder ist blockiert Pumpenrad einsetzen, Pumpenkammer reinigen.
(z.B. durch Kies).
4
Ursache Behebung
Filtereinsätze überfüllt. Filtereinsätze nicht überfüllen.
Eventuell die aufeinanderstoßenden Flächen reinigen.
Profildichtung nicht richtig montiert. Dichtung korrekt in die vorgesehene Nut einsetzen.
Auf Beschädigung prüfen und ggf. austauschen.
. . . die Filterleistung stark nachgelassen hat?
Ursache Behebung
Absperrhebel nicht richtig eingestellt. Absperrhebel einstellen.
Sicherheitsadapter verschmutzt. Sicherheitsadapter abnehmen, Absperrhebel öffnen und die Öffnungen
mit EHEIM Reinigungsbürste (Nr. 4005570) reinigen
Schlauchinstallation hat zu wenig Schläuche auf Knicke, Verschmutzungen und Verengungen prüfen,
Durchlass. begradigen und reinigen (EHEIM Reinigungsbürste Nr. 4005570).
Ansaugkorb verstopft. Grobschmutz entfernen, Ansaugkorb reinigen.
Filtermasse stark verschmutzt. Filtermasse reinigen und ggf. erneuern.
Filtermassen in Netzbeutel abgefüllt. Filtermassen nur lose in Filterkörbe einfüllen.
Filtermassen nicht richtig gereinigt. Filtermassen gemäß Kapitel 7 gründlich reinigen.

. . . sich Luft im Filter befindet?
Ursache Behebung
Standort des Filters. Die Oberkante des Pumpenkopfes sollte mindestens 10 cm unterhalb
der Wasseroberfläche liegen. Ideal: unterhalb des Aquariums.
Luft wird über Schlauchinstallation Schlauchverbindungen auf richtigen Sitz und undichte Stellen prüfen
angesaugt. und ggf. austauschen
Zusätzliche Luftversorgung Ausströmer der Luftpumpe nicht in der Nähe des
im Aquarium (z.B.: Membranpumpe). Ansaugrohres platzieren.
Filtermassen verschmutzt. Filtermassen reinigen.
Filtermassen in Netzbeutel abgefüllt. Filtermassen nur lose in Filterkörbe einfüllen.
. . . die Pumpe sehr laut läuft?
Ursache Behebung
Keramikhülse nicht oder falsch eingebaut Keramikhülse richtig einbauen, ggf. ersetzen.
(nur bei professionel 3e- 350 Typ 2074).
Keramikachse gebrochen. Keramikachse erneuern.
IMPORTANT SAFETY INSTRUCTIONS
WARNING – To guard against injury, basic safety precautions should be observed, including the following.
a) READ AND FOLLOW ALL SAFETY INSTRUCTIONS.
b) DANGER – To avoid possible electric shock, special care should be taken since water is employed in the use
of aquarium equipment. For each of the following situations, do not attempt repairs by yourself; return the ap-
pliance to an authorized service facility for service or discard the appliance.
USA
5
Ursache Behebung
Falscher Filtermassenaufbau. Filtermassenaufbau auf richtige Reihenfolge prüfen (Kap. 3, Schritt 9).
Filtervlies nicht erneuert. Filtervlies bei jeder Reinigung unbedingt erneuern.
Pumpe verschmutzt. Pumpenkammer, Kühl- und Schmierkanal reinigen
(EHEIM Reinigungsset Nr. 4009560).
Wasserkreislauf nicht richtig Durch mehrmaliges Pumpen Wasser ansaugen (siehe Kapitel 3)
hergestellt. Darauf achten, dass sich während des Befüllens das Düsenrohr über
der Wasseroberfläche befindet, damit das Gerät optimal entlüftet.
Zu viel Zubehör am Schlauchsystem Angeschlossenes Zubehör mindert Filterleistung. Zubehör (z.B. CO2,
installiert. UV-Klärer) entfernen bzw. über separaten Wasserkreislauf betreiben.

1) If the appliance falls into the water, DON’T reach for it! First unplug it and then retrieve it. If electrical com-
ponents of the appliance get wet, unplug the appliance immediately. (Non-immersible equipment only)
2) If the appliance shows any sign of abnormal water leakage, immediately unplug it from the power source.
(Immersible equipment only)
3) Carefully examine the appliance after installation. It should not be plugged in if there is water on parts not in-
tended to be wet.
4) Do not operate any appliance if it has a damaged cord or plug, or if it is mal-
functioning or has been dropped or damaged in any manner.
5) To avoid the possibility of the appliance plug or receptacle getting wet, posi-
tion aquarium stand and tank to one side of a wall-mounted receptacle to pre-
vent water from dripping onto the receptacle or plug.
A ”drip loop”, shown in the figure, should be arranged by the user for each
cord connecting an aquarium appliance to a receptacle. The ”drip loop” is
that part of the cord below the level of the receptacle, or the connector if an
extension cord is used, to prevent water traveling along the cord and coming
in contact with the receptacle.
If the plug or socket does get wet, DON’T unplug the cord. Disconnect the
fuse or circuit breaker that supplies power to the appliance. Then unplug and
examine for presence of water in the receptacle.
c) Close supervision is necessary when any appliance is used by or near children.
d) To avoid injury, do not contact moving parts or hot parts such as heaters, reflectors, lamp bulbs, and the like.
e) Always unplug an appliance from an outlet when not in use, before putting on or taking off parts, and before
cleaning. Never yank cord to pull plug from outlet. Grasp the plug and pull to disconnect.
f) Do not use an appliance for other than intended use. The use of attachments not recommended or sold by the
appliance manufacturer may cause an unsafe condition.
g) Do not install or store the appliance where it will be exposed to the weather or to temperatures below freezing.
h) Make sure an appliance mounted on a tank is securely installed before operating it.
i) Read and observe all the important notices on the appliance.
j) If an extension cord is necessary, a cord with a proper rating should be used. A cord rated for less amperes or
watts than the appliance rating may overheat. Care should be taken to arrange the cord so that it will not be
tripped over or pulled.
k) This appliance has a polarized plug (one blade is wider than the other). As a safety feature, this plug will fit in a
polarized outlet only one way. If the plug does not fit fully in the outlet, reverse the plug. If it still does not fit,
contact a qualified electrician. Never use with an extension cord unless plug can be fully inserted. Do not attempt
to defeat this safety feature.
l) ”SAVE THESE INSTRUCTIONS”.
USA
English
The EHEIM professionel 3 and professionel 3eexternal filters offer – with their newly developed, integrated suction
aid and the function-driven safety adapter – the optimum level of convenience and the highest level of safety. The large
tank volume and the big prefilter in connection with the matched filter media stacking assure optimum water clarifica-
tion and an efficient decomposition of pollutants.
For indoor use only. For use with aquariums.
All electrical equipment in the water must be disconnected from the mains during care and maintenance work. It is
imperative to disconnect the filter from the mains prior to opening it.
1. Safety instructions
6

The connecting line of this device can not be replaced. When the line is damaged, the device must no longer be used.
Never carry the pump by the cable; do not bend the cable.
This equipment is not intended for use by persons (including children) with limited physical, sensory or mental abili-
ties or for persons with no experience or knowledge unless they are supervised by a person responsible for safety or
unless they have received from such a person instructions on how to use the equipment. Children should be supervised
to ensure that they do not play with the equipment.
Notice: These divices produce magnetic fields which might cause electronic and mechanical disturbances or
damages. This also refers to pacemakers. Please consult the manuals of medical equipment for the re-
quired safety margins.
Attention: Maintenance work presents the risk of crushing th fingers due to high magnetic forces.
For your own safety, we recommend to form a drip loop with the connection cable to prevent any
water running along the cable from intruding into the socket. When using a multiple socket or an
external power supply unit, position them atop the filter’s power connection.
Since a wide variety of varnishes and polishes are used when processing timer, the appliance feet
can leave visible traces on furniture or parquet floors as a result of chemical reactions. Therefore
the device should not be placed on unprotected wooden surfaces.
To achieve optimal operational safety there must be a maximum of 180 cm between the surface of
the water and the bottom of the filter.
Attention: Filter must always be operated in an uprigt position only.
Burning danger! Be careful when touching the heating coil of devices with integrated heater.
Take the necessary precautions when handling components that can discharge static electricity.
Do not clean the unit – or parts of it – in the dishwater. Not dishwater resistant!
Do not dispose of this product as normal household waste. Take it to your local refuse collection side.
The product is qualified in accordance with the respective national regulations
and guidelines and meets EC standards.
geprüfte
Sicherheit
20 cm
max.
180 cm
7
2. Component overview (see II)
1. Set the locking lever (12) to „OFF“ and press the adapter bar (18) until the safety adapter (13) disengages.
2. Open the locking clips (9) by pulling the clips’ lower edge. 3. Remove the pump head (17). 4. Remove all
inserts. Caution: Do not overfill filter inserts as, otherwise, their accurate fit is no longer assured. 5. Fill the
filter inserts with EHEIM filter media. 6. Rinse the filled filter inserts with water.
Note: Easier cleaning with EASY CLEAN function.
7. Close the filled filter cartridge with the screened cover (5). 8. Shake the filter cartridge under running water.
Repeat this procedure with all filter cartridges. Caution: insert the white filter fleece into the very top filter car-
tridge and close it with the screened cover. 9. Then, re-insert the filter cartridges in the following sequence into
the filter container (10): In professionel 3 - 250 (Type 2071): 1. Filter cartridge with EHEIM MECHpro. 2. Filter
cartridge with EHEIM SUBSTRATpro, white filter fleece and screened cover.
3. Connection and commissioning
1. Filter mat blue 2. Prefilter seal 3. Prefilter 4. Prefilter flap 5. Cover grating 6. Filter pad white 7. Filter
inserts 8. Rubber buffers 9. Locking clips 10. Filter tank 11. Hose locking device 12. Locking lever 13. Safety
adapter 14. Bracket 15. Float 16. Suction aid 17. Pump head 18. Adapter bar 19. Control panel (profes-
sionel 3e) 20. Profile seal 21. Pump wheel 22. Pump cover 23. Hoses 24. Outlet elbow 25. Nozzle pipe
26. Suction pipe 27. Sucker with terminal clamp 28. Power supply unit (only in professionel 3e- 350 Type
2074) 29. Suction basket 30. Power cable 31. Connector socket for EHEIM Interface (optional)

8
In professionel 3 - 350 (Type 2073) and professionel 3e- 350 (Type 2074): 1. Filter cartridge with EHEIM MECH
pro. 2. Filter cartridge with EHEIM bioMECH. 3. Filter cartridge with EHEIM SUBSTRATpro, white filter fleece
and screened cover. In professionel 3 - 600 (Type 2075): 1. Filter cartridge with EHEIM MECH pro. 2. Filter
cartridge with EHEIM MECH pro. 3. Filter cartridge with EHEIM bioMECH. 4. Filter cartridge with EHEIM SUB-
STRATpro, white filter fleece and screened cover.
10. Insert the prefilter (3) with the blue filter mat (1) (place onto supports ➞arrows). 11. Attach the pump head
(17) (observe fitting position) and close the locking clips (9).
Note: Use original EHEIM hoses only.
12. Attach the pre-assembled hose accessories to the aquarium. 13. Cut the hoses (23) to length in accord-
ance with the clearance between the filter and the aquarium and plug onto the accessories. 14. Plug the hoses
(23) onto the safety adapter (13) down to the limit stop. 15. Attach the hose locking device (11). 16. Push the
safety adapter (13) into the pump head (17) until it audibly latches. 17. Set the locking lever (12) to „ON“.
18. Assure the the nozzle pipe (25) is suspended above the water surface. 19. Rapidly press the suction aid (16)
several times consecutively until the filter tank (10) automatically fills with water (no water must be present in
the prefilter!). 20. Plug in the power supply unit (28) at the pump head (17) (only in professionel 3e - 350 Type
2074). 21. Plug in the power cable (30). 22. For bleeding, press the suction aid (16) once or twice and push
the nozzle pipe (25) to the desired position.
Note: For electronic operation (professionel 3e) use the „operating instructions electronics“.
4. Operation
Note: Electronic version (professionel 3e):
The control panel indicates the filter elements to be cleaned. Implement maintenance works in case of reduced
filter capacity (approx. every 3 to 6 months). First, clean prefilter (6.1). If prefilter cleaning insufficient:
Clean all filters (general cleaning 6.2). If general cleaning insufficient: Clean the pump chamber. (6.3).
5. Maintenance and care
Note: Renew the blue filter mat after the third cleaning.
1. Disconnect the power cable (30). 2. Disassemble the safety adapter (13) and the pump head (17) (chapter
3, step 1 - 3). 3. Remove the prefilter (3). 4. Remove the blue filter mat (1). 5. Rinse the blue filter mat (1)
under running, lukewarm water (replace if required). 6. Empty the prefilter (3) and rinse it. 7. Insert the blue
filter mat (1) into the prefilter (3). 8. Insert the prefilter (3) with the blue filter mat (1) (place onto supports ➞
arrows). 9. Check and, if required, clean the seals and treat them with EHEIM care spray (No.
4001000). 10. The prefilter flap (4) must be unobstructed. 11. Attach the pump head (17) (observe fitting
position) and close the locking clips. 12. Put the filter system into operation (chapter 3, step 17 - 23).
6.1Prefilter cleaning
1. Disconnect the power cable (30). 2. Disassemble the safety adapter (13) and the pump head (17) (chapter
3, step 1 - 3). 3. Remove the pre-filter, the filter cartridge with the screened cover and white filter fleece. Renew
the white filter fleece (6) during each cleaning process. 4. Remove all filter inserts. 5. Rinse the filter inserts
(7) and filter media with water until they are clean (see EASY CLEAN function). 6. Empty the filter tank (10).
6.2General cleaning

9
Note: Only carry out steps 7 to 8 during every third to fourth general cleaning. By mixing used and new sub-
strate media, the required bacteria cultures remain intact.
Caution: Do not overfill filter inserts as, otherwise, their accurate fit is no longer assured.
7. Leave one-third of the used EHEIM SUBSTRATpro and EHEIM bioMECH in the filter cartridge. 8. Re-fill two-
thirds of the used EHEIM SUBSTRAT pro and EHEIM bioMECH. 9. If required, completely renew EHEIM
MECHpro. 10. Re-insert all filters and filter inserts (chapter 3, step 8 - 10). 11. Clean the hose system using
an EHEIM universal cleaning brush (No. 4005570). 12. / 13. / 14. (chapter 3, step 8 - 10). 15. Attach the pump
head (17) (observe fitting position) and close the locking clips (9). 16. Put the filter system into operation (chap-
ter 3, step 17 - 23).
Caution: The caramic axis may break. Clean carefully!
1. Disassemble the safety adapter (13) and the pump head (17) (chapter 3, step 1 - 3). 2. Turn the pump cover
(22) and remove it. Grease the seal ring with EHEIM care spray. 3. Disassemble the pump wheel (21). 4. Clean
the pump chamber, pump cover, pump wheel and lubrication duct with the EHEIM cleaning set (No. 4009560).
5. The pump wheel (21) must be clean and unobstructed (arrows). Observe the installation position of the cera-
mic sleeve (a) (only in professionel 3e - 350 Type 2074). 6. Insert the pump wheel (21) into the pump chamber.
7. Close the pump chamber with the pump cover (22) observing the cutout and studs (arrows). 8. Disassemble
the bracket (14) and the float (15) on the top side of the pump head (17) and clean them. 9. Install the check
valve (14/15) (observing the installation position; the float must be unobstructed). 10. Attach the pump head
(17) (observe fitting position) and close the locking clips (9). 11. Put the filter system into operation (chapter 3,
step 17 - 23).
6.3Cleaning the pump chamber
. . . Top part of filter can’t be closed
Cause Solution
Filter inserts have been inserted wrongly. Push filter inserts and pre-filter in until they lie flush on top of each other.
Filter inserts are too full. Do not overfill filter inserts. If need be, clean the touching surfaces.
Gasket not fitted properly. Insert correctly into the groove provided in the upper part of the filter.
Check for damage and if necessary replace.
7. What to do if . . .
. . . Top of filter leaks
Cause Solution
Closing clips not closed properly. Close all clips properly.
Sealing areas or gasket soiled. Clean seal areas and spray lightly with EHEIM silicone grease spray
(Order no. 4001000).
Sealing ring not fitted, Insert sealing ring correctly or renew.
inserted wrongly or damaged.
. . . Primer does not work
Cause Solution

10
. . . Filter performance has greatly deteriorated
Cause Solution
Safety adapter lever position not correct. Check lever setting and adjust.
Safety adapter soiled. Remove safety adapter; open shut-off lever and clean openings
with EHEIM cleaning brush (no. 4005570).
Hose installation. Check that there are no kinks or marked narrowing of cross-section.
Hose installation soiled. Clean hose installation with universal cleaning brush (no. 4005570).
Strainer blocked. Remove coarse dirt, clean strainer.
Filter media heavily soiled. Clean filter media.
Filter media filled into a net bag. Never put long-term filter media in net bags or nylon stockings. This
leads to a drastic reduction in pump performance within a short time.
Filter media not cleaned properly. When cleaning, remove the filter media from the filter media basket
and rinse through with lukewarm water.
Filter media wrongly assembled. Check that filter media have been assembled correctly in the recom-
mended layers of filtering. Fill bottom filter insert to just under edge
with EHEIM MECH. Fill next filter inserts with EHEIM SUBSTRAT, also
to just under edge. Never place white filter pad under the handle.
Filter pad not renewed. Be sure to renew the filter pad each time you clean.
Pump is dirty. Clean pump chamber, cooling and lubrication channel with EHEIM
cleaning brush set (no. 4009560).
Water is not circulating properly. Take filter into operation by priming (as described in the instructions).
Make sure that the water runback (delivery side) is above the surface
of the water during filling so that air is optionally bled from the device.
Too many accessories installed Connected accessories reduce filter performance. Check and remove
on the hose system. unnecessary accessories or operate via a separate water system.
. . . Pump does not work
Cause Solution
No mains supply. Plug in to mains.
Shaft broken. Renew shaft (see list of spares).
Impeller missing or blocked by bits Fit impeller, clean pump chamber.
of gravel, shells or similar.
. . . Air in the filter
Cause Solution
Cause Solution
Prefilter flap in prefilter Check the prefilter flap for pollution and, if required, clean it.
not closed. The prefilter flap must be unobstructed (see chapter 6.2, step 13).
Prefilter is filled with water. Empty prefilter, repeat priming. Priming only works with empty prefilter.
Check valve polluted/defective. Clean and, if required, replace the check valve (see chapter 6.3).

Filter location. The top edge of the pump head should be at least 10 cm beneath the
surface of the water. It is better to place it underneath the aquarium.
Air is being sucked in via the Check that hose connector is fitted properly, and may be check
hose installation. whether hoses leak.
Additional air supply Do not install diffuser in the vicinity of the suction pipe.
(membrane pump).
Filter media heavily soiled. Clean filter media.
Filter media have been placed in net bags. Never put long-term filter media in net bags or nylon stockings.
. . . The pump causes loud operating noise
Cause Solution
Ceramic sleeve not or incorrectly installed. Correctly install or, if required, replace the ceramic sleeve.
(only in professionel 3e - 350 Type 2074).
Ceramic axis broken. Replace the ceramic axis.
Français
Le filtre extérieur EHEIM professionel 3 et professionel 3evous offre, par le biais d’un assistant d’aspiration nou-
vellement développé et integré ainsi que par son adaptateur de sécurité très fonctionnel un confort optimal et la plus
haute sécurité. Un tel progrès est possible grâce au volume important de la cuve et au grand préfiltre, associés à la
stratification adaptée des masses filtrantes pour une clarification optimale de l’eau et une élimination efficace des sub-
stances nocives.
Usage intérieur exclusivement. Destiné à être utilisé uniquement en aquariophilie.
Avant de plonger la main dans l’eau de l’aquarium, retirer les prises électriques de tous les appareils installés dans
l’eau. Avant d’ouvrir le filtre, le débrancher entièrement du secteur.
La ligne de raccordement de l’appareil ne peut pas être remplacée. L’usage de l’appareil est interdit lorsque le câble
est endommagé ou coupé. Adressez-vous à votre négociant spécialisé ou à votre service après-vente EHEIM.
Cet appareil n’est pas destiné à être utilisé par des personnes (enfants y compris) aux capacités physiques, senso-
rielles ou intellectuelles limitées ou dépourvues d’expérience ou de connaissance, à moins qu’elles ne se trouvent
sous la surveillance d’une personne responsable de la sécurité ou obéissent à ses recommendations sur la manière
d’utiliser l’appareil. Veillez surveiller les enfants afin de pouvoir être certain qu’ils ne jouent pas avec l’appareil.
Remarque: avec ces appareils, des champs magnétiques peuvent provoquer des troubles ou des détériora-
tions électroniques et mécaniques. Ceci est également valable pour les stimulateurs cardiaques. Les dis-
tances nécessaires de sécurité doivent être relevées dans les manuels de ces appareils médicaux.
Attention: en cas de travaux de maintenance, risque de coincement en raison de forces magné-
tiques élevées.
Pour votre propre sécurité, nous vous recommandons de former un col de cygne avec le câble pour
éviter que l’eau s’écoulant éventuellement de long du câble ne pénètre dans la prise. En utilisant
par exemple une multiprise, celle-ci doit être placée plus haut que la prise de secteur du filtre.
Vu que le traitement du bois fait appel à un grand nombre de laques et vernis, les pieds de l’appa-
reil, sous l’effet d’une réaction chimique, peuvent laisser des résidus visibles sur les meubles ou
1. Consignes de sécurité
20 cm
11

des parquets. Il ne faudra pas poser l’appareil sur des surfaces en bois sans intercaler une protection entremise.
Au moment de choisir l’emplacement de votre appareil, tenez compte de la hauteur d’installation.
Afin d’obtenir une sécurité de fonctionnement optimale, une distance maximale de 180 cm entre la
surface de l’eau et le fond du filtre doit être respectée.
Attention: Faire systématiquement marcher le filtre en position verticale.
Risque de brûlure! Usez de prudence au toucher du serpentin de chauffage des appareils chauffants.
Respecter les indications de sûreté en manipulant des éléments de construction qui risquent des
décharges électrostatiques.
Ne nettoyez pas cet appareil – ou les pièces qui le composent – au lave-vaisselle. Ne résiste pas au lave-vaisselle.
Ne pas jeter le présent produit à la poubelle. Ramenez-le à votre lieu de décharge locale.
Le produit est autorisé à l’emploi conformément aux réglementations et
directives nationales respectivement en vigueur.
Il respecte les normes adoptées par l’Union européenne.
max.
180 cm
geprüfte
Sicherheit
2. Aperçu des piéces (voir II)
1. Mettre le cliquet d’arrêt (12) sur „OFF“ et appuyer sur le verrou de l’adaptateur (18) jusqu’à ce que l’adapta-
teur de sécurité (13) se débloque. 2. Ouvrir les clips de fermeture (9) en tirant sur les bords inférieurs des clips.
3. Retirer la tête de la pompe (17). 4. Retirer tous les paniers. Attention: Ne pas remplir les paniers filtrants à
l’excès, car alors ils ne pourront plus être installés correctement. 5. Remplir les paniers filtrants avec masses
filtrants EHEIM. 6. Rincer à l’eau les paniers filtrants remplis.
Conseil: Nettoyage facilité par la fonction EASY CLEAN.
7. Recouvrez le panier filtrant rempli avec la grille de fermeture (5). 8. Agitez le panier filtrant sous l’eau cou-
lante du robinet. Répétez l’opération pour tous les autres paniers. Attention: posez la ouate filtrante blanche dans
le panier filtrant supérieur et couvez-le avec la grille de fermeture. 9. Réintroduisez les paniers dans l’ordre res-
pectif à l’intérieur du réservoir (10). Pour le modèle professionel 3 - 250 (type 2071): 1. Panier filtrant conte-
nant EHEIM MECH pro. 2. Panier filtrant contenant EHEIM SUBSTRATpro, ouate blanche et grille de fermeture.
Pour le modèle professionel 3 - 350 (type 2073) et professionel 3e- 350 (type 2074): 1. Panier filtrant conte-
nant EHEIM MECH pro. 2. Panier filtrant contenant EHEIM bioMECH. 3. Panier filtrant contenant EHEIM SUB-
STRATpro, ouate blanche et grille de fermeture. Pour le modèle professionel 3 - 600 (type 2075): 1. Panier fil-
trant contenant EHEIM MECH pro. 2. Panier filtrant contenant EHEIM MECH pro. 3. Panier filtrant contenant
EHEIM bioMECH. 4. Panier filtrant contenant EHEIM SUBSTRATpro, ouate blanche et grille de fermeture.
10. Installer le préfiltre (3) contenant le coussin filtrant en mousse bleu (1) (installer sur le raccord ➞voir les
flèches). 11. Replacer la tête de la pompe (17) (respecter la position d’installation) et refermer les clips de fer-
meture (9).
3. Raccordement et mise en service
1. Coussin filtrant en mousse (bleu) 2. Joint du préfiltre 3. Préfiltre 4. Clapet du préfiltre 5. Grille de re-
couvrement 6. Coussin filtrant en ouate (blanc) 7. Paniers filtrants 8. Tampon en caoutchouc 9. Clips de fer-
meture 10. Cuve du filtre 11. Dispositif de sécurité du tuyau 12. Cliquet de fermeture 13. Adaptateur de sé-
curité 14. Pince-support 15. Flotteur 16. Dispositif d’amorçage 17. Tête de la pompe 18. Verrou de l’adap-
tateur 19. Pupitre de commande (uniquement pour le modèle professionel 3e - 350 type 2074) 20. Joint pro-
filé 21. Rotor de la pompe 22. Couvercle de la pompe 23. Tuyaux 24. Bec coudé 25. Canne de refoulement
26. Tuyau d’aspiration 27. Ventouse avec étrier de serrage 28. Bloc d’alimentation (uniquement pour le modèle
professionel 3e - 350 type 2074) 29. Crépine d’aspiration 30. Câble d’alimentation 31. Coussinet de raccord
pour EHEIM Interface (en option)
12
Other manuals for Proxima 250
1
This manual suits for next models
6
Table of contents
Languages:
Other EHEIM Pet Care Product manuals