Payment PAX S80 User manual

PAX S80
SET-UP GUIDE
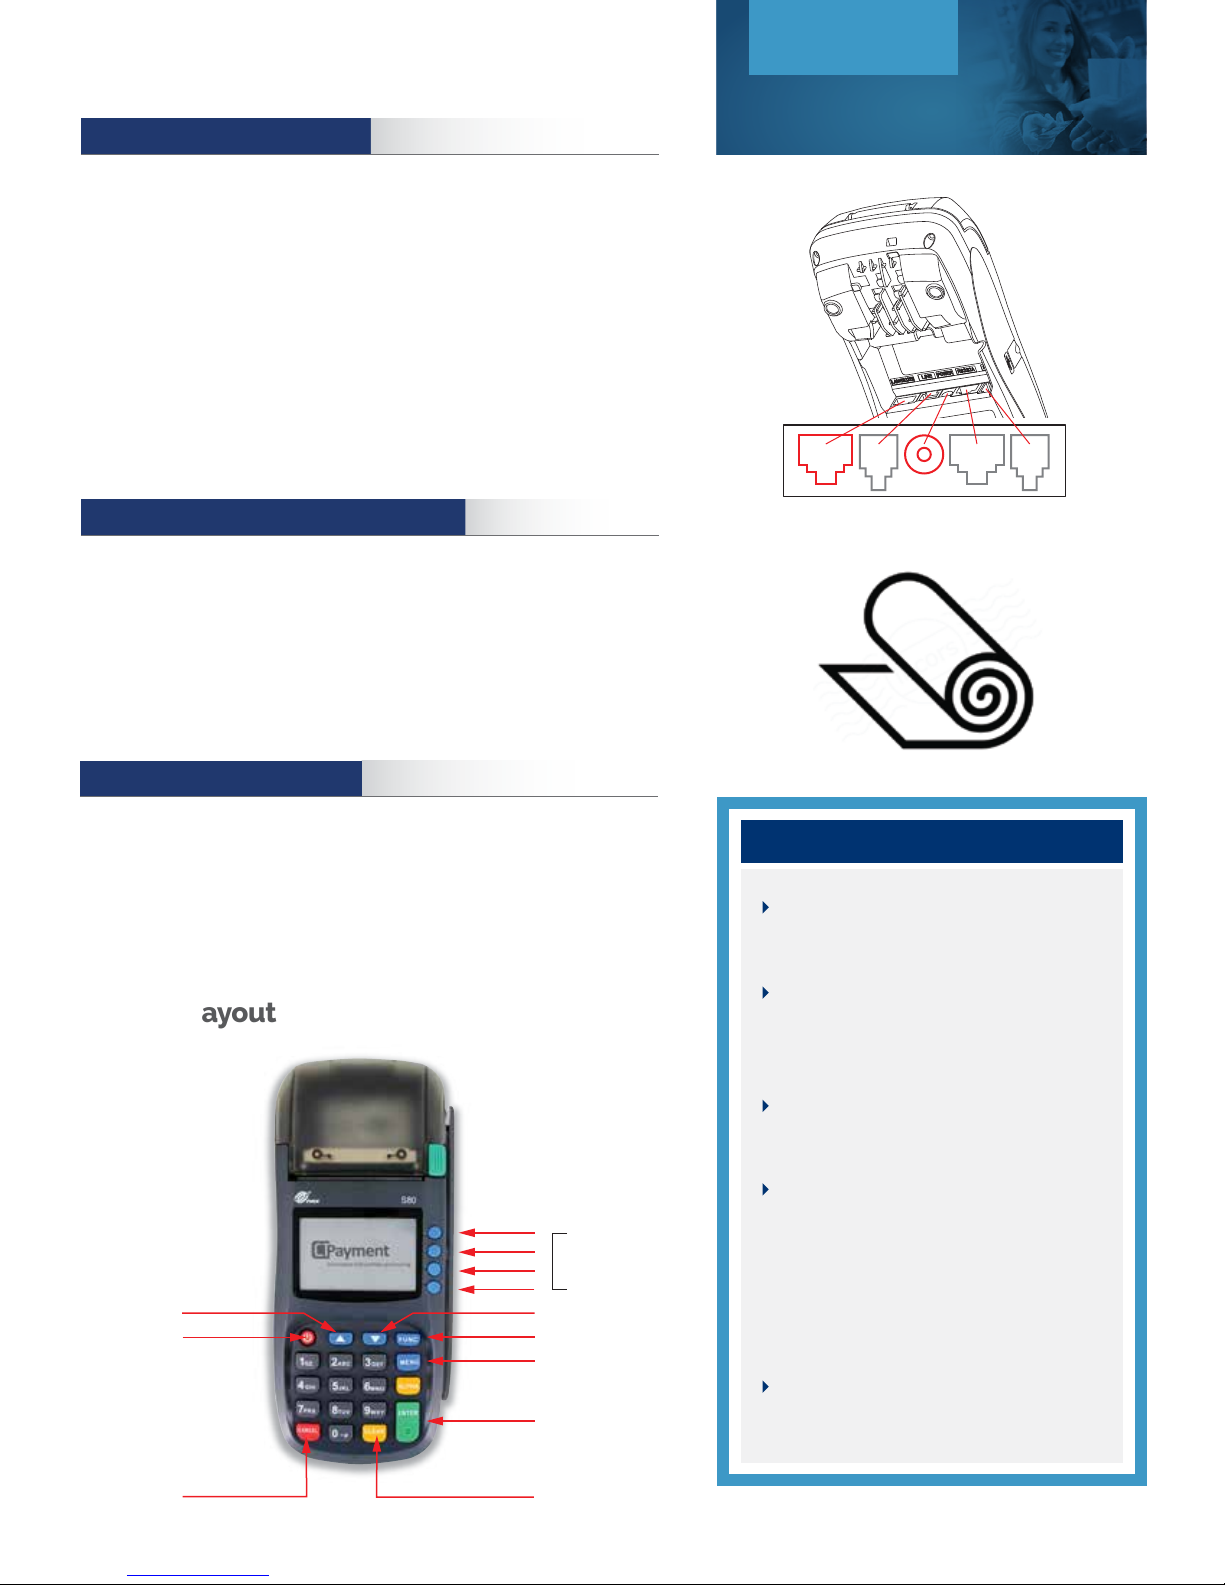
CONNECTING THE TERMINAL
Hold the PAX S8face down on a table or work place.
Plug the power adapter connector into the S80 “Power” jack (middle).
Plug the PAX S8power cord into the available electrical outlet or power bar.
Plug the required communication cord(s) into the proper sockets.
Plug the Ethernet cable into the “LAN” socket, and/or plug telephone
line cable into the “LINE” socket.
Switch the terminal on by pressing the Power button.
LOADING & CHANGING THE PAPER ROLL
Press the green paper cover release button and open the paper roll cover.
Place the paper roll in the compartment making sure the paper feeds from
the underside of roll, towards the paper tear bar.
Pull the end of the paper out of the compartment beyond the tear bar and
close paper roll cover.
Menu Layout
Power button is used to switch
terminal on/off.
The PAX S80menu functions are
arranged in two menus:
Transaction and Administration.
Scroll buttons are used to scroll
through to display menu options.
To access letters on the numeric
keypad, press the key quickly until
the desired letter appears.
Press 0 (zero) twice for space,
Up button for* [ •] and Down
twice for [ •].
Use yellow Corr button to go back
one step.
Keypad Layout
Set-Up Guide
PAX S80
1
LAN / LINE POWER R5232A PINPAD
Scroll button
Menu button
Fonction button
Enter button
Clear button
Scroll button
Power button
Cancel buy
F1 Soft button
F2 Soft button
F3 Soft button
F1 Soft button
SETTING ADMIN PASSWORD
Press MENU to access the Admin MENU
Press 3 for SET-UP
Press 3 for SYSTEM SET-UP
Enter default Admin password 000000, press OK
Enter new Admin password

CHANGING THE LANGUAGE
Press Menu to access ADMIN MENU.
Select 3 for SET-UP, press OK
Select 1 for OPTIONS, press OK
Key in Admin password, press OK
Select MERCHANT LANGUAGE
Choose Language
CHANGING MERCHANT AND ADMIN PASSWORDS
Press Menu to access ADMIN MENU
Press 9 to access PASSWORD MENU Options
TO CHANGE MERCHANT PASSWORD TO CHANGE ADMIN PASSWORD
PRESS 1
Enter current password, press OK
Set new password, press OK
PRESS 2
Enter current password, press OK
Set new password, press OK
ENABLE PASSWORD TO RESTRICT VARIOUS TERMINAL FUNCTIONS
Press Menu to access ADMIN MENU
Press 9 to access PASSWORD MENU Options
REPORTS
PRESS 3
Enter the Admin password,
press OK
Clerk Report:
Choose Yes/No
Pre-auth Report:
Choose Yes/No
Batch Report:
Choose Yes/No
Choose Yes/No
FINANCIAL (TRANSACTIONS)
PRESS 4
Enter the Admin password,
press OK
Refund Transaction:
Choose Yes/No
Void Transactions:
Choose Yes/No
Keyed Transaction:
Choose Yes/No
MISCELLANEOUS
PRESS 5
Enter the Admin password,
press OK
Clerk ID Setup:
Choose Yes/No
Print Setup:
Choose Yes/No
Close Batch:
Choose Yes/No
Set-Up Guide
PAX S80
2

COMMUNICATION TO HOST SET-UP
Start by turning on terminal and changing default password
from 000000 (see Change Password instructions)
Press Menu to access ADMIN MENU
Press 3 for SET-UP
Press 2 for HOST SET-UP
Enter new Admin password, press OK
Enter the 8 digit terminal ID (TID), press OK
Default communication is Ethernet.
To set fallback to Dial if Ethernet is not available, press Up Scroll for Yes
Select INPUT TYPE.
Select up scroll arrow for IP
IP ADDRESS should set at 206.152.27.137
NAME should be set at www.ctpaiement.com
PORT NUMBER should be set at: 5085
TELEPHONE NUMBER should be: 1 877 866 7513 (for dial set-up)
Press Menu to access ADMIN MENU
Press 3 for SET-UP
Press 3 for SYSTEM SET-UP
Enter Admin Password, press OK
TERMINAL DATE will be set automatically by host
TERMINAL TIME will be set automatically by host
Main Communication mode default setting ETHERNET
To change communication mode use Down scroll arrow to select DIAL
If the terminal is set to DIAL communication:
Set the DIAL TYPE to TONE or PULSE using up/down scroll buttons
Set the LINE DETECTION to Yes/No using up/down scroll buttons
Set the BAUD RATE to 1200 or 2400 using up/down scroll buttons
Set ETHERNET SETUP to dynamic or static using up/down scroll buttons
If ETHERNET SETUP is set to STATIC IP:
Enter terminal static IP address, press OK
Enter Mask ID, press OK
Enter Gateway Address, press OK
If ETHERNET SETUP is set to DYNAMIC IP:
To Set AUTOMATIC DNS to YES, use up/down scroll buttons, press OK
If AUTOMATIC DNS is set to NO:
Enter primary and secondary IP addresses. Use the Up scroll button to enter [ • ]
SYSTEM SET-UP
Set-Up Guide
PAX S80
3

PRINTER SET-UP
Press Menu to access the ADMIN MENU
Press 5 for PRINT SET-UP
Set the NUMBER OF COPIES (choose 2 for merchant and customer copy), press OK
Set PAUSE between copies to YES/NO, press OK
If Pause set to YES, set PRINTER INTERVAL in seconds, press OK
Set PRINT DECLINED RECEIPTS to YES/NO (recommended to set to YES)
Set PRINT VOID RECEIPTS to YES/NO (recommended to set to YES)
Set PRINT COMPLETION to YES/NO (recommended to set to YES)
Set PRINT FORCED RECEIPTS to YES/NO, press OK (recommended to set to YES)
Set RECEIPT FOOTER: Set up to 4 lines of text - 24 characters per line. Press 0 twice for space.
Set FOOTER #2 Enter alpha-numeric for second receipt footer line, press OK
Set GST #, press OK
Set PST # if required, press OK
Press Menu to access the ADMIN MENU
Press 3 for SET-UP
Press 1 for OPTIONS
Enter Admin Password, press OK
NOTE: Debit SURCHARGE
Set LANGUAGE
Set APPLICATION MODE (Retail/Restaurant/Driver) using F soft buttons, press OK
Set TERMINAL TYPE to Debit only or both Debit and Credit using up/down scroll buttons, press OK
Set TIP OPTION to ON/OFF using up/down scroll buttons, press OK
IMPORTANT: If Tip is YES, set all of the 3 TIP PRESET functions to 0-0-0 for the PAX S80 model
Set CASH BACK OPTION (Debit Only) to ON/OFF using up/down scroll buttons, press OK
Set PRESET 1 Cashback amount
Set PRESET 2 Cashback amount
Set PRESET 3 Cashback amount
Set Cash Back Signature Line to ON/OFF using up/down scroll buttons, press OK
Set ENTER LAST 4 DIGITS to activate validation of the last 4 digits of a credit card for swiped transactions
for fraud protection. Set to ON/OFF using up/down scroll buttons
Set INVOICE NUMBER to OFF or Manual if tracking invoice numbers with transaction IDs, press OK
Set TERMINAL BACKLIGHT from 0 (dimmest) to 99 (brightest), press OK
Set TERMINAL BUZZER to ON/OFF using up/down scroll buttons
TERMINAL FUNCTIONS/OPTIONS SET-UP
Set-Up Guide
PAX S80
4

Press the UP scroll arrow to access ADMIN MENU
Press 4 for KEY EXCHANGE function
Terminal will automatically connect to Host and update KEYS
CT-PAYMENT KEY EXCHANGE
Press the UP scroll arrow to access ADMIN MENU
Press 6 for MAINTENANCE function, press OK
Press 1 for DLL PARAMETERS, press OK
Terminal will automatically connect to Host and update DLL parameters
Press 2 for EMV PARAMETERS, press OK
Terminal will automatically connect to Host and update EMV parameters
Press 3 for SIM CARD ASSOCIATION ( for wireless device only)
CT-PAYMENT HOST DOWNLOADS
Press the UP scroll arrow to access ADMIN MENU
Press 8 for TRAINING function, press OK
Enter merchant password, press OK
Select TRAINING YES/NO, press OK
Batch must be closed to be in training mode
TRAINING MODE
IMPORTANT NOTE: When terminal is in training mode any Sale transactions will not be processed.
Please ensure you turn Training OFF to begin accepting payments.
Unlock terminal
Clear pending reversal
Clear pre-authorizations
Clear batch
SUPPORT
To manually authorize transactions you must call the card issuer
07 / 2016
You will have to call your Payment Service Provider:
PRINTER REPORTS
Press Menu to access ADMIN MENU
Press 2 to access REPORT OPTIONS
Press 1 to print TERMINAL SET-UP
Press 2 to print CLERK set-ups (if available). Enter Merchant password, press OK
Press 3 to print BATCH
TRM DETAILS (all transactions details), enter merchant password, press OK
TRM SUMMARY (all transactions by card types), enter merchant password, press OK
HST SUMMARY (all transactions transmitted to host), enter merchant password, press OK
Press 4 to print PRE-AUTHORIZATION report, enter Merchant password, press OK
Press 5 to print EMV PARAMETERS
Set-Up Guide
PAX S80
5
Table of contents
Other Payment Payment Terminal manuals


